Female infidelity is a rather complex phenomenon. First, with the social ...

Among the considerable number of tools in demand in Everyday life almost any homeowner, there is an inexpensive and uncomplicated tool - a gun for polyurethane foam.
Can you do without it?
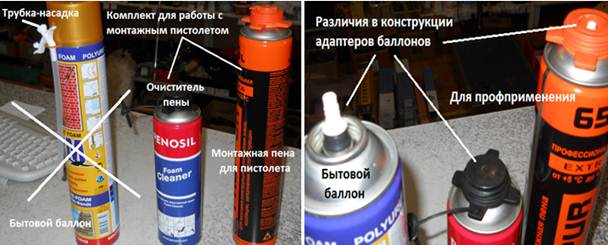
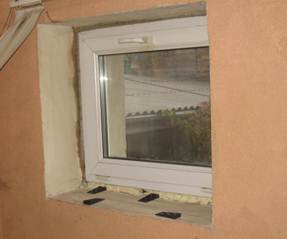
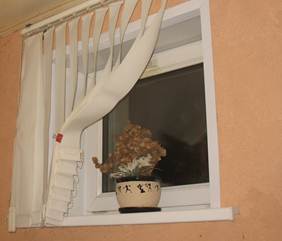
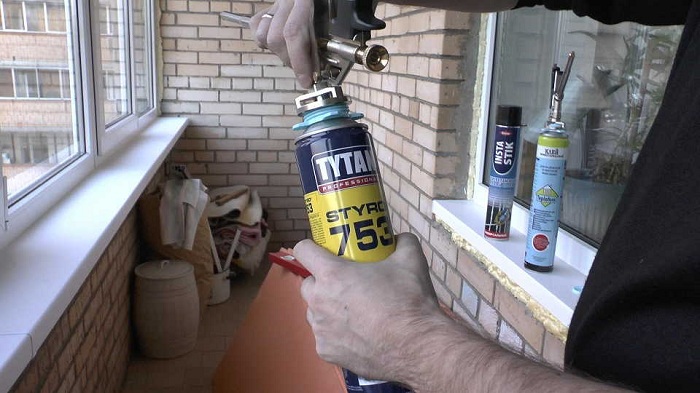
I guess, yes. The reader probably knows that there are cans with polyurethane foam for domestic use. In this case, the use of polyurethane foam is possible without the use of an assembly gun. But my personal experience working with such cylinders (assembly seam in the photo on the left), as well as the subsequent experience of performing work with an assembly gun (assembly seam in the photo on the right) gave me the following thoughts:
Taking into account the fact that the manual is usually attached to the pistol, the information presented above will be sufficient for reading and understanding the article.
The reader probably knows or has heard about the law of "the transition from quantity to quality." But, unfortunately, this law does not apply to those "mountains" of assembly guns that are on our counters. Even the purchase of a relatively expensive pistol cannot be a guarantee of its quality and serviceability. Therefore, the only correct solution is to check the functionality of the assembly gun when purchasing it. It is not difficult to check the gun when buying, the only thing we need for this is a polyurethane foam cleaner. You need to either take it with you to the store, or buy it directly from the store, since it is still needed when doing work.
There are two possible scenarios for the development of events.
We need to check the performance of the pistol, as well as the quality of its assembly (the presence of leaks, gaps), without spoiling its presentation. So, for example, if you immediately start using polyurethane foam, and it turns out that the foam gun is faulty, it will be much more difficult to prove the marriage (in reality, it is practically impossible). That is why a polyurethane foam cleaner is used for testing.
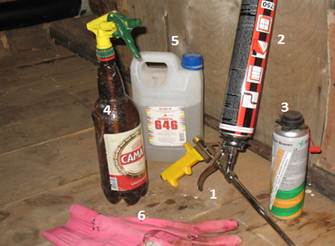
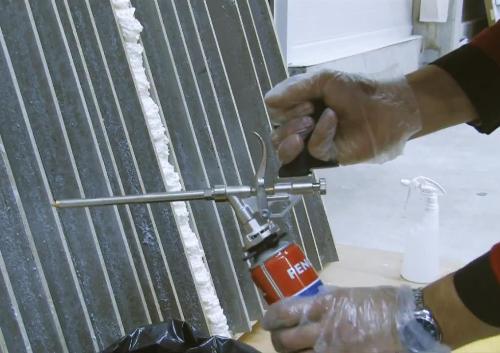
For high-quality work using an assembly gun, you will need the following materials and tools, which are almost fully shown in the photo below:
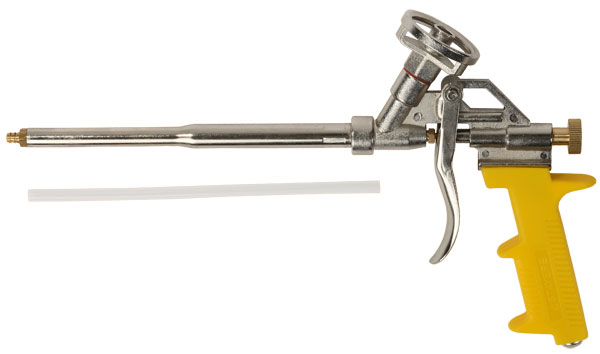
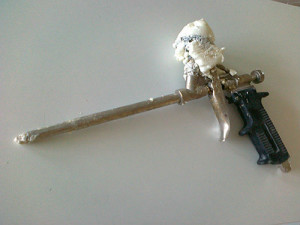
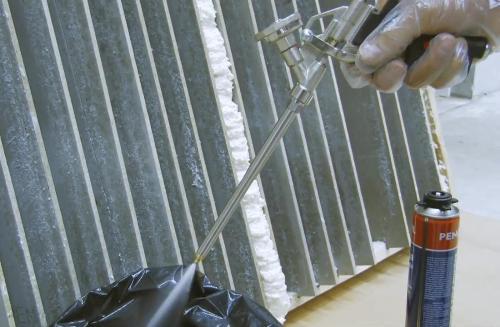
In addition, in the process of performing work, situations sometimes arise when it is difficult or impossible to perform foaming at the place of work (access to the foaming place is limited, it is required to foame an extended internal cavity, etc.). In this case, it is convenient to use a flexible extension - a nozzle for the gun. It can be either included in the kit or purchased separately or made independently. The photo below shows a pistol with an extension - a nozzle.
There are enough articles and debates on the Internet about the choice of polyurethane foam. Based on practical considerations, when choosing a foam (for beginners), I will note the main thing:
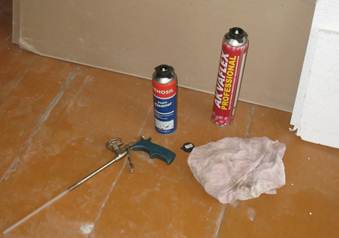
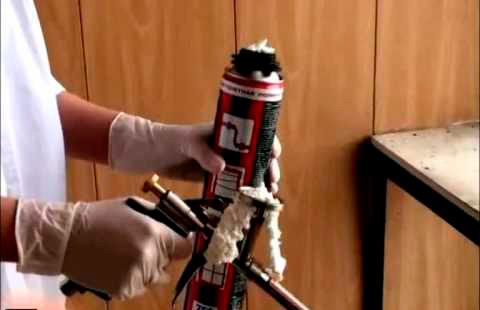
For the assembly gun, you need to buy the entire kit (a can of polyurethane foam and a can of foam cleaner). If, for example, you do not buy a foam cleaner in advance, it may happen that the gun turns out to be disposable, and you have to throw it away after the first use. The main explanations and features of the cylinders are shown in the photo below.
When choosing a polyurethane foam, it is imperative to pay attention to the weight of the cylinder, which may differ markedly from a nearby cylinder of another manufacturer. You need to take those products that are larger in weight.
Important! Be sure to check the date of manufacture and the permissible shelf life. I do not recommend buying stale products.
Polyurethane foams are summer and winter. Depending on the time of year and the place of work, this should also be noted.
In most cases, if we are not talking about specific requirements for the work performed, compliance with the above points when choosing Supplies will allow you to buy normal high-quality polyurethane foam suitable for work.
Since the instructions for the assembly gun for its use are attached, I will note only those moments when performing work that I personally adhere to.
Everything that is necessary for the performance of work must be prepared and located near the place of work. It is also necessary to check and make sure that there is a sufficient supply of the product in the foam cleaning cylinder, which will allow you to thoroughly rinse the gun after completing the work.
a) The flow (output) of foam from the gun must be stable and constant (and small).
b) The movement of the gun along the seam must be uniform.
In words, this is easy to do, but in deeds - only after gaining practical work experience.
Note. All the slowdowns in the movement of the pistol, and even more the stops for "supposedly more thorough foaming", actually worsen the quality of the assembly seam and work.
It is important to understand that after completing the work, it is impossible to leave the assembly seam (foam) unprotected from atmospheric influences (moisture, ultraviolet light) for a long time. Therefore, only after taking protective measures, the work can be considered completed. What to use as protection?
Depending on the specifics of the work, this can be painting, plastering, the use of special tapes, etc. We will talk a little more about this below.
Since the range of application of foam and an assembly gun is huge, from construction work to design and even auto-tuning, we will consider the most typical (popular) examples in relation to the needs of an ordinary homeowner.
The most typical and common application of the assembly gun and foam is for window and door assemblies. The execution of work in this case is very similar, with the exception of some peculiarities, so we will consider them in more detail separately.
Consider the example of installing a plastic window, which was partially discussed in my previous article. In this case, we need a gun with polyurethane foam to perform three operations:
A brief description of these operations is shown in the photo below.
Some important points that need to be understood and taken into account before starting work on the installation of window structures:
Window openings in brick wall in a constructive sense, they can be different, for example, a window opening with a quarter (external or internal) or without a quarter.
Depending on this, there may be significant differences, both in installation and in the choice of materials used.
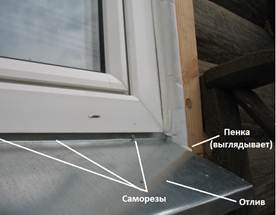
The photo below shows how the protection of the assembly seam is implemented using the example of windows installed by me in a brick building. In the photo on the left - from inside the premises, in the photo on the right - from the side of the street.
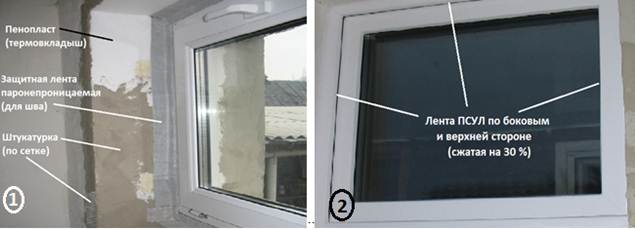
Explanation of the photo:
The protective tape inside the room during the work is also protected by plaster, as well as the surface of the window opening.
Learn more about the installation features plastic windows when doing work on your own, an inquisitive reader can look in my previous
When installing plastic windows in wooden house, the system of interaction of the window profile, window frame and load-bearing wall very different from the previous version.
Two fundamental mistakes are possible here:
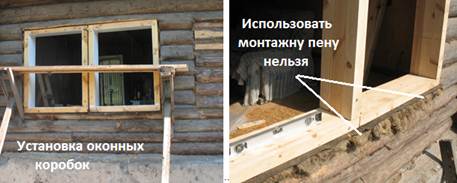
The photo shows some points regarding the installation of plastic windows in a wooden house.
In this case, the plastic window cannot be installed directly into the wall opening (as in a brick wall). And when installing (fixing) the window boxes themselves to the wall, you cannot use mounting foam (nails or screws) either. A window block in a wooden wall cannot be rigidly fixed and it must be movable in relation to the wall. But the installation of the plastic window itself in the window frame must be performed, as in a brick wall. That is, with the use of mechanical fastening and subsequent foaming with polyurethane foam. A fragment of the work is shown in the photo below.
More details about the features of installing plastic windows in a wooden house can be found in
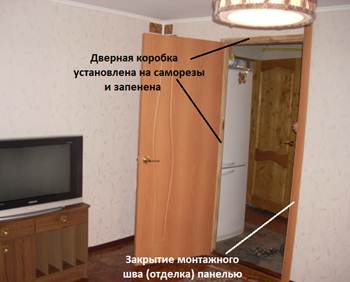
The use of polyurethane foam when installing doors is now widespread due to its simplicity, convenience and significant time savings when performing work. Since the process of installing door structures is in many ways similar to the process of installing window structures, we will consider only certain points (features) when performing these works. The photo below shows fragments of door installation work at the very beginning of work and at the final stage. It is important to note that the door (doorway) in the photo on the right is an interior door, and the other door is an entrance door.

The main differences front door(in addition to weight and size indicators) are in the conditions of its operation. That is, a significant temperature difference acts on the front door, in contrast to interior doors. Therefore, after foaming, the assembly seam for the entrance door must be protected, both from the inside of the room and from the outside.
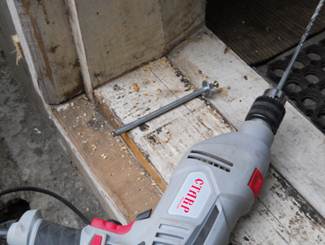
Before foaming, mechanical fastening of the door block of the front door must be performed, more reliably and thoroughly than when installing interior doors. The photo below shows the corresponding fragment of the work performed before foaming. Dowel length 180 mm, installed in the amount of 8 pcs. on the sides of the block.
For interior doors, the operating conditions are much easier, so there is no objective need to protect the assembly seam (foam). Another question is that from the point of view of aesthetics, it is quite logical to seal the seam (foam). The photo below shows a fragment of the installation work. interior door inside the house.
When performing thermal insulation works using expanded polystyrene insulation, the use of polystyrene foam allows you to minimize heat loss (eliminate cold bridges), which can occur if it is impossible to accurately fit the joints of thermal insulation sheets, at the joints of thermal insulation sheets with building structures, etc. moments of performing thermal insulation work. In most cases, modern insulation can be easily adjusted at the joints using a mounting knife. At the same time, for example, due to the irregularity of the geometry of the room to be insulated, inaccuracies in the fitting of sheets, especially in the corners, cold bridges may appear in the heat-insulating layer, when fitting mechanically is impossible. In this case, the use of polyurethane foam makes it easy and simple to eliminate such defects.
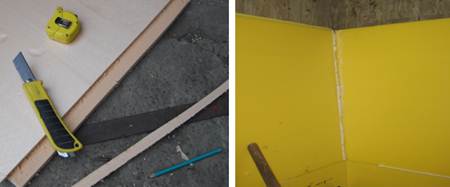
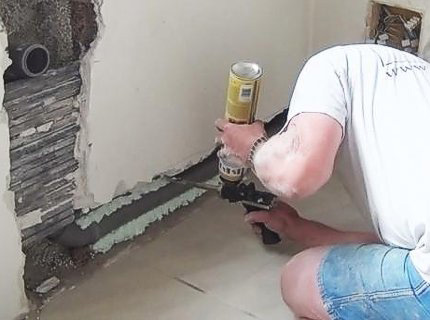
In some cases, without the use of a gun and polyurethane foam, the volume and complexity of thermal insulation work would have increased markedly. The photo below shows an example of insulation of the lower building structures of a house.

Photo No. 1 shows the insulation of the site with polystyrene foam at the border of the insulation between the wall of the house (cotton wool) and the basement of the house (expanded polystyrene). Without the use of foam, it would be simply impossible to fix the foam under the basement drain without the formation of cold bridges.
Photo No. 2 shows the use of polyurethane foam for fixing thermal insulation under a galvanized drain (protective cover).
Photo No. 3 shows the sheets of thermal insulation of the basement of the house, which tightly (without the formation of a cold bridge) adjoin the base of the house, including the thermal insulation installed under the protective visor of the base.
Photo No. 4 shows the installation of thermal insulation for the blind area of the house, which is also adjacent to the thermal insulation of the basement of the house. The result is a monolithic (de facto) thermal insulation cake at the bottom of the house that protects the lower building structures of the house.
On the distant approaches to the house, protection is provided by a warm blind area, the bottom of the house is protected by an insulated basement, the wall of the house is protected by wadded insulation, and the border between cotton wool (house wall) and expanded polystyrene (house basement) is reliably protected using polystyrene and polyurethane foam.
Two important properties of the polyurethane foam: adhesive ability and the ability to expand during polymerization (hardening) allow the use of polyurethane foam as a universal construction adhesive. In this case, the versatility also lies in the fact that the polyurethane foam allows you to connect completely different (in their properties) materials.
The photo below shows fragments of work performed when I used polyurethane foam in this capacity. The photo on the left shows the arrangement of niches in a brick wall. Installation is made using polyurethane foam. The photo on the right shows similar work done to install multimedia equipment in the room (projector and rear speaker speakers).

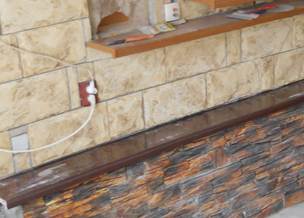
The photo below shows a fragment of the work performed when the foam was used to fix the colored window sill used in the decoration of the room for the spatial delimitation of the basement part of the wall (dark stone) and the wall of the room (light stone).
The properties indicated above make it possible to effectively use polyurethane foam as a construction sealant for filling voids in technological holes in the presence of cracks in the mating structure, etc. The photo below shows fragments of work performed using polyurethane foam in this capacity. In the photo on the left, the gap between the brick structure and the wooden wall of the house is closed with a foam seam.
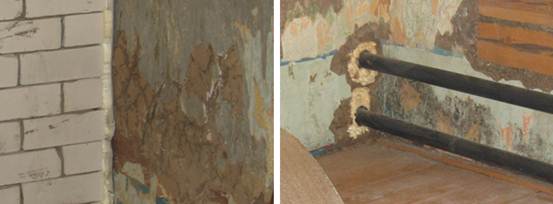
In the photo on the right, the through hole in the wall is also covered with foam.
Let's summarize:
The use of polyurethane foam (and a polyurethane gun) allows you to simply and efficiently solve a variety of tasks that the owner of the house has to face. And how not to be mistaken when choosing a pistol, we now know.
By the way, when I somehow rejected a pistol when I bought it, the sellers put it back in the general "pile", which means that it will wait for its buyer. Good luck with business!
The simple truth that no editing is done without a professional tool is not disputed. Repair work with the participation of polyurethane foam is unthinkable without an appropriate device - a gun. The device facilitates application, saves building materials, makes seams neat and accurate.
The models presented in a variety will make a novice master get confused. What to rely on when choosing - we will find out now.
The mechanism is a complex structure, which during operation will have to be disassembled more than once for cleaning and adjustment. In order not to break the fragile inner part, you should know how the pistol works, so that later there is a chance for repair or replacement of components - this is another item of saving the family budget.
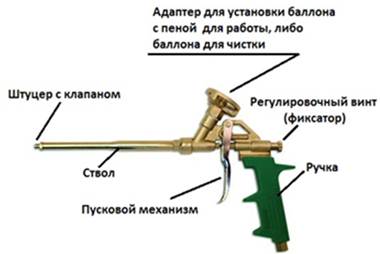
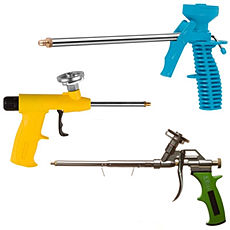
So, any model of an assembly tool consists of the following:
Internal structure: compression spring, control valve, sleeve and through hole for creating a vacuum.
The work is as follows: the composition from the cylinder falls on the ball gear and seeps into the rod. The thrust force is generated by a control valve that pushes the foam into the barrel. The trigger gives the foam access to the outside.
Having mastered the purpose of the tool and the principle of operation, you can go directly to the choice of the model. Any option can be classified according to many criteria that facilitate the work of the master, prolong the operation of the device, and its payback. So, what are the criteria for making your own choice:
Typically, pistols are made of metal, plastic, or Teflon. What is the difference, advantages and disadvantages? Consider:
There are also models made of durable plastic. However, there is a high risk of acquiring a fake for a high price. Only a professional can find flaws, and in order not to "run into" such a product, it is better to prefer a proven metal to it.
There are only two options - a collapsible and non-collapsible model. Therefore, the choice is also easy - it is preferable to choose a non-disposable pistol with a monolithic body. After work, they simply throw it away and acquire a new one for further installation. The collapsible version is easily cleaned of foam, the details change, which means that such a purchase is much more profitable - as you know, the repair cannot be completed, but can only be postponed.
It is impossible to completely ignore the Chinese production - among them there are worthy specimens. Likewise, European production is not always preferable to Russian quality. The main condition for choosing is not to consider pistols from unknown companies. Not to be mistaken, below is a list of brands tested over the years.
So:
With a specific list, choosing your own tool won't be difficult. The buyer should inspect the device for integrity and check the mechanism - this service is provided to the client in reputable hardware stores. How this happens - we will describe below.
Naturally, only reusable models are tested - cheap plastic, even if it works, will be unsuitable for further use. As a composition, not a foam balloon is purchased, but a container with cleaning acetone or any other solvent, whose action is inert to the material of manufacture.
The procedure is divided into two stages:
It will be useful to recall that the purchase of a gun for polyurethane foam is accompanied by the preservation of the receipt and the packaging. In this case, there will be no delays in refunding or replacing the model.
This is not difficult. A proven and reliable pistol is turned over so that the handle is at the top. A nozzle is screwed onto the cylinder to the body, and a plastic or metal cap is preliminarily removed from the container. It is important to shake the assembled gun vigorously several times to build up pressure.
Further, the device is turned over and the control valve is opened several turns - if more pressure is required, it is gradually brought to the desired one. Direct the barrel with the nozzle to the sealed place and pull the trigger. Work is carried out from the bottom up, filling only a third of the voids - the resulting foam will complement everything else. If there is not enough installation composition, the cycle is repeated.
The remaining foam, unfortunately, is not used again, so it is important to calculate the amount required in advance to avoid unnecessary waste. They must be released from the cylinder at the end of the work, since the gun will need to be cleaned and stored until the next time. Installation of the next cylinder is possible only with a qualitative release from the previous composition.
It can be done in two ways. If you use a pistol, it was decided the next day, then proceed as follows:
Better cleaning, in the event that the gun is left for storage and is to be used from time to time, is as follows:
To summarize: right choice and the use of a nailer are described in detail.
The recommendations are simple to implement, as well as the prevention of the purchased device. Self-repair with a quality tool will save a large part of the family budget, as opposed to spending money on the services of professionals.
Where is it used? Perhaps it will be easier to say where it has not yet been used. Installation of windows, thermal insulation of premises, elimination of cracks and gluing of all kinds of materials. Soundproofing of steel and acrylic bathtubs and kitchen sinks. Garden sculptures and decorative elements.
This is not a complete list of the possibilities of using polyurethane sealant, which we know as polyurethane foam.
Foam is sold in containers in the form of cylinders.
Moreover, the latter are of two types:
It is about this device and there will be a speech in this article. What is the construction of the pistol? What to be guided by when choosing it? How do I use it? We will try to find the answer to these questions together with you.
The principle of operation of a gun designed to work with polyurethane foam is based on the simplest mechanics.
It consists of the following nodes:
From the cylinder, the foam is fed through a ball valve into the supply tube. By pulling the trigger, a double valve is opened, which is located in the tube. This allows the foam to escape. At the other end of the tube there is a mechanism that regulates the volume of the supplied foam. A special nut, by unscrewing or twisting, increases or decreases the foam output.
Due to the fact that the principle of operation and the device of polyurethane foam guns are almost the same for all manufacturers, the choice is much easier.
When choosing a pistol, we look at:
How to check if a gun is holding pressure? At home, a can of acetone is installed in the gun, and the solvent is launched inside. Then the balloon is removed and the instrument is left for a couple of days. After that, you can determine the quality of the device. To do this, just pull the trigger. If the acetone that remains in the pistol comes out under pressure, as in a shot, then the purchased product is of proper quality. If there is no cotton, then you can return the pistol to the store. It retains its presentation and can be exchanged for another model without any problems.
In fact, there are no secrets and nuances when working with a pistol. Everything is extremely simple.
First of all, the instrument needs to be charged. To do this, lift the ring holding the balloon up along the thread until it stops. After that we screw in a full bottle. We return the ring to its original position. In this case, you can hear the hiss of the compressed gas escaping under pressure.
After that, you can get to work. It is enough to direct the pistol tube to the desired place and pull the trigger.
Foam may spray in a thin stream at first. If there is a need to increase the flow, you need to unscrew the nut located at the end of the tool. You need to regulate smoothly. Experimentally, you can select the material consumption that is required.
With proper handling, this device can protect the foam inside itself from drying out. To do this, simply leave the balloon on it. If the packaging with foam is removed, then the inside of the polyurethane foam will solidify. And pretty quickly. To avoid this trouble, you can either rinse the instrument with a solvent, or install a new foam cylinder and activate it. And one moment. If you store the gun with the cylinder down the tube, then it will be in working order at any time. The foam will not solidify.
As for the prices for this instrument, they can cost $ 10 (and there are no guarantees that it will work out), and $ 20-50. In the latter case, you will purchase a professional quality product. And of course, it is advisable to purchase it not on the market, but in specialized stores.
Among the manufacturers, one can mention Zubr (Belarus) and Workman (Canada). They are followed by Stayer, Hilti and Kraftool. The latter group of manufacturers produces fairly good products. However, there are many fakes. Original models last a long time. And fakes are handed over after the first use. Therefore, it is advisable to be on the alert and purchase pistols in trusted stores.
We wish you success and pleasure from using a professional quality tool. May every day bring you satisfaction from work and joy from the results obtained.
Even the most expensive professional tool can be damaged by inept application attempts. Well, in order to get significant savings and achieve high-quality sealing of window or door blocks (and not only) during installation, you need to know about how to use a foam gun, without such knowledge there is a high probability of getting only a headache.
First of all you should remember about safety measures when working with polyurethane foam.
The fact that the pistol must be held with the cylinder upward is known to many, this is the basic rule. In addition, you should know some others. regulations.
If there was no such sound, this indicates a malfunction (sticking) of the inlet ball valve, in some cases this may indicate the expired shelf life of the foam itself. To eliminate this problem, you will have to disassemble the gun and clean it of old dried foam, or replace the foam.
After all work is completed, the following steps should be performed:
In order to use a pistol with a wound cylinder after a break, especially a short one, you do not need to make any special efforts. Clean the nozzle from the layer of hardened foam, it is best to use a sharp knife for this, it will be more convenient and faster.
After that, shake the can, as in the initial use, and then you will need to bleed off the stagnant foam. This usually takes 5-10 seconds, after which you can start working.
First of all, it should be remembered that the gun must be regularly flushed. If the tool is used regularly (professional installation of windows, doors), it is worth installing cleaning after using 3-4 cans of foam. In this case, it is necessary to first skip the flushing through the entire device of the pistol (by pressing the trigger), after which the tool should be postponed for 1-2 hours so that the acetone dissolves all the foam inside. Then you should press the trigger again and rinse the instrument for 5-10 seconds.
The main malfunctions of the gun for polyurethane foam:
To eliminate it, you will have to unscrew the cylinder adapter and release the valve ball, while liquid flushing (foam solvent) may be needed. It must be poured over the valve and wait a little. When removing the ball, be careful not to damage the surface or lose the valve spring.
After cleaning the assembly, the tool usually recovers.
To eliminate the malfunction, you will have to disassemble the pistol almost completely. Unscrew the regulator, disconnect the gun barrel, unscrew the nozzle (in some non-separable models, the operations may be different, but the meaning remains the same - to disassemble the foam supply unit).
The needle and the nozzle itself should be handled with particular care; any damage to these parts will entail the need to replace them. After it is necessary to process all the details by flushing, the barrel can even be soaked in it. At the end of processing, all parts should be wiped with a soft cloth.
After assembling the gun, the spontaneous flow of foam usually stops. Otherwise, the parts or seals themselves will most likely have to be changed.
In order to prevent this situation, you should remove the remaining foam from the adapter when replacing the cylinder.

When operating a gun for polyurethane foam, the main thing to remember is that any tool loves a neat and careful attitude towards itself, do not forget about it.
When performing work with the use of polyurethane foam requiring increased accuracy, subtlety and accuracy, a gun will become an excellent assistant, with which the material is consumed much more economically, and the accuracy of foam application increases. One of the main rules of the gun for polyurethane foam is how to use, you should protect your eyes and hands with goggles and gloves.
Shake the can vigorously at least 20 times immediately before installing. Remove the protective cap from the cylinder with polyurethane foam, screw the cylinder into the gun holder, holding the tool handle with one hand, and screwing the foam cylinder with the other.
When screwing in, the cylinder is in an upright position, and the gun is turned with the handle down. Then it is necessary to unscrew the adjusting screw half a turn back, which will translate the cylinder with the gun into working condition. When the trigger is pulled, the barrel of the tool will fill with foam. For a better understanding of what a polyurethane foam gun is and how to work, we recommend watching the video instructions prepared below with this tool.
The design of the tool is quite simple and they are all designed according to the same principle:
Thanks to this simple design, charging the tool is the simplest procedure and is produced in a matter of minutes.
Despite the simple device and ease of use, this tool requires careful attitude and care. Before using a foam gun, you need to know and follow a number of requirements:
If you do not clean the gun poorly or forget to do it after completing the work, it will most likely stop working. Dried foam remaining in it is the main cause of tool failure.
How to properly clean a gun from dried polyurethane foam video
If the gun does not work or begins to pass foam poorly, it is necessary to inspect it and establish the cause of the malfunction (see video).
The trigger is easy to squeeze, but no foam comes out. Check the foam cylinder, perhaps the problem lies in a poor-quality cylinder.
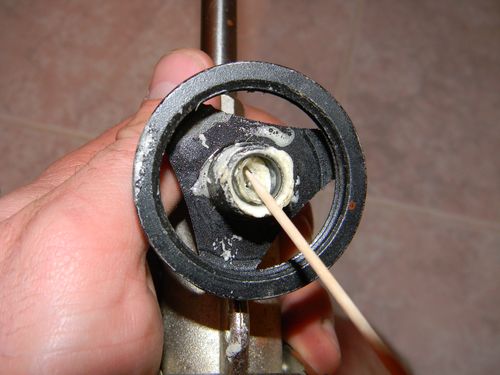
How to use a foam gun. If the problem is with the instrument, remove the can, insert the cleaner and try again. In the absence of operability, the likely cause will be a wedge or contamination in the ball valve gearbox:
If this procedure did not return the foam gun to work, it means that the foam has hardened inside, where it will be necessary to completely disassemble the tool for its further cleaning. To do this, you will need keys, foam cleaner, wooden sticks, a screwdriver, a soft rag:
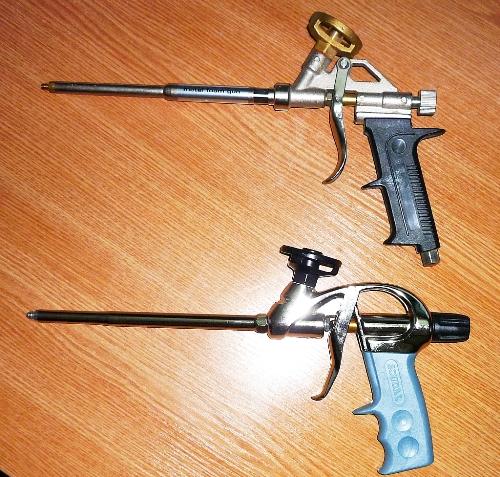
Comparison of guns for applying polyurethane foam video
After removing all the dried foam, we assemble the tool in the reverse order.
When working with assembly guns, it must be prepared, after which, for correct use, observe simple instructions: (see video in detail)
Rules for using polyurethane foam video
The tool needs periodic cleaning not only after completion of work, but also during its process when replacing a used foam cylinder with a new one. The cylinder is replaced in the same way as the first cylinder is installed:
How to use a foam gun video
The cleaned instrument is stored with the cleaner screwed on.
Female infidelity is a rather complex phenomenon. First, with the social ...

This method of cooking bell pepper was brought by my mother from ...

When updating a game, it's best to get familiar with new content and new ...