Female infidelity is a rather complex phenomenon. First, with the social ...


A doorbell is a familiar device that we use every day without even noticing it. But this is until you need to install a new one or replace the old one. This is where the difficulties begin: how to connect the bell, which wires to use, where to get the power from and where to supply it ... There is nothing difficult in connecting, but you need to know the circuits.
Before connecting a call, you need to deal with its device. The scope of work depends on this, and their type of work can also be different. At the place of installation, electric calls are for apartment and street. The difference is that the button in the second version has a sealed body, with a high level of protection against dust and moisture. These are the models that are needed when installed on the street.
Not every doorbell is a simple device
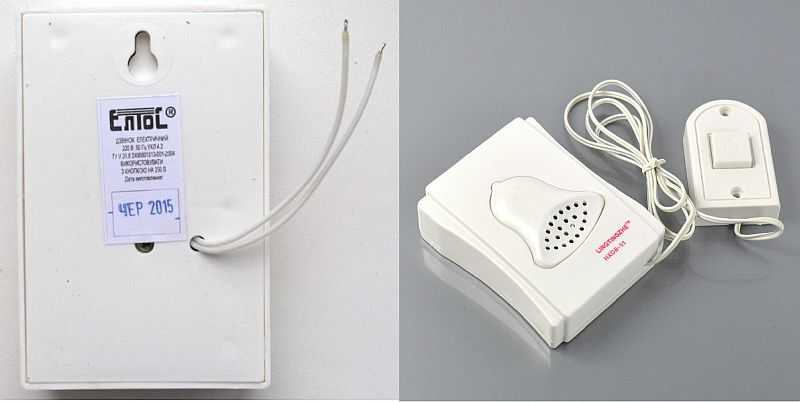
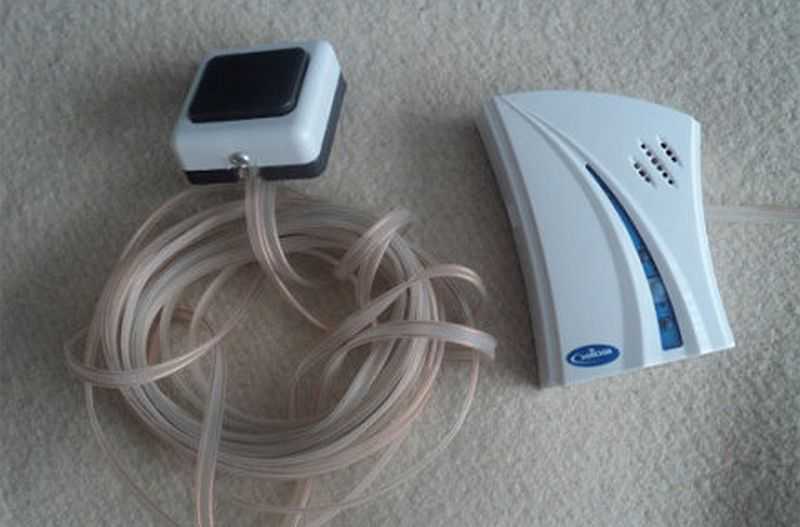
Any doorbell consists of two parts: a button and an indoor unit, which contains an electro-mechanical bell or a board and a speaker. According to the method of execution, there are wired and wireless electric calls. The wired blocks are interconnected by wires (hence the name). When the bell key is pressed, power is supplied to the indoor unit, which emits a beep.
Wireless operation is based on the transmission of radio signals. The receiver is in the indoor unit, the transmitter is in the button. Signals can be of two types: analog and digital. Analog wireless calls are cheap, but not very reliable: the signal is prone to distortion, which often leads to false positives. There are also reverse situations - there are no sounds, since the signal is “lost” or has become too weak. Another nuisance with wireless analog calls is the overlap of the range with neighbors. Then it turns out that the buttons of the adjacent bells trigger a signal on all receivers. We called the neighbors - you received a signal. And vice versa. How to fix? Change the frequency of the signals. This is done by soldering the jumpers on both blocks.
Wireless calls - easy installation, but there may be operational problems
Digital wireless calls work more reliably but also cost more. The digital signal is less susceptible to interference. Most companies design their own waveform, so that overlapping the radius does not cause problems. In addition, some models have the ability to change the frequency regularly.
The advantage of wireless is ease of installation. No wiring or routing problems. The downside is that cheap models are unstable (especially in winter, when the batteries freeze), while reliable ones are expensive.
There is much more fuss with wired installation. But this is a "make and forget" option. Problems can only arise if the wiring is damaged.
It seems, well, what is so difficult - to choose a place to set up a call. This is only at first glance. There are many nuances, knowledge of which will make the process of setting up a call much easier.

You can put a doorbell in an apartment in a couple of hours. Even if it's a wired option. The bell is usually set at a distance of 10-15 cm from the doorframe. The installation height was previously at the level of 140-160 cm, today it is increasingly set at the level of 120-140 cm - this is more convenient for children and the elderly to use.
The indoor unit is located near the entrance, but hung higher so that it does not interfere. The wires connecting both blocks are most often routed through a hole in the door frame. At the same time, they try to hide them - to lay them in a strobe.
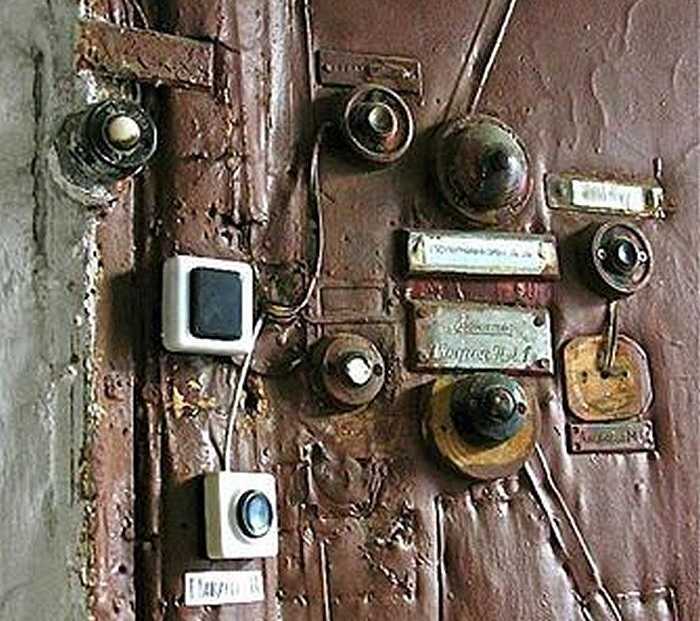
You can even put a wired bell on the door ... and more than one
There is a second option - to drill through the wall, pass the wires through the hole, cover it up on both sides. In this case, the button can be positioned opposite the indoor unit. Damage to the wall in this case will be minimal. If this option does not work, the hole can be made either opposite the place where the bell is installed, or opposite the place where the indoor unit is installed, thus minimizing damage on one side or the other.
So that later, if it is necessary to replace the bell or wiring, not to start all over again, a plastic or metal tube of a small diameter can be inserted into the hole in the wall - so that it is enough for laying two thin cables. After the wires are laid in it and everything is connected, you can drown the edges with a rag, cover with plaster mortar.
With wireless models, everything is easier - you can fix the button anywhere within the range of the receiver (see the description), install and connect the indoor unit. That's all.
In a private house, the button and the indoor unit are usually located at a considerable distance. The button is placed near the entrance gate, and the indoor unit is in the house. When installing a wired call, the distance between them does not affect the performance in any way, it only affects the length of the required cable. But when choosing wireless models, you need to select them so that the button is in the zone of reliable reception.
When connecting a wire bell, the wires are pulled either through the air, fixing them on accessible supports - trees, poles, walls of buildings. This method of laying is faster and less labor-intensive, but also less reliable - it is easy to damage or steal the cable. The second way is. For models powered by 220 V, all laying requirements remain the same - trench depth 70-80 cm, on top - protective tape, etc. To supply 24 or 12 free power, you can lay the cable in a corrugation to a depth of about 35-45 cm. But at this depth it can be damaged with a shovel when working on the site.

With wireless models, it's easier to install and connect. We fixed it in the range, installed the batteries. Everything. But, when choosing a place to install the bell button, sometimes you have to be smart. Most of the problems arise if the fence is solid, metal - from a profiled sheet, for example. The sheet of metal shields the signal from / to the receiver and the wireless bell just doesn't work. In this case, there is a simple option - make a hole in the fence and install the button so that the body with the transmitter is behind the fence, and the button itself is accessible. The option is simple and straightforward, but not everyone likes it.
The second method requires intervention in the structure. Install the standard button with the transmitter on the inside of the fence, having previously soldered the wiring to the input and output. On the outside of the fence, put a regular button (better - in a weatherproof version - with a rubberized case). Connect it in series. When you press it on the second - with the transmitter - power is supplied, it sends a signal.
In this chapter it will be about electrical connection. We will consider separately wired and wireless models, since the power supply and the methods of its connection / supply are different.
The overwhelming majority of wired-type doorbells are powered by 220 V and only about 10-15% of 12 or 24 V. When installed on the street, in the courtyard of a private house, the second option is safer, since low voltage does not pose a danger to humans. But in this case, it is necessary to have an inverter that converts 220 V into a safer low-voltage power supply of 24 or 12 V.
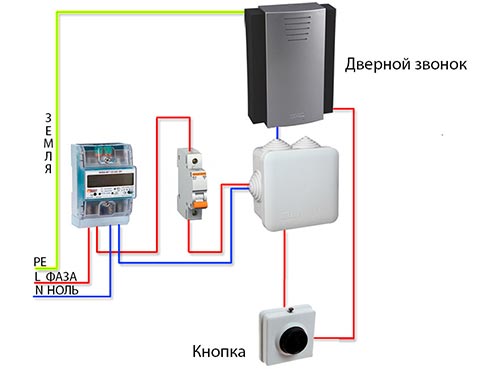
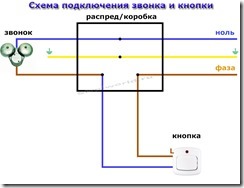
When the call is connected to a 220 V network, power can be taken from the nearest junction box. An indoor doorbell unit is usually installed next to the door. There is usually a junction box here, from which power goes to the lighting. Here you can connect a call.
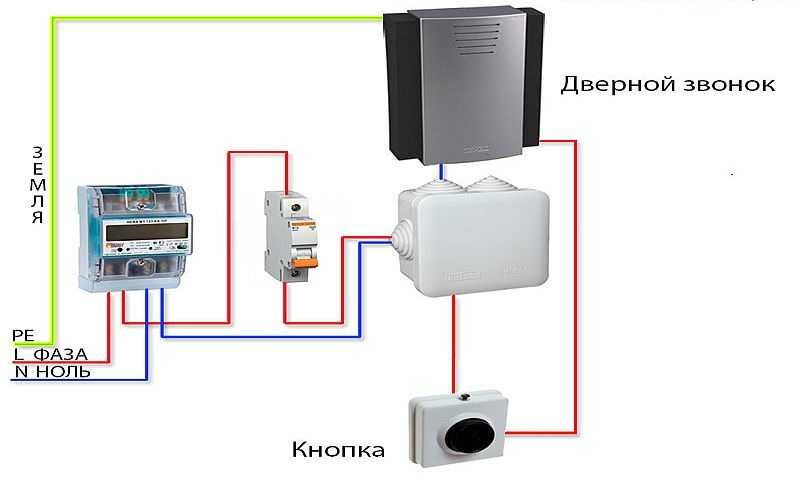
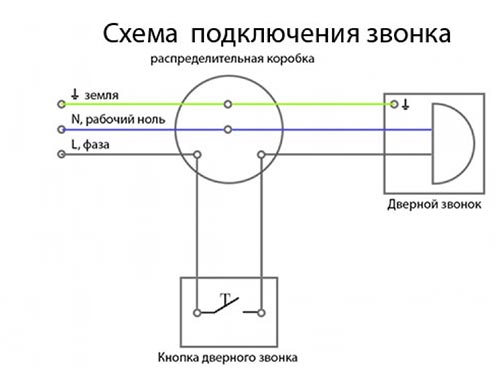
The doorbell connection diagram is simple: the phase is started on the button, from it it goes to one of the outputs of the indoor unit. A neutral wire is fed to the second contact of the block. The diagram of this connection is shown in the figure below.
In addition, how to connect a call, you need to think about how it can be connected. The currents in these devices are very small, and when connected in an apartment (the route between the bell and the indoor unit), literally any wire in isolation will do. It can even be telephone noodles, internet cable, twisted pair.
You can connect a bell in an apartment with "noodles" with a solid core diameter
If you need to pull power on the street, you already need a power cable - or NYM of the smallest cross-section. You can also use rubber or PVC sheathed wires, but it is better to route them in a protective corrugated hose.
Sometimes you need to connect two buttons to one bell - for example, from the gate and from the front door. In this case, they are connected in parallel.
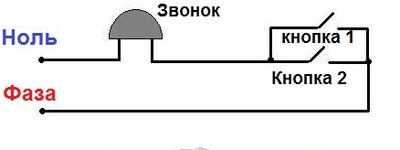
There are two wires coming out of the junction box, connected to the phase. One is pulled to one button, the other to the other. A wire comes from the second contact of each of them. Both of these conductors are connected to one of the contacts of the indoor unit. The second free contact connects the wire from the "neutral" from the junction box. With this connection scheme, the bell will work when you press any of the buttons.
In the wired version, you can put not only two buttons, but also two bells. You can even three, if necessary. This situation is more common. For example, put one call in the house, the second - in the building, in which you spend no less time than in the house. In the summer kitchen, garage, etc.

How to connect a call in this case? Two bells are connected to the power supply in parallel. To do this, we supply the phase from the junction box to the button. Two conductors leave the second output of the button: one for both calls. We supply "neutral" to the free call leads - again, two wires.
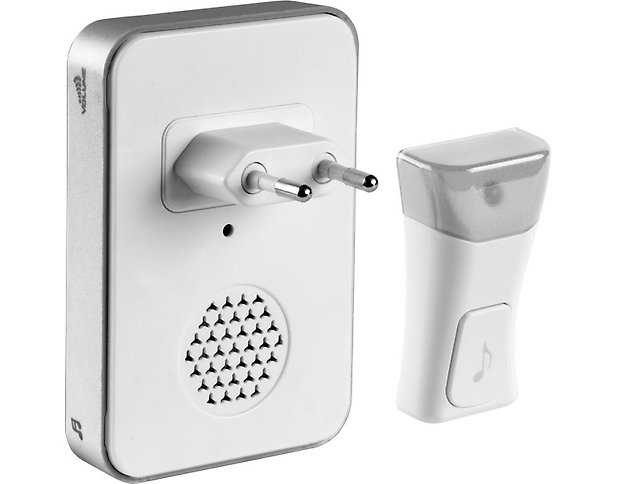
Wireless models are most often powered by batteries, but there are models whose internal units are powered by 220 V. But in the second version, all that is needed is to plug them into an outlet - there is a standard plug on the back side. So the question of how to connect the call in this case does not arise.
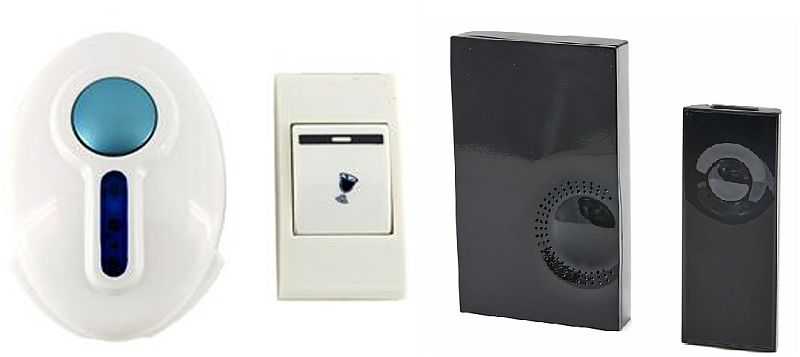
Wireless models - different kind, different styles
In regions with cold winters with buttons that run on batteries, you need to be careful: not all of them can work at -20 ° C, let alone more low temperatures Oh. Lithium batteries feel good in cold weather. But they are not in all formats, but only in AA and AAA. So it's best to find a bell whose button is powered by this type of power source. If you already have a call and the batteries “run out” there regularly, you can try to find another way out:
Perhaps there are other ways to connect a call in a wireless version so that it works in cold weather.
It is necessary to install a doorbell on every front door of a residential, office or industrial premises. This device is irreplaceable, as it allows you to promptly inform with a sound signal about the arrival of guests.
Currently, there are several call designs that differ not only in functionality, but also in different connection options.
Therefore, you should correctly determine the availability of technical conditions for their installation and perform this procedure yourself. This will not only save money, but also gain installation experience.They are a fairly simple design, which, when exposed to external influences, creates various sound signals. These include small bells that are hung indoors and set in motion with an outside rope, or simple rings attached to the door. They are now outdated and used for decorative purposes. Their advantage is independence from any power sources, as well as simplicity of design. That is, connecting a doorbell does not require complex installation work and the use of special knowledge in the field of construction and electrical engineering.

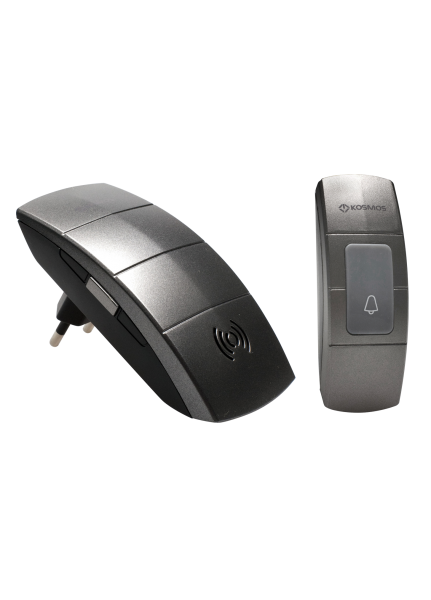
Doorbell kit
This type of bells is an improved model of mechanical ones. It consists of two blocks: a remote button and a housing with a resonator located inside. They are connected to each other by wires, and the main unit is connected to electrical network... An electromagnetic coil is located inside the main unit, which, when voltage is applied, transmits a force to the attached metal plate and, thus, creates a sound signal.
Note!
Such models are practically not used, since their mechanical parts are very unreliable, and the sound tonality does not change.
This type of calls is a modern solution based on microcircuits. They are available in two types: wired and wireless. Both options have compact dimensions, several built-in melodies, as well as additional functions, including motion sensors, an autonomous power supply system, etc. - transmitter and receiver of the signal within the permissible zone of reliable signal transmission.
Installing a wired connection of the bell button to the main unit will require laying a hidden cable in the wall, and, accordingly, cause a violation of the external decoration of the walls. You will also need experience in installing cables and restoring exterior wall cladding. If the bell is installed in a private house, then pulling the cable down the street and then entering it into the room is rather difficult. But after the installation is completed, a reliable warning system will be obtained, which can work from the mains in the main mode and from batteries in the emergency mode, and can also be easily replaced with another one without dismantling the cable.

Wireless ringer device
Laying the cable is only required for wired calls. To do this, inspect the surface of the walls inside the room near the exit from the house or apartment for the presence of the nearest junction box. It is usually located at the top of the wall at the point where the cable enters the house from the meter. Inside the premises, the cable can be laid in an external or hidden way, and outside the apartment only hidden in order to provide reliable anti-vandal protection. For hidden wiring, using a puncher, grooves are drilled in the wall of a suitable size. External wiring is placed in boxes fixed with self-tapping screws.
To connect the doorbell with your own hands, draw up a sketch taking into account all the technical features of the room for the optimal location of the button and the main unit. Then a groove is grooved along the wall in the horizontal direction with a depth of three times the diameter of the cable to be laid. All turns of the cable are performed at right angles, so that later there will be no problems with finding them. The wires are fixed with plastic clips every meter. In the junction box and nodal connection points, a margin of about 10-15 cm is left.
The main unit is attached to the wall with dowels, after which it is connected to the laid cable in the break of the neutral wire. If connected to a phase cable, then pressing the bell button can damage the electronics. The blue or black wire is zero, and the red one is phase.
Note!
You can accurately determine the phase using a special indicator.
The connections must be made on terminal blocks to avoid short circuits. The unit is disassembled in accordance with the instructions and the cable is connected to the terminals. The battery-powered doorbell is easy enough to mount on the wall without laying or wiring.
It is advisable to install the bell button at a level of at least 1.5 m from the floor for ease of use. First, the button is disassembled, fixed on screws or dowels to a wall or door, and then the wires are connected. The case cover slides neatly over the fixed interior and screw or snaps into place. You just need to fix the wireless button to the wall with double tape or in any other way.
After completing the installation work, it is necessary to connect to the power supply. First, the power supply to the apartment is turned off on the introductory board using circuit breakers. Then connect the neutral wire and the phase to the corresponding supply wires in the junction box. A connection error can cause damage to the main unit, so you need to use the phase indicator before connecting the doorbell. If everything is done correctly, then after turning on the power, the circuit should work. If the call does not work, then you need to ring the wiring with a tester and fix the breakdown.
It is quite easy to independently connect a doorbell with the right step-by-step approach. It is enough to study the technical conditions for wiring installation, choose the appropriate design and type of bell, and also fulfill all the requirements of the installation instructions.
We talked in more detail about all the basic schemes for connecting apartment calls in the article "".
For our installation example, we chose a wired electromechanical doorbell. Zamel (Swept) model Bim Bam - two-channel gong. This electric bell is designed to be installed in a standard wiring diagram, so the delivery set is as simple as possible.

Getting started installing the doorbell
Be careful! The scope of delivery does not include a power cord with an electrical plug for connecting to the ringer socket. In our installation example, we'll show you how to turn the absence of an electrical cord into an advantage, resulting in a more aesthetically pleasing doorbell installation.
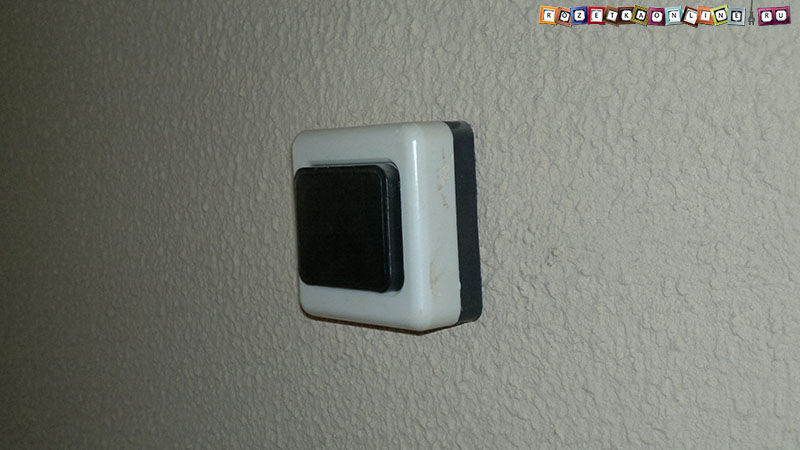
For correct work a call, according to the connection diagram, a control button brought out to the entrance is required.
And the socket for connecting the bell itself, which is often located inside the apartment next to the front door, under the ceiling.
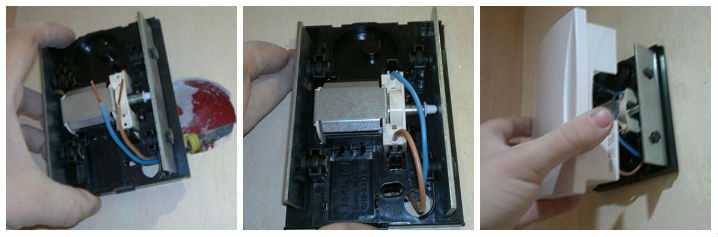
In our case, since the Zamel electric call does not have an electric cord for plugging into a socket, we removed the socket mechanism in advance and removed the conductors of the supply cable necessary for connecting. In our case it is Brown(Phase wire coming from the button) and blue(zero). The insulation was removed from the ends of the cable cores to a distance of about 10mm - 12mm.
How to determine which of the wires is phase, zero, and which grounding independently, our detailed instructions - .

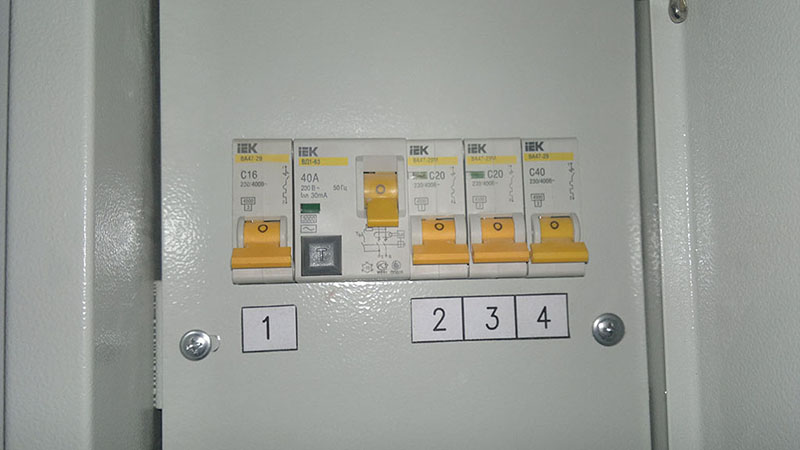
If the wiring is done correctly, exactly according to the diagram, there should be no voltage on the wires until the button is pressed. But it is best to forcibly turn off the supply of electric current in the metering and distribution board.
To do this, in the electrical panel, it is necessary to turn the levers of the circuit breakers to the “off” state, usually this is the position in which the lever is directed downward. Which machine needs to be turned off, if they are not signed, is determined empirically, turning them off in turn, and checking, for example, with an indicator screwdriver, the presence of voltage in the wiring for the switch. As a last resort, turn everything off. But then make sure once again that there is no electric current at the installation site!
We lay the conductors of the supply wire into the bell body, from the back side, through a special hole, as shown in the image below.
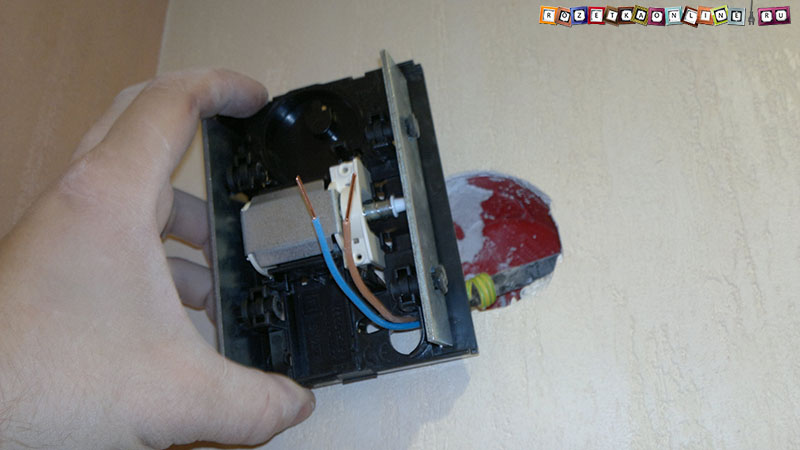
We connect the wires by placing them in the terminals located directly in the doorbell mechanism. In the Zamel electric doorbell, self-clamping spring terminals are used for connection, which greatly speeds up and facilitates installation.

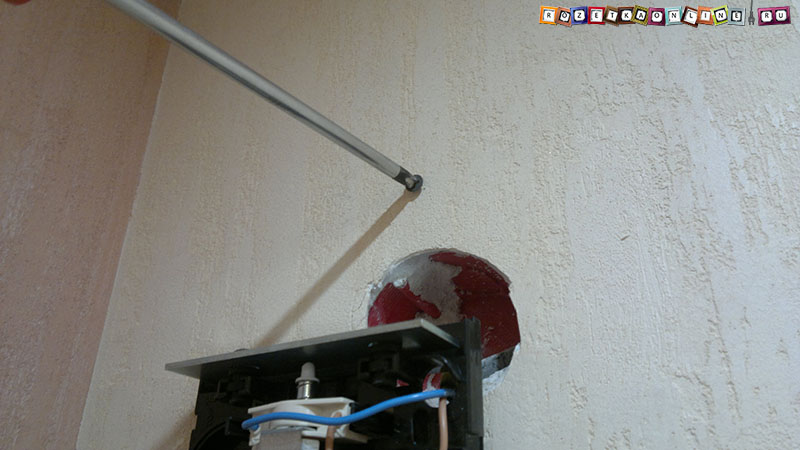
Slightly above the socket, from which the wires for connecting the bell are taken out, we screw in the self-tapping screw. At the same time, its head should not enter the wall to the end, but should protrude at a distance of 3mm - 5mm, as shown in the image below. Depending on the materials of the walls, different fasteners can be used, the main condition is the correspondence of the head to the size of the seat in the bell fastener.
Be sure to make sure that there is no electrical wiring in the place where the fasteners are installed., if you are not sure, it is safer to step back from the axis of installation of the socket in either direction.
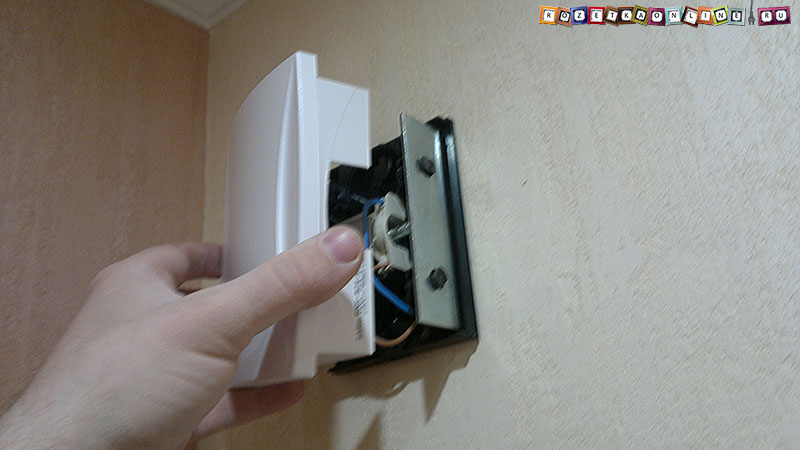
We put on the body of the bell on the head of the self-tapping screw, using a special seat on the back side. By adjusting the distance at which the fasteners stick out of the wall, you can achieve the most reliable fixation of the bell on the wall.

After the housing of the apartment bell is securely fastened, put the cover back in place, as shown in the image below.
This completes the installation of a wired electric call, you can turn on the electricity supply and check its operation. If everything is correct, when you press the control key (call button) located in the entrance, you will hear a pleasant, melodic sound, which dies down if you release the button.

As you can see, the bell has completely blocked the socket behind it and, due to the absence of unnecessary wires, it looks very attractive in the interior.
This installation method, in our opinion, is the most convenient and aesthetically pleasing. The main disadvantage is the lack of a simple possibility of forcibly turning off the doorbell. Bells are rarely equipped with switches, but you cannot simply turn it off from the socket. Another question is how often you need such an opportunity. In any case, it is always possible to implement quite simply a switch of any type in the call, for example, a rope switch.
Now you know how to install a doorbell and can easily handle it yourself.
If you have any questions about installing a doorbell, of any type, leave in the comments to the article, we will try to help.
Also, if you found inaccuracies or there are any additions to the article, be sure to write!
Good day, dear readers of our blog. Let's look at the topic of how to connect a doorbell with your own hands, without resorting to the help of a familiar electrician, who is likely to fail culturally, unless it is a global electrical installation of your apartment during the next major renovation.
If you are lucky with the repair, then you will replace the old wiring with a new one that will touch the bell. If repairs are not foreseen and the circuit does not work, and a wire is broken somewhere, then you can find the broken section and restore it so that the circuit works.If you do not want to suffer, then you can use the wireless connection scheme.
V this option everything is very simple, there is no need to punch grooves, lay wires, and even think about how to switch wires in a junction box. There are several options for wireless calling. Let's take a closer look at the two options.
The kit of the first option includes a button (possibly two), running on a battery and a bell block on the body, which has a plug for an ordinary socket on the back side, and the front side bears some kind of design solution and it also contains buttons for controlling the melody and sound volume , the control can be located on the side.
Connecting couldn't be easier. The bell block with a plug is inserted into any socket convenient for you, and the button is installed in front of the front door. The button can be installed on double-sided tape, or on screws, if provided by the design. In the second version, the button is also attached in front of the entrance door with adhesive tape or screws, but the bell unit no longer has a plug and runs on two or three finger batteries.
In this case, the bell is installed in the apartment, usually above the front door. A hole is drilled, a plastic dowel is inserted, into which a screw is screwed onto which the bell is hung. The fasteners, of course, can be different depending on the design. This problem can be easily solved without noise and dust.
In this case, of course, you have to tinker. As a rule, a switch for a corridor lamp is installed in the corridor near the front door. From the switch, the wire rises into the junction box, in which the power wires are connected, and the lamp, in this box, the power wires and wires going to the button and the bell are also switched.
If you are in the process of repair, then you can safely make a furrow from the junction box to the future location of the bell and lay a wire, just in case, three-core and small section (0.5-0.75mm 2), the third core will be just in case, for grounding metal parts of the bell, because you do not know what you will buy, this is usually thought about later.
The second wire is already two-core, also of a small section, is laid from the junction box to the button, also in the strobe, then it is removed, through the through hole in the vestibule and then in the strobe or plastic box, we bring it to the door frame from the side where the button will be located and to the desired height (usually 1.5 meters from the floor).
At the desired height in the frame, we drill a hole with a larger diameter than the wires, it is desirable that the wires are double-insulated or insert a sleeve into the hole, and pass the wires outside through it, no matter what the wire touches directly to the tree. Next, we disassemble the button and, according to the instructions, fix it to the frame, from the side of the staircase, of course, and connect the wires to the button contacts.

Keep in mind that the button is supplied with a phase that is interrupted by a contact in standby mode. And before starting to produce in the junction box, you should make sure that there is no voltage.
Next, we return to the junction box and make the wire commutation. The supply wires in our case are three colored, blue - zero, brown - phase and yellow - zero. A two-wire cable is laid from the button to the box, the colors of the wires are blue and brown, and three wires are laid to the bell, blue, brown and yellow color.
We clean all the wires in the box, take the incoming blue zero wire and connect it to the blue wire going to the bell. Next, we connect the yellow ground wires. Now we take the incoming supply phase wire Brown color and connect it to the brown wire that goes to the button, then we take the blue wire that goes from the button and connect it to the brown wire that goes to the call.
In our case, the connection of the wires was made by twisting and soldering, how to make wire connections in different ways, read in a separate article. After gluing the wallpaper, the bell unit is installed, for this, holes are drilled for fastening the bell according to its design, the blue and brown wires are connected, if necessary, the yellow ground wire.
Then voltage is applied, we press the button and if everything is done correctly, you should hear the sound of a melody or a trill, or something else. If for some reason the repair is not foreseen and there is no call, but it is needed, then we take a screwdriver and opposite the corridor lamp switch near the front door, stepping back 15-20 centimeters from the ceiling, tap the wall with the back side.
The heard dull sound will show, the cover of which must be carefully removed and all the operations for laying, connecting the wires and connecting described above must be done. This, of course, will lead to a violation of the integrity of the wallpaper from chasing, plus dust and, as a result, a small repair.
Best regards, Alexander & Igor!
To notify the residents of the apartment about the arrival of guests, a doorbell was specially created. Today it is presented in two types: wired and wireless devices. In order for it to be able to receive a sound signal, it is necessary to connect the device. How to do it right?
Attention! All work, except for the determination of the phase and zero cable, is carried out with the power supply disconnected.
First, how to connect an electric bell in an apartment with wires. Open the box with the device and inspect it. How many lives goes out? Now compare their number with the one that looks out of the wall in the place where you decided to put the call box. Several options are possible.
The work plan is to find the phase and zero. To do this, use an indicator screwdriver. Touch the end to the bare wire. If the bulb does not light up, it is zero. It is directly connected to the common wire in the junction box. It is advisable to use a terminal block for connection rather than twisting.
The phase in contact with a screwdriver is detected by an indicator light. The vein is passed through a button that plays the role of a key closing the electrical circuit. And then the wire is connected to the phase in the junction box.
If a three-core cable comes out of the device and the hole in the wall, then you have a ground connection. This can only be in new buildings, where the wiring has a standard color:

You can easily identify the wires by color, but for better security, still make sure that the wiring is correct with an indicator screwdriver. You already know how to connect a 2 wire doorbell. With the three wires, everything is the same, except that you additionally need to combine the ends of the ground wires.
If the wall and the bell have a different number of wires, the one that is "superfluous" is the grounding conductor. It is only needed to increase security, and does not affect the operation of the device in any way. You are familiar with the wiring diagram for a 220V doorbell with two wires. It remains only to qualitatively insulate the tip of the grounding cable.
Have you decided to connect a bell for the front door so that you can receive a signal from two different places? Then you need a second button, but you can use three, four or more. The main thing is to be guided by the rule: they must all be connected in parallel.
 The two-button doorbell, the connection diagram of which is given above, is convenient for use in cottages with several entrances to the house.
Wireless counterparts can be powered from an outlet or batteries. The first is inconvenient in that it does not work with the power supply disconnected, the second in that it requires regular replacement of the batteries. Their advantage: they don't require a connection.

Female infidelity is a rather complex phenomenon. First, with the social ...

This method of cooking bell pepper was brought by my mother a long time ago from ...

When updating a game, it's best to get familiar with new content and new ...