From internal pipelines, drains are transported by external ...
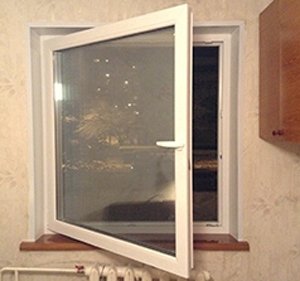
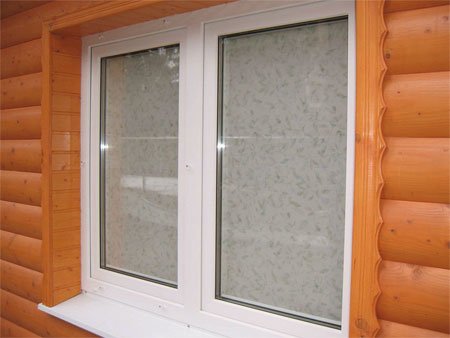
The wooden house is distinguished by its beauty outside and the pleasant atmosphere inside. But making your home perfect is impossible without structures such as windows. Before you install them, you need to understand what material is best suited for this. For several years now people have been actively using plastic windows. They combine perfectly with wood, while allowing to reduce heat loss, increase sound insulation and give the design a finished look. It is also worth paying attention to that. how is going
Before buying PVC windows, you need to decide what they consist of. Such information will allow you to perform high-quality installation of plastic structures. So, the main elements of PVC windows remain:
But here is how the shutters on the windows look wooden, and how they can be installed. can see
Even when choosing a PVC window, you should pay attention to size. According to the standard for plastic windows, the size of the window construction will be 1200x1200 mm.
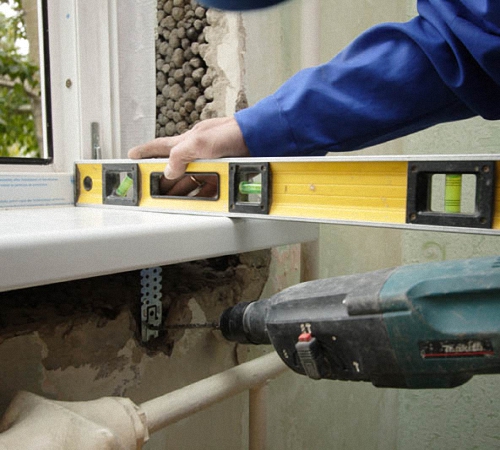
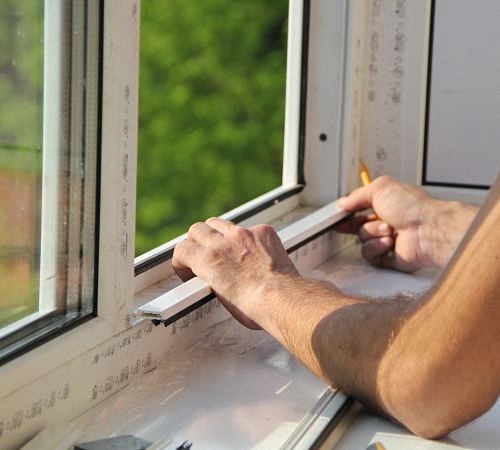
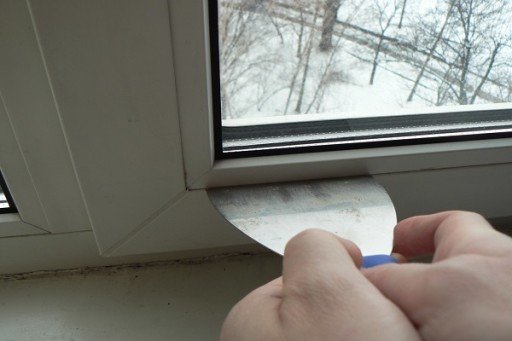
The process of installing PVC windows in a wooden house requires strict adherence to technology. The first step is to carefully make all measurements. First determine the distance from the floor to the windowsill. This will require taking into account the growth of a person. Equalize the resulting distance to 80 or 90 cm. When taking measurements, it is necessary to take into account the comfortable indent to the window. The windowsill should be higher than the dining or writing desk. When everything became clear with the location of the windowsill, it’s worth going to the side of the opening. They will be 5 cm below the windowsill. This distance must be ensured for polyurethane foam. It is also worth paying attention to how you can produce
Cut the opening by applying a level. Using a plumb line, mark the vertical marks. The upper limit is determined taking into account the height of the structure. PVC frames suggest an increase in the opening by 14 cm above the window structure. The width of the opening should also be 12 cm more than the horse.
When the preparation of openings and casing is completed, then you can proceed to the installation of double-glazed windows. In this case, one basic rule should be taken into account - it is impossible to drill through the frame, as this can violate the tightness and thermal insulation. It is best to use special mounts for this. Installation work can be simplified if dismantled from the sash frame. Thus, it is possible to facilitate the design.
You may also find it helpful to learn more about what material is worth using.
On the video how to install a plastic window in a wooden house:
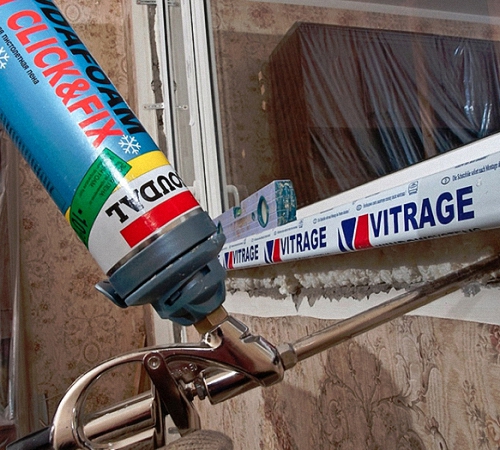
The process of mounting the frame is carried out using a level. This will make it possible to get it right fit. After installing the frame, you can proceed to fixing the slopes. At the same time, do not forget about the gaps for the mounting foam. When the frame is already installed, you can pick up a gun with mounting foam and walk it around the perimeter of the opening.
Carrying out the installation of PVC windows in a wooden house, it is necessary to take into account the following features:

After the installation of the plastic window is completed, care must be taken that the integrated structure has an attractive appearance. For these purposes, you will have to complete the finish, which includes the installation of slopes.
They can be both plastic and wooden. Consider the process of installing PVC panels:
But how the plastic window is insulated for the winter will help to understand this.
On the video design of a plastic window in a wooden house:
If you decide to use slopes made of wood, then you will get an attractive design of PVC windows. But when choosing a material, make sure that it is advantageously combined with the appearance of the whole house. In a wooden house, slopes from a wooden lining look great. This design option is in great demand today and for the following reasons:
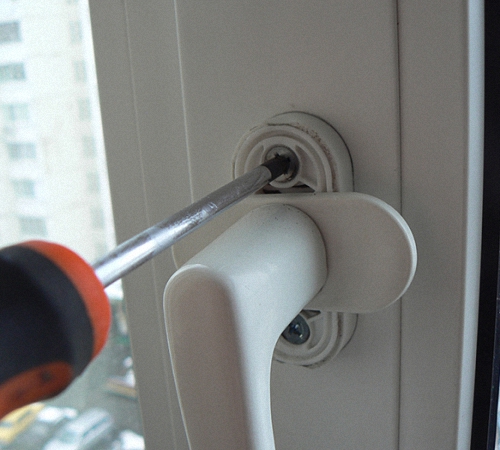
But how to adjust the plastic windows, and what tool is needed, this will help to understand
The installation process of the lining is not difficult, so even an inexperienced person can cope with such work.
To do this, simply follow the following sequence of actions:
After installation, it is important to understand how to do this work yourself.
You can buy a PVC window today at a price of 3,000 -6,500 rubles apiece. But professionals can install a window at a price of 800 rubles per m2.
The popularity of PVC windows is growing every year. And this is not surprising, because such designs have a presentable appearance, a long service life and excellent noise and heat insulation properties. Even the windows installed in a wooden house will be advantageously combined with the construction and perform their tasks perfectly.
Plastic windows can be installed in any kind of structure: stone, concrete, wood. But installation in a wooden structure requires more attention, as the tree is prone to shrinkage due to drying out. The wood that dries turns into a strong press capable of deforming the window unit. As a result, the window structure ceases to function correctly, it can squint. Consider how to avoid the occurrence of such a situation and install windows without errors. Let us dwell on the specifics of the window construction made of polyvinyl chloride, its strengths and weaknesses.
PVC windows are PVC window constructions. This material is a chemical synthetics based on petroleum ethylene, chlorine. This polymer is resistant to various influences and lasts a long time. Window structures made of the specified material are resistant to:
PVC for window structures is a tough and durable material. The strength of the polymer is several times greater than the strength of wooden structures and can withstand swings of one hundred degrees - from fifty degrees below zero to fifty degrees above zero.
Polyvinyl chloride consists of the following components:
The material lasts a very long time, manufacturers give a twenty-year guarantee, but to make sure whether this is so far impossible. The life of the first installed windows has not yet passed. Claims that even in fifty years windows will not lose their properties are possibly real. But window seals fail much faster. As practice shows, they must be changed every eight to ten years. In general, the life of the seal depends on the temperature of each particular area.
Among the advantages of plastic structures are the following:
Proponents and opponents of plastic windows argue about the safety of these structures for health. Those who claim that structures are unsafe for human health argue for the presence of lead in the raw materials. But the lead in the windows is completely safe, in addition, most manufacturers have replaced this material with others. The fact that PVC window structures are quite economical and environmentally friendly is confirmed by certificates:
In some countries, the government pays money to residents who have installed plastic constructions for their personal contribution and are not indifferent to saving natural resources.
Opponents of plastic structures claim that over time, plastic takes on an unaesthetic appearance, as it turns yellow and burns out. But at present, the technology for the production of plastic windows has been improved and the color is not lost under the influence of natural forces.
In the event of a fire indoors, window structures of this type will "hold" the fire, as the plastic structure has high thermal insulation capabilities.
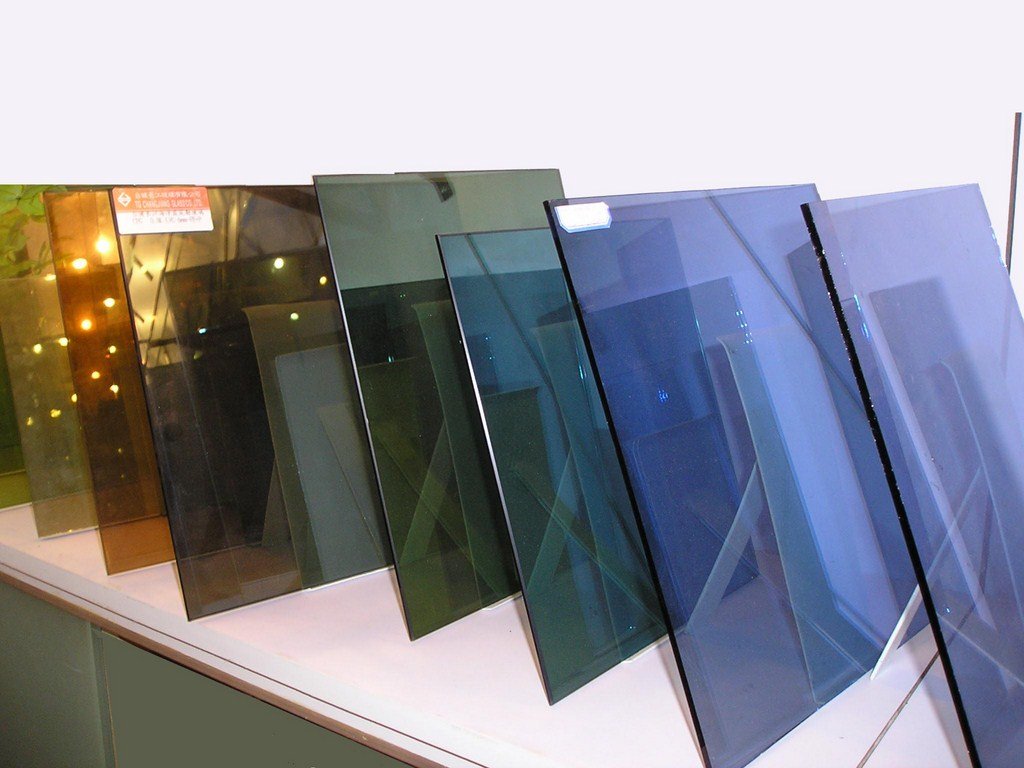
The construction segment presents a huge variety of plastic windows. They are different in many respects: shape, size, number of flaps, their opening options, types of double-glazed windows, and profile varieties. Currently, manufacturers have presented windows with various kinds of decoration and varying degrees of transparency.
By the number of shutters, the windows are divided into one, two and three-leaved. The option chosen depends on the location, the size of the structures and the individual characteristics of the home. For a small window, it will be convenient to have one sash. For typical apartments, it is recommended to install windows in a pair of wings.
Regarding the opening of windows, the following options are distinguished:

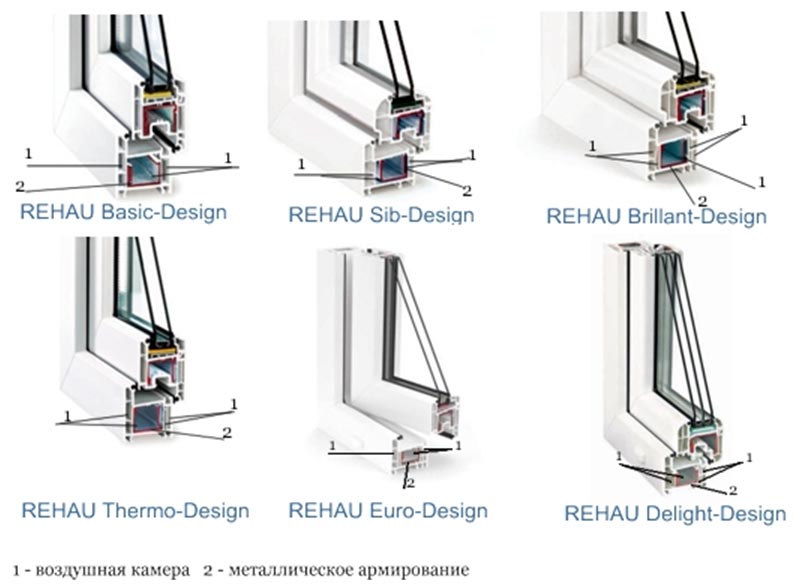
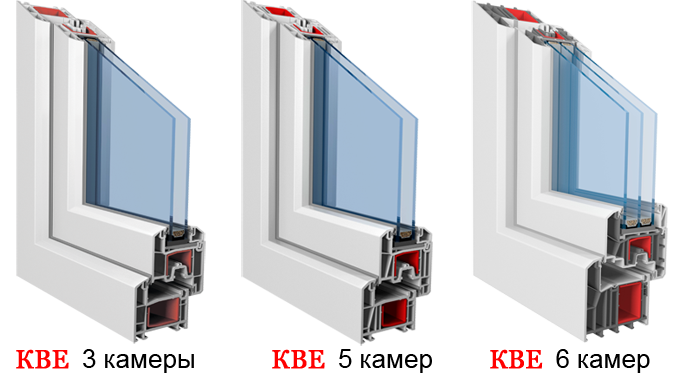
From the characteristics of the profile depends on its operational capabilities. Polyvinyl chloride itself has low thermal conductivity, but chambers with air inside the structure help to keep heat several times better. The thermal conductivity of the window and the air temperature in the home depend on the number of chambers. There are three to seven cameras.
Three-chamber windows are installed in rooms that do not require heating: outbuildings, sheds.
As for six and seven-chamber windows, they do not perform their functions better than four or five-chamber windows, so there is no point in overpaying for the design.
As for marking profiles with letters, there are types: A, B and C. Type “A” is used in homes. “B” and “C” are recommended for use in factory or warehouse premises.
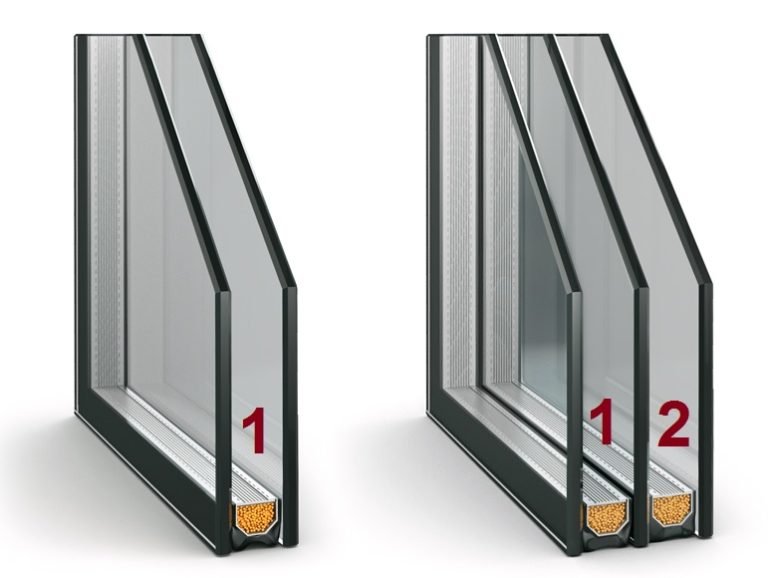
The glazing itself can be made using two, three or four sheets of glass. They are fixed at the required distance from one another and form cameras.
Double-glazed windows can be one, two and three-chamber. This point can be confusing when buying a window. It should be clarified which cameras are meant in the frames themselves or in double-glazed windows.
With the installation of plastic windows in wooden walls, you will have to study the theory of the issue in order to do everything right. Some people think that it is impossible to install plastic windows in old wooden buildings. But actually, no, this can be done in any type of premises. You can install the windows yourself, provided that there is minimal knowledge of the building foundations. The main thing is to take into account the features of wood as a material and take into account the fact that the wooden skeleton of a house can cause a drawdown.
After the windows are selected for wooden house, you need to familiarize yourself with the technology "pigs". This technique is aimed at preventing deformation of window structures, regardless of the selected material.
According to statistics, a wooden house shrinks to thirty-five centimeters. Depending on the basis of the structure, twelve months after the construction of the house, it sits down in any case, this is a natural process. The maximum error will be provided that the house is built of logs, the minimum - of glued. An ordinary beam can sag for thirty - forty centimeters. This is taken into account as a factor capable of deforming window structures. Deformation may occur in the impossibility or difficulty in opening and closing the window.
Builders are advised not to put plastic structures in new homes until it shrinks. But experience shows that old structures can also warp windows. But what to do, is it not possible to install plastic metal structures in wooden houses? In fact, experienced builders have developed installation technology that will allow full use of PVC windows.
For a successful installation, it is important to plan and carry out competent preparatory work, they consist of such actions:
At the preparatory stage, a decision is made about the shape of the window, the number of wings, in what color scheme it will be and in how many packets.
When all decisions are made, the order of double-glazed windows according to requirements is carried out.
Okosyachka is the next step in the installation of metal-plastic construction.
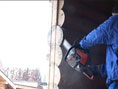
You can finally install the window structure in a wooden structure after preparing the pigs. This is a wooden beam structure designed to support weight. bearing walls and not allowing the window to deform. The required beam size is ten by fifteen centimeters. Using chisels, connecting grooves are made on these bars, about five centimeters wide. Longitudinally with the help of a chainsaw, cuts are made. All manipulations are controlled by the building level.
Plastic structures are inserted into the prefabricated system and fixed with fasteners. The installation procedure is as follows:
A small box, specially installed in a wall made of wooden material, performs several important tasks:
Experienced builders insist on installing the door even when installing plastic windows in an old wooden house. They argue that this measure is simply necessary. A building made of wood all the time in one way or another changes its size - during the rain it swells, in the heat - it dries up.
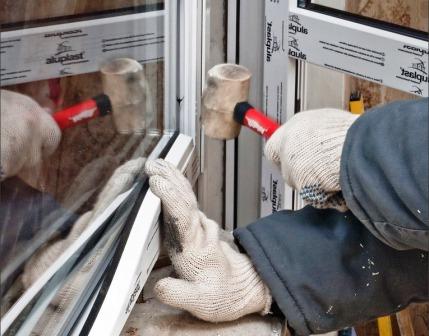
The most important process is the process of installing plastic structures in their intended place. To do this, it is advisable to prepare in advance the entire tool that will be needed in the process of mounting the structure:
Naturally, other tools will be needed during operation. Ideally, such work should be carried out with a partner who will be able to feed the tool, will hold the structure as necessary.
Installation of plastic elements is not an easy type of construction activity. If you yourself are installing plastic windows, consider all the recommendations of specialists.
Correctly calculating the dimensions is not easy, this is a very difficult process, which is best entrusted to a professional from a window workshop. Recently, an online calculator of plastic structures has appeared, allowing you to find out the exact cost. It is very comfortable. The sites are presented with various filters:
The cost of window structures is affected by the number of leaves, the choice of additional fittings, additional functions of the double-glazed window, profile color.
To see how the installation of plastic metal structures in wooden houses takes place in practice, watch the video. In fact, you can install windows on your own, for this you need to take into account the specifics and features of this method and follow the recommendations of specialists.
Windows made of strong and durable plastic can be found today not only in stone, but also in wooden buildings.
However, their installation in a wooden wall is significantly different from installation in stone structures. The reason for this is a significant shrinkage of the wood during the drying period.
In raw material, it can reach 6-8% (1.2-1.6 cm per 1 meter of the height of the log house).
Drying wood turns into a powerful press, which easily deforms the window unit. The flaps do not open after such an impact, and the frame is warped.
It turns out that a high-quality installation of plastic windows in a wooden house is not possible - you ask? No, it is quite real, but only subject to special technology. We will consider it in our article.
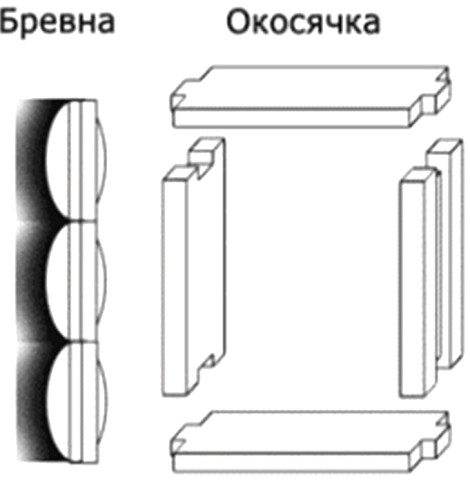
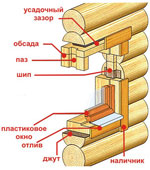
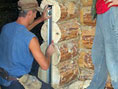
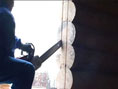
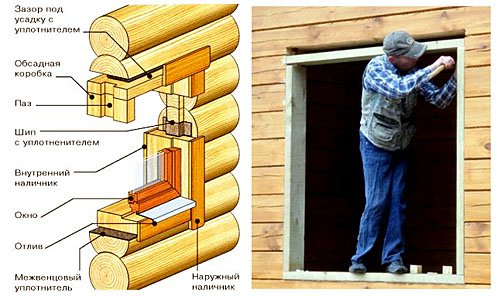
In order to eliminate the pressure of the wall on the window block, the masters came up with special “skids”, popularly called pigs or casing. The idea of \u200b\u200bsuch a technology is very simple: a vertical ledge-ridge is made on the end of the logs of the window opening with a chainsaw.
A window carriage is put on it - a wooden beam with a vertical groove cut out in it. There is no rigid connection with screws or nails between the opening and the carriage. As a result, due to the sliding ridge-groove joint, we get a frame that moves freely with the drying wall.
Thanks to this original solution, the destructive deformation of the log house does not act on the plastic window installed in the casing.
![]()
Piglet performs several important functions in a wooden wall:
And now let's take a closer look at how to install plastic windows in a wooden house with your own hands, using a casing.
Cutting the ridge at the ends of the window opening should be treated very responsibly by marking with the help of a level. Any deviation from the vertical and the inaccuracies made at the “crest-groove” joint will negatively affect the operation of the pigtail, disrupting its free movement on the wall.
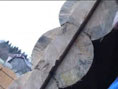
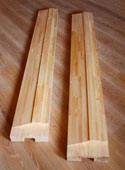
Having made crest cuts, you can begin to manufacture window carriages. These are wooden planed whetstones with a section of 150х100 mm. At their ends, it is necessary to make cutouts measuring 5x5 cm to insert horizontal jumpers (board 150x50 mm with two spikes at the ends).
When making a casing, keep in mind that its assembled height should be 7-8 cm less than the height of the window opening. If you make a pigtail without such a gap, then the upper crowns will shrink the box when it shrinks, deforming it.
In order to correctly insert a plastic window in a wooden house, you must adhere to the sequence of operations established by experienced masters.
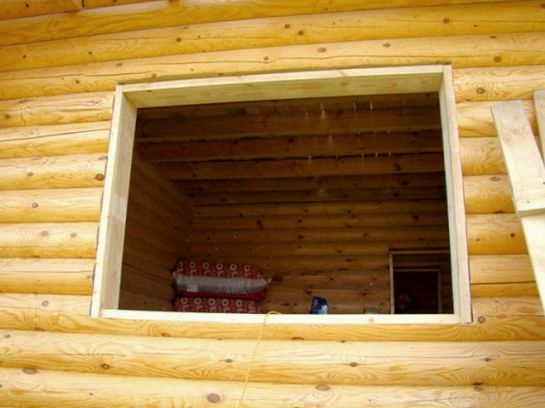
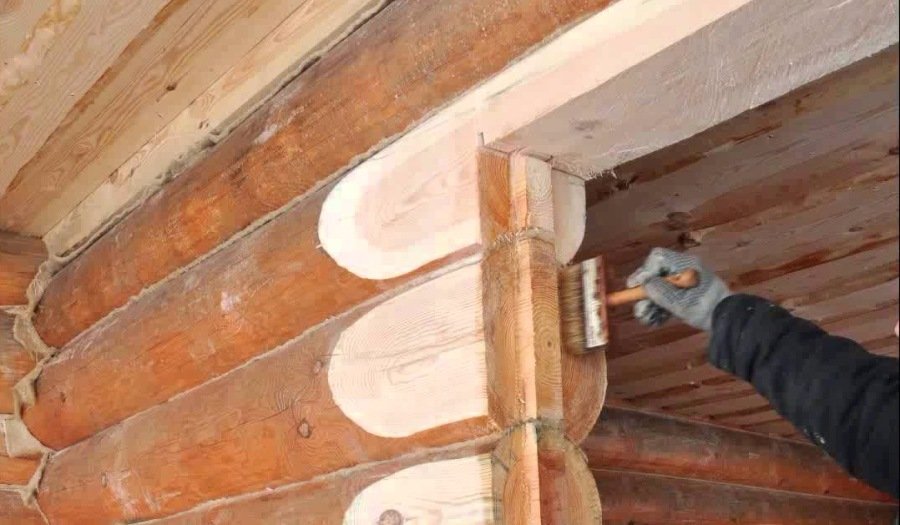
First you need to overlay the crests of the window opening with tow and fix it with a stapler or small nails. This is necessary to insulate the joint and eliminate squeaks. After that, the lower jumper of the pigtail fits into the window opening. Then carriages are stuffed on the crests (casing side bars). A second jumper is inserted into the upper cutout of the gun carriage and lowered to a horizontal position. Having assembled the box, it must be neatly fastened with self-tapping screws so that they do not go into the crests of the log house. Otherwise, the casing will not “work”, because self-tapping screws will not allow it to slide along the wall.
All cracks remaining in the window opening after installing the pigtail tightly clog the tow. Then, according to standard technology, a plastic window is installed with all the associated operations to ensure protection of the joint zone with the casing from moisture, heat loss and noise penetration.
The gap between the pig and the log wall is filled with thin boards wrapped in a roll of tow. As the walls shrink, they are alternately knocked out. To do this, the upper platband (it is attached only to the pigtail) is removed and, removing the unnecessary "compensation" board, put it back in place.
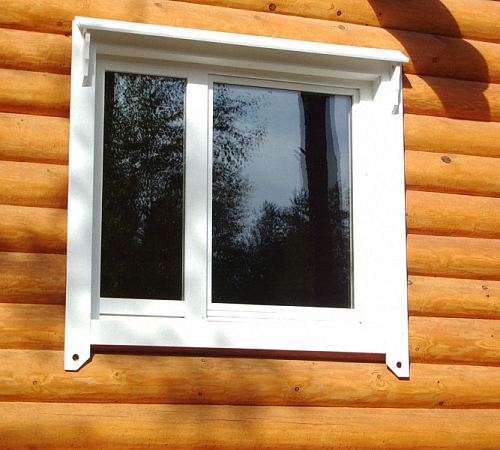
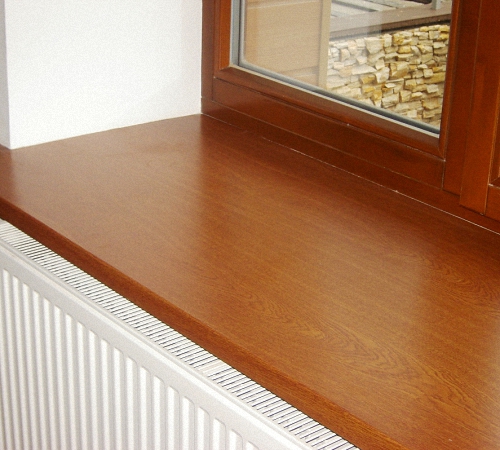
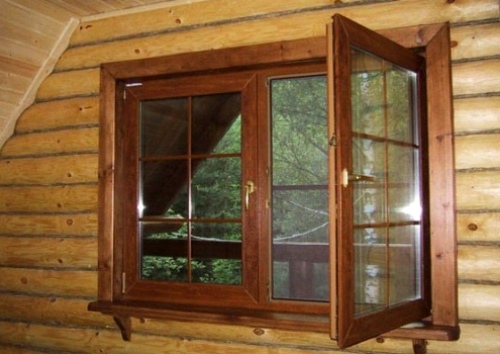
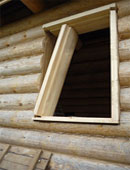
The finish of a plastic window in a wooden house is no different from the decorative sheathing of a conventional frame. It is very advisable to order not standard white plastic windows, but covered with a special film that imitates the color and texture of natural wood. They will naturally look against the background of a chopped wall. Having completed the insulation and sealing of the joints, the window block with a pigtail inside and outside is sheathed with a wooden platband.

Until now, we talked about installing plastic window blocks in new log cabins.. But is such a technology needed, if we are talking about an old wooden house?
Experienced craftsmen argue that a piglet is needed here. The fact is that any log house, even after 5 years of shrinkage and shrinkage, does not stop changing its size. Wood is a living porous material. Therefore, when it rains outside, the log and beam swell. During hot summers, the reverse process takes place and even an old hundred-year-old log house loses several centimeters from its former “wet” height.
It should be noted that the old window box is absolutely not suitable for the role of a pigtail, because it can not slip on the surface of the wall, compensating for its shrinkage.
Therefore, the owner has two options:
Concluding our review, we say that installing a plastic window into a wooden wall is not a very complicated process. With a careful and attentive attitude to the matter, it can be qualitatively performed on your own, without involving “dear” masters from the side.
We sometimes receive additional questions that cannot always be answered as part of the comments. We will answer such questions further and give options for solving a specific problem.
Good afternoon!
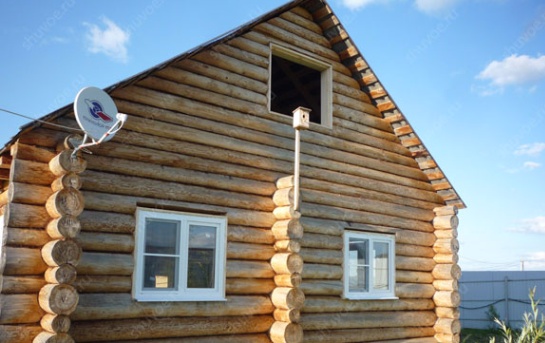
With the installation of a plastic window in the log house, it’s clear, but how is a plastic window installed in the house on the pediment, in which the opening for the window from the 80x100mm board is formed?
This installation option is simple. Only before installation, it is advisable to attach an antiseptic rail of 20x20 mm along the contour of your box (it will act as a quarter, protecting the polyurethane foam sealant from sunlight). If you have already made a quarter on the board, then you do not have to put a rake.
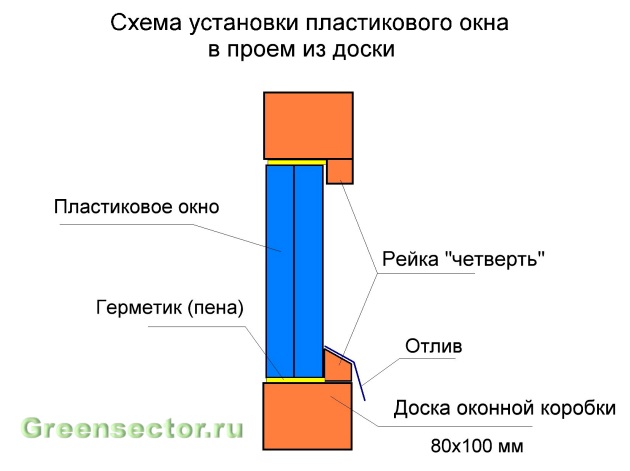
We put a plastic window on the gaskets (to create a gap into which the foam will be blown). After that, we carefully pass the entire circuit with sealant. It is possible to additionally fix the window in the opening with the help of metal mounting plates. However, one foam will hold the window securely.
I didn’t step back from the outer edge of the window block, but the house is old, the window block is level and somewhere in some places a 50 mm board goes outside the street, and now it’s cooling. What can be done?
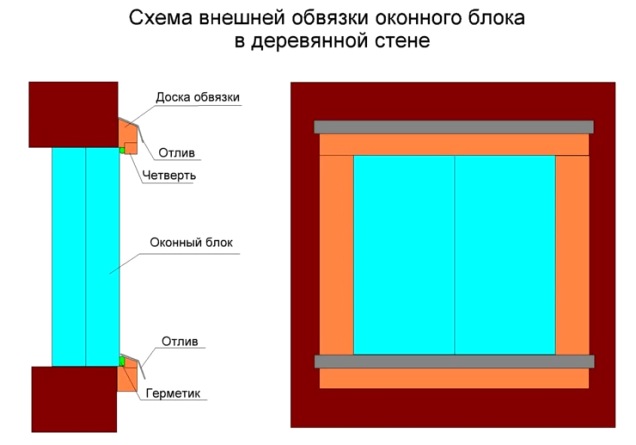
The best option is to remove the window block and install it in the quarter-indented opening, as shown in the previous diagram.
An acceptable option is to make a thick board around the window block outside the wall so that quarters are obtained that cover the junction of the window block with the wall from blowing. Seal any leaks and gaps with foam or tow from tow.
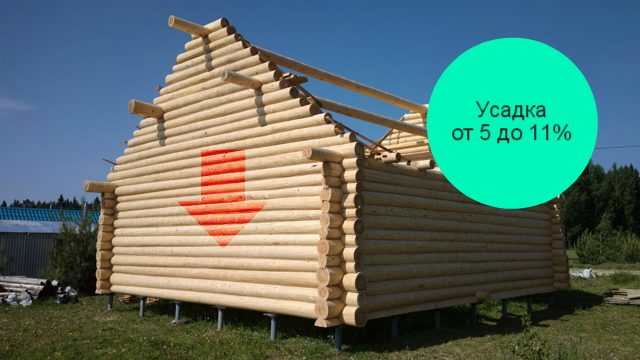
The installation of plastic windows in wooden houses has its own characteristics, in contrast to the installation in the usual prefabricated house, the technology of which is described in the main section of this site. For example, the openings of log (timber) houses, as a rule, do not have quarters. But the most important difference is that in the first few years after construction (does not apply to frame-panel), wooden houses are inherent to shrink as a result of the drying of the wall material (logs, timber). And this factor cannot be neglected, because the plastic window installed in the usual way (in a bare opening) in the first year will be crushed and deformed by the overlying crowns. As you know, in the first two years (the most active period of wood drying) after the construction of the house, the wall shrinkage per 1 meter of height can be:
There are other more frightening figures about the shrinkage of log cabins: 10 - 15% of the initial height. At one of the construction forums, I somehow saw this information: from the original wall height of 2.3 m after shrinkage, 2 meters remained. In general, the amount of shrinkage depends on several factors:
Fellings from an ordinary log sit most heavily, then a rounded log, a beam (2 times less than a conventional log), a profiled beam, glued beam (about 10 times less than a log) go down.
Even if the house stood up, i.e. has been in operation for more than 5 years, experts still recommend taking into account the possibility of vertical wall movement as a result of seasonal changes in humidity and air temperature when installing windows and doors. Figuratively speaking, a wooden house is a more lively structure compared to urban buildings made of stone and concrete. Therefore, the installation of plastic windows in such cases is not done in the opening itself, but in a special wooden box that acts as a link between the window and the wall. This box is called differently: casing, salary, deck, piglet. For the purposes of this article, we will use the term casing .
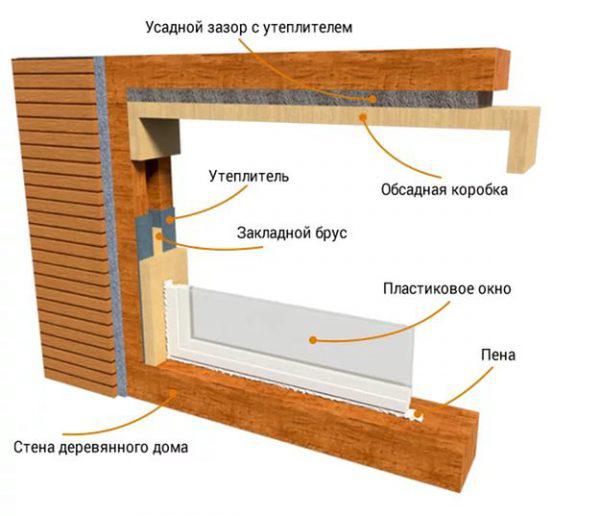
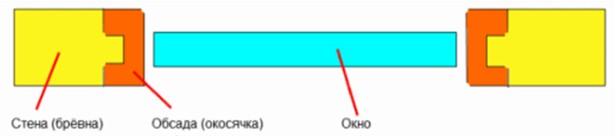
First, let's figure out how the casing is arranged and what is the point of its use.
As can be seen from the figure (click to enlarge the picture), the casing is an ordinary window box made of four, sometimes three (sides and top) thick boards installed inside the opening. The meaning of this design is that it is independent of the vertical movements of the wall and moves freely in the opening, as it is not attached to the logs (timber) either with nails, or self-tapping screws, or other fasteners, but is held with the help of grooves in the side racks, mounted on the spikes at the ends of the logs. Even foam is not used to seal gaps around the casing - only tow, jute (flax) and other soft insulation. Please note: on top of the casing, a large gap is specially left, the size of which is designed for the maximum possible shrinkage of logs (timber). During the first years after the construction of the house, this compensation gap will gradually decrease to the minimum, but the top log (beam) of the opening, if correctly calculated, will not crush or distort the casing. Thus, the shrinkage of the house does not affect the size and shape of the casing, and, accordingly, does not damage the plastic window inside it.
If you decide to install plastic windows in an old wooden house, which has already undergone the shrinkage process, then, when dismantling the window blocks, you will probably notice: they are made according to the same principle as the casing construction described here, i.e. not nailed to the logs of the opening, but fixed in it with the help of a simple "groove-spike" system on the sides. This suggests that the technology for installing windows and doors in the casing was invented for a very long time, and is used with success to this day. We will not invent anything new and go the same way.
There are several ways to install casing:
We will use the last option - in the deck, since it determines the maximum strength and stability of the opening, because the casing not only protects the window from shrinkage of the walls, but also ensures the stability of the wall at the point of cutting the opening.
In short, the sequence of our actions will be as follows:
We use foam only inside the casing. The gaps around it are insulated with traditional tow. The next 5 years (if the house is newly built) we will have to periodically remove the platbands and re-dig the upper clearance above the casing, gradually reducing the amount of insulation inserted there. Only after complete shrinkage of the house, the gaps around the casing, if desired, can be sealed with foam from the outside.
Before sawing, we mark the window opening with the help of a level, because a plastic window will be installed strictly according to the level in all planes, therefore, the casing should also be installed in the opening as precisely as possible in level initially. The lower crown in the opening needs to be cut, as shown in the figure, so that an even horizontal platform is obtained.
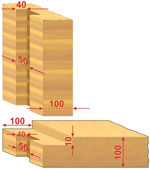
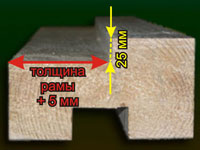
The dimensions of the opening are determined based on the size of the plastic window, the thickness of the casing bars and the size of the necessary gaps. The thickness of the bars I propose to take 100 mm.
Aperture Width ( W opening) will be equal to the width of the frame of the plastic window ( W frames) plus 40 mm (two side gaps of 20 mm to the right and left of the frame) plus 200 mm (thickness of two side casing posts of 100 mm) + 30 mm (thickness of insulation on the sides of the casing and correction for unevenness of the side walls of the opening) minus 50 mm (the ends of the spikes recessed into the grooves of the racks at the ends of the logs 25 mm each on the right and left):
W opening \u003d W frames + 220 (mm)Opening height ( H opening) will be equal to the height of the frame of the plastic window ( H frames) plus 30 mm (clearance under the frame) plus 20 mm (clearance above the frame) plus 180 mm (thickness of two casing crossbars of 100 mm minus two connecting grooves of 10 mm each) + 15 mm (thickness of insulation under the casing and correction for irregularities lower cut of the opening) plus upper shrinkage clearance ( H shade):
H opening \u003d H frames + H seedling + 245 (mm).Shrink gap size ( H shrinkage) is not easy to determine, since the amount of shrinkage at home, as mentioned above, depends on many factors. If we, for example, roughly calculate it, taking everything to the maximum, then for a window with a standard height of 1,400 mm (plus the thickness of the casing rails, plus mounting gaps ~ 245 mm) with a 15% shrinkage, the upper gap will be 24.5 cm - a huge hole , the height of which, most likely, in the end will be too large. To simplify the task and avoid mistakes, do not rack your brains over GOSTs that regulate the shrinkage values \u200b\u200bof building materials of various tree species, comparing this with local climatic conditions, etc. You can do it easier, namely:
So, we calculated the size of the opening, marked it and cut it out. Now you need to cut the spike at the ends of the logs (timber) on the sides of the opening. The spike is also marked with a level in the center of the log (beam). The size of the spike is 40x40 mm. We trim the side and bottom of the opening with flax or jute using a stapler.
Firstly, it is necessary to determine the width of the casing bars: it should either be equal to the wall thickness, or be slightly larger, so that later, when installing external platbands, they (platbands) lay tightly on the casing, and not on the wall. Secondly, for the manufacture of casing, it is necessary to take well-dried material, otherwise the assembled structure itself will deform soon after drying.
The first to cut the upper (top) and lower (window sill) rungs, making them 30 mm shorter than the width of the opening (excluding spikes). At the ends of the apex and window sill, cut a groove under the spike 50 mm wide and 40 mm deep. Also at the ends of both crossbars we make small recesses of 10 mm for joining the crossbars with side racks.
We make side racks with a height exceeding the height of the frame of the plastic window by 70 mm. On the reverse sides of the uprights, we use a circular saw to cut a groove under a tenon 50 mm wide and 40 mm deep.

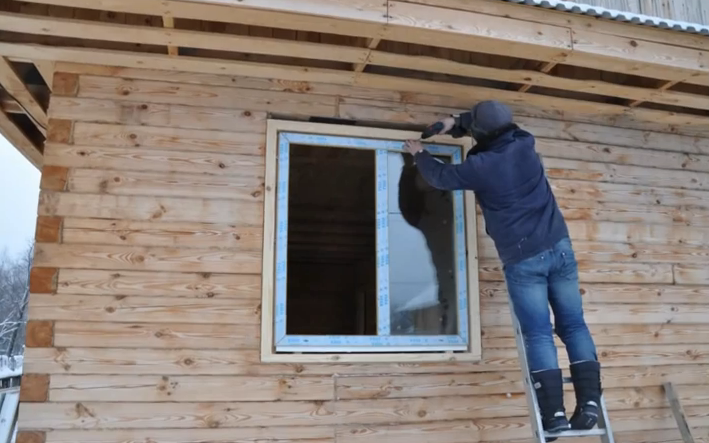
We begin the installation of casing in the opening from the lower crossbeam (window sill). Then an apex starts up in the opening, under which we substitute side racks one by one, fitting them with grooves on the spikes. We fasten the casing elements together with self-tapping screws and coat the joints with sealant. The gaps around the casing are caulked by the usual tow. We close the upper shrinkage gap with a roller from tow, wrapped in flax (jute). Now you can proceed with the installation of the window.
We install a plastic window, aligning it with the front edge of the casing or slightly digging it into the house. Pull a window inward to a third of the wall thickness, as is done in a panel or brick house, here it is not necessary due to the lower coefficient of thermal conductivity of wood (less than freezing depth). Moreover, with a small thickness of the walls of a wooden house, deepening the window into the opening, we will be forced to cut the narrow window sill without it.
If you calculated the dimensions of the opening and casing as described above, then the mounting clearances around the window frame should be 20 mm on the sides, 20 mm on the top and 30 mm below (we’ll make the lower gap larger so that you can later insert a plastic window sill under the frame, the thickness of which is 20 mm).
It is more convenient to fasten the frame to the casing with the help of self-tapping screws measuring 6x100 or 6x120 mm, placing them in the same way as when fastening with anchors. We drill holes in the frame with a drill with a diameter of 6 mm. It is dangerous to use self-tapping screws longer than 120 mm in that they will go through the casing and screw into the logs (timber), which is unacceptable.
Provided that all the preparatory work was done using the level, the window frame should stand exactly on the casing, i.e. the front edge of the casing should be parallel to the plane of the window, without noticeable distortions.
Before foaming the gap between the window and the casing, it is necessary to decide with what material we will waterproof the installation joint from the street side. As you know, the two main enemies of foam are sunlight and water. If from sunlight we can simply close the installation joint with platbands or strips, then waterproofing is more difficult, because it must meet two basic conditions: not to let water in, and at the same time not to prevent the release of moisture vapor from the inside out. Well, and, of course, waterproofing must be resistant to prolonged weathering. All of these conditions are met by materials such as waterproofing vapor-permeable tape and special sealant.

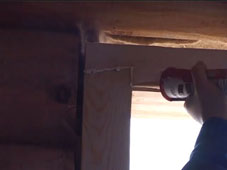
Sealant "STIZ-A" - one-component vapor-permeable acrylic sealant of white color for sealing the outer layer - is characterized by good adhesion to the main building materials: plastic, concrete, polymer concrete, foam concrete, plaster, brick and wood, including. It is also resistant to UV radiation, precipitation, temperature deformations and can be applied even at subzero temperatures up to -20 degrees. The only drawback of this material is that it is difficult to find in small containers, and buying a whole bucket makes sense when you install a lot of windows. If you select “STIZ-A” as the external waterproofing, the procedure will be as follows: first we foam the window, then, after complete drying, we cut off the foam sticking out from the outside and after that we apply sealant to the cut with a spatula.
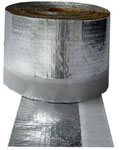
Waterproofing vapor-permeable tape (self-adhesive butyl rubber tape consisting of a vapor diffusion membrane with an adhesive layer of sealant on one or two sides) is sold in rolls of different widths. In our case, a tape width of 70 mm is suitable. Using such a tape as a waterproofing, correctly orient it when gluing. You can determine this by blowing into it from one side and the other (do not forget to remove the paper first). Since there is a membrane inside the tape, the air can only pass in one direction. The side on which it is impossible to “blow through” the tape is external (street). The sequence of actions (first the tape, then the foam or first the foam, then the tape) does not matter much, but you need to take into account that the foam, expanding upon drying, not only stretches the tape with a bubble (it will interfere later when installing the platbands), but it can tear it from a window or casing. Therefore, if you are first sticking the tape, then fasten the platbands or rigid fillers immediately on top of it, and then foam. Or first foam, wait until the foam has completely dried (24 hours), cut off its excess and right awaystick the tape in order not to expose the foam cut to prolonged weathering.
Pre-compressed self-expanding sealing tape (similar to foam rubber), impregnated with a special composition, due to which it is waterproofing and vapor permeable. Comes in a compressed state, twisted into rollers. If you opt for a tape, then buy one that expands over 30 mm. It is necessary to stick PSUL not on the outside of the frame profile, but to the end near the front edge. This should be done after fixing the frame in the opening, but before foaming. Of course, it is more convenient to glue the frame with PSUL before mounting, when it lies on the floor, but then the installation will need to be done at an accelerated pace, because after a few minutes the tape will expand and interfere with work. The assembly seam should be replaced only after the PSUL is fully expanded and overlaps the installation gap. But here the same problem is quite possible as with a waterproofing tape: the foam expanding during drying can squeeze PSUL out. This can be avoided by pressing PSUL from the street side with platbands or bedclothes.
On the inside, the foam also should not remain open to prevent moisture from entering the room from it. For the device of internal vapor barrier, you can apply vapor barrier tape, which has already been described in the main section of this site, or use acrylic sealant SAZILAST-11 ("STIZ-B").
It is glued to the end of the frame with a thin adhesive strip prior to foaming. Immediately after foaming, the protective paper is removed from the wide adhesive strip and the tape adheres to the casing. While the foam under the tape has not hardened, it is advisable to immediately install the window sill and fasten the start profile to the edges of the frame, otherwise the tape "inflated" with foam will prevent this later.

It is applied to hardened foam, more precisely, to its cut. In this case, it is no longer necessary to rush with the installation of window sills and a starting profile, as when using a tape. Nothing will prevent you from doing this later, when it is convenient.
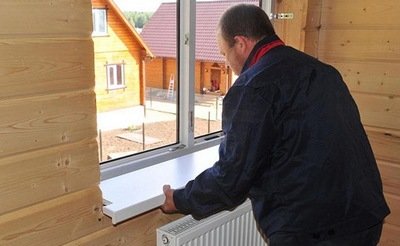
The interior decoration of a window in a wooden house (window sills, slopes) is not much different from that in a panel or brick house. It’s even a little simpler here: you don’t need to drill holes to install slopes - we fix everything with screws in a tree (in casing). It is also not necessary to additionally insulate the slopes from the inside with foam or other material. To be safe, it is enough to foam the inner surface of the casing with a narrow strip near the installation joint before installing the slopes. This will be enough, because the tree does not freeze as deep as concrete or brick.
This method of window installation allows you to save on slopes and window sills, gain time and achieve a greater, in my opinion, aesthetic effect, but for this you need a good woodworking machine to evenly cut the so-called reverse quarter on the casing elements, into which a plastic window will be installed .
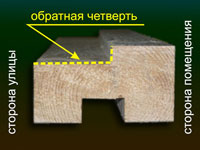
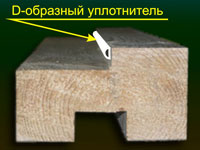
What is the inverse quarter can be easily understood from the figure. This is the recess in which the window frame will be installed on the street side. The depth of the quarter is 25 mm. The width is made 3-5 mm more than the thickness of the frame, for example: the 5-chamber VEKA has a profile thickness of 70 mm, therefore the width of the back quarter should be 73-75 mm. It is important to accurately calculate the size of the casing and window, carefully assemble the casing and install the casing in the opening exactly according to the level - the inner lumen should be in the shape of a regular rectangle, and all the edges of the outer edge should be in the same plane without skew. In order not to be mistaken in size, it is better to first make and install a casing, and only then, in place, measure and order a plastic window precisely.
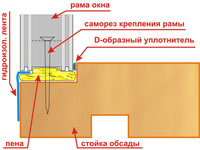
Consider how the casing window will be installed with the inverse quarter.
Assume that the casing is already installed in the opening. The size of the plastic window is such that it turns out to be slightly larger than the "clearance" of the casing, and more precisely: 14 mm wider and the same height. From the inside, such a window will not enter the casing, but on the other hand, it will easily enter the opposite quarter from the street side. At the same time, the edges of the frame will “hide” for a quarter of 7 mm on each side (no longer possible - the hinges of the wings will prevent), and the mounting gap will remain around the frame, which will later be filled with foam. The frame is attached to the casing with self-tapping screws, as already described above. To ensure a beautiful tight joint of the frame and the casing from the side of the room, we use a D-shaped door seal. We glue it before installing the frame with the adhesive side on the edge of the quarter. When attaching the frame, we tightly press it to the quarter, compressing the seal, and screw the screws, fixing the window in this position. The installed window is foaming from the street. Then, after the foam dries, its surplus is cut off, the seam is sealed with waterproofing tape or coated with STIZ-A sealant, platbands are installed.
Of course, since we are giving up interior decoration casing with any additional elements, you should ennoble it, i.e. give her a look appropriate interior design premises.
First of all, you need to give the lower crossbar the shape of a windowsill, so that its inner edge protrudes slightly from the wall and is slightly wider than the opening.
Second - we make the "dawn" of the inner surfaces of the uprights and the tip, i.e. we abandon the primitive rectangular (in section) shape of these elements and build a large chamfer, simulating the turn of the slopes.
Next, we process the inner surface of the casing elements. There are many possible options: texture, color - the choice is yours. You can just sand the surface and varnish it. You can cover the tree with a stain of the desired color, so that the casing surface is in harmony with the color of the window and / or the color of the walls.
There is also, in my opinion, an interesting, but more expensive option - to make surface brushing, i.e. process antique.
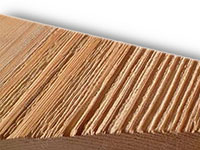
Artificial aging of wood under antiques is now very popular in various design styles. The essence of brushing technology is to remove soft fibers from the surface of the wood using a metal brush (along the fibers), while the smooth surface turns into a relief one. After giving a textured texture, the wood is cleaned from pile and fibers, then the final gloss is given. You can immediately coat the wood with varnish, but the "aged" wood will look much more spectacular after processing the stain of the color you want. However, there is an even more effective way of coloring - patting - creating a contrast between dark wood pores and a lighter surface. This is achieved with the paint of the desired color: it covers the entire front surface of the casing, and then the top layer is removed with a cloth until the paint has time to dry. The final stage of artificial aging is varnishing. It is applied in two to three layers. You can then rub the surface with a soft cloth to give a gloss.
Is it possible to install plastic windows in a wooden house? By what signs is it worth choosing a profile, accessories and a double-glazed window? How to install windows and how to maintain them during operation? In my article I will try to answer these and some other questions.
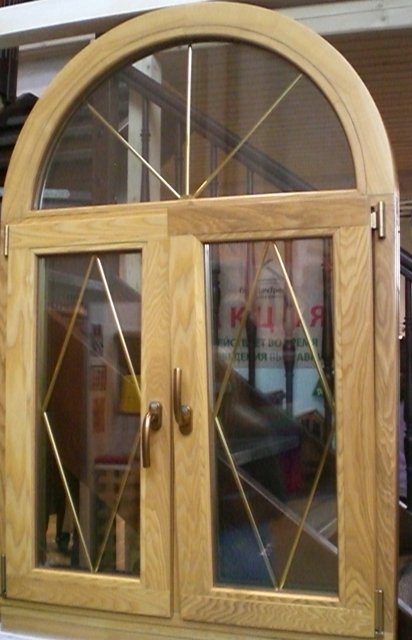
In my opinion, wooden frames have no advantages over plastic, except for a more respectable appearance.
This argument in favor of a tree is also rather doubtful. Metal-plastic frames glued in the factory with a texture film reliably represent wood, while they are devoid of all its shortcomings.
What exactly do modern wooden frames lose to plastic?
Before discussing how to install a window, let's decide on its choice.
In multi-apartment wooden buildings built in the Soviet era, standard wooden window blocks made of wood were used, manufactured in accordance with GOST 11214-86. The dimensions of the window blocks are easy to find in the text of the document. For the convenience of the reader, I will give them here:
| Height / width mm | 510 | 870 | 1170 | 1320 | 1470 | 1770 | 2070 |
| 560 | + | + | |||||
| 860 | + | + | + | + | |||
| 1160 | + | + | + | + | |||
| 1460 | + | + | + | + | + | + | + |
| 1760 | + | + | + |
When choosing the number of sashes, it is worth remembering a simple rule: the width of the opening sash should not exceed 70-80 centimeters. Otherwise, under the weight of the double-glazed unit, it will inevitably sag over one or two years of operation and will overwrite the frame.
Another instruction is related to the location of the opening sash. In the tricuspid window, it should be in the middle; as an option, you can select a window with two opening sashes at the edges and one blind in the middle. Such a device of the window unit will give you the opportunity to wash the glass of the blind shutters outside without exposing yourself to danger of falling out of the window.
In my opinion, the choice of profile has a minimal impact on the performance of windows. All profiles currently offered on the Russian market are made of high-quality polyvinyl chloride, resistant to ultraviolet, low and high temperatures. The times when cheap Chinese plastic turned yellow and brittle a couple of years after installation were a thing of the past: nobody needs customer problems.
The only somewhat valid argument that can be made in favor of expensive profiles of German manufacturers (first of all, widely advertised by KBE and Rehau) is their somewhat higher stiffness and ability to withstand significant bending stress without deformation. However, rigidity is important only in very specific conditions - with a large area and in conditions of significant wind loads.
By the way: two panoramic windows in my attic (13 square meters each) are assembled on an inexpensive Chinese Hauteck profile. They perfectly tolerate the strong winter winds characteristic of Sevastopol. With strong gusts of wind, only a slight vibration of the glazing is noticeable.
When choosing a profile for a region with cold winters, you should pay attention to the number of isolated air chambers in it. The more of them, the less heat will be lost through the window frames due to air convection.
In my opinion, Siegenia-Aubi hardware is the most reliable. After a thoughtful study of the reviews, I opted for it and never regretted my choice. In addition to this manufacturer, Roto, Maco and Winkhaus fittings deserve flattering reviews.
When choosing a hardware kit, you should pay attention to several points related to its functionality:
The answer depends on the climate zone in which you live:
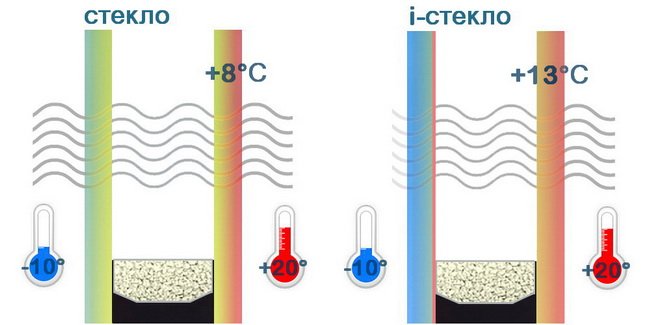
One of the glasses in it is supplied with a thin (only a few molecules thick) multilayer metal sputtering that reflects light in the infrared part of the spectrum (corresponding to thermal radiation).
What does it give:

Here are a couple of interesting facts related to its direct functions:
In addition: triple glazing is one and a half times heavier than double glazing, which means a greater load on the profile and faster sagging of the opening wings.
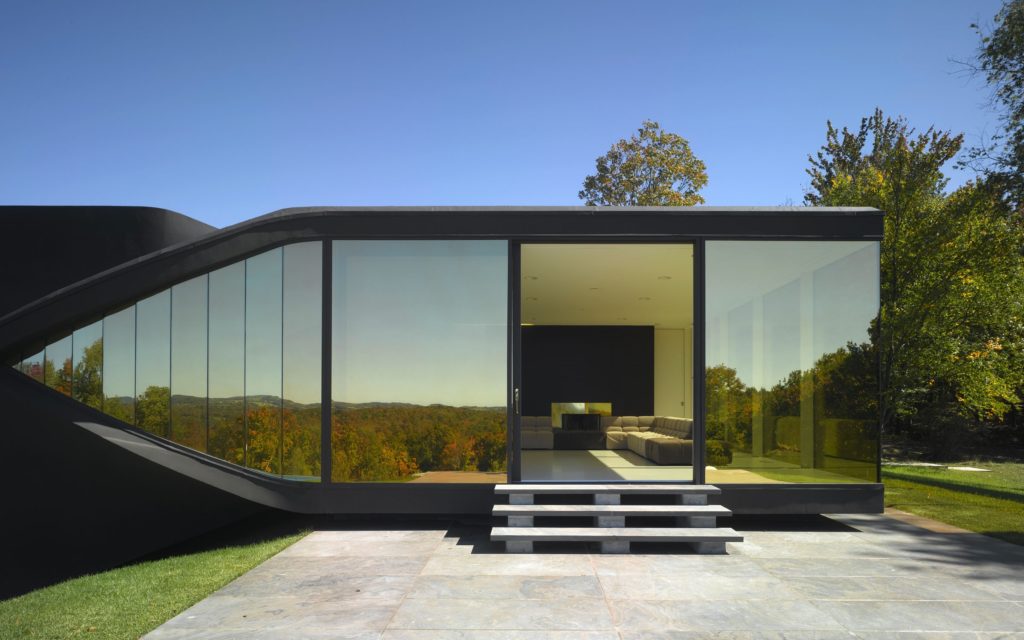
Light-protective glazing has limited permeability to light in the visible part of the spectrum. It is popular in regions with long sunny summers. A light-protective double-glazed window is also useful in a room with panoramic glazing on the south side of the house.
Mirror glass differs from light-shielding glass in that its translucency changes depending on the direction of light passage. Simply put, you can see the street from the house, but the interior of the house from the street is impossible to see.
Do not flatter yourself: mirror glazing is impervious to the view from the street only as long as it is lighter on it than in the house. In the evening, when the light is on, the picture changes.
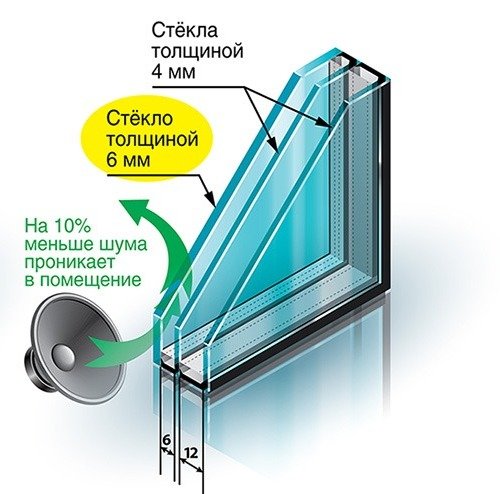
Soundproof glass unit combines several glasses of different thicknesses (usually 4 and 6 mm). The thickness of the distance frames separating the glass in the bag also varies. Thanks to this structure, glazing drowns out sound in the widest possible frequency spectrum.
Now - about how to insert a plastic window in a wooden house.
The installation technology is very different from the installation order of a window unit in a brick or panel house. The differences are due to the fact that wooden structures do not have constant dimensions and geometry:
From here follow the basic rules for installing windows:
If there is no opening in the wall, the window installation procedure is as follows:
The lower edge of the opening in the log house should not fall on the top of the crown, but on its middle. Agree that installing a window sill on a round log is quite problematic.

Hint: the correct installation of the window unit is possible only if there is a gap of 1.5 - 2 centimeters between it and the casing. Mounting on foam allows the joint to compensate for slight deformation of the walls and casing with fluctuations in temperature and humidity.
Replacing windows with plastic in a wooden house is usually carried out without replacing the pigtails: only the window unit is changed. If the casing is in good condition, it is enough to grind it with a grinder with a petal circle and re-treat it with protective impregnation with an antiseptic.
With a large wall thickness, the slopes of the opening need additional decoration. As a rule, they are closed with a wide board or typed from a wooden lining.
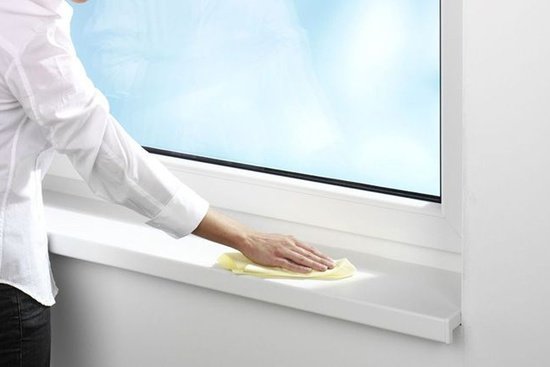
Everything is very simple. Only a rubber sealant is required for care, and then only twice a year: it is lubricated along the entire length with special silicone grease or ... ordinary castor oil, which can be bought at any pharmacy. Lubrication will prevent the rubber from drying out and cracking.

In addition: do not forget to translate the pinch rollers in the summer position in the spring, and in the winter - in the fall. Pressed in the warm season with excessive force, the sealant will quickly lose its original shape, and in winter it will pass through from under the sash.
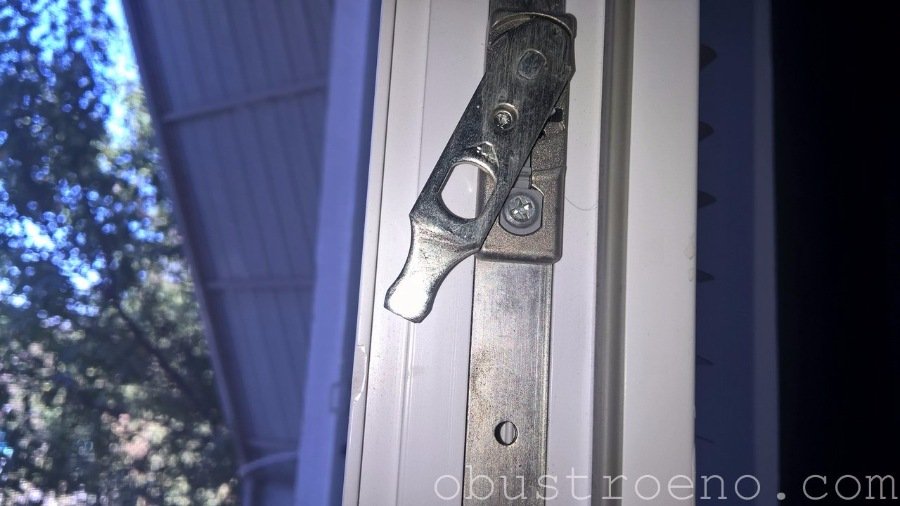
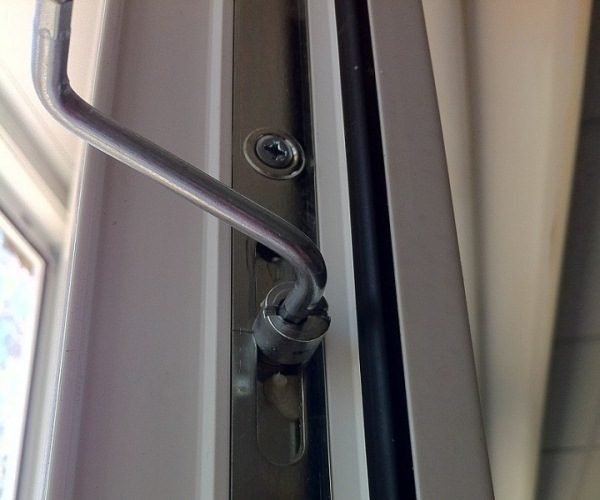
The adjusting screw responsible for changing the vertical position of the sash is located in the lower hinge. Screw head - for hexagon; A universal key with a set of hex keys can be found in any bike shop.
Another screw in the bottom hinge is located horizontally on the side of the sash. Its rotation will eliminate distortion or bring the sash closer to the frame from the side of the lock. The latter is necessary in the case when the pressure rollers in severe frosts ceased to cling to the counter parts of the lock due to a change in the linear dimensions of the sash.
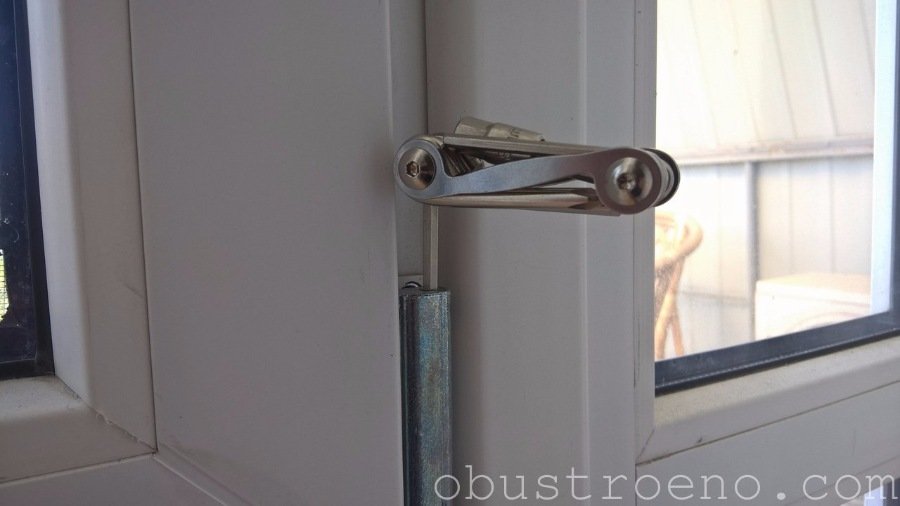
Easily. To do this, just buy a window retainer comb. The cost of this simple device is only 100 - 150 rubles.
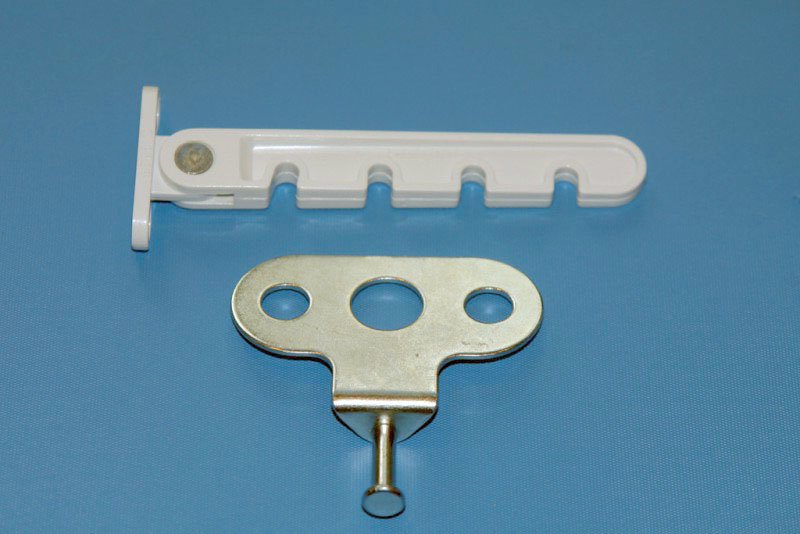
Window latch - comb.
Self-installation does not cause you any problems:
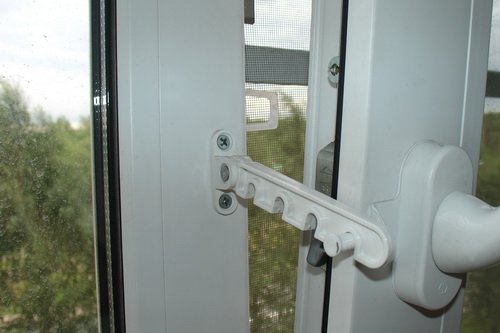
Yes, it’s easy:
How to insert a double-glazed window in a frame? Also very simple:
In the opening sash, the pads must be installed under the double-glazed window on the hinge side, as well as between the top of the bag and the side profile on the lock side. They are needed in order to eliminate skew and unload the profile of the bottom of the sash.
Hint: in her absence, you can use an ordinary hammer with a gasket from a bar or thick plywood.
For obvious reasons, in this case it is impossible to install a radiator in a window sill - it simply does not exist. But the problem has several other solutions:

I hope that my simple recommendations will help my dear reader to select and install windows in their own home. As usual, additional material can be found in the video in this article. I would appreciate your comments and additions. Good luck, comrades!
September 22, 2016If you want to express gratitude, add clarification or objection, ask the author something - add a comment or say thanks!
From internal pipelines, drains are transported by external ...
Each apartment, like every family, has its own characteristics, so it is difficult ...