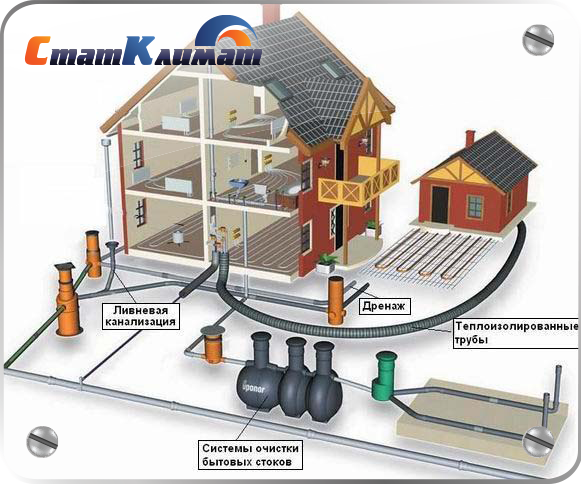
From internal pipelines, drains are transported by external ...
To produce decorative wood products, you need to use specialized equipment. This type of device has multifaceted characteristics in distinctive models, so you need to take into account individual preferences for choosing the best option. Modern manufacturers continue to improve the functionality of equipment from this category, which makes it possible to make an accurate choice. It is also necessary to determine the type of relevant materials, as this is a fundamental factor in the implementation of the main task.
The main advantage of devices operating on the basis of electricity consumption is efficiency. Users often come up with the question of which is better to choose, so you need to consider all aspects of existing offers. To compare indicators, we will take several models from leading manufacturers. High-quality wood carving with a jigsaw is the key to the implementation of the desired decorative details, but for this you need to take into account the characteristics of your device.
DeWalt DW331K
Woodcarving with a jigsaw arbor examples of work woodcarving lesson with a jigsaw
Trion PS-300
Makita 4351FCT
This craft needs certain knowledge, but even beginners will be able to cope with some tasks from this category. High-quality wood carving with a jigsaw primarily provides for a serious approach based on the use of safety standards and rules. These standards will also help achieve accuracy, which is considered a key aspect in working with wood. Given the reviews, which is better to choose an electric jigsaw, you can highlight some processing tips from experts:
Modern artistic wood carving with a jigsaw is performed on parts of a laminated or smooth surface, so the workpiece should be placed face down. It must be remembered that the diameter of the holes must correspond to the throughput capabilities of the used device web.
The current market for modern construction equipment offers multifaceted opportunities that allow you to achieve the desired quality result in the shortest possible time. Professional masters without fail have in their arsenal the latest developments, which confirms their reputation and is a kind of guarantee for customers. If you cannot independently decide on the choice of a suitable device, then you can consider the existing opinion of users or use the advice of understanding consultants.
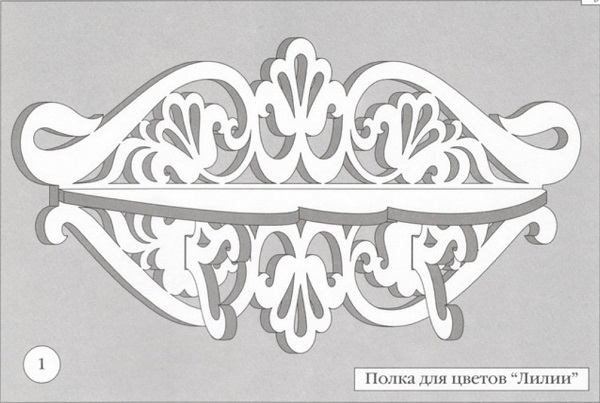
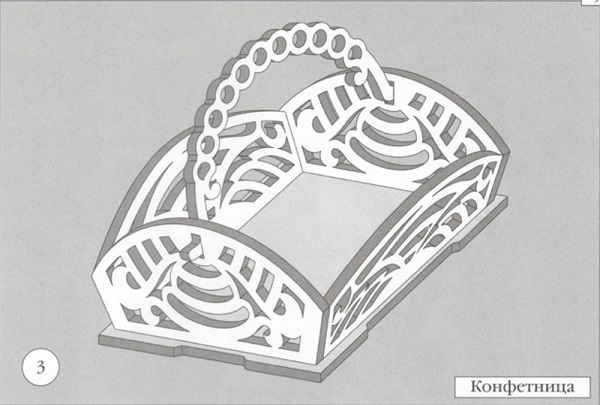
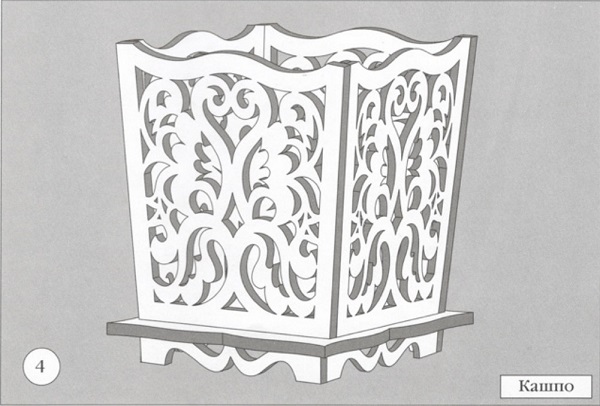
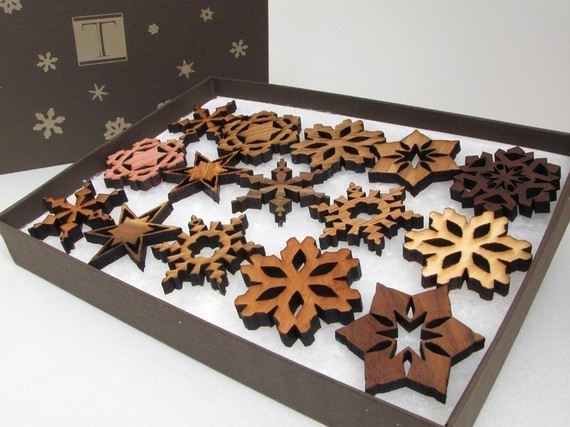
The album of drawings for sawing with a jigsaw contains sketches of finished prefabricated decorative products from plywood. Detailed drawings are presented for fifteen artistically decorative household items. Drawings of parts for cutting can be proportionally increased or decreased, while you get different sizes of the finished product. Examples of ornamental design of various elements of prefabricated products can be changed at one’s own discretion, which will make it possible to diversify the decorative attractiveness of the finished object. Be creative and imaginative. For a wide range of lovers decoratively.
ISBN 5-93357-037-0
1. Shelf for flowers “Lilies”
2. Shelf for flowers “Tulips”

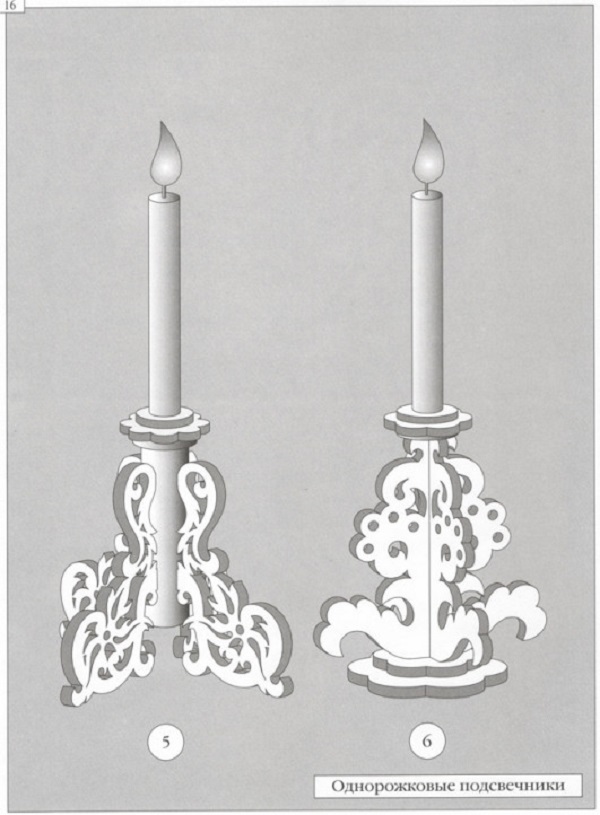

8. Stand for the Easter egg “Rooster”
9. Easter egg stand “Chicken”
10. Stand for the Easter egg “Bird”
11. The stand for the Easter egg “Horse”
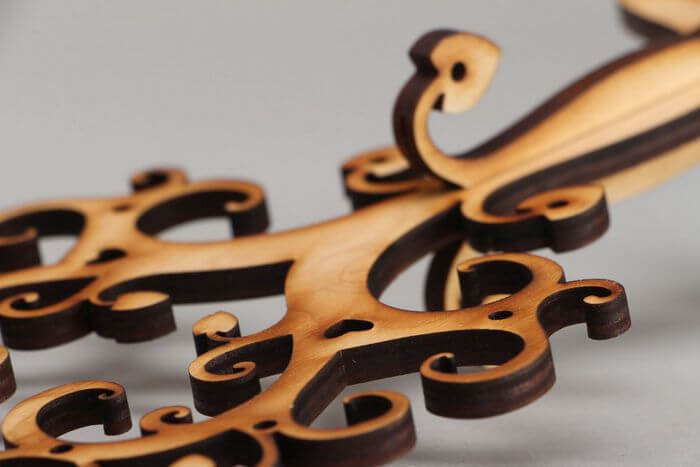
Openwork sawing ornamental carving is perhaps the most beautiful type of artistic processing of wood. The technique of cutting threads involves preliminary marking of a flat surface on which patterns are subsequently sawn with a jigsaw. The result is, as a rule, a beautiful openwork lace, although here everything depends only on the imagination of the master.
Unfortunately, today many people consider it more advisable to buy a finished craft than do it yourself. However, mass replicated production does not know such a thing as “exclusive”.
And many of us would like to put on the shelf something original that no one else has. And the most obvious solution is to make such a product yourself, which we will talk about in this article.
Probably, few in school years did not pick up a jigsaw in labor lessons. And those who not only held this tool, but also tried to cut something with it, were surely convinced that it was quite difficult to achieve high-quality crafts using a hand jigsaw. Only the most diligent and assiduous manages to become true masters of their craft.
Sawing out patterns of shapes from plywood, over time you will be able to move to more complex patterns that will require more accuracy in your work. However, in order to study all the subtleties of this craft, it is necessary to first learn the basic principles of work.
Advice!
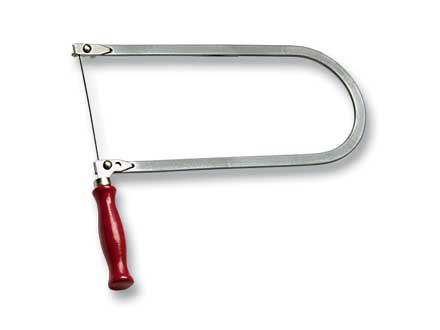
The metal frame may be tubular (in the form of a tube) or plate.
A tubular frame is preferable because it ensures uniform tension of the file.
In addition, the length of such a frame is greater, which ensures sawing more distant edges.
The wood frame has a screw for fixing the file. The metal frame has no screws.
Advice!
To ensure the quality of the metal frame, it should be checked for elasticity.
To do this, tighten it with both hands, holding it in this position for about two minutes, and then slowly release it.
If the distance between the clamps is restored - the frame is high-quality.
Advice!
When fixing the file on the jigsaw, make sure that the teeth “look” down.

Sawing work is carried out in several stages:

To avoid mistakes in cutting, the following instruction will help you:
In this article, we examined the basic principles of openwork cutting thread. With this knowledge, you can, with due diligence, cut out a picture of any complexity from plywood. In the video presented in this article, you will find additional information on this topic.
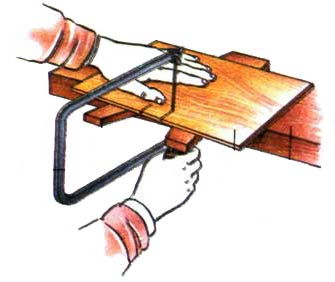
First of all, you should correctly organize your workspace. Despite the apparent formality - this is a very important condition. A properly equipped place provides not only comfort and convenience, which is important for many hours of work with a manual jigsaw, but also directly affects the quality of the project.
As a persistent design, a special machine-table is used, for which the name "dovetail" is fixed. It is a small rectangular board with a wedge-shaped cut that goes into the working field for sawing. Dovetail is attached to the edge of a table or workbench with a clamp.
They work with a manual jigsaw while sitting or standing, placing the workpiece for cutting at a level of 30-40 cm from the eyes. The light source is placed in front at an angle to the working plane. Compliance with these rules will allow you to control the cutting line as accurately as possible, thereby improving the quality of the project being cut.
Despite the simplicity of its design, modern hand jigsaws differ in a number of features that you should pay attention to when choosing. It is better to refuse models with a sheet iron frame by choosing a jigsaw made of a metal tube. This option provides the best tension of the blade and eliminates its skew, so that the file will not "lead away" in the process.

The file is fixed in the frame by tightening the upper and lower wing nuts. When choosing a jigsaw, pay attention that it is equipped with high-quality steel lamb with wide ears. This will significantly increase the usability of the tool in the process.
The file in the jigsaw is fixed strictly vertically, with its teeth down. The canvas must be tight. The degree of tension is regulated by compressing the frame: the tool rests on the edge of the table or squeezed by hand, then tighten the lamb, if necessary, pulling them with pliers. Straightened, the frame will ensure proper web tension.

For sawing small parts, figures with sharp contours and complex patterns on wood with a hand jigsaw, small files with a large number of teeth per inch are used. They do not jam in corners, creating a thin and accurate cut, without leaving chips. To create large products from plywood and long straight cuts, we use canvases with large teeth that cut much faster.
To get an accurate and accurate cut line, you must follow a number of basic rules:

Working with a manual jigsaw, it is not guided along the line of the pattern, but along the inside of the contour, since even the thinnest blade leaves a cut, the width of which should be taken into account. This is especially important when cutting products with a precise fit of elements, for example, or.
When finished, do not forget to loosen one of the clamps so that the jigsaw frame does not lose its elasticity.
The most intricate patterns are always based on a number of basic shapes and elements, having worked out which you will be prepared for complex projects. It is advisable to do this on thin plywood up to 3 mm thick.
Dull and Right Angles : the jigsaw moves smoothly without pressure on the workpiece, as if making idling; at this time, the second hand slowly turns the wooden blank to the desired angle.
Inner Circuit : for this, a small hole is drilled in the inside of the figure through which the file is passed. When cutting a circle, the cut line is drawn along the inner contour of the pattern. The tool stroke should be of medium intensity; the workpiece unfolds in proportion to the movements of the jigsaw.
Oval contour : sawing such a figure, increase the stroke of the jigsaw in steep sections, turning the workpiece in this place faster.
Sharp corners: An accurate sharp angle without chips and other defects is obtained by reducing two cuts.
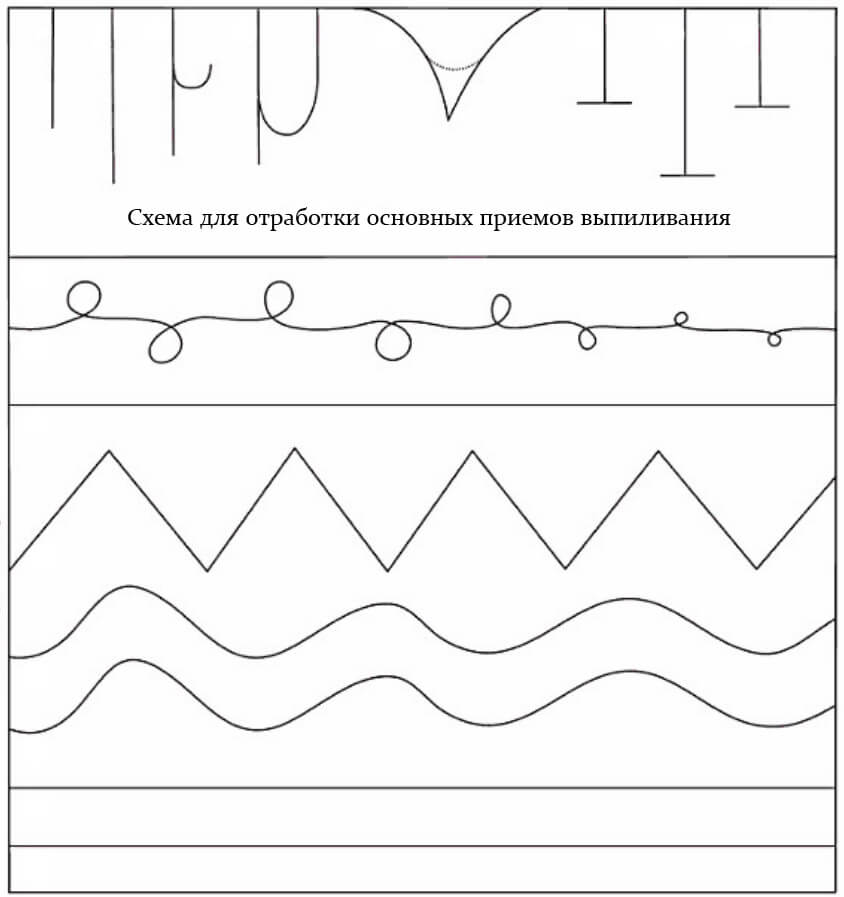
Advice! Sawing complex openwork patterns, start work from the center of the wooden blank, moving evenly to the periphery. This will greatly simplify the sawing process and will avoid breaking fragile work at the finishing stage.
You felt the jigsaw well, achieved a smooth ride and lead a neat cut line, but here the movement of the tool is hindered and the file wedges in the workpiece. This is a typical situation that occurs when carving with a plywood jigsaw. It occurs for the following reasons:
Practice shows that the best material for working with a hand jigsaw is birch plywood from 2 to 8 mm thick. It is affordable, easy to use and highly durable.
To create small details or a "dense" openwork pattern, it is more appropriate to use three-layer plywood up to 3 mm thick. It is easy to saw and at the same time it is quite durable. The likelihood that you will ruin the sawn curl the next time you jam the canvas - much lower.
When choosing material for crafts, pay attention to the fact that plywood is even and without a large number of knots. Examine the end face for the presence of air chambers, their presence indicates an uneven application of glue. It is better to refuse such low-grade plywood, otherwise you cannot avoid a large number of chips that will spoil the appearance of the product.
For all its practicality, plywood does not have such an expressive texture as a board. Sawing projects from the boards, you can use these advantages: play on the difference in colors and shades, the orientation of wood fibers (as in intarsia), etc. Crafts made of wood have a more attractive end (without a puff structure like plywood) and they are much easier to process with a finishing composition.

For cutting with a hand jigsaw, workpieces of soft and hard rocks up to 10 mm thick are used. When choosing material, give preference to tangential cut boards. Radial cut blanks are not recommended, as they have parallel annual rings that, due to their hardness, will remove the jigsaw when sawing.
The number and size of chips depends on the type of plywood used, the quality of the blade and how correctly the master saws. A few tips and professional tricks will help to cut with a manual jigsaw without chips:
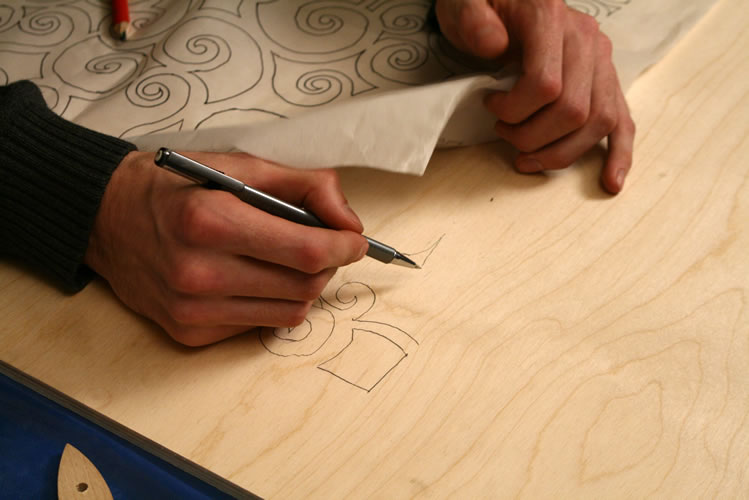
There are several convenient options for transferring a printed drawing to a wooden base:
From internal pipelines, drains are transported by external ...
Each apartment, like every family, has its own characteristics, so it is difficult ...