From internal pipelines, drains are transported by external ...

In the store you can buy wooden window structures, PVC windows and aluminum profiles. Each of the materials has its own characteristics that can satisfy any customer requirements. But if we are talking about a window for a summer residence, then the most suitable option would be a wooden frame. Such a wooden window frame can be made in the presence of the necessary materials and tools, as well as in compliance with the technology. Work must be done carefully and accurately so that all geometric dimensions are clearly observed. The window will last a long time.
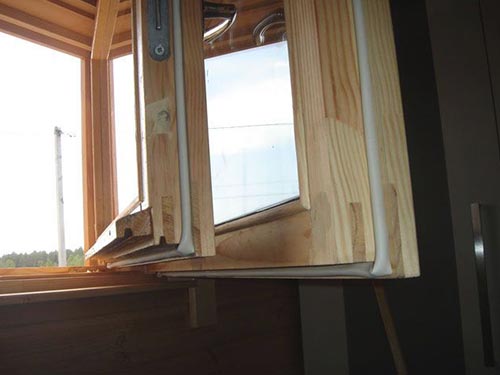
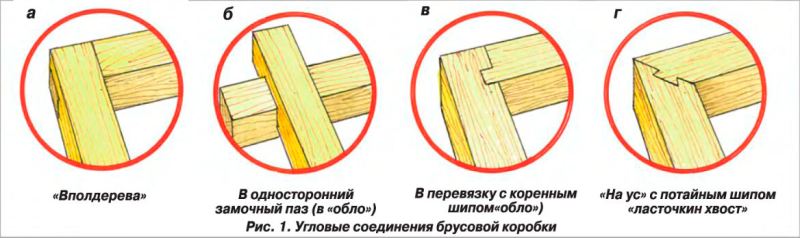
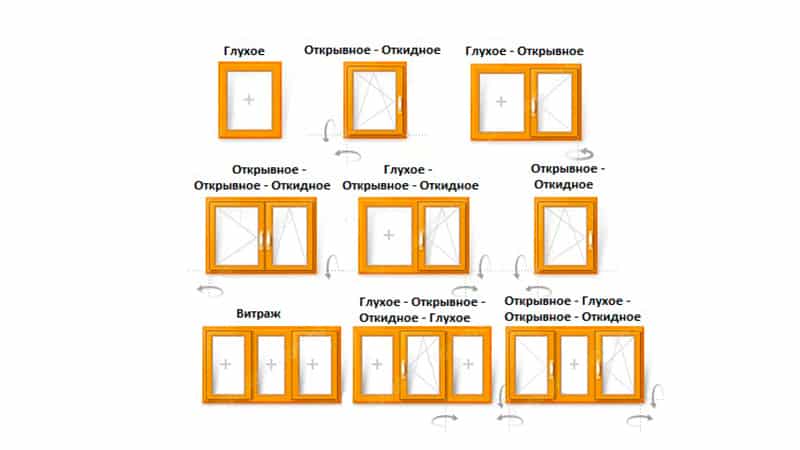
Structurally, a wooden frame can be made of several modifications:
In this case, in option 1, a window can be provided that will perform the ventilation function more efficiently than the sash.
The wooden frame can be made of any wood species. It all depends on personal preferences, skills in wood processing. The strongest and most durable breed is oak. Moreover, it is quite difficult to process and is an expensive material. Among other species that are most often used for the manufacture of wooden frames, birch, ash, pine, larch are known.
In order for the wooden frame to be strong and reliable, it is not necessary to take solid bars or boards. A very suitable material is glued beams. It is designed in such a way that it does not shrink during operation. This indicates a greater reliability and durability of this material.
As an alternative to wood, plywood sheets are used for the manufacture of a window wooden frame. It has sufficient strength and reliability, which allows its use as a source material.
The wooden frame can be assembled using the following tools:
Back to the table of contents
Before the wooden frame will be assembled, it is necessary to treat the bars with a special antiseptic composition. Thanks to this, the frame will last longer, since the wood will be protected from the formation of fungi and moisture.
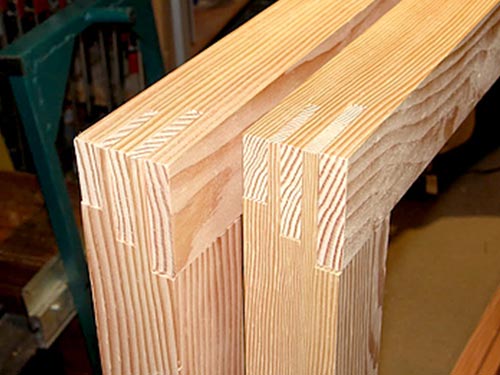
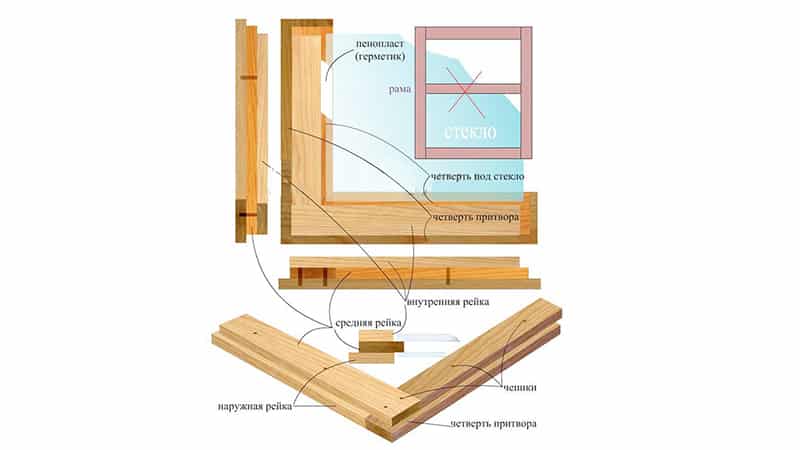
Do-it-yourself frame making begins with the box. A slit is made in a board 50x150 mm in size so that a configuration in the form of the letter “G” is formed. This will ensure the tightness of the window. Next, divide it into 4 identical parts. They are fastened together by means of a tongue-and-groove connection. That is, on one of the parts a groove is sawn, and on the other a tenon is sawn. These 2 connection elements must be carefully dimensioned so that the spike enters the groove without gaps, stretching. This will ensure a secure fit.
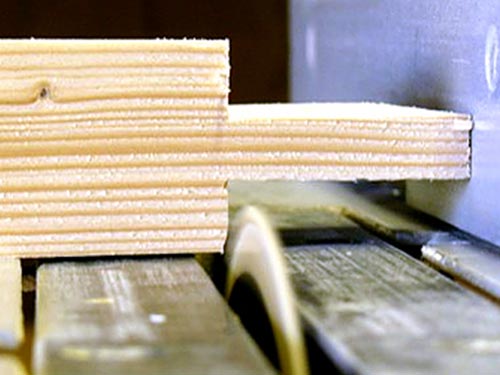
The groove is performed using a circular saw, which make cuts. And the excess is removed with a chisel and a hammer. The spike can be made with both a hand saw and a circular saw, with a certain skill. Grooves should be made on the details of the frame, which are located vertically. On horizontal - spike is cut.
After preliminary assembly of the box elements, it is disassembled. Joiner glue is carefully applied to the fasteners. Then they are connected, strictly observing the geometric angle of 90 °. This can be controlled using a square.
After that, corners of metal are inserted at the end angles. They will provide the box with additional rigidity. Further work can only be done after the glue has completely dried.

The window wooden frame is made of timber with a section of 50x50 mm. From it you should cut the profile according to the design of the window. It will differ depending on the size and size of the glasses that will be inserted next, the width of the glazing bead. Wherein dimensions frames should be such that when it is inserted into the box, a gap of 1-2 mm is maintained. The profile is performed using an electric or manual planer. The resulting notches should be sanded with a machine or sandpaper.
The blanks of the wooden frame are fastened together like a box, that is, a thorn-groove connection is used. For reliability and rigidity glued. On the outside, at the corners, metal corners can be screwed, which, in addition to decorative purposes, will increase the rigidity of the structure.
After that, the wooden frame and box can be coated with stain and varnish, if you want to preserve and emphasize the texture of the wood, or paint. Hinges are screwed on the window frame and the box, which serve as a connection between these parts. After inserting the glasses, the frame can be hung on prepared hinges.
Wooden windows have always been popular due to such positive properties of wood as: high heat-saving characteristics, environmental friendliness and durability.
One of the advantages is also that manufacturing wooden windows do-it-yourself task is quite doable even for the layman.
Of course, now they use metal-plastic ones, which are cheaper and also have their indisputable advantages, but still wooden windows are a classic and they will always be popular.
The most popular material for the manufacture of wooden window cases in our latitudes is pine. It is distinguished by availability, low price and practicality. Oak is superior to pine in material characteristics, but it is more expensive and therefore, for the first time, it is better to stay on pine windows.
Process of creation
The basic requirements for the board are as follows. Firstly, it should be well dried, and secondly, not have knots and deformations. These conditions are important, since the box will experience the main load, so its strength should not be in doubt.
The manufacturing technology of wooden windows with their own hands, involves the use of glued beams for the implementation of the box. In this case, the box has the most robust design. Glued beam is the compilation of individual boards in packages and gluing them on a plane. Boards in our case will be made of pine.
The size of the board is taken 15 * 5 cm. They are connected together by gluing. Then four holes are drilled and wooden pins are inserted into them. Such a connection will provide structural rigidity. In the opening, the box is installed motionless, using self-tapping screws and dowels and then, the cracks between the opening and the box are blown polyurethane foam.
We need to briefly dwell on the tool that will be needed to make the window.
If the window will be made for a summer residence in which you do not live in the autumn-winter period, it will be enough to limit yourself to a thin double-glazed window.
Window frames
Helpful information:
Pay attention to inexpensive windows made of wood "Red Hill": a frame of two-layer glued beams (pine) 57x60 mm, single-chamber double-glazed window.
If you decide to manufacture wooden windows with double-glazed windows, then you need to start with the design of the window frame. The minimum beam that you will need in order to make a frame should be 6 * 4 cm and will depend on the thickness of the window.
The profile for one window pane should have two rectangular folds, and the window with two panes should have one more. Frame production begins with a thorough processing of the timber. Then, using the thicknesser, we do all the markings, after which we begin the device of folds (grooves).
The manufacture of folds is carried out so that when the frame is already assembled, they are in the same plane. Otherwise, the glass will be poorly sealed. In general, the dimensions of the grooves depend on the thickness of the glass and the type of sealant.
Note!
If putty is used as a seal, the folds have a smaller width than when using glazing beads.
It must be remembered that strongly narrowed folds will let wind through. The thickness of the grooves is also affected by the width of the strapping beam.
The window frame is assembled so that the spikes fit snugly into the grooves. For a tighter connection, a spike should be installed. To do this, you must first drill a hole along the diameter of the tenon and grease it with glue.
In addition, at the end of the frame boards, to improve the connection, you can use the key. Her appearance will resemble a double dovetail. To do this, at each of the ends to be connected, a hole is made in the form of a trapezoid, into which a key is then inserted. Before finishing the assembly, the joints are lubricated with glue, and after assembly, the remaining glue must be cleaned with a knife. In the manufacture of a window with a sash, the installation of accessories will be added to the above works.
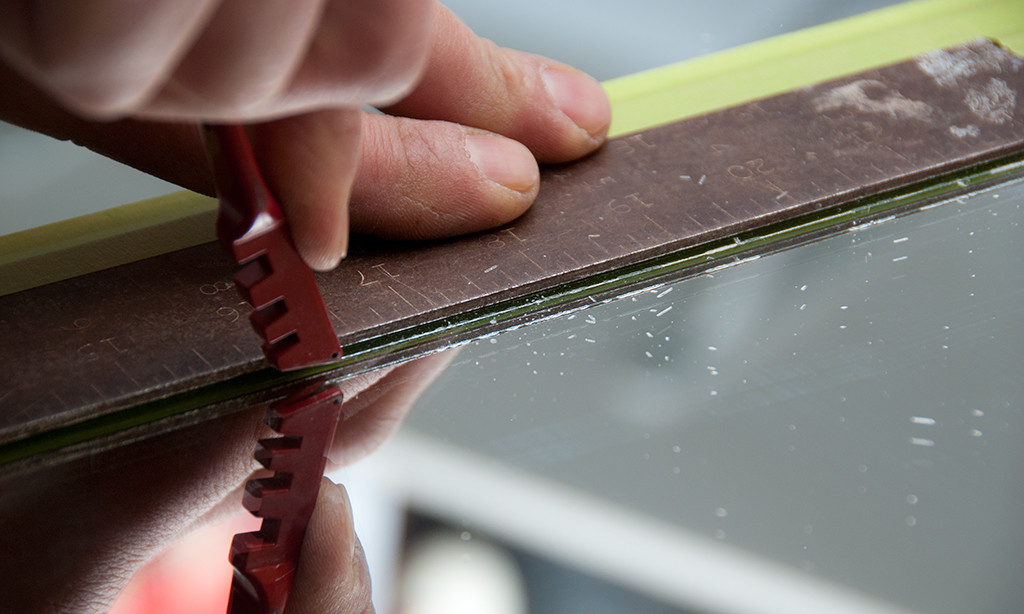
To prevent the window from being blown, carefully adjust the glass to fit the frame. To do this, you need to carry out its cutting with a diamond glass cutter. Before work, for safety, you need to wear glasses to prevent glass chips from getting into the eye and mittens, so as not to cut your hands. Glass cutting is carried out with a ruler, which should exceed the length of the glass. After we have drawn the line with a glass cutter, we move the glass to the edge of the table and break off the excess with the help of pressure. Glass should break off by cutting.
Everyone who has an idea of \u200b\u200bhow to make wooden windows should know how to correctly insert a window into the frame. First, let's try chopped glass by inserting it into the frame. If the glass is cut correctly, then pull it out and begin to prepare folds.
To do this, they need to apply sealant and insert glass into the frame. We fix the glass with the upper glazing bead and fix it with a thin clove. When using a larger glazing bead, for its fastening to the frame, self-tapping screws can be used.
In the manufacture of windows, which consist of two halves, one more beam is installed in the center, with the same grooves. One half of the window is made with a thinner frame and attached to the main one using hinges. In addition, a handle is attached to such a frame, and a groove for the closing mechanism is cut out.

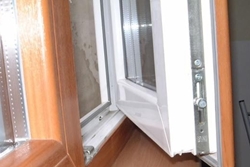
Double wooden window
Window leaves in wooden windows are an integral part and can be of several types: mortise, cut and sliding. The latter represent a rather complex mechanism and it is difficult to carry them out independently. The first option is made together with the window frame and maximum precision is needed here.
The best option for window leaves in wooden windows are split, which are made separately from the window, and then, ready-made, inserted into the frame.
Note!
When manufacturing a split window, it is not required to use any special fasteners or special skills during execution.
The manufacturing technology of such windows is slightly different from the mounting order of the window itself, only for smaller sizes. The difference is in mounting the opening mechanism, which usually represents the hinges, and attaching additional accessories, in the form of a handle with a closing device.
After completing all the work, the manufacturing technology involves lubricating the window surfaces with an antiseptic. After that, the window is placed in the opening and fastened in the grooves. Then we mount with screws that pass through the box and fasten them to concrete. Holes in concrete are made, most often, using an assembly gun.
After we fixed the window, we blow the cracks out with sealant. It is necessary to wait for it to dry, and then plaster the places of sealing. Work is being completed by mounting the ebb and window sill. Thus, it can be seen that making a wooden window with your own hands is not an impossible task, and this distinguishes them from metal-plastic windows.
Modern windows are distinguished by an enviable variety of materials, colors and shapes. Various manufacturers offer frames made of plastic, aluminum, wood. Thanks to new equipment and tools, the windows are airtight, durable and practical, since they do not require special care.
Plastic windows
However, there is such a huge selection and a negative point: the cost of purchased windows is quite high.
That is why many craftsmen are increasingly asking themselves how to make a window frame with their own hands.
After all, in order to glaze a small greenhouse, a porch in the country or a balcony, an ordinary wooden structure is enough to protect it from dust and wind.
Before you start carpentry, be sure to stock up on all the necessary tools or materials.
Do-it-yourself wooden frames with your own hands will require completely dried or glued wood to make. Variants are also possible when the wood is replaced by ordinary plywood.
As for the carpentry tool, for starters it is quite possible to do with the most elementary and simple things:
In addition to wood, timber or plywood, of course, you will need glass, carpentry glue, metal corners, a drawing of the future window. If you have chosen boards as the main material, it is best to purchase them with a cross section of 50 by 150 mm. The “golden section” of the beam for the future window is a 50 by 50 mm beam.
If everything is ready, then you can start making wooden frames with your own hands.
Joiner's tool
Glued wooden beam is a reliable, durable and lightweight material. It is not amenable to deformation and is often used in construction.
An ordinary beam is also suitable for the frame, only the probability that such a frame will lose shape under the influence of precipitation and temperature is much higher.
Although you should not forget that wooden structures can be treated with a special protective compound.
Manufacturing technology of window frames includes:
We make the windows ourselves
Since the factory frames have a rather complicated profile, it is very problematic to repeat it at home. This will require not only a professional tool, but also special equipment. It does not make sense to acquire all this for the manufacture of a simple construction. That is why ordinary craftsmen invented their own way to create a profile for the window frame: fastening strips of plywood.
For such a plywood frame, four strips are sufficient, from which a rectangle is then fastened. To make the desired profile, several rectangles are made together, made of plywood strips of different widths. This is the technology for manufacturing window frames.
Do not forget the common rule: it’s better to measure it several times than to ruin it once. If you are new to this issue, be sure to double-check your measurements several times.
Thus, the result of the efforts will be a layered beam needs configuration.
Using this method, both a regular, blank frame and a window with two or three glasses are made. A frame with one glass is easily made of eight plywood strips forming two rectangles. P the flakes of the second layer should be smaller than the width: this will make it possible to subsequently fix the glass to the frame.

Fasten the handle
Finished parts are connected using self-tapping screws. For designs with several glasses, it is better to coat all parts with carpentry glue. Then such a frame will serve its master for more than one year.
Despite the abundance of tips, the question of how to make wooden window frames yourself, each self-taught carpenter can decide for himself. It is not in vain that they say that each product remembers the hands of its master and often serves much longer than a thing bought in an ordinary store.
The advantages of plastic over wooden windows are now considered quite obvious. But the simplicity of manufacture and installation does not mean quality and comfort.
Eliminated from the ability to breathe, plastic double-glazed windows often create conditions unfavorable to health. In addition, asphyxiating air does not become cleaner even after airing rooms with a double-glazed window.
Wooden windows, in turn, also have a number of disadvantages, the most important of which is exposure to moisture. But with proper care, a wooden window can serve for a long time and, due to its environmental friendliness and the ability to breathe, the tenants of a wooden or other house to stay in a more pleasant condition.
Wooden windows have an important advantage - environmental friendliness and naturalness
How can I make a high-quality wooden window with my own hands? To do this, you need to adhere to a simple plan, as well as have some skills in working with tools for woodworking. The manufacture of windows of the simplest form has a memorable step by step character.
Before you make a new wooden window, you should prepare a number of tools, among which there will be a screwdriver and drill, a hammer with a set of chisels and chisels, as well as an electric planer. If there are no ready-made glasses for the window, then you will also have to get a glass cutter. In addition, rulers and other small appliances will be needed.
From the materials you should take the wood itself, screws, window hinges, as well as a sheet of glass.
The main task at the first preparatory stage of the wizard is to create a drawing. Sketches or drawings should contain the clear dimensions of each window element.
When they are created, it is usually done on a scale with observance of all relative distances. Incorrectly designed diagrams can lead to senseless waste of materials or premature destruction of the window.
When buying lumber, it’s worth everything to already purchase them with a margin, so that is enough. If you plan to make more than one window, it is better to make one probe and then proceed from the number of materials that in fact went into the manufacture of one window with your own hands.
Wooden blanks for wooden window parts should be made of wood, which is best suited for this. Often pine windows are used for windows, as they are easy to process and quite resistant to moisture. Oak materials are also often used.
Requirements for lumber:
Individual parts and blanks are made according to the drawing. This must be done using conventional cutting tools - a jigsaw, a saw. Finished parts are best sanded.
In some cases, instead of solid wood, glued beams can also be used. Their main feature is that due to the glued structure, the bars from many layers remain sufficiently stable and do not deform for a long time.
The basic size of the raw material for creating a box of a conventional wooden window is a board with a section of 150 by 50 millimeters. The box consists of four boards, which are interconnected by means of grooves and spikes made with a mill or chisels. They are made dense so that they are hard enough to enter into each other. In this case, all 4 parts of the box must be connected to each other strictly perpendicularly.
The strength of the finished structure depends on the strength of the connection.
In order for the tongue-and-groove connection to gain greater strength, it is stitched through with the help of a wooden rod, under which a separate hole is drilled.
The finished base of the wooden window is installed in the window opening, and the gaps between the box and the walls are foamed with foam. It is worth noting that too large gaps between the walls and the duct cannot be filled with foam alone, since a layer of foam more than 5 centimeters can deform the duct. Therefore, it is advisable to make a window opening of optimal size with a margin of up to 5 centimeters.
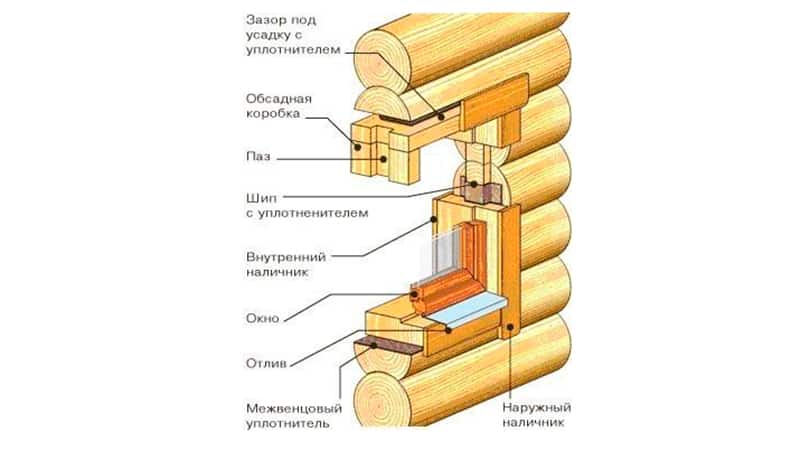
In the case of wooden buildings and walls made of timber or wooden log cabins, a small box is also used, the production of which has its own characteristics.
Before you make a frame, you need to determine the base material for it. Window frames are made of beams with a section of 50 by 50 millimeters. The manufacture of window frames provides one of two processing options - you can make both 1-glass and 2-glass profiles, which have 2 or 3 grooves, respectively (one for each glass insert and one for the box).
The grooves, as a rule, have a recess for sheets of glass with a height of 10 millimeters and a width of 14 millimeters. The bead that will fix the glass has a width of 10 millimeters (when calculated on glass with a thickness of 4 millimeters). The groove for the box is a little larger and has a cross section of 15 by 20 millimeters.
Making wooden windows with your own hands is generally a simple process, as well as assembling the most complex part (frame) of them. First, the window frames are assembled from wood, similar to the way the box was assembled. Their elements are connected using spikes and grooves, which are glued with glue.
Sometimes the frames are additionally fastened with metal corners (using self-tapping screws). Although the corners provide additional structural strength, they adversely affect their static appearance.
Even if all the dimensions of a wooden window with your own hands, frames and glass openings are known in advance, you still need to measure the glass before cutting. This is important to know in fact, since a deviation of even 1 millimeter can cause a window to blow through.
If you accurately measure and cut off the glass, then this will provide a sufficiently high density of its connection with the base of the frame.
Working with a glass cutter requires skill and experience.
To cut glass, a glass cutter is used, the technique of work with which also needs to be mastered. If there are no skills in working with cutting glass, then it is better to ask a specialist about this or purchase a glass of the right size in a store, where it can be cut immediately by the specified standards.
The edges of the glass are sharp enough, and therefore they need to be processed with sandpaper.
If the glass is processed independently, it is very important to adhere to safety precautions, the instruction for which has several important points. Firstly, you need to use special gloves with rubber pads, since even the smallest pieces of glass can injure your hands. Secondly, it is desirable to protect the face with a mask, as well as glasses.
Before you start cutting the base sheet, make a few preliminary cuts to determine the optimal pressure on the glass cutter.
When cutting glass, you need to press it with optimal force. If not enough, then a poor-quality cut will lead to the appearance of chips on it. In another case, excessive application of force will cause the glass to crack, which will not only damage the glass, but also be fraught with injuries and cuts.
When cutting, the glass cutter is held along the ruler, which can be made of almost any material. You can also use a regular bar as a ruler.
After cutting, the glass is stacked in the window frame, fixed with glazing beads. Preliminary, a sealant is applied to the wood.
A window made of wood, mounted box. For this, self-tapping screws or window hinges are used. After this, the window sill is installed.
The simplest self-made window will provide the house with warmth and comfort, as well as inexpensive.
If necessary, you can make several such windows and install them in a box on the outside and inside. Thus, it is easy to provide additional insulation for the winter.
With your own hands, you can create almost any device or element of the house that will become a reason for joy. After all, even a wooden window can not only replace plastic double-glazed window, but also to become a good test for the suitability of a beginner joiner.
Modern windows for the most part are double-glazed windows, consisting of prefabricated panels. These windows are easy to use, but they also have some disadvantages. So, for example, if one of the glasses is accidentally broken, it will be very difficult to replace it, especially if it has a non-standard size. In addition, companies that produce double-glazed windows often close, and many models, when it comes to replacing glass, are discontinued.
Those who are interested in how to make wooden windows themselves, photos and detailed instructionsposted on this page are very useful. The photograph shown below shows a real home-made double-glazed window, for the manufacture of which neither special skills nor significant financial investments are required. If glass breaks in such a double-glazed window, it can be easily found in any building store, and if condensation collects between the glasses, it will be enough to change the sealant and replenish the desiccant.
Double-glazed windows having an air gap not filled with any noble gas, due to the circulation of air flows between the glasses, suffer significant convective losses. Noble gases have a large mass, which significantly slows down the diffusion. But on the other hand, the gas tends to get lost as the double-glazed window ages, and in a bag filled with air, you can add a desiccant and change the sealant without any special devices.
The most common material from which wooden frames for windows are made is pine, which today is considered the most practical, inexpensive and affordable wood. A sensible substitute for pine wood is oak wood, but for the first time in their life craftsmen making wooden windows, it is better to choose less expensive species of trees. Wooden beams for wooden windows must be dried according to all the rules, and in addition, they should not have any knots, no cracks or other damage. It is important to remember that the boxes, when they are fixed in the window opening, take on the main mechanical load. If glued beam will be used for the manufacture of all elements, then its strength will be sufficient to withstand deforming loads.
Tools for the job to be needed
If, for example, a board 150x50 mm is used for the manufacture of the box, then in the blanks for it it will be necessary to make a groove 15 mm deep in the form of the letter G. For the block, you need to make four blanks, and then connect them using glue (preferably carpentry) and additionally drill holes in the right places and insert a three-centimeter rod made of wood, which will provide the connection at a right angle with immobility and the necessary rigidity.
The finished box is fixedly fixed in the prepared window opening. To do this, drill holes in the wall, drive in the dowels and fasten the finished structure with screws. If there are gaps between the finished block and the walls, they must be sealed with construction foam. It should be remembered that during the installation of the box does not take into account the mobility that it can acquire during temperature extremes.
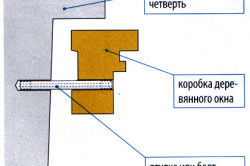
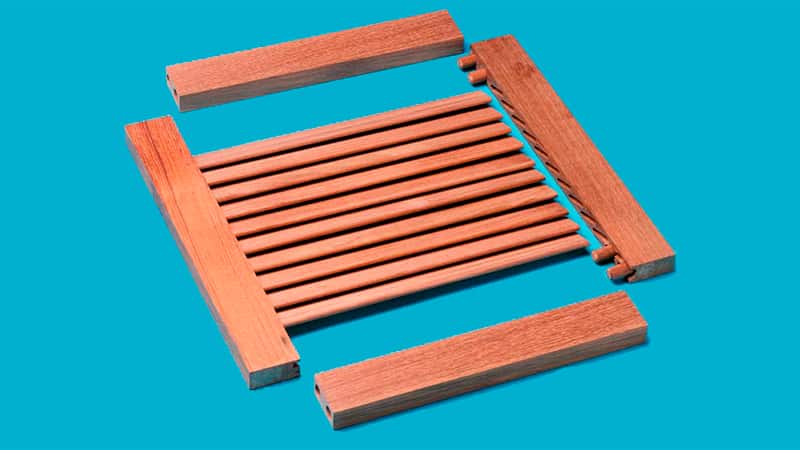
The main feature of the project presented here is a window cover, bursting with glass and providing free space for the sealant and wooden glazing beads that hold the glass.
For those who are going to make windows with their own hands from wood, the drawings presented on this page show how to make a frame for ten-mill glazing beads that will securely hold four-millimeter glass. The gap between the glasses is about 1 cm, while the metal parts bursting them are not used. It should be borne in mind that a sealant for wooden windows whose width is equal to the width of the glass will not be the best option for such a design: it is better if the cross-section of the sealant is equal to the groove section.

Making a box for a window
The best sealant is material that does not suffer from exposure to sunlight. Often a silicone sealant is used for this, but it should be noted that it is not suitable for such purposes, since it is difficult to remove from the glass surface. You can make a frame from pine wood, or you can use white oak wood or other blanks. Before cutting the material for the window frame, carefully measure the perimeter of the window opening and increase the result by another 10%.
To assemble the binding shown here, you will need to cut the material at an angle. Joints made up of grooves and spikes hold the structure tighter, but continuous grooves are better for sealing. To connect the parts of the frame to each other, it is best to use screws with a flat head and coarse thread. Flat head screws are best threaded into special holes.
DIY window frame assembly
The process of cutting glass is in fact not complicated, but it is important to take into account some of its nuances. First of all, you should take care of safety precautions: reliably protect your eyes and hands from possible surprises. Glass must be strong and completely intact. Before cutting, the glass is thoroughly cleaned and then greased with a small amount of fat.
Experienced craftsmen advise you to always cut glass in one cut. When you click on the glass, a sound is heard, after which the glass is shifted to the very edge of the working surface and click on it. To make such a double-glazed window, as discussed here, it is necessary to make measurements with an accuracy of millimeter.
The edges of the glass after cutting are processed for polishing with sandpaper.
First, the glass for fitting is inserted into the frame, and then the sealant is removed and put in its place. Glass is placed back into the frame and wooden glazing beads are installed for the windows, and then the window is painted and equipped with handles.
When joining glazing beads, the screws must be tightened slowly, starting from their middle. This is necessary in order to prevent too strong pressure on the fragile corners of the frame.
Based on the fact that, if necessary, the window should be easily repairable, it is not necessary to paint over the caps of used screws, but many prefer that they are not visible. An ideal way to hide the screws has not yet been found, so everyone chooses what suits him best.
We install a window frame into the house from a bar
A drier must be placed between the panes. To do this, add a hole at the top of the sash, which is later caulked with a wooden pin. If you have a compressor on hand, you can fill the gap between the windows with dry air. The pins are painted with paint before installing the window and repeat this procedure after it.
The window mentioned here does not fog up even after a year, and if you need to replace the glass, then this will not cause too much difficulty. Such windows can be installed even in rooms with high humidity (that is, in the bathroom or in the kitchen).
Screw holes can be covered with decorative handles. Using standard screws, you can also scrape paint out of their grooves.
For reliable sealing, experienced craftsmen insert glass, having previously applied sealants to the joints of the joints. To make the window more resistant to weather conditions, after the sealant dries, put a window putty on top of it. It is important to know that some modern fillings can be difficult to remove from glass, so it is much easier to work with traditional window fillings.
It is best to paint the windows a few days after the putty is applied.
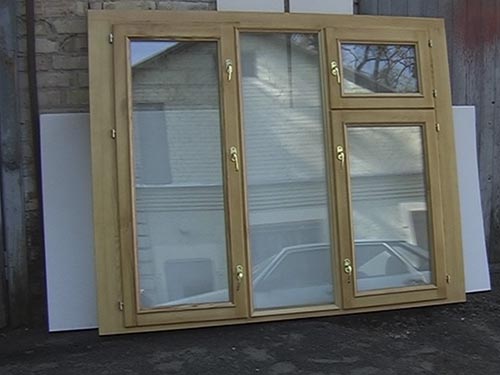
Options for wooden windows
For the manufacture of laminated window blocks, specialized technologies are used. A special film is applied to the plastic profile, which is attached to the surface with glue. The film consists of several layers embossed on its surface, and in order to apply it to a plastic surface, it is necessary to use laminating equipment.
Lamination is necessary not only to make windows look more aesthetically pleasing: in this way they become more resistant to all kinds of atmospheric phenomena and durable and remain extremely easy to clean. There is a film whose surface resembles natural wood. On such a decorative film, dust and dirt are practically invisible, therefore plastic windowslaminated wood-like, photos of which can be seen below, are incredibly practical.
In addition, film-coated windows are resistant to temperature fluctuations and weather conditions. The construction covered with a PVC film is not sensitive to atmospheric precipitation, and the film itself retains its color even under prolonged exposure to sunlight.
Another indisputable advantage of laminating with PVC film is the wide range of its colors and textures, among which there is a suitable option for any occasion.
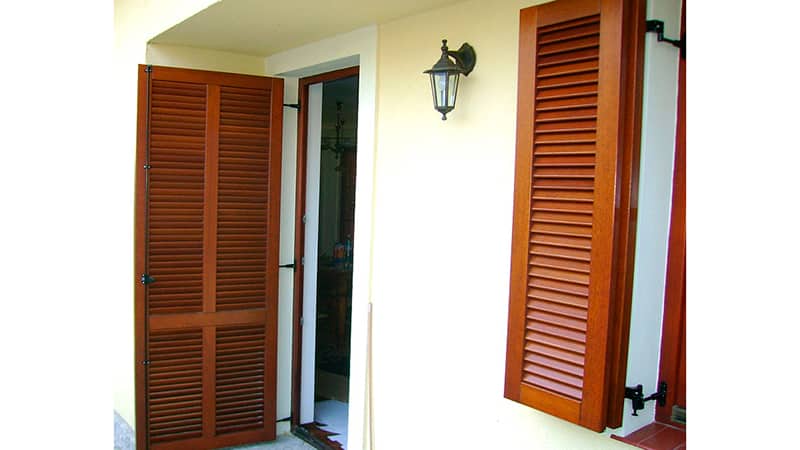
After installing the shutters, the room becomes additionally protected from cold and atmospheric phenomena. Wooden window shutters, photos of which can be viewed at the end of the page, are made external or internal, and according to their structure, they are single or double-winged, panel or paneled. Anyone can make such shutters on their own.
Variant of design is placed on the windows.
To make window shutters from wood, you will need boards with a width of 100-200 mm and a thickness of more than 20 mm. Veneered boards made of hardwood are considered the most suitable, but a smooth fugue is also quite suitable.
In addition, you will need to take care of the availability of tools for processing wood: hacksaws, drills, screwdrivers, planers, chisels, etc. Measuring tools will also be required: level, tape measure and carpentry corner. For the final stage of work, you need to purchase drying oil, brushes and paint, as well as an antiseptic.
Window Shutter Assembly
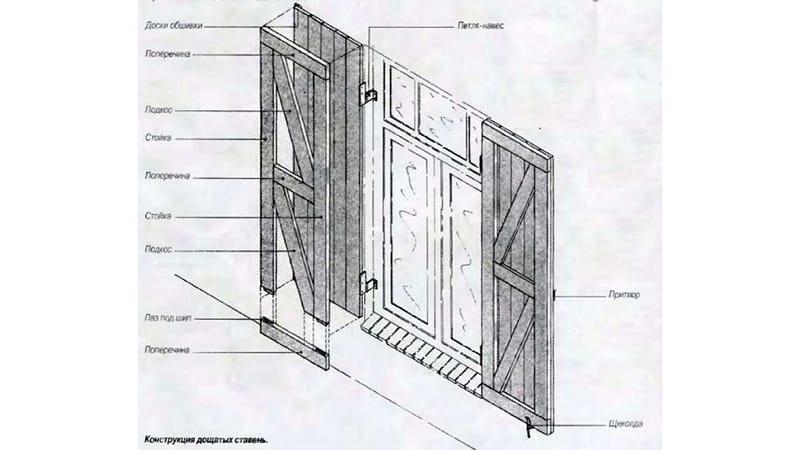
How to make ordinary shutters from boards
From internal pipelines, drains are transported by external ...
Each apartment, like every family, has its own characteristics, so it is difficult ...