From internal pipelines, drains are transported by external ...
Every gardener is aware of the importance of proper and cultivating the land for good results. Digging it twice a year, as well as harrowing after digging, loosening the soil - these are all ways to saturate it with oxygen, which positively affects the yield of planted crops.
Each type of work requires its own gardening equipment: shovel, rake, chopper. And in order not to purchase all of them individually, it is better to have one tool that, in its functionality, replaces them all. It seems that this is from the realm of fantasy, but in fact, such a tool has already been invented and is used by gardeners with might and main. It is called a “miracle shovel” or “miracle pitchfork”.
Such a tool has rich functionality, incorporating the capabilities of five different tools designed to care for the land:
At the same time, you not only replace the five tools, but also greatly simplify your work. For example, you have the opportunity to dig up the earth to a certain depth or harrow in order to achieve a certain flatness of the earth's surface. And the long, complicated digging process turns into a quick and tireless task.
While working with the miracle shovel, your legs and arms will be involved, but not the lower back, since you do not need to squat and bend down. So you will feel fine after cultivating the land.
You can not only dig and harrow the earth, but also rake leaves, branches, tops. You can dig up potatoes with ease and without damage to root crops.
Of course, you can work with such a tool only on the land that you have been cultivating for several years. It will not be suitable for processing virgin soil, since it will not cope with a dense earthen lump.
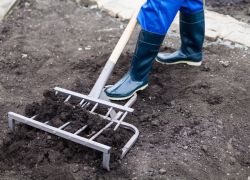
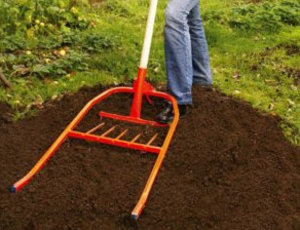
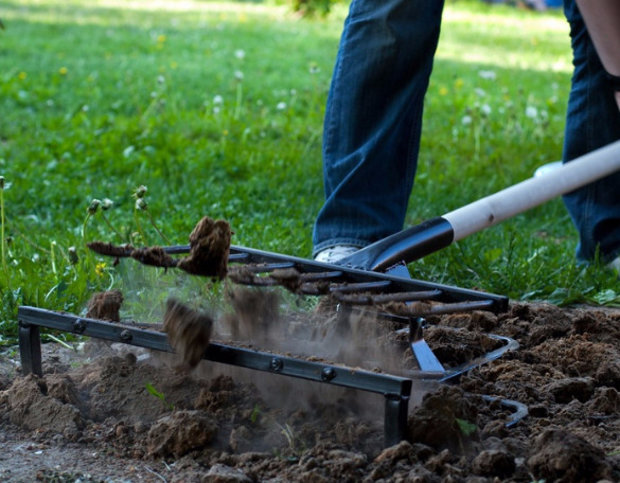
Working with a miracle shovel is a real pleasure. You tremendously save time and effort. It is a large pitchfork that you need to stick into the ground and then lower the mobile. At this point, the ground passes between the forks and the metal pins. As a result, you dig and loosen the earth at the same time.
So, the process of digging with a miraculous shovel consists of two simple movements - sticking a pitchfork into the ground and lowering the black. After each “digging”, the miraculous shovel must be pulled back and thus moved row by row.
Digging and loosening takes three times less time than using traditional tools. And if the land during processing is soft and dry, both a woman and an elderly person will cope with this.
All wonderful shovels, depending on the depth of cultivation and the presence of additional elements, are divided into standard ones, such as "Mole" and type "Plowman". We will not consider ordinary ones, since they, as a rule, are made with our own hands and consist only of forks and a back stop.
As for the differences between the Plowman and the Mole, the first shovel was invented mainly for loosening the earth. Her bayonet length is 10-15 cm, which makes it possible to process any type of soil without much effort. Whereas the Mole shovel has a long bayonet length of at least 25 cm, so it is suitable for deeper digging. The pothole made with its help can be used immediately for planting vegetable crops. And to work with such a tool, more effort is already needed.
There are universal shovels with a bayonet length of 15-20 cm. They are suitable for high-quality processing of chernozems, which in winter do not freeze deeper than 5-10 cm. In more severe climatic regions, it is difficult to work with them.
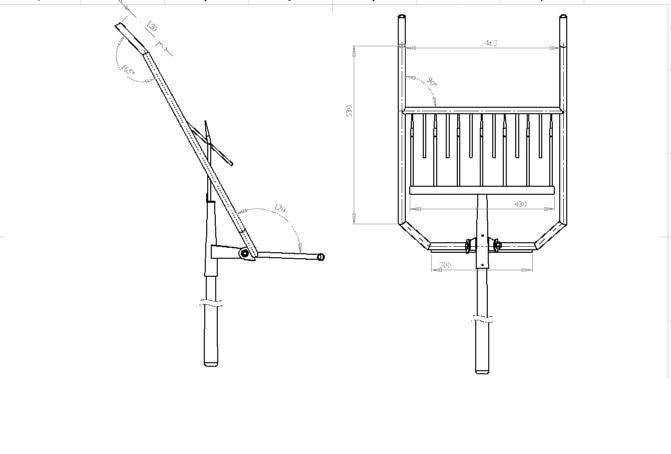
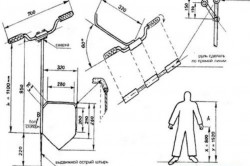
Here's how to dig a garden and not overwork it? So that your back does not hurt and your hands do not shake after work? Is there a shovel for the lazy? Yes, such a wonderful shovel has long been designed and is working hard at the dachas of folk craftsmen. Of course, at the pike's command, she won’t turn the earth upside down; she’ll have to put in the silushka anyway, but on a much smaller scale. So that the reader can build this wonderful inventory with his own hands, we offer photos, videos and drawings.
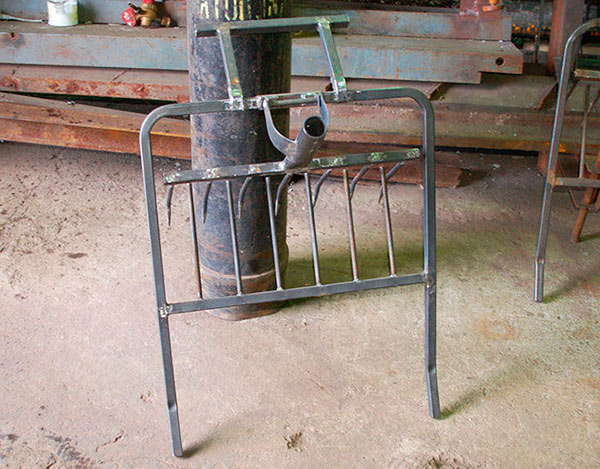
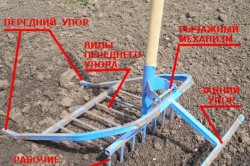
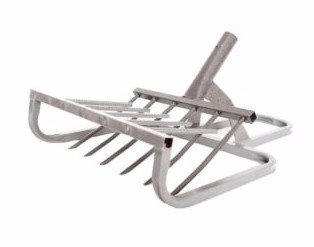
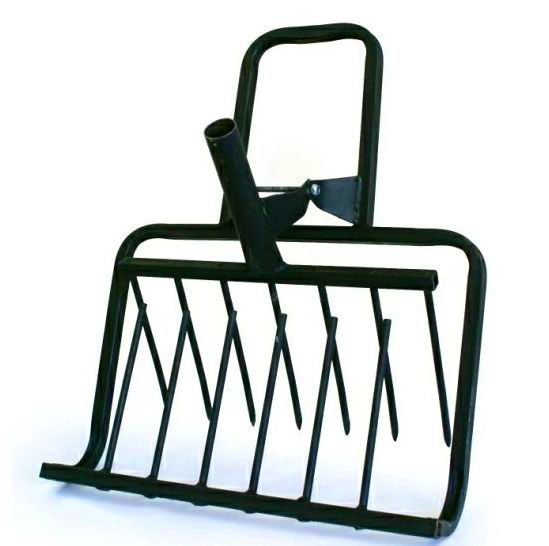
The design is based on a support frame, to which two rippers are attached: the main and auxiliary. The main cultivator is similar to a pitchfork, it is hinged to the frame using steel ears. The rods of the auxiliary, or counter, ripper are mounted on the frame rigidly and at such a distance that they enter exactly in the middle of the gap between the teeth of the forks. In the rear part of the device there is an emphasis, allowing you to transfer part of the effort to raise the soil to the soil itself.
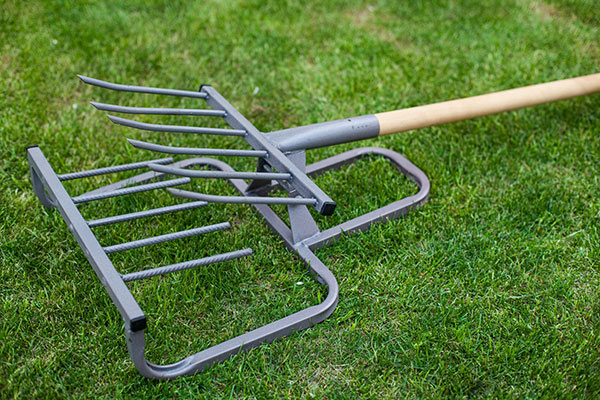
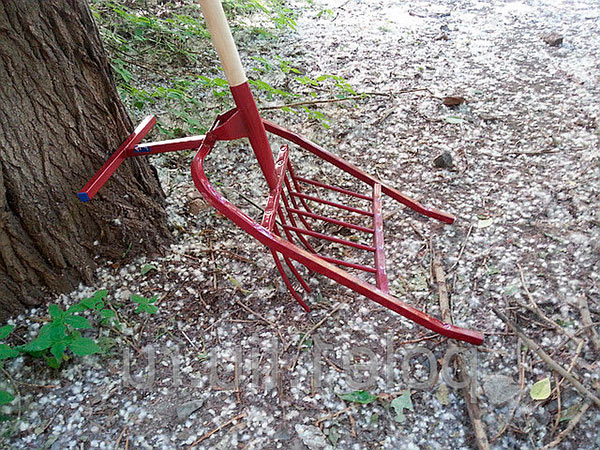
The Miracle Shovel is a support frame on which two rippers are fixed
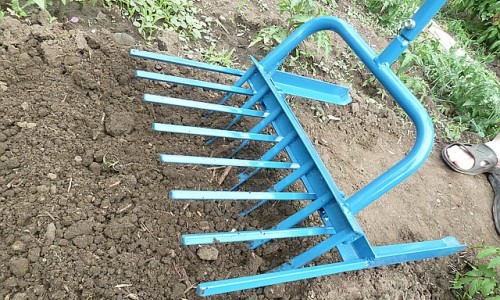
During operation, the support frame is put on the ground and the stop is fixed with the foot so that the miracle shovel does not go to the side. Forks are pierced into the ground and, clicking on the stalk, raise them. The soil breaks down into large clods and breaks into the teeth of the auxiliary cultivator. Then a step is taken back, the frame is pulled closer, and the operation is repeated.
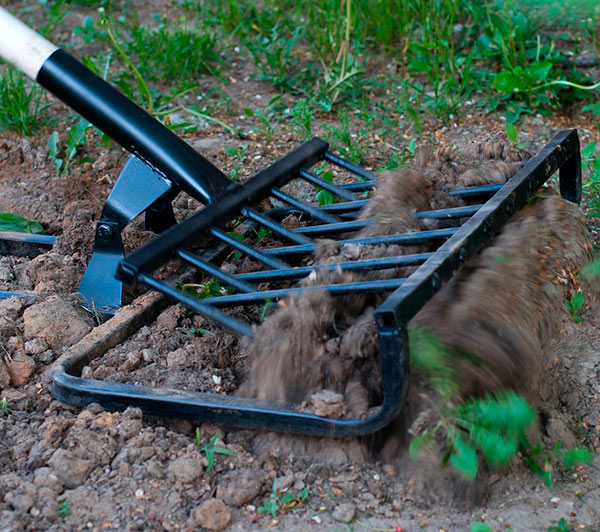
Forks pitch into the ground and, clicking on the stalk, raise them
This simple device allows you to quickly, efficiently and without tearing down your legs, treat a considerable area by the standards of private gardening. Here is an incomplete list of miracle inventory achievements:
Attention! Do not try to dig up heavy soil with a shovel during a drought. The tool will be broken, and the earth will remain unbroken.
The ingenuity of folk inventors knows no bounds, so it is possible that this list will be updated in the near future.
In the store, a miracle shovel costs several times more than its bayonet sister, so if you have a little experience working with welding equipment, you can make this advanced tool yourself.
For work you will need:
Tip. To make the shovel work even better, sharpen the rods for the main cultivator before welding.
In order for your new tool to please its performance, you should remember that it is not omnipotent, and give it only the kind of work that it really can do. Miracle Shovel is unable to dig a hole. Do not entrust her with a curly dig around flower beds or other curved elements of a summer cottage. Since for lifting the pitchfork you need to put pressure on the handle with your weight, such a shovel will not suit a fragile teenager.
But if we are talking about a quick, “with a twinkle”, digging in 10-20 acres for potatoes, then here the miracle shovel has no equal. And most importantly, the gardener will not even remember his lower back.
DIY Miracle Shovel - video
Not everyone knows how to make a miracle a shovel with their own hands, but almost all summer residents and gardeners, owners of personal plots know how difficult it is to dig a garden. This procedure will be greatly simplified if you know how to make a miracle a shovel with your own hands. It is worth noting that such a device is far from the only one in the arsenal of summer residents, there are others, however it is it that can significantly reduce the time of digging a site, save energy when working in the field.
A miraculous shovel is necessary for digging a site in spring and autumn, before planting plants during gardening.
The latter is especially important, since everyone who has encountered such a job knows how difficult it is to complete it. Indeed, the intensive digging of the garden is not only difficult and tiring, but also detrimental to health. A home-made tool performs much better the functions of a regular shovel and, according to the owners of this device, they can quickly and efficiently dig up the necessary land.
Many people believe that such a tool is capable of digging any soil, but this is a misconception. Such a device can only dig up areas with black soil or sand (soft soils), falling under a shovel of stone (masonry residues, for example) will stop work. Another misconception associated with this miraculous thing is that people consider such a device to look like an ordinary shovel. However, it is not. Such a device is more reminiscent of a pitchfork, plow, rake, headboard (since they can be used in construction), but not on a shovel. But the functions that this unit performs are similar to the functions of a bayonet shovel, which digs up a site in spring and autumn, before planting plants during gardening.
Despite the fact that the tasks performed by such a device are similar to the tasks of a shovel, and the operating principles of these tools are similar, there are still differences that are very, very significant. So in the process of ordinary digging with standard garden tools, it is necessary to exert considerable strength and have great endurance (after all, you need to not only put a shovel on a full bayonet, but still get it with soil), and when working with a miracle tool you only need to lightly press the handle of the device and the ground itself loosens.
When working with a conventional tool, it becomes necessary to clean the surface of adhering earth and debris (humus, dry leaves, etc.), break up clumped clumps of earth (if this is not done, the excavated area will not be suitable for planting). Here, rods, fittings or pipes themselves dig and loosen the site. Even manufacturers of such devices in their commercials say that this design significantly reduces the load on the spine.
Such digging also extracts weed roots, small debris, etc. from the soil. It also saves time on weeding, because weeds in this case will not grow.
Many summer residents often confuse such a “wonderful” tool with another non-standard product of the industry, which is called the “Tornado”. However, this is not correct, since the Tornado only loosens the soil, and does not dig it up.
The shovel itself is structurally composed of a frame with longitudinal pins, which serves as a baking powder. A shovel frame is attached to the baking powder, the connection being movable. At the same time, the reinforcing rods on the frames should not coincide in location and provide free movement. In this case, the second frame has a handle-lever, which is located at an angle to reduce the load and efforts exerted by the operator. However, this design has a number of technical difficulties that affect its operation.
Back to the table of contents
For all its merits, such a design has a number of drawbacks that most manufacturers hide and do not mention in commercials. These include the following:

To create a shovel you need to stock up water pipe with a conditional pass of about 20-25 mm.
Based on the disadvantages of such devices described above, it is worth saying that such a device is not a "super" device for work. Like most other such “miracles,” they can only be used under certain conditions in areas with soft soil. Therefore, before you purchase or make this tool, you must carefully weigh the pros and cons.
The beginning of the summer season is not only a vacation, but also a lot of work in the garden. Each summer resident tries to make the task of tillage as easy as possible, for which different equipment is used. Recently, a miracle shovel, which can be made with your own hands, has gained wide popularity.
 The classic version of the miracle shovel is a bayonet shovel, which allows you to qualitatively process the soil of any complexity. Such a tool is a combination of pitchfork and sledges, thanks to which it is much easier to plow the soil. Of course, it is much easier to use walk-behind tractors, electric cultivators or ask for help from a tractor driver whose machine is equipped with a plow. Nevertheless, all these actions will require quite substantial material costs, which is why most gardeners still prefer to work with their hands.
What is so remarkable miracle shovel? The sharp teeth of the super-shovel easily enter the ground, and thanks to the lever (presented in the form of a long handle), you can lift large pieces of soil, which will loosen on the second part of the pitchfork located on the surface.
Based on the depth of cultivation and the presence of additional elements, all such devices can be divided into three types: ordinary, such as a plowman and a mole.
Ordinary shovels in most cases are made at home and consist of forks and a back emphasis. When using such a tool, you can really reduce the load and increase the speed of work, but such a shovel will not solve the problem with large blocks of earth. It is suitable only for work on regularly cultivated chernozems.
 The miracle shovel of the “plowman” type is intended not only for digging the earth, but also for better loosening the soil. The length of its bayonet is usually 10-15 cm, which makes it easy to cut any type of soil, and the bayonet calmly goes into the ground even when the weight of the worker is not more than 60 kg.
The mole’s bayonet depth is at least 25 cm and is designed for deep digging.Rytvina is immediately used for planting vegetable crops. In the case of the use of this particular tool, a digger will require a certain effort, especially if you have to work on compressed soil or alumina.
Important! In addition to the described options for miraculous shovels, there are also universal options, the bayonet length of which is from 15 to 20 cm. They are excellent for regions where the soil can freeze by 5-10 cm, and the main type of soil is chernozem (burozem). If the climatic conditions of the region are even more severe, then even such a depth of shovel bayonets will not be enough, and you will not be able to qualitatively update the soil.
How to dig a miracle shovel? We note the convenience of its use: you will not need to bend down, and the risk of injuring your back is minimized (this is especially true for people with radiculitis). The required physical efforts are also reduced, and the speed of work, on the contrary, increases. The procedure for working with an improved shovel is as follows.
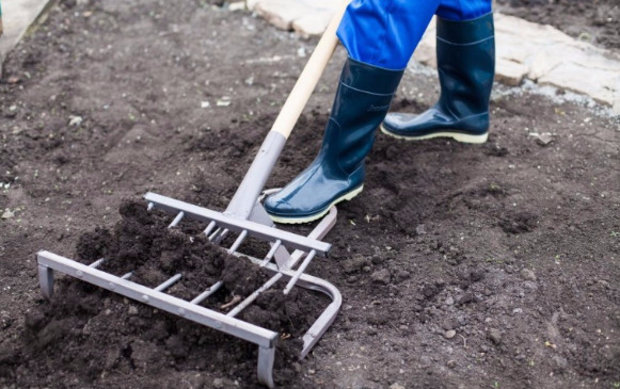 By pressing the foot on a special platform, it is necessary to deepen the shovel into the ground. Without removing your foot from the platform, take the second foot a step back, while tilting the shovel towards yourself - the soil will be on the teeth. Lightly shake the left and right hands to shake off the soil, thus performing loosening. You can flip the soil with one sharp movement of the hand up, moving the shovel 10-15 cm back. After completing several approaches, you need to walk around the site with a rake and smash the clods.
Did you know? The outdated name for the modern shovel is “spade”. It came from the determination of the type of action “to step in, to step with the foot”, that is, to press on a metal bayonet.
In factory models of shovels, moving parts are often clogged with earth, which is why they begin to work worse. In addition, sometimes wooden handles that break into special sockets break down. In home-made tools, all parts are connected fairly rigidly, so that breakage and jamming are almost completely eliminated. However, this does not mean at all that the miracle shovel for the garden, which was made by hand, is completely devoid of flaws. There is a serious possibility of deformation of the joints of soldering or welding and breakage of plastic parts (if any), although such malfunctions appear only after many years of active use.
 There are several important points that you should pay attention to when self-made wonderful shovels. The length of the bayonet to which it will enter the soil depends on the depth of freezing of the soil. In cases where the use of a shovel is necessary only for loosening the soil, 10 cm will be enough, but for planting vegetable crops, it will be necessary to perform a deeper digging (at least, the teeth should go into the layer of frozen soil by 5 cm). The width of the future miracle shovel depends on the estimated area of \u200b\u200bland capture.
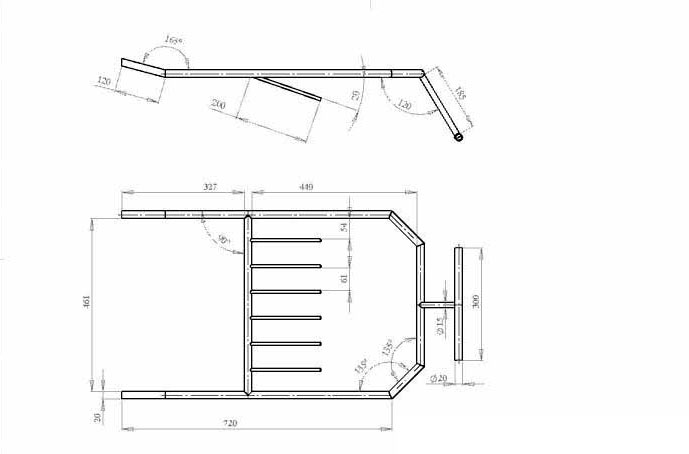
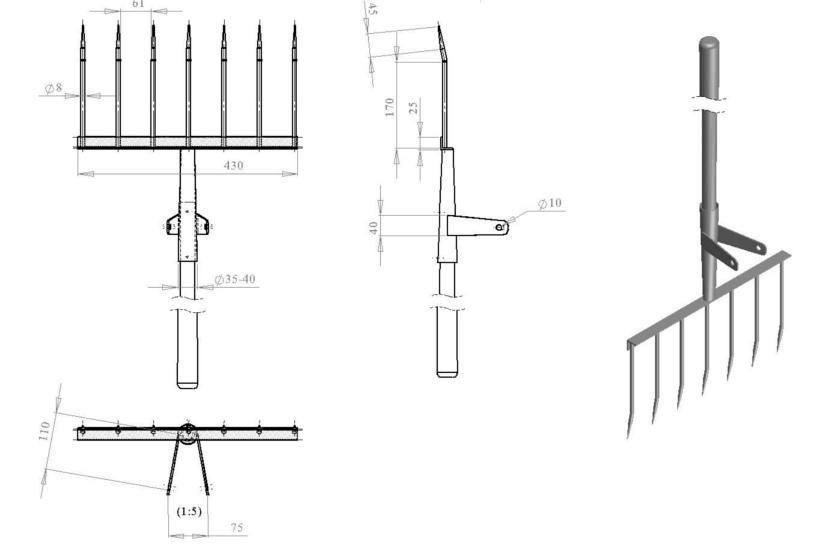
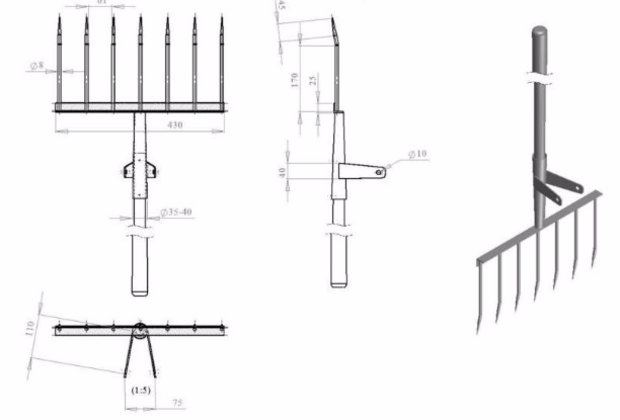
Important!The width of the tool should not exceed 50 cm, otherwise it will be necessary to exert too much effort. Choosing the necessary materials to create your own miracle shovels, it must be remembered that industrial models are based on the use of forks, but not ordinary two- or trident, but wider (from 35 cm). At a step between the working rods, about 5 cm is formed, which is seven teeth a quarter meter long. It is clear that this is not the whole miracle shovel, and the drawing, which will be presented below, shows many other equally important details.
So, to create the described tool with your own hands you will need:
Did you know? The name of the person who invented the miracle shovel is not known for certain, although it is believed that it was developed in Yekaterinburg.
Before embarking on the independent manufacture of a miracle shovel, you need to pay attention to the main structural features of such a tool. In most models, the forks are mounted movably on a forward, horizontally positioned frame, supplemented by an emphasis in the rear (in some cases, the frame is replaced with a slightly sloping upward slide). Counter-directional shafts are missing between the teeth, which are more like a rake.
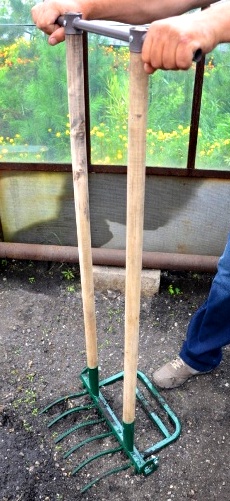
The tool can have two handles, but in most cases it is an ordinary shank, like a shovel or the same forks. However, not in all cases a wooden handle is used, since such a lever can easily break (the teeth often cling to the roots). Instead of the handle, a metal pipe (for example, aluminum) can be installed. If the wooden handle breaks in the nest of the garden tool, at its very base, it will be difficult to remove the chip, and the only way out is to try to drill it.
There are more simplified models, the design of which includes only the frame, which is simultaneously an emphasis (placed behind the working part). The teeth are fixed directly to the front rod, at the ends of which are fasteners for the other two handles. This version of the miracle shovel is most often made at home.
Did you know? In the old days, a standard wooden shovel (or, as it was also called, a "blade") had a width of 6-14 points and a length of 8-16 points, and this with a total length of 1½-1¾ arshin with a handle. In Russia, all shovels and blades were extruded mainly from aspen, sometimes from linden or birch, and even less often from oak or maple.
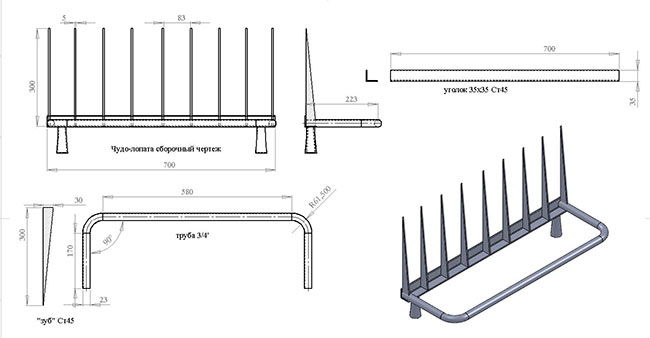
With the independent manufacture of a miracle shovel, first of all, it is necessary to create bayonets, for which the armature prepared in advance is cut into pieces of the desired length. The ends of these segments are sharpened on one side at an angle of 30 °, although if the soil on your site is soft, the bevel angle can be reduced to 15 ° (though this will lead to frequent blunting of the cutting part).
Having the required bayonets in hand, you can proceed to create the supporting bar, for which part of the square pipe is cut off. It is also worth preparing a round hollow pipe, which in the future will play the role of a handle. All elements are welded according to the drawings below.
So, we have already figured out how to make a miracle shovel ourselves, and what you may need for this. But is this tool really necessary in the household? It is necessary to take into account all the advantages and disadvantages of this design.
A miracle shovel is much more convenient to use than its other counterparts, because it:
There are also design flaws, they include the following:
 The tool is just perfect for arable work. Based on the length of the bayonets on the main forks, the pothole is used either for loosening the soil or for sowing. So, a depth of 15-25 cm (the exact figures depend on the level of soil freezing) will be quite enough for planting potatoes, cabbage, corn and most vegetable crops. However, given that tomatoes, peppers and cucumbers are planted immediately with seedlings, they will have to manually create separate holes. In the garden, a miracle shovel will be useless: it is not suitable for digging trees and creating neat holes.
Summing up all of the above, it should be noted that such an inventory will definitely be useful to owners of vegetable gardens used to grow vegetables, moreover, the area of \u200b\u200bthe cultivated area should not be less than half a hundred, otherwise it will be easier to do the work with a regular shovel.
Was this article helpful?
Well no
With the onset of the summer season, every summer resident is faced with the acute problem of digging up the garden. Everyone remembers that such "physical education" is fraught with pain in the muscles, back and joints. But the earth must not only be dug up, but also loosened. This hard work sometimes seems endless and completely impossible for an elderly person. How to be? After all, everyone wants to have a well-groomed garden.
For such works, you can attract any mechanized means, but their disadvantages are high cost and the fact that if the work is carried out during the period when weeds have already appeared, the use of such equipment will increase their number several times, because even uprooted and cut into small parts, they easily take root and multiply.
We want to bring to your attention Miracle Shovel for the lazy - A simple, high-quality and inexpensive way to avoid the monotonous, tedious and sometimes traumatic hazardous work of putting household plots in order. Let us say, not without pride, that this new product was developed and produced in the Russian Federation.
A shovel-ripper is a lever-type mechanical construction consisting of a frame and two forks directed towards each other. The principle of its operation is based on increasing productivity while minimizing the effort spent due to the use of lever mechanisms.
Benefits
Types of miracle shovels:
it is made of high quality steel in Yekaterinburg, has a frame length of 780 mm.
For the convenience of customers, available in 3 sizes:
Loosening depth (length of working pitchfork) -230 mm
Advantages:Unlike other shovels, the Plowman has the longest levers of emphasis, which makes the work even less labor-intensive.
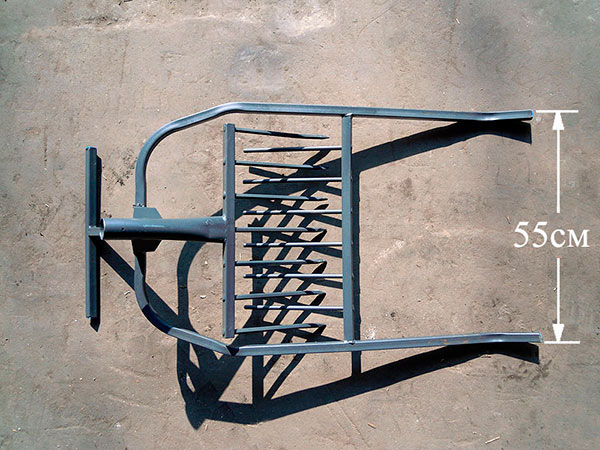
it is made of high-strength steel in Chelyabinsk. Has a frame length of 520 mm.
Available in 3 sizes:
Loosening depth (length of working pitchfork) -250 mm
Advantages: Due to the larger footprint than other shovels, there is no excessive immersion in the ground, which avoids unnecessary work.
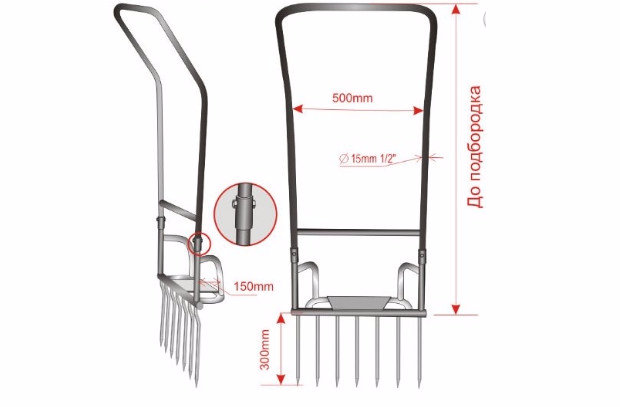
it is made in Chelyabinsk and has 3 modifications. Let's look at them. The length of the working forks (loosening depth) for all models is 250 mm

Advantages: Designed for 2 cuttings with a transverse height-adjustable handle. That is, the fundamental difference between this shovel is that equal effort is applied with both hands, which is very important for people with diseases of the spine. When working with this model, the lower back will be almost motionless.
So, having considered all the possible options, we were convinced of the undoubted advantages of the so-called “Miracle of the shovel for the lazy”, it remains only to choose the one that is suitable for you.
What do you need to know?
From internal pipelines, drains are transported by external ...

Each apartment, like every family, has its own characteristics, so it is difficult ...