DEGREES OF COMPARISON OF ADJECTIVES In English, as in Russian, ...

Double-glazed windows made of prefabricated glass panels are beautiful and convenient. But they have one drawback: if the glass is accidentally broken, you often have to replace the entire window, and this is both long and expensive. Therefore, if you need windows for a summer residence or for some outbuilding, plastic windows economically disadvantageous. It is much easier and cheaper to install wooden ones. Yes, and making wooden windows with your own hands is not so difficult, although it would be unfair to call this work simple.
Wooden windows are able to maintain the required level of humidity in the house, which favorably affects the internal microclimate of the room.
Making a window in a home workshop, and in addition, and not having sufficient qualifications, it is impossible to achieve its complete tightness and reliable sound insulation. Therefore, for a residential building, it is still better to order windows for professionals. But for a veranda, bathhouse, shed or garage, anyone can try to make wooden windows with their own hands, as long as the necessary materials and tools are at hand.
When deciding to make a window yourself, you need to responsibly approach the choice of material. The wood must be well dried, otherwise warping and shrinkage of raw wood cannot be avoided in the future. Also, the board should not have chips, cracks, knots, etc.
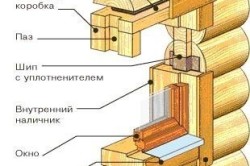
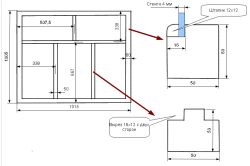
The window design itself consists of a box, which is inserted into the window opening and is rigidly fixed in it, and the frame itself with inserted glass. For a box, it is better to take a wooden board with a section of 150x50 mm, and for a frame, a wooden bar with a section of 60x40 mm is usually used.
Pine or oak boards are used for windows. Oak is much more durable than pine, but also much more difficult to process. Therefore, novice carpenters first make window structures from pine and, only after gaining experience and “filling their hands”, they switch to working with oak.
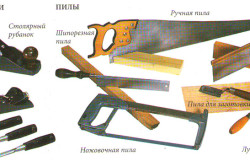
From the tools for assembling the window you will need:
Back to index
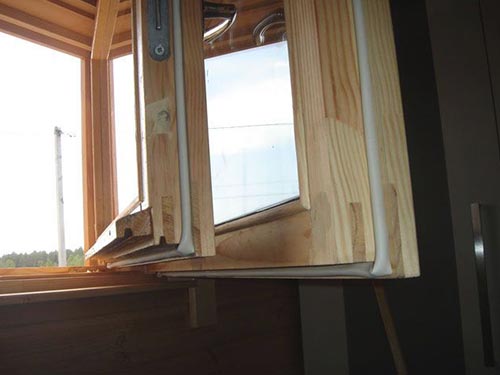
Despite the ease of manufacture, the box must be treated with great respect. After all, it is the box fixed in the window opening that will take on the main load. If it cracks or sags under the weight of the wall, it will be impossible to insert a window into it, and the windows of the one inserted will probably burst.

Start making the box with blanks. To do this, 2 pieces are sawn off from the board, corresponding in length to the width of the window opening, and 2 pieces corresponding to its length. The ends of the boards corresponding to the width of the box, with the help of a jigsaw and a chisel, are turned into a spike 20 cm thick. And at the ends of the boards, measured along the length, a groove of the same thickness is made in the middle.
After that, for each board, you need to select a groove with a planer to a width of 50 mm and a depth of 3-4 mm. The resulting ridges will subsequently serve as a support for the window frame and contribute to a better tightness of the window. Having finished sampling, all four sides of the box are interconnected.
Fixing the corners is first done with wood glue, and then two holes Ø12-15 mm are made at the ends of the boards so that the drill passes through the top board and goes deep into the end of the bottom board by 10 mm. Then, wooden rods of the appropriate diameter are inserted into each hole. These rods provide a fixed fixation of boards connected at right angles.

Usually, window frames are inserted into the wall directly during the construction of the walls, and frames after the completion of the roof. The box must be inserted with the selected side out. Because the box is quite long time are subject to significant stress, especially on their upper part, to avoid warping, temporary spacers are inserted into them before the frames are installed.
These spacers are vertically inserted 25-30 mm boards, 10 mm longer than the distance between the transverse boards of the box. The lower part of the boards is cut off evenly, and the upper part is cut at a slight (4-5º) angle so that the spacer can be inserted more tightly into the box, and subsequently it is easy to remove it from there. The number of spacers depends on the width of the span and is taken at the rate of 1 spacer per 40-50 cm of width.
Back to index
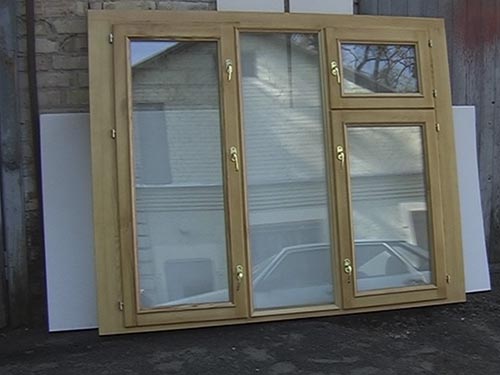
The shape of the window frame profile depends on the number of panes to be inserted and their thickness. With a single-glass profile, the frame has 2 grooves: 1 - for glass, 2 - for a more hermetic insertion into the box. For a double-glazed profile, you will need another additional groove. If you want the window to have three glasses, it is better to make an additional single-glass frame that will be inserted into the box from the inside.

First you need to properly cut the timber. Having measured the distance between the boards of the box, mark the same on the beam, and then saw off, but not directly, but at an angle strictly of 45º. The ends are sawn off along a converging path, i.e. one face remains the same length, while the opposite is shorter. If the window is planned to be hinged, then you need to saw off 4 heights of the box and 4 blanks corresponding to half of its width plus 3 cm. If everything is measured and sawn off correctly, then the blanks connected together should form a rectangle, 1-2 mm in size smaller than the inner perimeter of the box.
On each blank that will be attached to the window frame, on one side of the long edge, a planer makes a selection 10 mm wide and 5 mm deep to ensure greater tightness when installing the frame in the box. On the short edge, the same sample sizes are also made. If the profile is single-glazed, then one selection is made on the short edge at the diametrically opposite end from that made on the long edge. With a two-glass profile, selections are made from both ends of the short edge.
On the remaining two bars, grooves are also made, but differently. They are made half the width and half the depth of the beam, but in a mirror image. That is, grooves are made so that, upon contact, the two halves are connected into a single structure. The same grooves must be provided in the ends of the horizontal bars connected to the vertical bars (this is where the extra 3 cm of width will go).
Two half-frames are assembled from these blanks. Further, as with the assembly of the box, holes are made at the ends, only smaller, Ø 8-10 mm. Then the ends are folded together and connected with wooden rods. For greater reliability, long self-tapping screws are screwed into the end connections, be sure to drown their hats, and even better - the ends are fastened with metal corners.
Two assembled half-frames are attached to the window box using small cylindrical hinges, 2 for each half-frame. The hinges are fastened with screws: one half - to the frame, the second - to the window box. In a static position, two half-frames are fixed with latches or bolts.
If the window will not open, then two options for the window frame are possible. If the window itself is small, then 2 box heights and 2 of its width are sawn off for the frame. Further operations for assembling the frame are completely identical to the hinged window.
However, if the size of the window is large, then it is better to provide for the division of the glass into two or three parts. The frame body itself is assembled according to the same scheme, but 1 or 2 additional vertical beams are additionally mounted into it, on which grooves for glasses are made.
To do this, on the frame body in the middle or at a distance of 1/3 from the edges on the back of the frame, grooves are made for half the bar, and in width - for the width of the bar. On additional blanks, spikes of the same width and thickness are made from the outside. Then the spikes are inserted into the grooves and fastened with wood glue and self-tapping screws. Such frames are not attached, but simply inserted into the box. Their fixation is carried out with platbands, and the remaining gaps are sealed with mounting foam.
Instruction
Take a well-dried planed board, it will avoid window warping or shrinkage. Make a box for a wooden window. For its manufacture, you can use boards with a section of 50x150 mm. On the board, make a groove so that the profile of the board is L-shaped. The resulting comb will contribute to the tightness of the window. Use an electric planer for this work.
Then, in accordance with the size of the window opening, cut the board into 4 parts and connect them together. It is best to make such a connection using a straight spike and a straight groove. To create such a connection, you need to cut a tenon on one board (which will have a horizontal position), and a groove on the other. This work can be made with a saw, hammer and chisel or use hand mills. Then coat the joints with wood glue and assemble the box. When assembling, it is important to ensure that the parts are connected at an angle of 90 degrees. To ensure a rigid connection, drill a hole in the end and insert a wooden pin smeared with glue into it. Install window metal corners at the corners to the ends to strengthen the box. After the glue dries, the box is ready.
Now you need to make a window frame, for which a beam with a section of 50x50 mm is used. The sequence of its manufacture is the same as for the boxes. Make a profile using a hand mill or an electric planer. In order for the frame to open and close easily, you need a gap between the frame and the box of 1-2 mm.
Related videos
note
Do-it-yourself wooden windows can be used on verandas, balconies, in a bathhouse, i.e. where the wooden window will act as a barrier against environment. Consider making a single-leaf wooden window with your own hands. Now consider the design of a wooden window. The window consists of a box, which is attached to the window opening and the frame itself with glass. The box can be made from boards, for example, with a section of 50x150mm.
Therefore, without special equipment, it is unlikely that it will be possible to make a frame out of wood, like the one sold in stores. But for rooms in which there are no special requirements for windows, it is quite possible to make frames with your own hands. Consider how to make a window frame with your own hands, in a home workshop. To begin with, let's swing at the manufacture of the simplest, single-leaf, design. Everyone knows that wooden frames dry out over time, losing their shape.
Sources:
A little background. The windows in our house in Peterhof were, one might say, rare: the year of manufacture was one thousand nine hundred and a half, the fittings were Soviet-style latches, the exterior was like that of the “thirty-four” after the Kursk Bulge, thermal conductivity was excellent. In short, it was cold in winter, and the appearance, to put it mildly, did not satisfy even such an unnatural comrade as me. The easiest thing was to order plastic, but I really wanted to try my hand at carpentry, which resulted in a month of leisurely work in my spare time.
Glued sash.

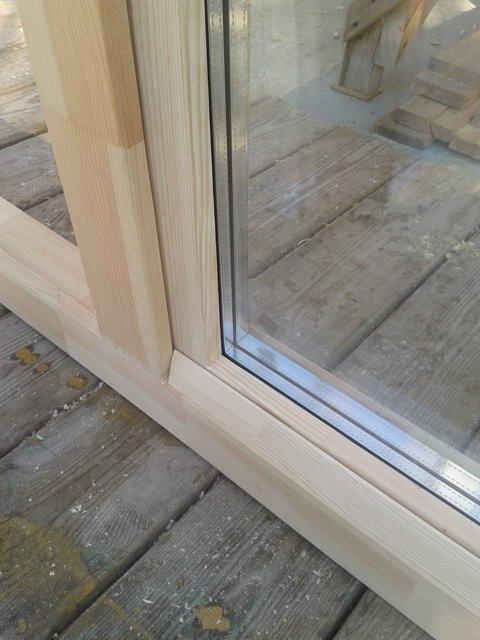
And here is the sash in the frame and also such a baffle so that water does not accumulate in the crack.
Almost finished product, covered with Pinotex. There is no double-glazed window in the deaf part yet.
Double-glazed windows ordered two-chamber with different thicknesses glass and different distances. If I'm not mistaken, the formula was 4-10-6-12-4. It took about 9 thousand rubles for two windows (2 double-glazed windows in the deaf parts, 2 in the sashes). Larger double-glazed windows (those that were installed in the blind parts) were very heavy. The two of them almost burst while the frame with glass was shoved into the opening.
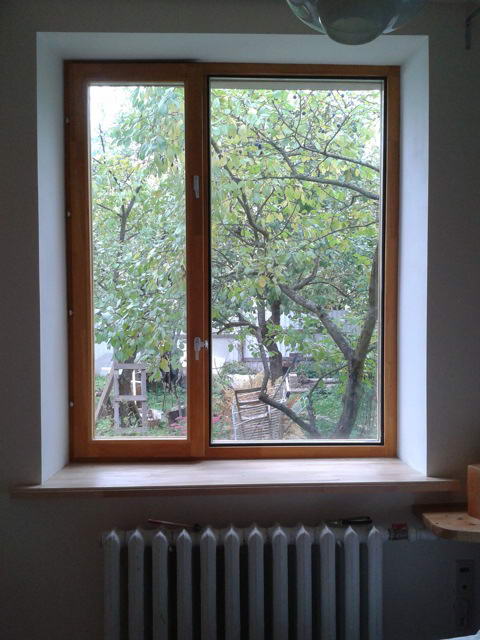
New window in the opening. Well, since such a booze went on, then I filed, polished, and installed new window sills.
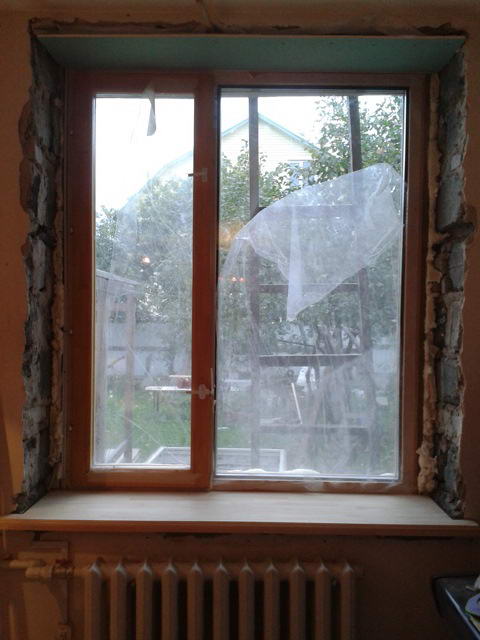
Here already made slopes. Shtapik put in about a month later.
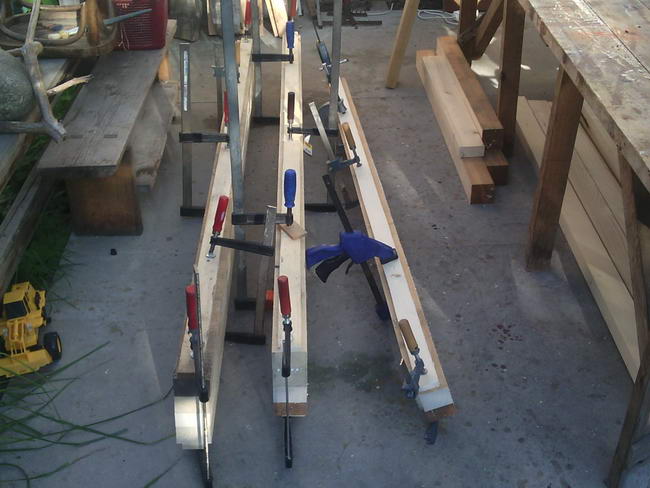
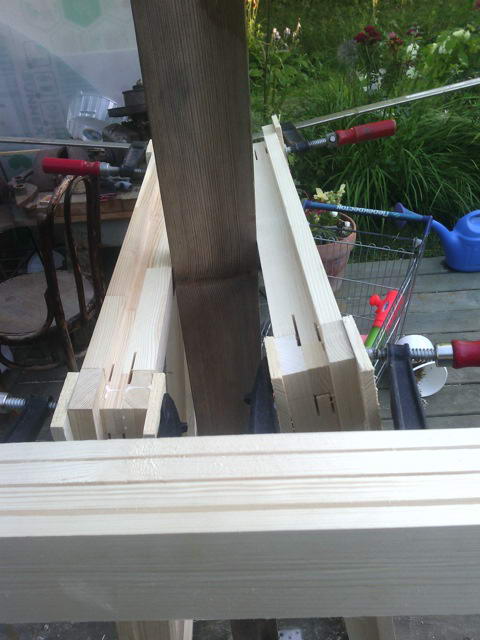
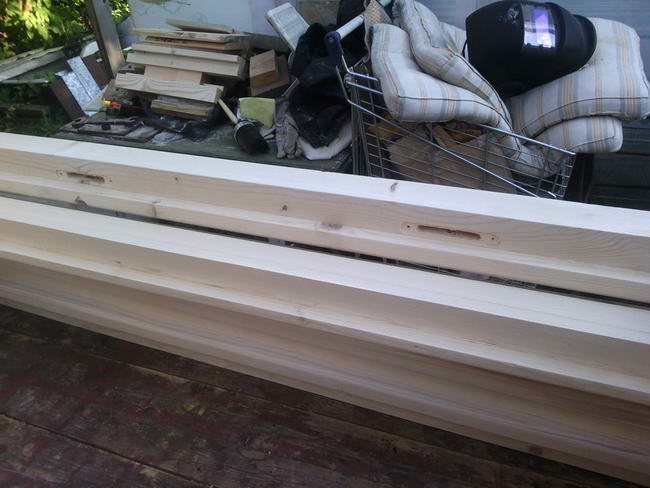
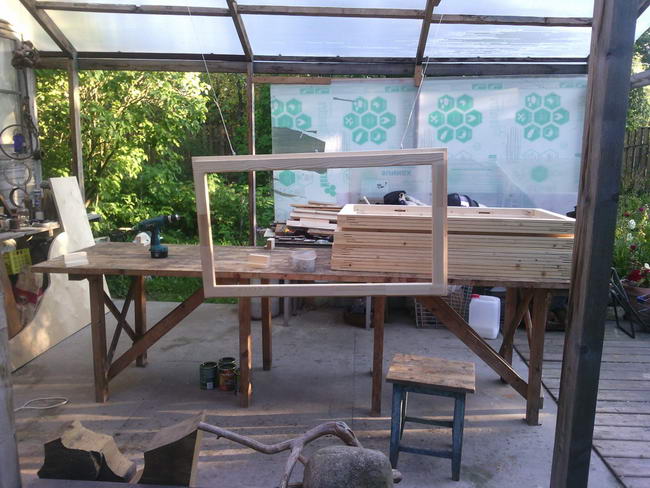
I must say right away that it was tiring to count all these quarters, grooves, spikes, and final finishing and grinding is a rather dreary task. Nevertheless, in the year 15, the party’s wife said “it’s necessary” and puzzled with windows for a house in a village in the Novgorod province. The situation at that historical moment was such that ... Well, in general, there was no situation. I've just bought a car, I'm feverishly hammering in banknotes to patch up a hole in the budget, and here you are - we would have four windows, and two of them opening. There is no reason to buy plastic, so I had to start the jointer, thickness gauge and other machinery again. This time it took less than a week, since the windows were much smaller, and he did not make double quarters in the sashes, he managed one. Initial material: timber 50*100. Process illustration:
Pair bonding. For lack of availability, the vime managed with clamps.
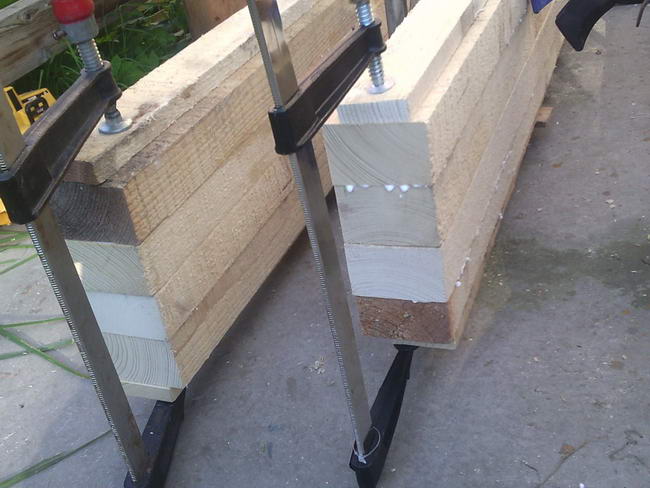
Spikes and grooves are cut, blanks are assembled.
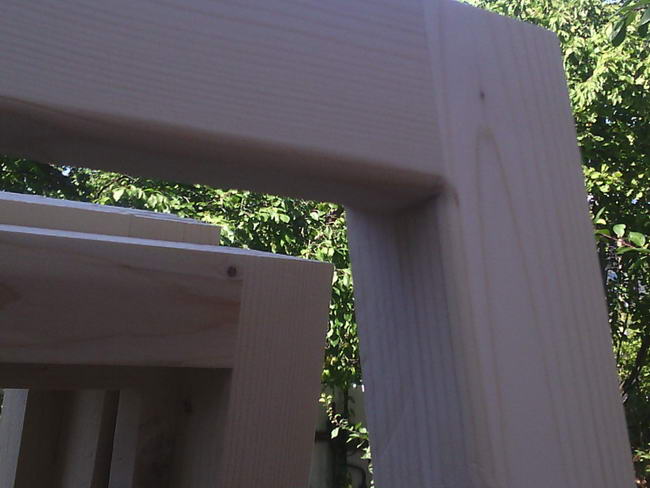
We make a rounded edge on the inside.
This is how the joint turns out.
We drill holes for fittings, with a milling cutter we select recesses for metal fittings.
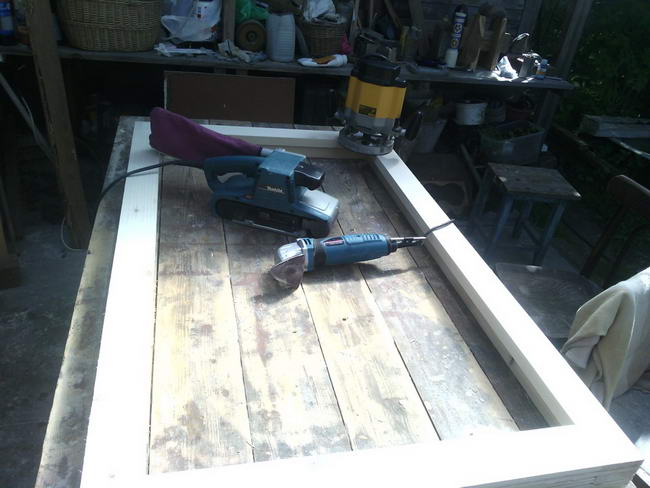
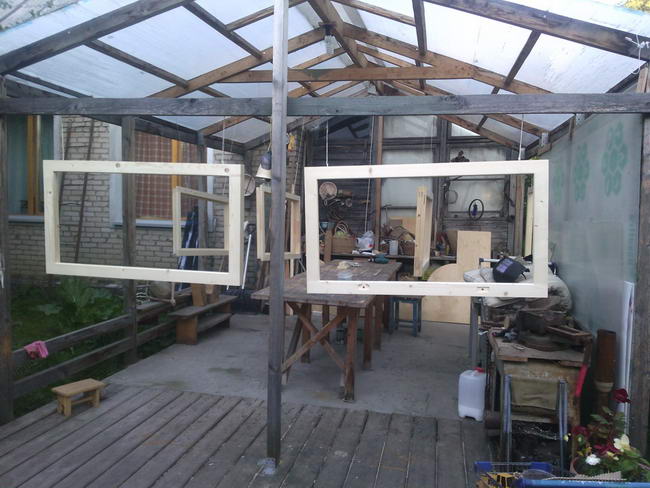
We hang for subsequent chemical treatment. Jars of Pinotex under the table.
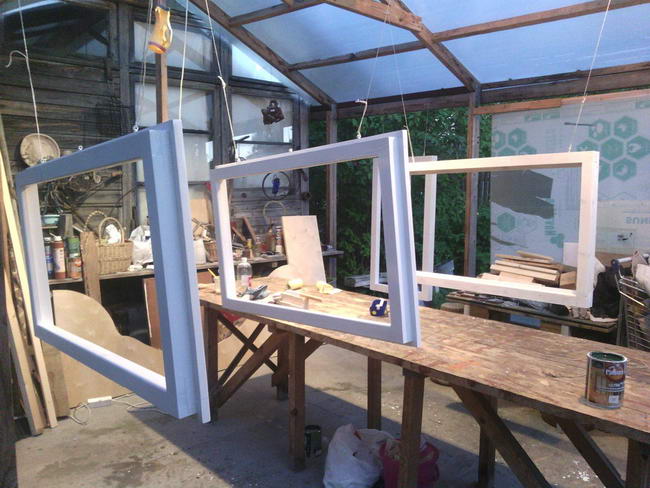
First layer: Pinotex Base. In the background are windows installed two years ago.
Second and third layers: white Pinotex Ultra.
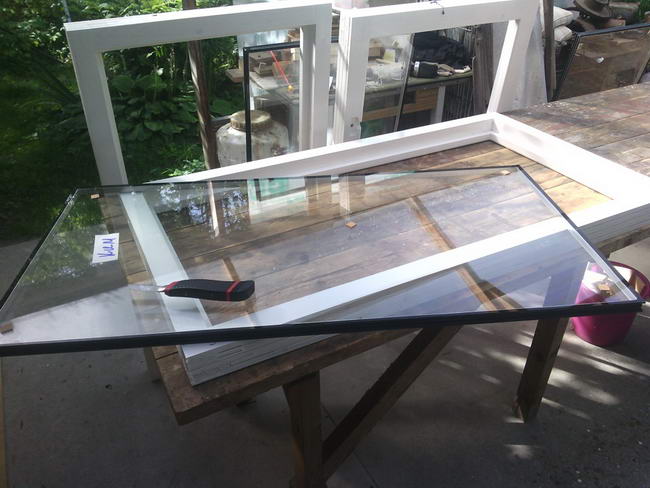
The double-glazed window is single-chamber, since no one lives in the village in winter.
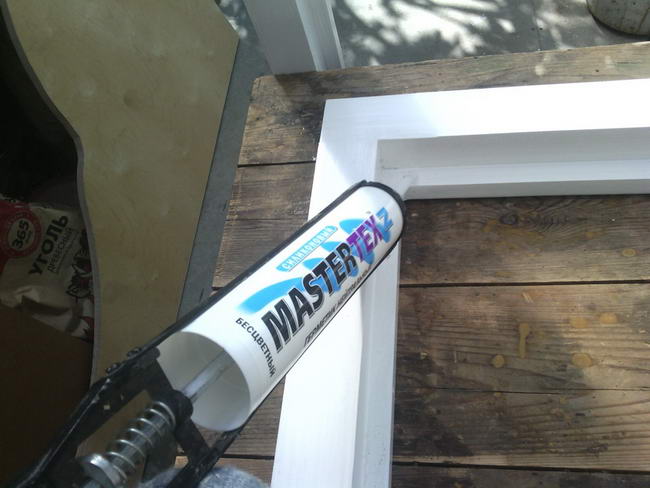
Apply a thin layer of transparent sealant.
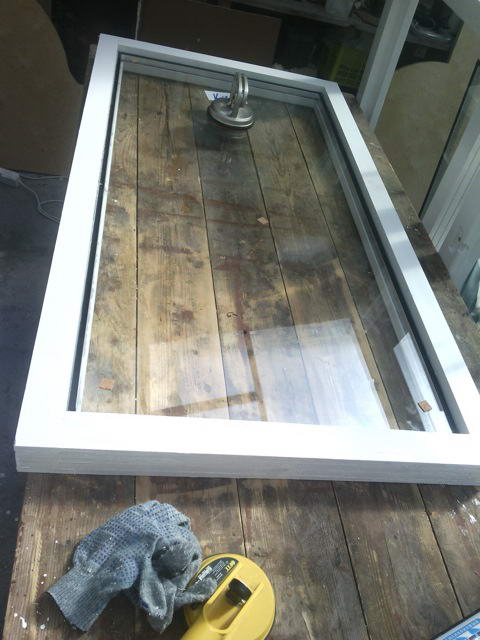
Suction cups came in handy for once, otherwise everyone was lying around doing nothing.
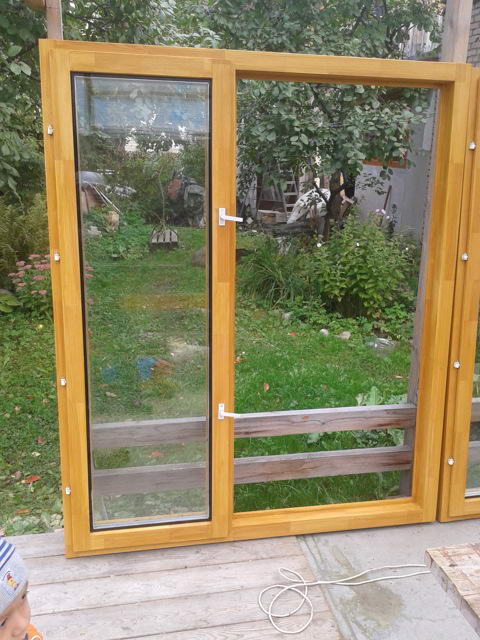
Window complete with glazing bead and false cover. 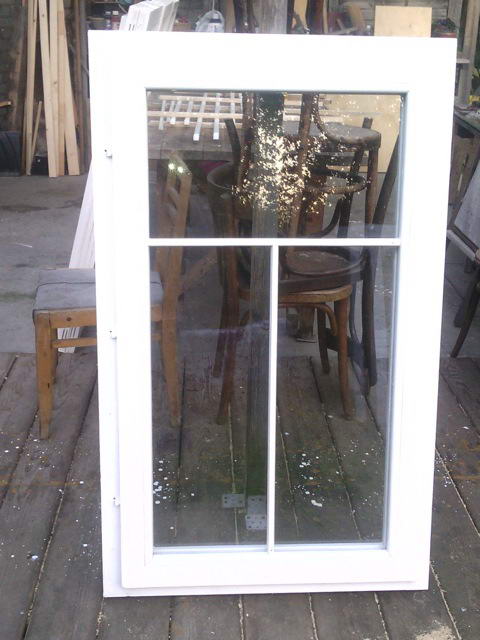
My view from the back.
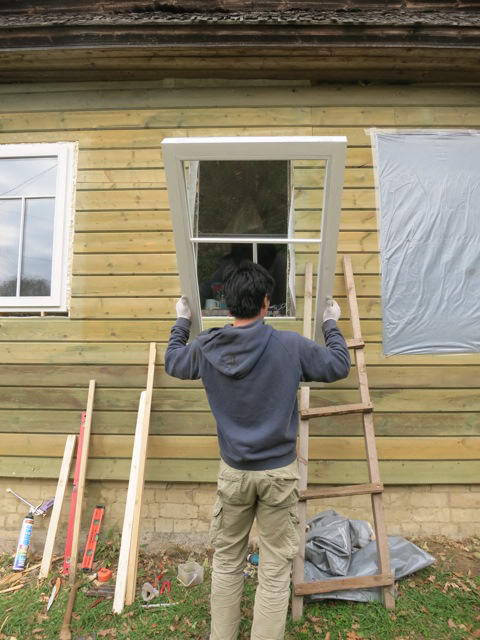
Facade with new windows.
![]()
Such pies with kittens turned out.
List of tools: planer, planer, miter saw, sawing machine, milling cutter, belt and vibration grinders, chisels, mallet, screwdriver (drill), clamps, caliper, square.
List of moral and psychological qualities: patience, accuracy, the ability not to break the tool, when it turns out that on the already processed and glued workpiece, the cut was made on the wrong side.
Guys, there is nothing super complicated about this. The most difficult thing for me was to imagine the place where the spikes and grooves meet in three dimensions. With square bars, this does not cause any difficulties at all, but when the quarters go, then you need to strain a little. I didn’t master AutoCAD, so I had to keep all the isometrics in my head during the work. The rest just requires patience. The second batch of windows turned out much faster for me. Between these two batches there was a couple of simpler and smaller windows: just a blind window with one quarter, where the double-glazed window is inserted. I did these in general in three days: the first day - planing and gluing (two hours), the second day - quarters, spikes, grooves, assembly, grinding (five hours), the third day - impregnation (two hours).
In the store you can buy wooden window structures, PVC windows and aluminum profiles. Each of the materials has its own characteristics that can satisfy any customer requirements. But if we are talking about a window for a summer residence, then a wooden frame would be the most suitable option. Such a wooden window frame can be made with the necessary materials and tools, as well as with the observance of technology. Work must be carried out carefully and accurately so that all geometric dimensions are clearly observed. The window will last a long time.
Structurally, a wooden frame can be made in several modifications:
At the same time, in option 1, it is possible to provide a window that will perform the functions of ventilation more efficiently than a sash.
The wooden frame can be made from any type of wood. It all depends on personal preferences, skills in wood processing. Oak is considered the strongest and most durable breed. However, it is quite difficult to process and is an expensive material. Among other species that are most often used for the manufacture of wooden frames, birch, ash, pine, and larch are known.
In order for a wooden frame to be strong and reliable, it is not necessary to take solid bars or boards. Glued laminated timber is quite a suitable material. It is made in such a way that it does not shrink during operation. This indicates greater reliability and durability of this material.
As an alternative to wood, plywood sheets are used to make a wooden window frame. It has sufficient strength and reliability, which allows its use as a starting material.
The wooden frame can be assembled using the following tools:
Back to index
Before the wooden frame is assembled, it is necessary to treat the bars with a special antiseptic composition. Thanks to this, the frame will last longer, as the wood will be protected from the formation of fungi and moisture penetration.
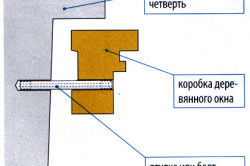
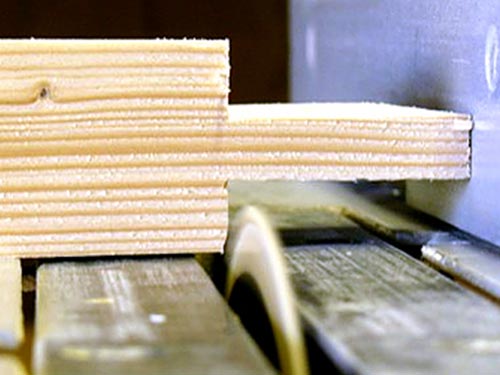
Making a frame with your own hands begins with a box. In a board measuring 50x150 mm, a slot is made in such a way that a configuration in the form of the letter "G" is formed. This will ensure the impermeability of the window. Next, you should divide it into 4 identical parts. They are fastened together by means of a thorn-groove connection. That is, a groove is sawn on one of the parts, and a spike is sawn on the other. These 2 connection elements must be carefully sized so that the spike fits into the groove without gaps, tightly. This will ensure secure fastening.
The groove is made using a circular saw, which is used to make cuts. And the excess is removed with a chisel and a hammer. The spike can be made both with a hand saw and with a circular saw, with a certain skill. The grooves must be made on the frame parts, which are located vertically. On the horizontal - a spike is cut out.
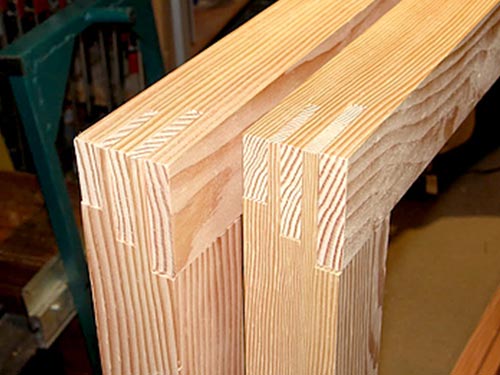
After pre-assembly of the elements of the box, it is disassembled. Carpentry glue is carefully applied to the fastening parts. Then they are connected, strictly observing geometric angle at 90°. You can control this with a square.
After that, metal corners are inserted at the end corners. They will provide the box with additional rigidity. Further work can be carried out only after the glue has completely dried.

The window wooden frame is made of timber with a section of 50x50 mm. A profile should be cut out of it according to the design of the window. It will differ depending on the size and dimensions of the glasses that will be inserted further, the width of the glazing bead. Wherein dimensions frames should be such that when it is inserted into the box, a gap of 1-2 mm is preserved. The profile is performed using an electric or manual planer. The resulting notches should be sanded with a machine or sandpaper.
The blanks of the wooden frame are fastened together in the same way as a box, that is, a tenon-groove connection is used. For reliability and rigidity glued. On the outer part, metal corners can be screwed in the corners, which, in addition to decorative purposes, will increase the rigidity of the structure.
After that, the wooden frame and box can be stained and varnished, if there is a desire to preserve and emphasize the texture of wood, or painted. Hinges are screwed on the window frame and the box, which serve as the connection of these parts to each other. After inserting the glass, the frame can be hung on the prepared hinges.
Wooden windows have always been popular due to such positive properties of wood as: high heat-saving characteristics, environmental friendliness and durability.
One of the advantages is also that the production wooden windows do-it-yourself task is quite feasible even for a non-professional.
Of course, now they use metal-plastic windows more, which are cheaper and also have their undeniable advantages, but still, wooden windows are a classic and they will always be popular.
The most popular material for the manufacture of a wooden window box in our latitudes is pine. It is distinguished by availability, low price and practicality. In terms of material characteristics, pine is superior to oak, but it is more expensive and therefore, for the first time, it is better to stop at pine windows.
Process of creation
The main requirements for the board are as follows. Firstly, it must be well dried, and secondly, it must not have knots and deformations. These conditions are important, since the box will experience the main loads, so its strength should not be in doubt.
Do-it-yourself wooden window manufacturing technology involves the use of glued laminated timber to make the box. In this case, the box has the most durable design. Glued laminated timber is a compilation of individual boards in packages and gluing them along the plane. Boards in our case will be made of pine.
The size of the board is taken 15 * 5 cm. They are interconnected by gluing. Then four holes are drilled and wooden pins are inserted into them. Such a connection will provide structural rigidity. In the opening, the box is installed motionlessly, using self-tapping screws and dowels, and then, the gaps between the opening and the box are blown out with mounting foam.
It is necessary to dwell briefly on the tool that will be needed to make the window.
If the window will be made for a dacha in which you do not live in the autumn-winter period, it will be enough to confine yourself to a thin double-glazed window.
window frames
Useful information:
Pay attention to inexpensive windows made of Krasnaya Gorka wood: a frame made of two-layer glued laminated timber (pine) 57x60 mm, single-chamber double-glazed window.
If you decide to carry out the manufacture of wooden windows with double-glazed windows, then you need to start with the design of the window frame. The minimum timber that you will need in order to make a frame should be 6 * 4 cm in size and will depend on the thickness of the window.
The profile for one window pane should have two rectangular folds, and a window with two panes should have one more. Frame production begins with careful processing of timber. Then, with the help of a thickness gauge, we make all the markings, after which we begin the installation of folds (grooves).
The manufacture of folds is carried out so that when the frame is already assembled, they are in the same plane. Otherwise, the glass will be weakly sealed. In general, the dimensions of the grooves depend on the thickness of the glass and the type of seal.
Note!
If putty is used as a seal, then the folds have a smaller width than when using glazing beads.
It must be remembered that strongly narrowed folds will let the wind through. The width of the strapping beam also affects the thickness of the grooves.
The window frame is assembled in such a way that the spikes fit snugly into the grooves. For a tighter connection, a spike must be installed. To do this, you must first drill a hole according to the diameter of the spike and grease it with glue.
In addition, at the end of the frame boards, to improve the connection, you can use a key. Its appearance will resemble a double dovetail. To do this, on each of the connected ends, a hole in the form of a trapezoid is made, into which a key is then inserted. Before completing the assembly, the joints are smeared with glue, and after assembly, the remaining glue must be cleaned with a knife. In the manufacture of a window with a sash, the installation of fittings will be added to the above works.
To prevent the window from blowing through, you need to carefully fit the glass to the size of the frame. To do this, you need to cut it with a diamond glass cutter. Before work, for safety, you need to wear goggles to prevent glass chips from getting into the eye and gloves, so as not to cut your hands. Glass cutting is carried out with a ruler, which should exceed the length of the glass. After we have drawn a line with a glass cutter, we move the glass to the edge of the table and, using pressure, break off the excess part. The glass should break off according to the cut.
Anyone who has an idea about how to make wooden windows should know how to correctly insert a window into a frame. To begin with, let's try on the cut glass by inserting it into the frame. If the glass is cut correctly, then we take it out and begin to prepare the folds.
To do this, they need to apply sealant and insert the glass into the frame. We fix the glass with the help of the top glazing bead and fix it with a thin carnation. When using a larger glazing bead, you can use self-tapping screws to attach it to the frame.
In the manufacture of windows, which consist of two halves, another bar is installed in the center, with the same grooves. One half of the window is made with a thinner frame and attached to the main one with hinges. In addition, a handle is attached to such a frame, and a groove is also cut out for the closing mechanism.

double wooden window
Vents in wooden windows are an integral part and come in several types: mortise, split and sliding. The latter represent a rather complex mechanism and it is difficult to perform them on their own. The first option is made together with the window frame and here you need maximum accuracy.
The best option for window vents in wooden windows are split, which are made separately from the window, and then, finished, are inserted into the frame.
Note!
In the manufacture of a split window, the use of any special fasteners and special skills in execution is not required.
The manufacturing technology of such vents differs slightly from the order of mounting the window itself, only for smaller sizes. The difference lies in the mounting of the opening mechanism, which usually consists of hinges, and the attachment of additional fittings, in the form of a handle with a closing device.
After completing all the work, the manufacturing technology involves lubricating the window surfaces with an antiseptic. After that, the window is placed in the opening and fastened in the grooves. Then we fix it with self-tapping screws that pass through the box and fasten them to concrete. Holes in concrete are most often made using a mounting gun.
After we fixed the window, we blow out the cracks with sealant. You need to wait for it to dry, and then plaster the sealing points. The work is completed by mounting the ebb and the window sill. Thus, it can be seen that making a wooden window with your own hands is not an impossible task, and this distinguishes them favorably from metal-plastic windows.
DEGREES OF COMPARISON OF ADJECTIVES In English, as in Russian, ...

In the early days of comics, there were several female wrestlers with...

The message about Beethoven, summarized in this article, will tell you about the great ...