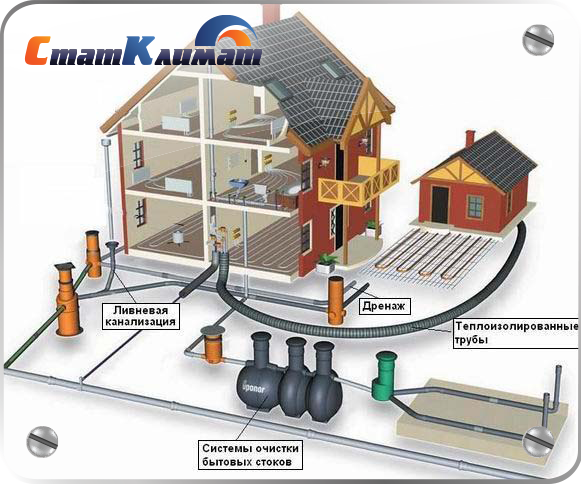
From internal pipelines, drains are transported by external ...
Sometimes from ordinary utilitarian constructions and devices very unusual things are obtained. Meteorology and romance, of course, are somehow connected, but to the device that we are going to talk about today, this is mediocre. Vane. A symbol of the fact that there are some invisible forces in the world that are higher than us, stronger and, probably, wiser.
No one will be surprised at the fact that the weather vane, as a term, comes from the consonant Dutch word, but it means something like a wing. Initially, it was used only as a device that determines the direction and strength of the wind. For Holland, the maritime state, especially at that time when the ships were sailing, the wind meant a lot. Only here it was impossible to measure its simplest parameters, direction and force, except as a weather vane. And today the device is by far the most affordable of all that are used in meteorology.
Holland, okay. And to us as for weathercocks and wind power. Our wind is almost always stable in strength. There was never a vital need for the use of weathercocks. In coastal regions, of course, it will be very useful. However, in spite of everything, romantically-minded homeowners come up with a wide variety of weathercocks not at all to study wind indicators and characteristics. There is something elusively attractive in it, so the weathercocks on the roof with our own hands made of metal, the drawings of which we present on the page, have become the highlight of any roof under which a romantic person lives.
The weather vane introduces mystery and romance into the style of the house, like a projection at a time when the weathercocks were spinning on the pointed towers and roofs of medieval cities. They also say that the weather vane scares away evil spirits and protects the house. Maybe. The symbolism of vane flags also directly speaks about this. The rooster, the most common character on weathercocks, is the first to meet a new day, a new wind and new weather. And it can also be considered as a kind of amulet.
What vane flags you will not find are family coats of arms, angels, intricate monograms, cats, which also have a certain mystical essence. Weathercocks with zodiac signs, sailboats, aircraft models, Jolly Rogers are often found ... In a word, there is no limit to fantasy. Anyone doing it yourself will be good if the design of the device is reliable and the material is correct.
The right material for a good and durable weather vane can only be metal. Although in the order of a creative experiment, you can make a weather vane made of wood. Naturally, in a few weeks there will be no trace of him, but as a test of skills in weathervane construction, a wooden one will also go. A plastic weather vane can live much longer than a wooden one, but there is no life in it. Plastic, and that’s it.
But metal is a completely different matter. Why not give plastic wedding rings? That's right, because they count on the same strong bonds as the metal itself. Of gold, hardly anyone will forge a wind vane flag, but copper or steel, or a stainless steel flag, will not only become a durable decorative element, but will also show the owner's solidity and his attitude to his house.
While we are talking about weathercocks, we have already given several drawings that can be safely repeated, and the weathercock is already on the roof. It is only much more interesting to come up with your own unique weather vane, guided by the general rules shared by the masters.
Now that we are in the know how to make the right weather vane with our own hands, according to the diagrams shown in the pictures, we can begin to experiment and decorate our house with copper, forged or flat metal weathercocks. Good luck to everyone!
Since ancient times, mankind uses a weather vane to determine the direction and speed of the wind. This can be a simple device in the form of a flag mounted on a high pole, or a more complex device with a rotating tube and an arrow, which determine the strength of moving air masses. The rotation of the weather vane occurs due to air pressure on the flag, which tends to occupy the optimal position. At this time, the counterweight points in the direction from which the wind blew. Often the device is equipped with rumbas indicating the cardinal points, on which they are guided during observations.
How to make a weather vane with your own hands. A photo
Do-it-yourself weather vane can be made of wood and metal, plastic and tin, and its appearance can be a real work of art. The city halls of many European cities are decorated with beautiful, unique weathercocks in the form of birds and animals, buildings and ships, fairy-tale characters, etc. Thanks to the original appearance and simple, functional design, the devices have gained immense popularity among the owners of country houses, where they for the most part, they are just decoration.
To make a weather vane with your own hands, first of all, prepare it reduced sketch on millimeter or other marked paper, or the template of the figure you liked in full size. In addition, you will need the following materials and tools:
Below we will talk about how to make a weather vane with your own hands. Using our instructions and drawings, all the work can be done in one day. Correctly interpret our recommendations will help photographs of the individual stages, as well as videos.
The process of making a weather vane with your own hands can be divided into several stages:
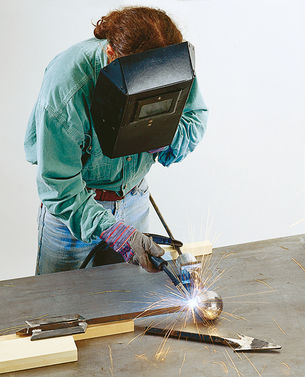
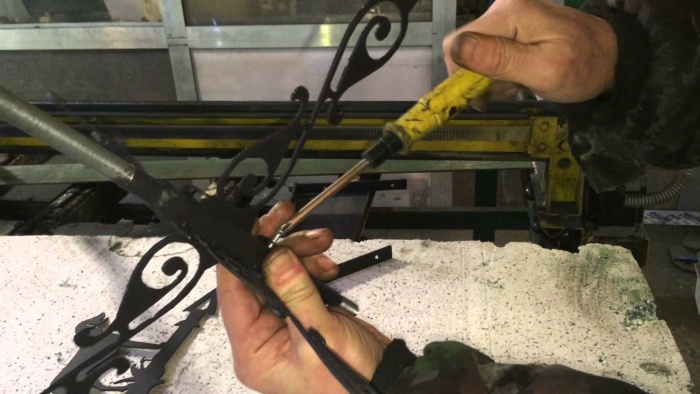
When working with metal, it is important not to forget about safety precautions. Welding should be carried out in a ventilated area, away from fuels and lubricants. It is important to use special gloves and a protective shield, and to choose clothes from natural fabric of sufficient thickness.
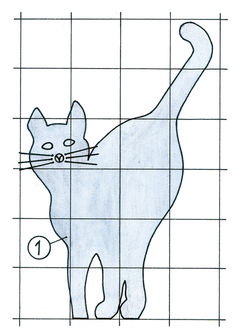
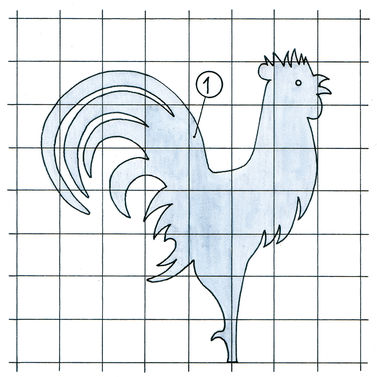
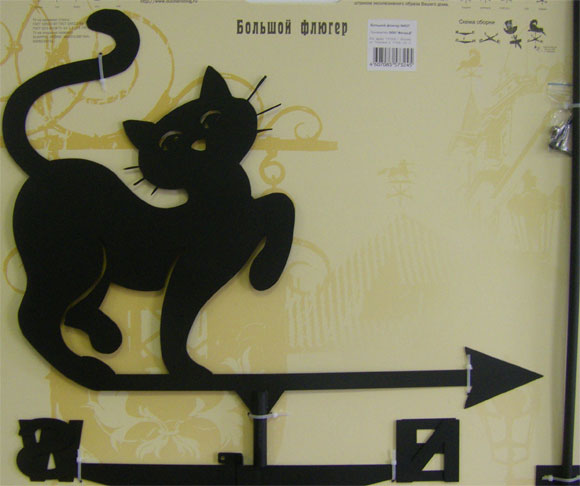
As an example, we suggest using sketches and drawings of a weather vane in the form of very popular figures in our country rooster or cat. The dimensional grid allows you to transfer the image to a metal sheet, increasing it to the required size.
Weather vane stencils. A photo
The drawing shows the dimensions of the rotary vane assembly and arrows, which will determine the direction of the wind.

Weather vane drawings. A photo
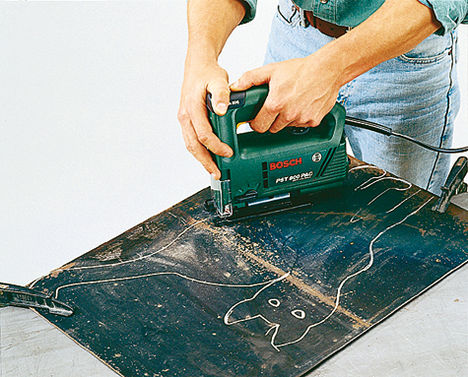
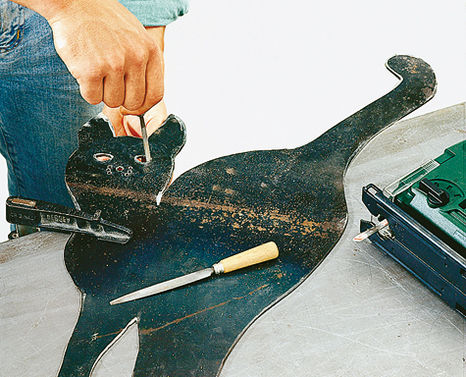
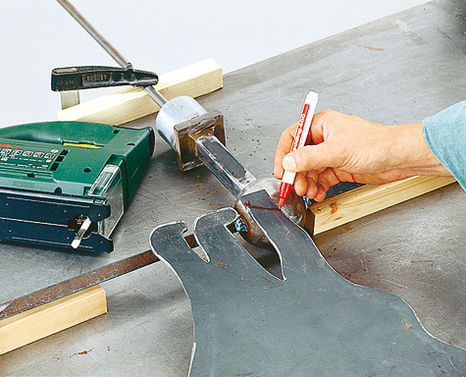
At the first stage, the figure of a cat is cut out of a metal sheet with a previously applied contour. The steel workpiece must be locked in order to prevent its displacement. Best to use bench clampswith which a metal sheet is attached to a workbench.
Making a weather vane with your own hands. A photo
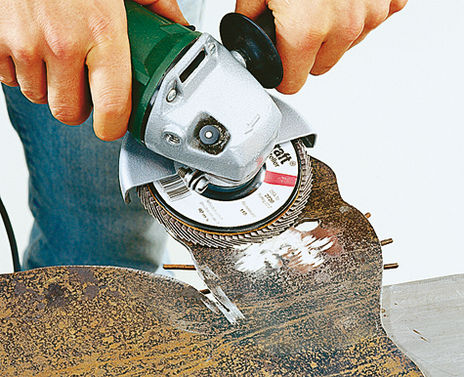
You can remove burrs along the edge of the part using a grinder with grinding all around.
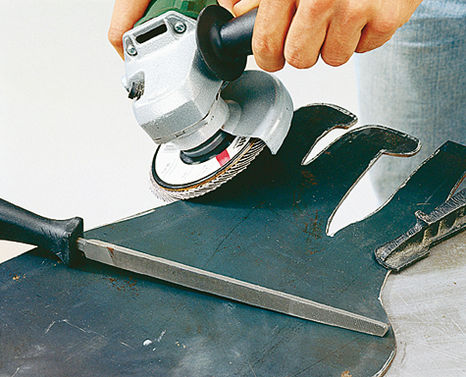
In hard to reach places, treatment is carried out using a wide, thin file.

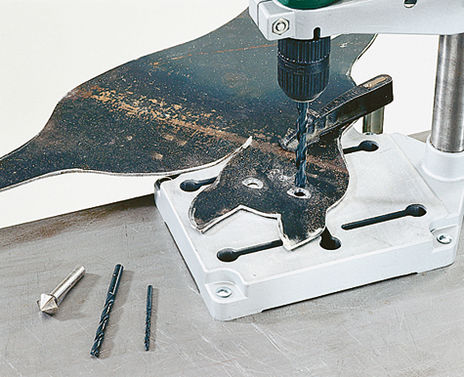
Firmly securing a metal figure on a workbench with a drill with a drill Ø 12-15 mm make holes for the nose, mustache and eyes.
Making a weather vane with your own hands. Photo instruction
The characteristic oval shape of cat's eyes is obtained by expanding the drilled holes with a semicircular filem and file.
3 mm steel wire chopped into pieces about 100 - 120 mm in size, after which 10 - 20 mm recede from the edge of each part and make a L-shaped bend. Thus, blanks for mustaches are obtained.

A cat's nose can be made from round metal rolling diameter up to 20 mm. The edge of the bar is rounded with the help of the same angle grinder.
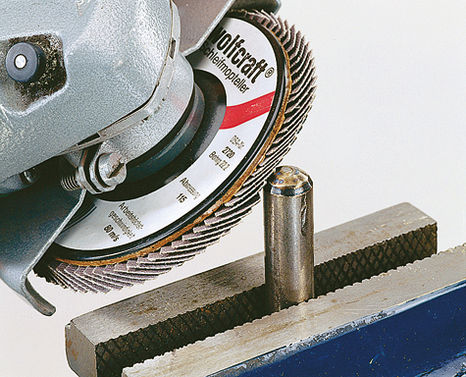
To simulate the shape and structure of a cat's nose, chisel characteristic dents are made on the workpiece.

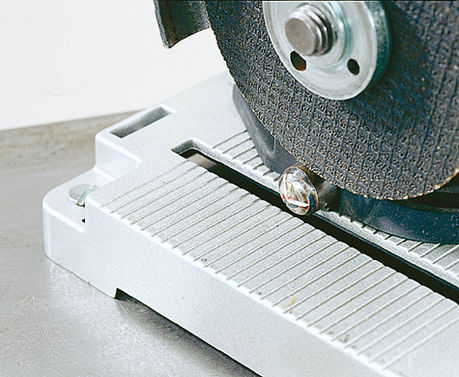
A prepared fragment of a thickness of about 5 mm is cut from the workpiece to obtain a part of the desired size.
The nose is mounted using welding machine. After that, a mustache is inserted into the prepared holes on the front side and welded from the inside.
![]()
After welding, be sure to process the seams grinder until you get a flat, smooth surface.
DIY weather vane. Photo instruction
The same instruction will be useful to those who decided to make a weather vane in the shape of a rooster with their own hands.

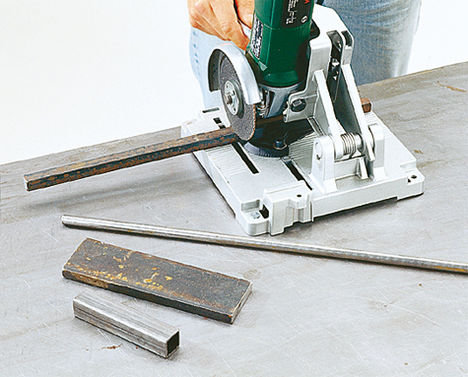
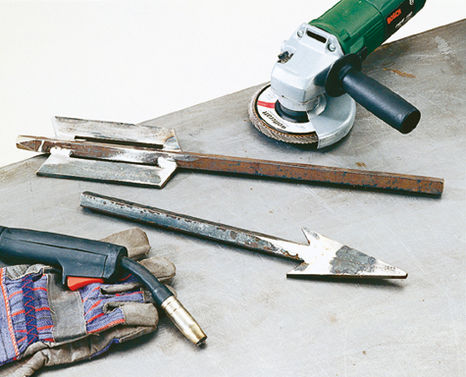
As the base of the boom, two pieces of a square bar with a section of 15x15 mm are used. In this case, the plumage is welded to one fragment, and the tip-shaped part to the other. Welding joints are carefully cleaned.
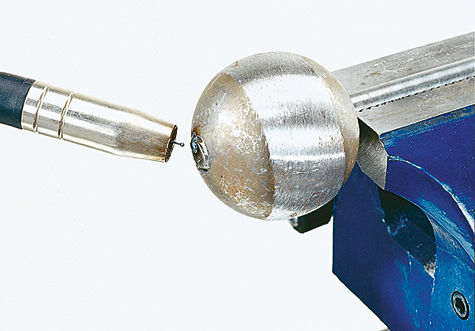
To make swivel unitdrill holes with a Ø 13 mm drill in its lid and steel ball.

The lid is welded to a 50 mm pipe segment with a diameter of 60 mm.

On two opposite sides of the steel sphere do the so-called flatter - recesses for a clear fit of the ends of the boom. A rod with a spherical element is welded to the base of the rotation unit.
After both parts of the arrow are fixed to the ball, proceed to fastening weather vane. To join the figure with a spherical element, a semicircular fragment is cut out at its base, after which the parts are joined by welding. To avoid splashes of molten metal on the figure, it is covered with a sheet of tin. It is very important to correctly orient the parts - the angle between the arrow and the rotary mechanism must be exactly 90 °.
Sustainabilitythe cat’s shape is determined by the attachment points - its front legs are welded to the steel sphere, and the rear legs touch the base of the pointer.

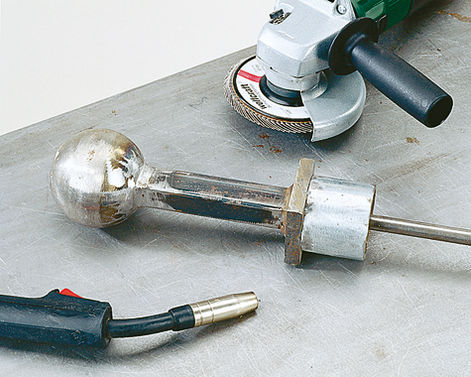
So that the structure can rotate freely, use these parts. A piece of round bar is selected as a supporting element.

Support rod must fit tightly into the pipe, after which the edges of the parts are scalded.
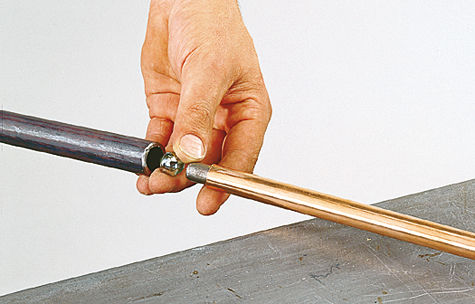
Ball, which is needed for easy rotation of the structure, is lubricated with any grease and inserted into a wide pipe, after which a copper or brass tube is installed in it.
After assembling the vane with a do-it-yourself vane stain and set on the roof.
The video below will give you the most complete picture of all the stages of making a weather vane with your own hands. You can use the video instructions for assembling a simple design, or proceed with the construction of a wind indicator with a generator and backlight. In any case, the product, made carefully and with soul, will please the owner and his family for many years, indicating the direction to the wind.
The popular belief that if you meet a chimney sweep on the street, then luck will be accompanied all day, was reflected in weathercocks with the contours of this character. Today, such a meeting is almost unrealistic, therefore attract good luck You can enter your home by installing a chimney sweep figure with a wind indicator on the roof.

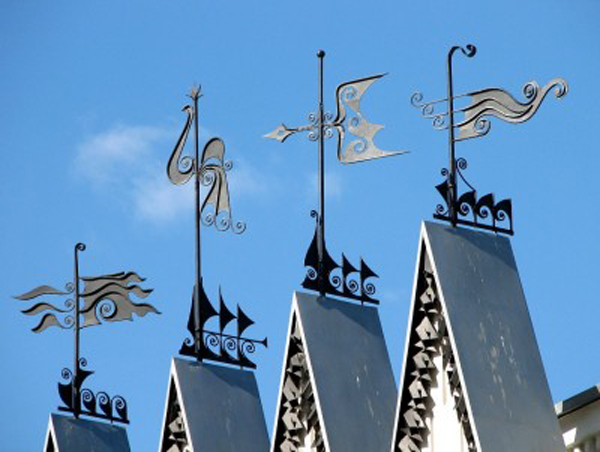
The cottage with numerous turrets and passages can be decorated a series of weathervanesthat are easy to do with your own hands. Stylized images of figures from the Russian ethnic group perfectly complement the roofs of buildings made for folk motives.
Catit has long been considered a guard at home and its protector from the dark forces. By placing a weather vane in the shape of a whiskered purr on the roof, you can create an aura of kindness and peace around your home.

Being a symbol of Heaven and the Sun, eagle embodies strength and power, speed and greatness. A weather vane installed above the house in the form of this proud bird can testify to the independence of the owner, show his social status and high social status.

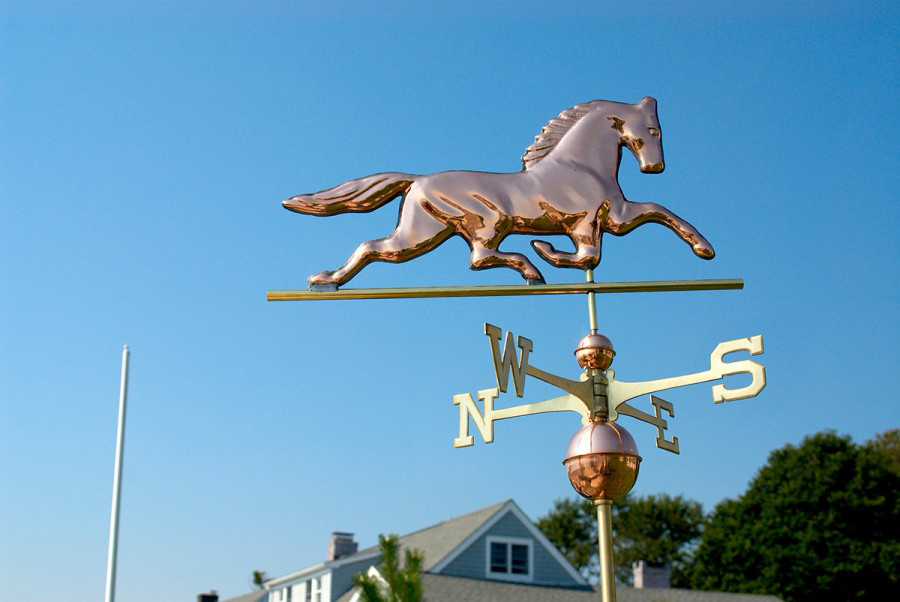
Weather vane horse Suitable for purposeful people with an active lifestyle. Those who are guided by prudence and nobility in their lives will be able to declare this to others, using this simple and elegant solution.
Griffinmounted on the roof can indicate the internal struggle of its owner with light and shadow, about the fluctuations between good and evil. In addition, the semi-half-eagle figure can talk about the strength, belligerence and vigilance of the owner, as well as protect the house from evil forces.

Weather vane old Russian boat will be in harmony with a large house with many windows, doors and stairs. By establishing such a figure, the owner of the home ownership will be able to tell others about remarkable mental abilities and the desire for new knowledge.

Traditionally owlis a symbol of wisdom and patience, so a person who decides to install such a weather vane should think about how much his self-awareness corresponds to the chosen image. And even if everything turns out to be very difficult in this regard, a personal owl on the roof can give an impetus to self-improvement.

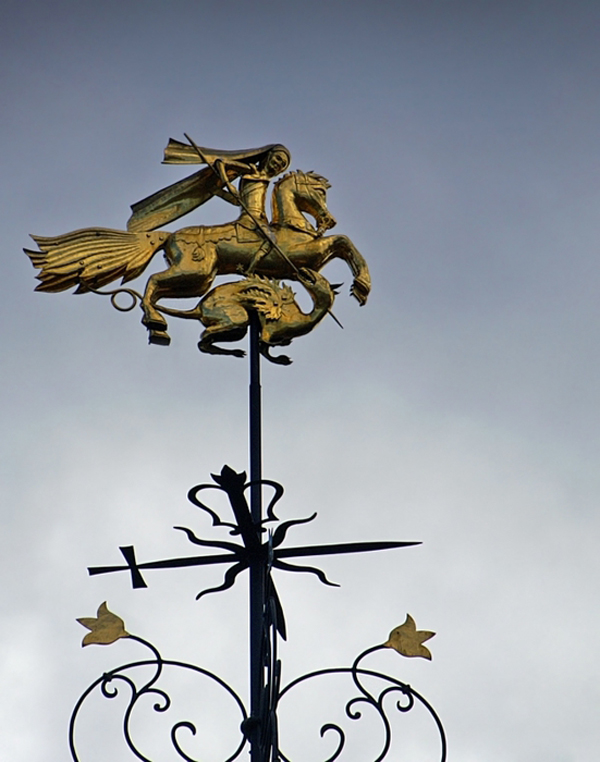
Religious motifs are not found on weathercocks so often, therefore, deciding to make a weathercock with your own hands based on the Bible or the Koran, think about what you want to convey to others with a similar solution. As a last resort, select some heroic figure, for example, George the Victorious, killing a snake.
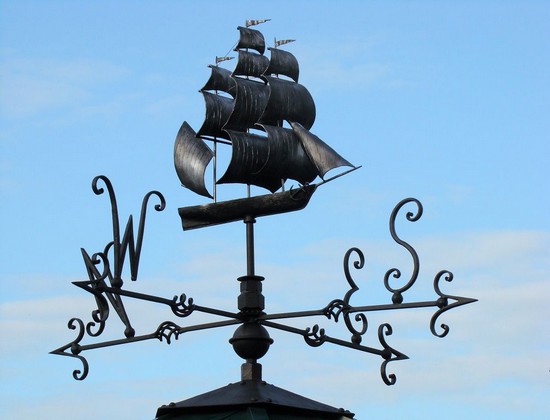
Shipflying across the sky in full sail - what could be more beautiful and romantic? Having decided to make such a weather vane with your own hands, you need to remember the complexity of such work and the need for accurate calculation.
Remembering the old tales, you can find that, despite the negative image, Baba Yaga always been a positive character. Note that this fabulous figure is an excellent solution not only from the standpoint of aesthetics, but also in a constructive way. The broom with which the witch is portrayed is an ideal windsock.
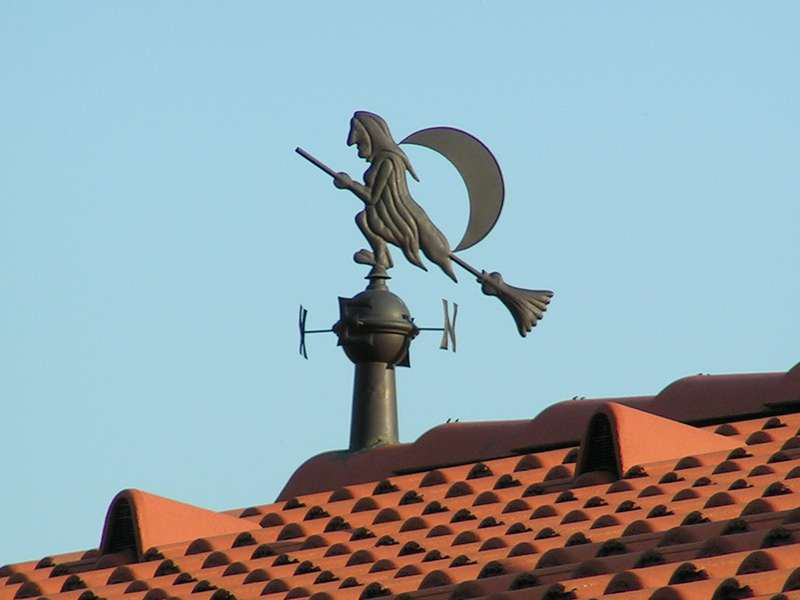
Often a weather vane with Baba Yaga is also decorated with a figure Black cat - her indispensable companion and adviser. The beauty and originality of such a composition will attract the enthusiastic looks of not only children but also adults.
Today, many suburban developers give the uniqueness of their home special significance. A distinctive feature becomes a highlight in the exterior of the building. True, there are not many such devices, and one of them is a weather vane. It has long been a popular element in Western Europe, but today you can also find a weather vane on Russian homes, the reason for installing it is to show the direction and strength of the wind.
Currently, manufacturers of various designer gadgets offer a huge assortment of weathercocks made of different materials. It makes no sense to talk about forms and design, the choice is actually the widest. True, such a toy costs a lot of money, so it makes sense to figure out the question of how to make a weather vane from improvised materials with your own hands.
Let's start with the materials, because this device is installed on the roof of the house, it is subject to all known environmental stresses, so you will need to think about its useful life in advance. In principle, do-it-yourself weather vane can be made from anything. Most often there are varieties made of wood (mainly plywood), sheet iron, rarely copper. Although the copper version is considered ideal.

A wooden weather vane, even if it is treated with protective compounds, will last several years. Steel will last several decades if it is periodically tinted, which is not always possible. But copper is an eternal construction. In addition, it is easiest to process a copper sheet, and decorating it will not be a problem.
Many craftsmen have recently cast their eyes on plastic, since there is a free sale of sheet material today. Processing polymer material is simple, for this there is no need to use any complex tools. But such a weather vane can be installed on the roof of the cottage. On a large beautiful house, he simply will not look. Here, expensive materials are needed to match the structure.
As for the tools, they are ordinary, each owner in the barn will have the necessary arsenal. For example, metal scissors, a hacksaw, a saw, a file, sandpaper, a grinder, a drill, a ruler and a pencil.
The design of the weather vane is based on two components:
Important! When making a weather vane with your own hands, it is necessary to take into account the moment that the horizontal part should be evenly spaced.

That is, on two sides of the axis should be equal parts by weight. In principle, this is the difficulty of manufacturing.

The design features of the weather vane include some additional elements. For example, you can make a weather vane with a screw that will show the strength of the wind. The more intense it spins, the greater the wind force. The design can be supplemented with a vertically mounted plate. It must be fixed in such a way as to remain in a free state. In this case, the plate should swing in one plane. With it, you can also learn about the strength of the wind. The greater the angle of deviation from the vertical, the greater the wind force.
As for the form and design, there are no restrictions. Everything is in your hands, it all depends on imagination and taste preferences. The same applies to the size of the weather vane. True, experts recommend using a width of 40-50 cm, a length of 70-80 cm. For small houses and cottages is the best option. If the weather vane is installed on the roof of the gazebo, then the size can be reduced.
First of all, it is necessary to determine the shape and design of the device. As mentioned above, turn on fantasy. Then your idea should be transferred to paper. The drawing must be done in all the smallest details.
Then you need to make a vertical support with your own hands. To do this, you can use any metal rod: fittings, pipe. Its dimensions: diameter - 13 mm, length 125 mm. In the upper part, a thread is necessarily cut for fastening the horizontal part of the weather vane. You can do it yourself using a die. The process is not very complicated.
A bearing must be installed on the bottom of the weather vane, it is he who will allow the weather vane to rotate around the axis. The decorative element itself is fastened by means of four plates installed at the bottom, which are attached to the metal axis by welding on one side and holes for screws are made on the other side. It is with these fasteners that the weather vane is attached to roofing material at home.
Attention! A very important point is to make sure that water and dirt do not get into the bearing.
Therefore, it is necessary to put on a cap made of metal sheet material when assembling the weather vane. Someone manages to make a cap out of a plastic bottle cap.

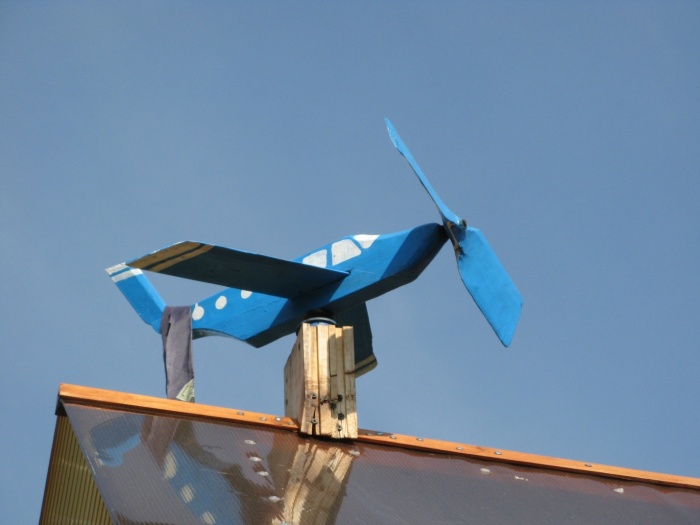
Air vane - the structure is dynamic, so it is not installed on high houses. It just won’t be seen how the propeller turns. Namely, he is the highlight. The complexity of this design is that the rotating part must somehow be freely attached to the figure of the aircraft.
The plane itself can be easily cut with a hacksaw for metal from a sheet of iron, you can make it yourself and from plywood or plastic. But the weather vane propeller must be metallic. It is important to understand that the blades of the rotating element must be located relative to each other at a small angle. The propeller can be cut from a galvanized sheet of iron, which uses metal scissors. In the center of the strip, a hole is made for the fasteners. After that, the edges of the strip should be slightly turned in different directions.
Now you need to fix the propeller to the plane. There are several options:
It is necessary to determine the installation location. It is believed that the weather vane should not spoil the symmetry of the roof structure of the house. Therefore, if there are pipes on the roof, then fastening is best done to them. If there are none, then the best option is the skate of the roof. For installation on the ridge, only two fasteners (strips) are needed, which will be located exactly at the angle of the roof slopes.
How to assemble the weather vane at the installation site.
By the way, the inner diameter of the pipe is matched to the outer diameter of the bearing. And one more very important point. All parts and units of the weather vane should be performed with a large margin of safety. This is especially true for fixtures. It must withstand sufficiently large wind loads. And the snow will be a great test for him.
Do not forget that the weather vane with a propeller is located in the open. So the rain will wash it constantly. Therefore, it is recommended to lubricate the metal structure with solid oil. And this is after its painting. In addition, periodically it is necessary to tighten the threaded assemblies, tint the device, lubricate the bearing, and so on. That is, the weather vane is not just a beautiful element of the exterior design of the house, it is a mechanical toy that must be constantly looked after with your own hands.
The weather vane has long been a common accessory for roofs of residential and office buildings. The fashion for weathercocks that spin in the wind and revitalize the home environment has been preserved to this day.
It can be made in the form of any object, both flat and three-dimensional. The main thing is that relative to the direction of the wind it is always set in the same position. Indeed, the purpose of the weather vane is to indicate the direction of the wind. For a more accurate representation, a horizontal crosshair with the directions of the world is placed on its axis. And today, the weather vane wilde for meteorologists is one of the main instruments for obtaining information about the wind. There are also weathercocks that are known far beyond their location. One of them is St. Thomas at the city hall of Tallinn.
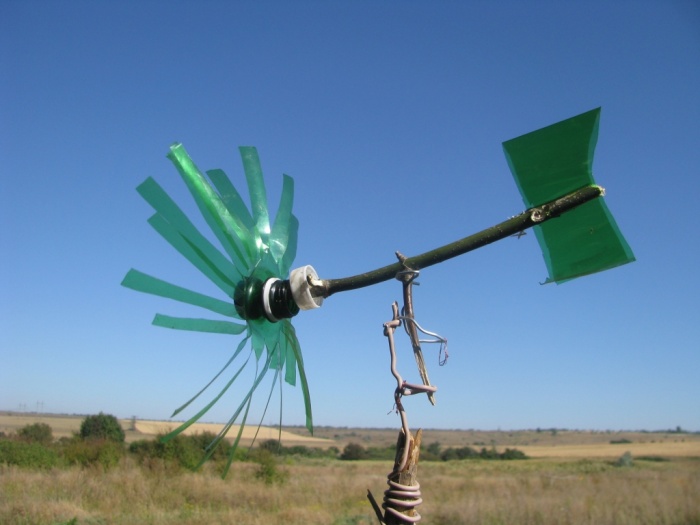
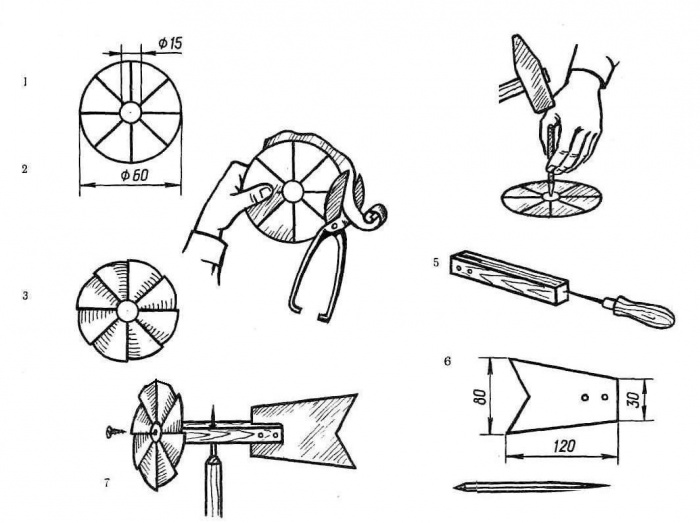
It’s not difficult to make a weather vane with your own hands of the simplest design. Many in their childhood did with their own hands or with their father as well as other home-made toys. To get more attractiveness and benefits, you need to do it with a propeller. Then he will indicate not only the direction of the wind, but also its strength. This will require:
After fixing the tail in the bar, we make a propeller. It is necessary to begin with marking in the bar the axis of rotation in the middle of the bar. Then:
Now there is a device by which you can judge the strength and direction of the wind.
There is also an opinion that the vibrations from the rotation of the weather vane propeller are transmitted to its pole buried in the ground and scare away moles, which spoil the lawns and the layout of the plots at the summer cottage. But to create more noise using the wind, you need a special weather vane.
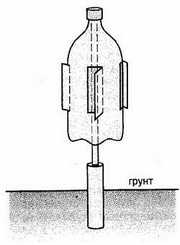
It is necessary to make a weather vane with your own hands to scare away moles so that it creates a noticeable noise. This type of weathervane vilda is simple in design, and drawings are not required for its manufacture. It will require:
It remains to stick a rod into the ground and put a bottle on it. Now the bottle will rotate on the rod under the influence of wind. In this case, the direction of the wind is not important. And the noise from a rotating bottle penetrates the ground well through a short metal rod.
In order to know the direction of the wind, its speed and strength in a science such as metrology, a special device is used, shown in the photo, which is called a weather vane. It has the form of a flag, for the manufacture of which various materials are used, including metal. At the opposite end, he has a counterweight. You can make weathercocks with your own hands.
Relatively recently, these devices on buildings were installed by many homeowners, especially in coastal cities, but today they are less in demand. True, in the Baltic republics that were formerly part of the Soviet Union, as well as in the Scandinavian countries and a number of other European states, they can be seen on many roofs of residential buildings and structures for various purposes. Do-it-yourself weathervanes are popular among the population there.
In cities such as Tallinn, Riga, Amsterdam, the weather vane has become a business card. Outstanding local craftsmen have turned the making of a weather vane with their own hands into a real art. So unique in appearance and grace of execution, these products have been adorning the Moscow Kremlin for several centuries in the Russian capital, the building of the city hall in Riga, and in St. Petersburg the spire of the Peter and Paul Cathedral.
It should be noted that DIY weathercocks have recently become not necessary metrological instruments, but a tribute to national traditions and beautiful toys that can decorate the roof and appearance of the building. From a practical point of view, they are not necessary, because now they use modern devices that show very accurate results.
To decorate the roof of the building and give it an individual style, you can order this product to a professional or make a weather vane with your own hands - drawings for it are available on the Internet and in special literature. Some craftsmen have enough drawing and sketch.
Small items with moving parts are clearly visible on gazebos, garages, greenhouses, and besides, for example, a weather vane with a do-it-yourself propeller, repels birds from garden plots well.
The most common steel or copper pinwheel is a weather vane with their own hands, which is coated with paint for outdoor work. Forged products are less common. Weathercocks made from improvised materials are rare.
From internal pipelines, drains are transported by external ...
Each apartment, like every family, has its own characteristics, so it is difficult ...