The Ministry of Finance of Russia for the first time disclosed data on the salaries of employees of federal...

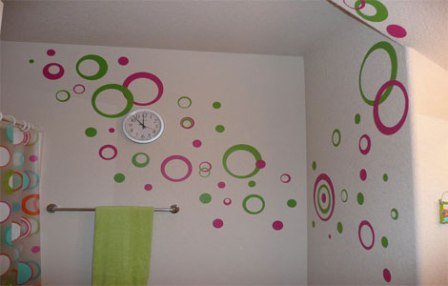
Renovating a bathroom is a costly and troublesome task. I would like to quickly finish the walls on my own, at least save a little and pick up a worthy replacement for the same tile. You can, of course, use various Wall panels. But there is a more profitable option - a self-adhesive film for the bathroom, which is not afraid of moisture. A variety of patterns makes it possible to find a solution for any interior.
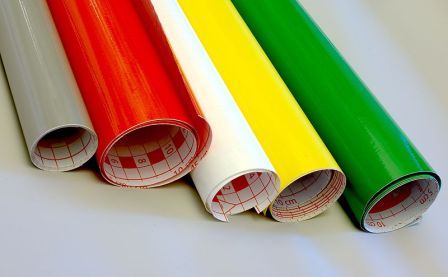
All high-quality self-adhesive films are made of PVC (Polyvinyl Chloride), which can easily withstand even the high humidity of the bathroom. In stores, they are sold in the form of rolls of various widths, from which you can cut a sheet of the desired length.
The vinyl film consists of three layers:
Before the start of work, the adhesive layer is covered with a special, easily removable paper, which has a centimeter line to facilitate cutting.
There are both monophonic films of a wide variety of colors, as well as with drawings, and stylized as ceramics, fabric, wood, leather.
They also differ in the type of surface on:
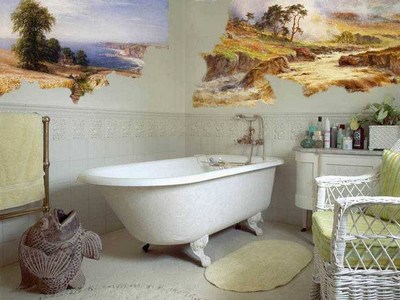
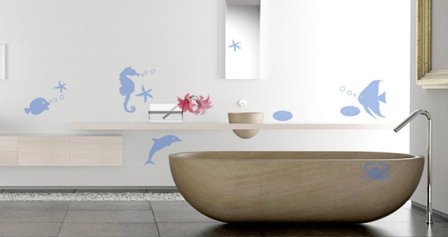
Self-adhesive film in the bathroom can be pasted over not only walls, but also ceilings, and doors with furniture. There are many options, and there is a solution for any style. But different combinations of different-looking films or photographs of landscapes look best.
And of course, a lower cost compared to the same tile or other decorative finishes. It will be cheaper to just whitewash or paint the walls.
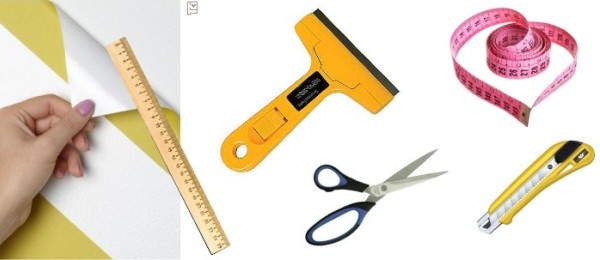
For cutting, you will need a knife and scissors, as well as a pencil, tape measure and ruler. For gluing, you will need a household hair dryer, a spray bottle with soapy water and a rubber spatula.
The toolkit is uncomplicated, it is easy to handle it. Much more attention will have to be paid to the preparation of the pasted surface. It has to be just perfectly flat. Otherwise, all the flaws will be visible under the film. After all, although it is strong, it is still quite thin.
Ideally suited for high-quality plastered concrete or brick surface. Drywall is even better, but care must be taken to carefully seal and smooth all seams between drywall sheets.
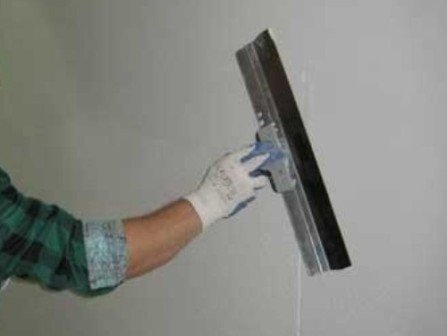
The plaster is applied in at least two layers: the main and finishing. The latter is polished with fine sandpaper to a perfectly smooth state and coated with a primer.
The application of a primer coat is mandatory. An acrylic primer is best, which will bind all the fine dust on the prepared surface and provide excellent adhesion. After priming, the self-adhesive bathroom film will definitely adhere firmly and will last a long time.
When sticking a vinyl film on a metal, plastic, glass or oil-painted surface, you will definitely have to degrease it with any solvent.
Typically, the backing has explanatory instructions in the form of drawings. It is enough to follow them, and everything should work out.
Self-adhesive film for the bathroom can be used both as the main finishing material and as an additional decorative element.
There is an imitation of all the main natural finishing materials - wood, stone, leather. You can edging mirrors, make trims for cabinets and doors, make applications in the form of cartoon characters or various ornaments. You can order a drawing from your own photo or choose from the available images.
Self-adhesive film has been in demand among the population of our country for quite a long time. With its help, you can not only make pretty patterns, signs and accessories, but even complete repairs. Let's try to attach a self-adhesive film to the bathroom.
Self-adhesive film for the bathroom - a pretty good option for finishing, especially if you need to update the premises quickly and inexpensively. This material is simply applied to smooth surfaces, seriously changes the design of the room, is not afraid of humidity and is able to withstand temperatures up to 80°C. Moreover, you can always choose not only a plain film, but also a material with ready-made drawings and patterns.
The good news is that self-adhesive bathroom film can be applied to almost any material. These are metal, ceramic tiles, wood, glass, plywood, plastered surface, gypsum, cork base, drywall.
The only disadvantage and the most stringent requirement is the application of a self-adhesive film only on a perfectly flat surface.
Nothing complicated or special, just the simplest set of tools: a pencil or pen for marking, a ruler (preferably long), a mounting knife for cutting, scissors for auxiliary cutting, an industrial heat gun, a squeegee (felt material to help in applying the film correctly) or felt spatula.
It’s worth starting with surface preparation, since far from every material the film will lie normally. Initially, the surfaces are well leveled and polished, then they are competently degreased and primed. Wood should be sanded and varnished, metal should be primed with a high-quality primer, drywall surfaces should simply be puttied and cleaned, primed and the film itself should be applied. That is, in order to apply the film on the surface of the bathroom, you need to make the surface perfectly even, and also degrease it so that the film adheres well.

Each type of self-adhesive is cut differently. For example, the most standard self-adhesive film in the bathroom is cut from the reverse side, according to the marking of the substrate. A film with a special pattern, which you will need to fold from different strips or pieces of self-adhesive, is cut from the front side. From the “face” there is also a cutting of the film, which imitates ceramic tiles.
For correct cutting, you will need measuring instruments, even a standard ruler, and a pencil. Further, after the final marking, the self-adhesive film is cut with a special knife, which we have already provided in our tool kit.

If you forgot something, you can always peep into the instructions during the work itself, since the pasting scheme is indicated on the back of the film.
The substrate is carefully separated from the film by only a few centimeters, then the edge is applied to the markings on the wall, that is, to the place where pasting begins. After that, the substrate is gradually separated from the film, and the film is successively pressed against the surface, constantly leveling with a felt squeegee. The process of leveling and squeezing out air bubbles from under the film occurs from the center to the edges, so as not to make wrinkles on the film.
If you missed bubbles when pasting, you can always pierce them with a needle or the tip of a mounting knife and smooth them out by squeezing air out from under the film and gluing it to the surface. If wrinkles form on the film, the film is abruptly torn off and pasted again.
It often happens that we need to cut and align corners and lines - this can always be done with a sharp mounting knife. If you need to paste irregular shape objects or, say, rounded elements, you can always heat the film a little with a hot air gun and pull it in the right direction.
A mounting hair dryer is also used to consolidate the results of the process. It warms up all surfaces pasted over with a film.
If you need to glue a metal, plastic or glass surface with self-adhesive, we offer another rather interesting and fast way which won't take long.
you need to moisten the surface of the pasting material with soapy water (a solution of clean water and detergent). Next, you need to remove the entire substrate from the cut piece of film and attach the film to the surface. As you understand, the material will not immediately stick, and you will have a great opportunity to move it in the right direction the right number of times. After laying the film on the surface as you need, just gently press the top edge of the film and expel all the water from under it with a squeegee, in a downward direction, thereby smoothing the material over the surface.

Pasted over the bathroom with self-adhesive film can be very quickly, but now we need to do everything possible so as not to lose her cute appearance and originality just as quickly. To do this, we consider methods for caring for the film.
You will not have any difficulties, because the care of the film is very simple, you only need to occasionally wipe the material with warm water and detergent or ethyl alcohol if the dirt is not removed by simple cleaning.
Do not use abrasives and strong chemicals to care for the film - gasoline, acetone, solvents and others.
As you can see, self-adhesive film in the bathroom can be an option for an inexpensive and very original finish. Moreover, you can always paste over the surfaces with a film yourself.
Do you want to customize your bathroom? Want to feel like a designer, but don't know where to start? Then self-adhesive bathroom film is what you need. Ease of sticking, moisture resistance, resistance to high (up to 80 degrees) temperatures, the ability to choose your own color scheme - and all this at an affordable price. And easy dismantling will allow you to regularly change the situation in the bathroom.
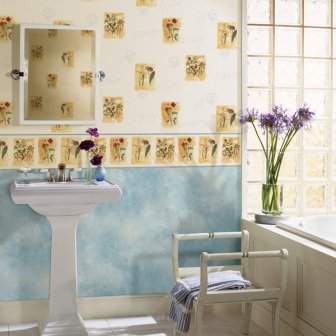
In order to create an atmosphere in the bathroom to your liking with the help of a film, you need to choose the color scheme that will be combined with the rest of the interior. It is advisable to choose a color of the film that will not contrast with other objects. For example, if the bathtub is made in a futuristic style, then the classic “square” film will hardly look nice. To emphasize cleanliness and “sterility” in the bathroom, a bright white film is suitable. To create an atmosphere of warmth and comfort, yellow and its shades are best suited. And if the bath or sink is painted in bright colors and you need to emphasize them - dark colors. Colors and shades can be combined with each other. Variety is often better than monotony.
It is not necessary to cover the entire room. The film can be perfectly combined with tiles and other materials. A very common technique is when the walls in the bathroom are covered with tiles, and on the wall under which the bath is located, an image of the sea or a wild landscape flaunts. This solution suitable for visual expansion of the room. You can also use custom-made film applications or ready-made designer ones. And if the repair in the bathroom has already been made, but pipes stick out inconveniently in the corner, then an inconspicuous film that matches the color of the walls will perfectly cope with the task and save you from unnecessary costs. The film on the ceiling with the image of the sky will give a feeling of serenity. An old cast-iron bath can be given modern look if you "dress" it in a matte film.
Self-adhesive film for finishing the bathroom does not require special skills. If you need to apply "self-adhesive" on a flat surface, then this process will not cause difficulties even for a beginner. However, surface irregularities or corrugated tiles will have to be removed. When the film sticks out, it looks ugly. For installation you will need a minimum set of tools:
First you need to prepare the surface. All irregularities, if possible, should be repaired with a primer. If the coating is wooden, then it is desirable to varnish it. The best effect will achieve a primer based on acrylic. Immediately before gluing, the surface must be thoroughly degreased. Then you need to cut the film into small squares (the lines of the squares are shown on the inside). When all preparatory actions completed, you can start pasting.
Separate the edge (2-4 cm) of the substrate (paper back) from the film, then attach this edge to the base and smooth with a squeegee strictly from the middle to the edges. With one hand, holding the middle of the substrate, pull it together, and with the other, smooth the film. This must be done to minimize the appearance of air bubbles. Bubbles that still appear should be pierced with a needle and then smoothed out with a squeegee. Particular care should be taken when pasting corners. After the work is done, the entire surface of the film must be heated with a hairdryer.
There is another way of gluing, which is best suited for glass or metal surfaces. The surface is wetted from the sprayer with a solution of water and detergent. Then you need to separate the substrate from the film and apply to the wetted surface. Further, from the middle to the edges, smooth with a squeegee, thus expelling water. It is best to do this with two people, although one person can do it.
Further care of the film does not require much effort. Most often, it is enough to simply wash the “self-adhesive” with warm water and detergent. After cleaning, wipe the surface dry is not required. If serious pollution has appeared, then alcohol-based substances will help (even vodka will do). However, powder detergents or solvents should not be used. Powders can scratch the film, and solvents can change its color.
So, self-adhesive film is a material that combines ease of use, reasonable cost, the ability to creatively approach the issue of bathroom decor, and ease of care. The gluing process is simple and labor-intensive. You can find the film on the shelves of almost all hardware stores.
1. An unusual material that can have any surface (glossy, matte, smooth, rough). The range of colors and shades is simply amazing. In addition, you can choose not a monophonic film, but various drawings, patterns, ornaments.
2. The price will please anyone who wants to make repairs, but does not have great financial resources.
3. Excellent quality characteristics: waterproof, durable, resistance to very high and low temperatures- up to 80 degrees.
4. You can perform all the work on pasting the film yourself, without involving specialists and without having special skills.
Despite the huge number of advantages, do not forget about the disadvantages. There are not so many of them, but you should not forget about them either.
1. A rather laborious process of preparing the surface for gluing the film, it must be clean, dry and smooth.
2. Water resistance is certainly an excellent quality for a bathroom finishing material, but the film does not allow the wall not only to get wet, but also to breathe, so diaper rash and mold can form under it.
3. Relatively short service life. For some, this is a disadvantage, but many like to often change the interior in their apartment. Low price and easy installation will allow you to carry out cosmetic repairs as often as your heart desires.
The film is sold in rolls from 45 to 90 cm wide and from 2 to 15 m long.
Taping your entire bathroom with cling film is a simple matter, but you are unlikely to like the result. Firstly, on large areas it looks ineffective. And secondly, it will be difficult to stick so much film on your own. Do not forget that the entire surface will need to be carefully prepared - cleaned, leveled and dried.
But the film can become a spectacular element of decor. It easily covers various ledges and corners. A great idea is to hide and decorate the pipes in the bathroom. Because high temperatures and their difference is not a hindrance, then you can close both the hot and cold pipes together. Designers are advised to arrange pipes for columns, for example, in Asian style. For example, paste over the column with red paint and stick carved black hieroglyphs on top. The result is a beautiful and effective accent.
It is easy to arrange the zoning of the room with a film, for example, decorate the walls and ceiling with plain tiles, and make the floor, bathtub and wall around the mirror and sink accented with a bright self-adhesive film with an interesting pattern.
What materials to glue. The undoubted advantage of the film is that it can be glued to almost any surface that you have in the bathroom:
What tools will be needed. Pasting the film does not require you to have special and expensive tools, just a simple set of common repair tools:
1. Surface preparation for sticking. The basis under a self-adhesive film has to be carefully cleared of dust and fat. The film will last a long time only on a smooth and clean surface. Degrease the surface with water and detergents.
A rough and porous wall will have to be treated with a primer. It is necessary to level uneven and cracked surfaces with putty. When dry, the wall is sanded and covered with a primer mixture. It is desirable that the base of the primer mass be acrylic, then the film will adhere as firmly as possible.
2. How to cut and prepare self-adhesive film. On the underside of the film (wrong side of the paper), even squares are drawn, along which it is very convenient to cut it to obtain a piece of the desired size. First, we measure how much film is needed, mark the necessary lines with a pencil and cut along them with a mounting knife. Do not forget to leave a margin of 2-3 cm on each side. If the film has a pattern of ceramic tiles or other geometric shapes, then it is cut from the front side along the lines of the figures.
3. How to stick the film. On the reverse side of the film there is a guide to pasting, all the work is schematically drawn there. The substrate is separated from the film by no more than 3-5 cm, evenly and very carefully applied to the surface. The film is smoothed with a felt spatula or squeegee from the center to the edges, releasing all bubbles and leveling the surface. Then, slowly, one hand removes the backing from the film, while the other smoothes the self-adhesive in turn in different directions. This order of work can save your wall from the appearance of air bubbles. If after finishing all the work you notice a few bubbles, pierce them with a thin knife or thick needle and gently smooth them out with a squeegee. If you do not have a squeegee, do not rush to run to the store for a purchase, you can take a piece of plastic and wrap it with a cloth. If a wrinkle is formed during pasting, then you must immediately tear off the film sharply and forcefully and apply it again. This is possible because the film finally adheres to the wall only after a couple of hours.
4. Pasting of corners, edges and completion of work. To paste over an even angle, the film is cut at 45 degrees, then folded and glued. For round edges or convex surfaces, the film is first heated with a heat gun, gently folded and glued. In the process of heating, the film becomes elastic and fits well on an uneven surface.
To achieve the best effect, repair professionals advise, after pasting, to warm up the entire surface around the perimeter with a building hair dryer, especially corners and joints.
If the surface to be glued has impressive dimensions (a whole wall), then wallpaper paste is first applied to it, so the film will hold more securely. At the same time, the seams of the film are closed with silicone sealant to protect the adhesive base from moisture.
In bathrooms, the film covers not only the walls, but also makes original accents on the details, gluing it to various materials: bath, glass, mirrors, metals and synthetic surfaces. To do this, pour detergent into the water and spray it on the desired surface. Then completely remove the entire substrate and apply the film to the wet base. Set the film in the desired position, press it and expel water with a squeegee, smoothing the film from the center to the edges. The main thing is that your detergent does not contain scratching components, thinner, gasoline and acetone. These components will spoil the surface or color of the film.
Regular daily care film is not required. Only if you need to remove dust or dirt, you can do this with a warm, damp cloth with the addition of a small amount of detergent. If the pollution is very strong, vodka or ethyl alcohol will easily remove it.
So, self-adhesive film is a unique and modern material for decorating a bathroom, it is easy to fit, for a long time retains its shape and color, has a very low price.
Today, it is widely believed that self-adhesive film is a cheap substitute for ceramic tiles, which are traditionally used for bathroom decoration. It should be noted right away that this point of view is absolutely erroneous, since self-adhesive PVC film is an amazing decorative finishing material, which, like ceramic tiles, has its own advantages and features. The use of self-adhesive film is not a way to replace other finishing materials, but is intended to create a unique beautiful coating that cannot be done with other facing materials.
Self-adhesive film for bathroom Today it is a widespread finishing waterproof material. It is made in different shades, it can have a different surface texture, its price is affordable for any apartment owner, such a self-adhesive is sold in most hardware and hardware stores.
The production of self-adhesive films is aimed at a wide consumer sector. This means that an important property of this material is not only its low price, but also its versatility. You can glue the walls with a self-adhesive PVC film of a suitable color and texture not only in a residential area, but also in an office, a trade enterprise, an educational institution, a medical institution and other organizations. Self-adhesive is relatively inexpensive, does not require additional expenses for the purchase of an adhesive and allows you to quickly complete the facing of all necessary surfaces.
For sale this finishing material comes in the form of rolls. The surface of such a film can be smooth, matte, contain a textured coating or even embossed. The range of colors and patterns that self-adhesive can contain is practically unlimited, which completely frees the hands of designers and opens up wide possibilities for them. However, most often this material is used as a self-adhesive film for the bathroom, which is associated with a number of advantages and benefits, such as water resistance, resistance to dirt, temperature, and detergents, elasticity and low price. If you once paste over the bathroom with such a film, this will be enough for several years of operation of the premises without losing the attractiveness of the coating.

Photos of PVC wall coverings in the bathroom are provided for your attention in this article. There are practically no obvious drawbacks to this material, except for the fact that it should be glued to a perfectly flat wall. You can use this finishing material for surfaces such as gypsum, plaster, drywall, putty, wood (plywood), metal, glass and plastic.
Since self-adhesive film does not require the use of an adhesive, and it does not require a saw, grinder or other traditional tools to cut it, you only need:
If you have other tools besides this that may come in handy, it is also advisable to prepare them, although the above should be completely sufficient to complete all the work. If you do not have a soft felt spatula, you will have to buy it at the nearest store, since it will be difficult to replace this tool.
Like all other facing works, gluing the walls in the bathroom with a film begins with preparatory work. They consist in cleaning and leveling the walls until a perfectly smooth and even surface is obtained. If stains from greasy substances remain on the walls, you can use water and detergents to remove them. All places with a rough surface must be carefully sanded with sandpaper, then soak all the walls with a primer. All cracks in the walls must be filled with putty, followed by sanding after it dries. Acrylic primers are recommended for reinforcing wall surfaces, as they provide maximum adhesion of the self-adhesive film to the surface. If you plan to stick PVC film on glass or metal surfaces, they must be slightly moistened.

After completing the preparatory work, you can proceed directly to the wall cladding in the bathroom. On the back of the film, after unfolding it, there is a print in the form of squares. Thanks to this, the material is very convenient to cut into pieces of the required size and desired shape. After marking with a marker and a ruler on the back side, the rolls are cut into pieces in accordance with the size of the walls. The self-adhesive is cut on a hard surface by pressing the ruler along the lines and drawing a mounting knife near it. This process is well captured in the photo in this article. If there is a pattern or geometric shapes on the front surface of the film, cutting should be done from the front side, leaving a margin of 2-3 cm at the edges. If the film surface imitates ceramic tiles, it must be cut along lines that repeat the seams between the tiles.
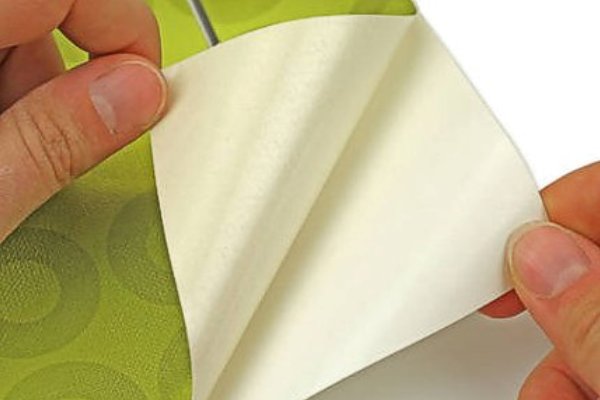
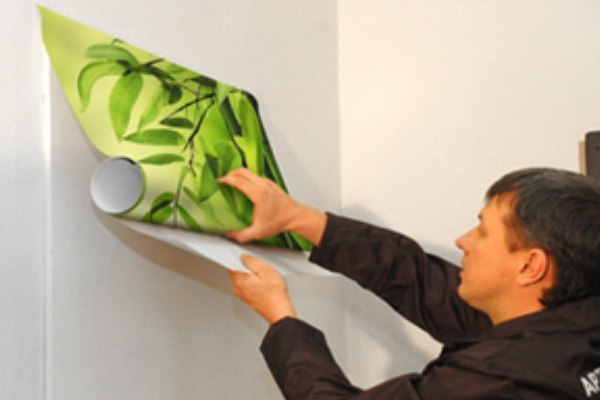
The process of gluing the film begins with its separation from the substrate. To do this, on the side from which the gluing will begin, the substrate is separated at a distance of 2-3 cm and the edge of the film is very carefully and accurately applied to the wall in the right place. Then slowly with one hand we continue to pull on the substrate, separating it from the film, and with the other hand we smooth the self-adhesive film using a felt spatula. It must be remembered that the smoothing of the film should occur from the middle of the web to its edges. Sticking should be done slowly, slowly, separating the film from the substrate as it sticks to the wall. At this time, it is necessary to monitor the absence of air bubbles under the surface of the material, which must be glued evenly and over the entire area.
Important advice! If you don't have a felt spatula, you can use a plastic sheet wrapped around with several layers of soft cloth instead.
If suddenly you notice that wrinkles or folds have appeared on the surface of the self-adhesive film, you must sharply pull the edge of the material and tear it off the surface, after which you should repeat gluing and smoothing more carefully. All defects must be corrected immediately, since after a few hours the self-adhesive can no longer be torn off the surface without damage.
For pasting internal and external corners, the protruding edges of the film must be cut at an angle of 45 degrees, bent and glued. Rounded edges, which are more difficult to process, are pasted over using a hair dryer. The device heats up the film in necessary place after which it becomes very soft and elastic. In addition, it would be desirable to evenly heat all the walls with a hairdryer after finishing them with a film.
In fact, special care for the walls pasted over with film in the bathroom is not required. All contaminants are easily removed from the surface of the material with a sponge, warm water and detergent. If this method failed to remove the stains, you can try to clean them with vodka or ethyl alcohol.
The only thing that is not advisable to use when caring for the facing film is abrasive detergents in powder form, as well as acetone-based solvents and gasoline. The use of these products may partially or completely damage the self-adhesive film.
Self-adhesive is a great way to quickly and beautifully finish the bathroom in any style. The decorative possibilities of the material are huge, the price is affordable, the finish does not need any special care. Of course, it is not as durable as a tile, and not as durable as a stone, but repairs with its help take a matter of hours. And the ability to periodically and very radically change the interior can hardly be called a disadvantage. Good luck with your repair!
The Ministry of Finance of Russia for the first time disclosed data on the salaries of employees of federal...

Of the many questions and topics that are asked to tarot cards, not a small one ...

The benefits and harms of Coca-Cola. Coca Cola is a popular drink all over the world....