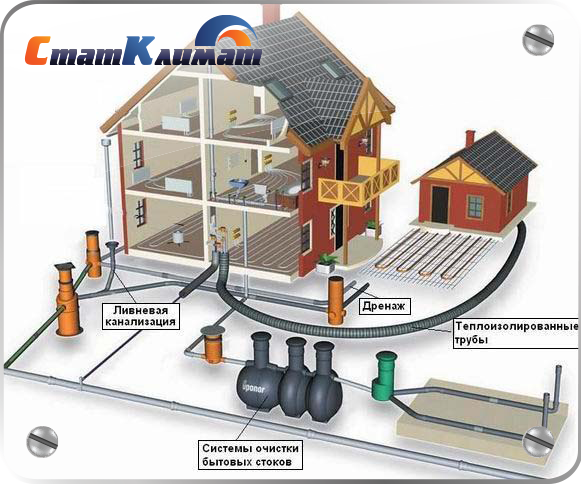
From internal pipelines, drains are transported by external ...

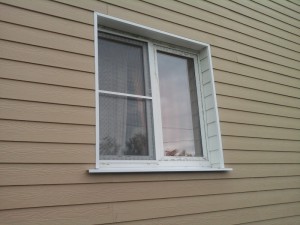
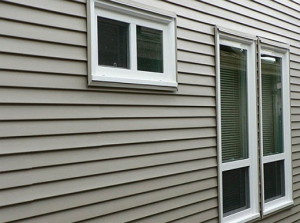
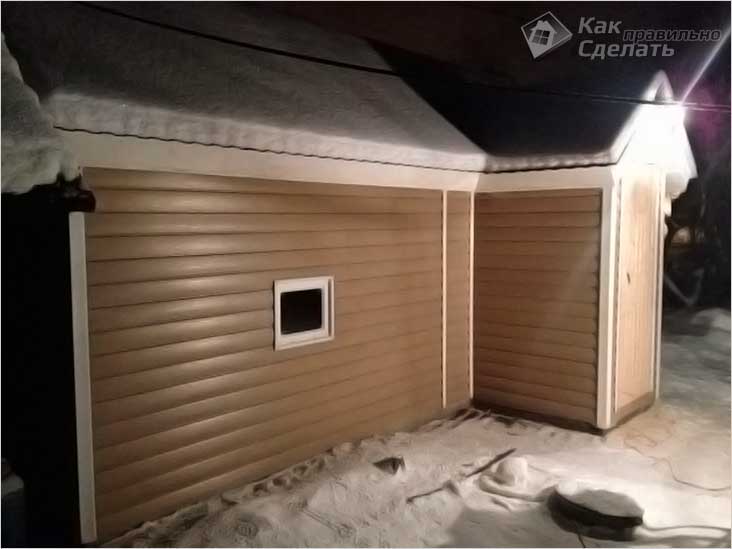
Today's selection of finishing materials is incredibly diverse. One of them is siding - window slopes with such a lining will gain a magnificent appearance and excellent performance. Therefore, we will discuss how to implement this option yourself.
Sooner or later, we may encounter replacing windows - basically it is a necessary necessity, but sometimes it’s just our whim. In general, the reasons are completely unimportant, most importantly, the result is the same - the decorative one is broken. Many may consider that it is not necessary to restore it immediately, because it is only aesthetics. However, it is worth considering that the appearance of both the window and the entire facade of the building as a whole, of course, is being transformed.
But besides this, the decoration of the slopes is mandatory for a number of reasons. For example, their integrity is as important for the insulation of a house as the quality of the windows themselves. After all, if it is broken, then cold air will penetrate into the room, drafts will appear. In addition, do not forget that the mounting foam, which is blown between the window frame and the opening, collapses under the influence of the sun. Therefore, additional protection is needed; various materials are used for this purpose, including siding.
So all the same, what is this facing material? The translation of the name sounds like “outer skin”. On the territory of Russia, they first started talking about him not so long ago, twenty years ago. It is a solid typesetting panels of a certain shape. In addition, the siding is also called directly the process of facing the building with the same material.
Siding can be wood, vinyl, ceramic, aluminum, steel and cement. Each of them has advantages over other species and, of course, disadvantages. The same variety awaits you in the choice of color, its palette is simply amazing with the number of shades - even the most picky client will be able to choose an option for everyone.
However, in addition to a fairly wide range of colors, this material has a number of advantages - for example, you will appreciate the excellent resistance to various chemicals and weather conditions. Also, the siding is fireproof, does not emit toxic fumes, does not fade and is not afraid of temperature changes. After such a finish, the sheathed surface still “breathes”. It is very unpretentious in operation, and the installation of such a facing material can not be attributed to complex in any way, due to which the decoration of window slopes with siding is so relevant today.
An indisputable advantage is its strength, so that it can withstand moderate mechanical stresses with dignity. Rodents and termites are indifferent to it, so there is no need for additional processing. As manufacturers promise, this sheathing material is able to maintain its original shape and color for as much as fifty years. In addition, it can be attributed to dielectrics.
There are also disadvantages. Firstly, some types, for example, the same vinyl siding, are prone to thermal expansion. Usually it is only a few millimeters, but if mistakes were made during installation, the coating can go in waves or even crack. Secondly, he is still afraid of significant shock loads. And thirdly, the highest quality products have a relatively high cost.
So, we examined how important it is to monitor the condition of window openings, learned a little about the sheathing material. Now, let's get acquainted with how to make external slopes from siding with your own hands.
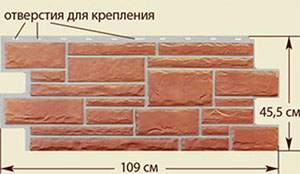
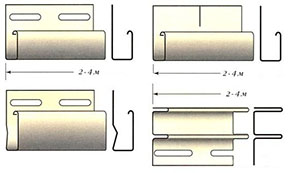
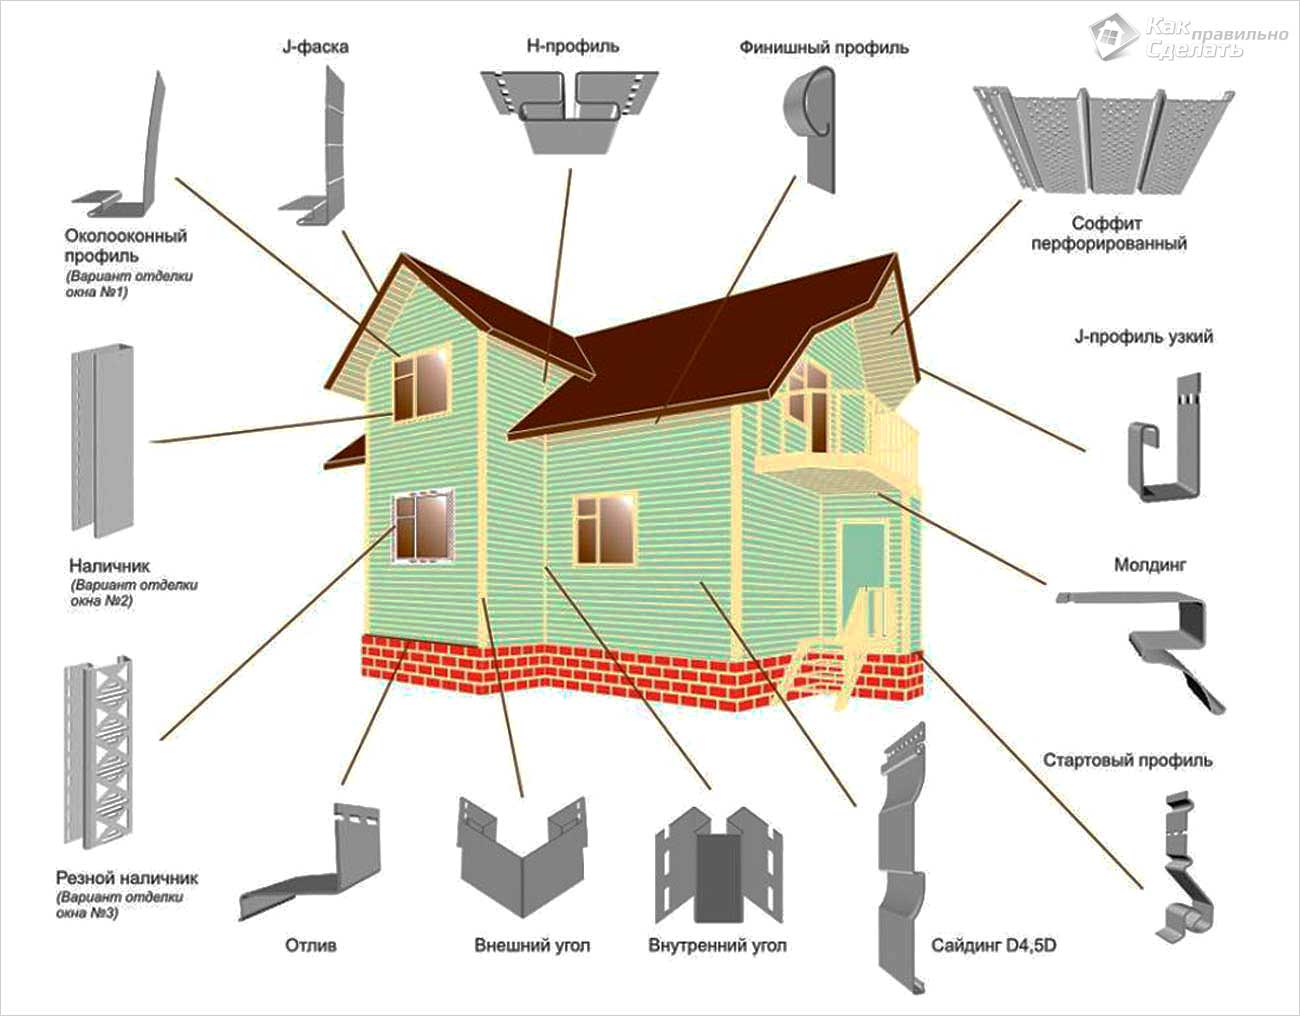
So, in addition to the panels themselves, there are a wide variety of components that will greatly facilitate the work. For example, a special profile is fastened around the perimeter of the window slopes. Its length is 3 meters. Please note that trimming this element is very difficult to dock, the seam will be obvious, which will greatly spoil the appearance of the entire building, and not just the window opening. You will also need a finishing strip that attaches to the top and sides of the window frame. Low tides and a J-profile are also purchased, with the help of which the installation of corners is carried out, if necessary. In general, we make the necessary measurements (length, width and depth of the opening) and in accordance with them we purchase material.
For all the figures obtained, take a margin of 10%, sometimes in the course of work, something spoils, breaks, and trimming may also be necessary.
This issue is resolved quite easily, since the necessary things are available for each owner. We will need a screwdriver, hammer, square, level, jigsaw or circular saw (if neither one or the other is available, then you can use an ordinary hacksaw or scissors for metal, only in this case the quality of the cut will be much worse). You will also need a tape measure and a pencil, and do not forget to stock up with enough self-tapping screws.

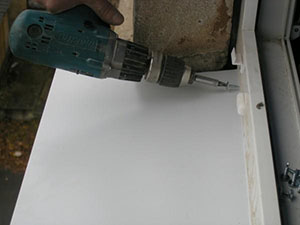
In general, and at this stage there is nothing new - slopes for siding are prepared in the same way as for other decorative finishes. It is necessary to cut off excess foam, remove dust, dirt and other garbage.
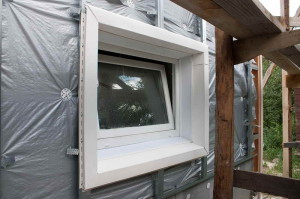
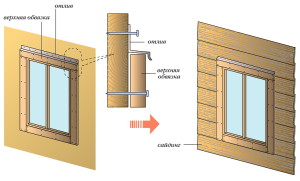
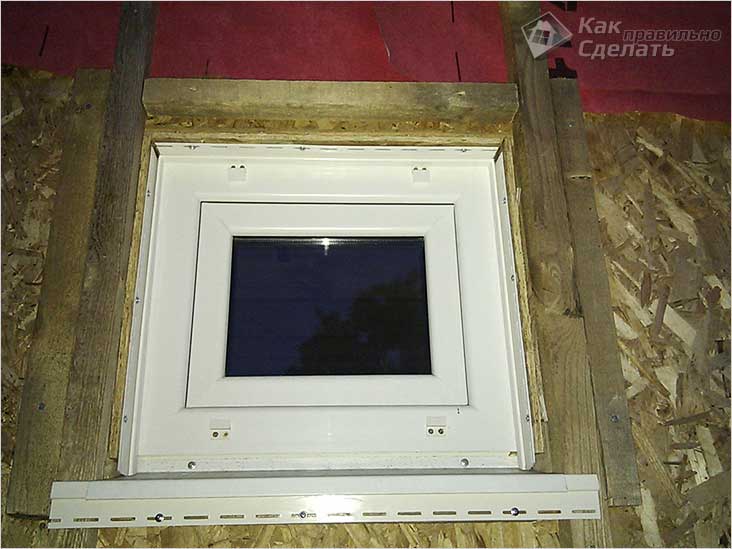
It is these elements that should be fastened first, it is rather difficult to underestimate their importance, since they protect the assembly seam, plus they also play the role of noise isolation. So, their fixation is as follows. As with, these elements should protrude slightly from the wall (not more than 10 cm) and from the ends, so their edges are trimmed and bent so as to produce small borders. Next, a small amount of polyurethane foam is applied to the protrusion, the ebb itself is pushed close under the frame and fastened with screws. Please note that that it is necessary to observe the deviation from the window, so that the water drains, as expected, to the ground, and not to the window. So that the foam does not pick it up, you should put some heavy object on its surface and leave it there until the foam is completely dry.
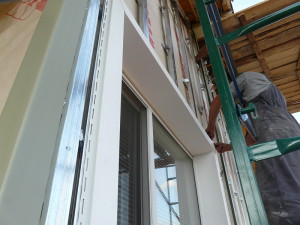
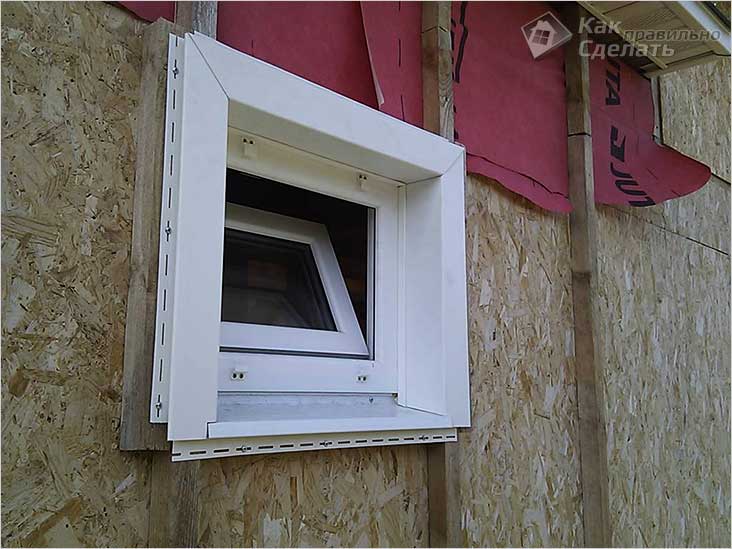
Next to the inner corner of the window opening, the finish bar is attached, and it should fit snugly enough to the surface and reach low tides. Then you can proceed directly to the sheathing of the slopes, for this purpose a window profile is perfect. The upper bar must be cut 10 centimeters more than the length of the slope. Then we cut it and bend it so that it overlaps the sides.
The side profiles are placed under the upper bar, this will provide more reliable protection. In order for the docking to have an aesthetic appearance, the protrusions of the upper bar should be cut at an angle of 45 °. The lower tongues of the sidewalls can be docked either close to the ebb, or lowered a little lower. The siding strips themselves are strung from bottom to top on each other according to the spike-groove system. If the latter does not fit on top, it must be cut off.
The work is done. Thus, if you choose siding as a finishing material, it is not difficult, and even an amateur can cope with such a task.
Decorating a building with siding is one of the fast and reliable options. The advantages of this solution are the speed of installation work and the possibility of simultaneous insulation of the facade of the house.
Although technologically the process of such decoration is not complicated in itself, difficulties arise if it is necessary to refine window and door openings. Not surprisingly, window siding decoration requires clarification and a phased description of installation work.
In order to fix the siding you need a standard set of tools. It includes:
In addition to the listed tools, a plumb line and a water level may be required. The standard tool kit is identical to those used with plastic trim materials.
Window Siding Tools
In order to complete the decoration around the window openings, special component materials and galvanized profiles will be needed. Namely:
If euro windows are installed in the house, then installation of ebbs under the windows and visors is not required. If not, then you must also purchase these components.
It is advisable to choose mounting hardware that matches the color and texture of the cladding panels. Or, if this is conceived by the design concept, the fittings may contrast contrast with the color of the main finish.
 Making slopes is a painstaking work that will require accuracy and accuracy from the master.
In order for the final result of work to please, it is necessary to create all conditions for safe and convenient work. To do this, you will need to provide the following:
Important! Some siding manufacturers also produce all the necessary fittings for making slopes. So they can additionally purchase special ebbs that will match the tone of the building.
 Siding is mounted on a prefabricated grille. This happens in the following sequence:
 It is worth noting that the siding that you have chosen fits around the window. If you have chosen metal siding, you must install it. no different from installing any other. The installation scheme is identical.
If you want to give the house a more aesthetic look, we recommend installing the basement siding with your own hands. reviewed step-by-step instruction its installation.
The installation process itself is quite simple, of course, provided that the crate for it is made correctly.
 Crate - This is a series of vertical bars made of wood or metal, mounted vertically on the external walls of the building. The external faces of these bars form a “virtual” circuit.
The main function of the crate - a support for fixing siding panels. And the more even this support will be, the more presentable the wall sheathed with siding will look.
The main difficulty faced by the master performing this work is the need to strictly observe the angles, as well as the horizontal and vertical levels. For this, markup is initially performed, then the rest of the installation work is carried out. Do this as follows:
It should be noted that the installation of siding without the use of a crate is a gross violation of the technological process. The only exceptions are openings with a width of less than 19 cm.
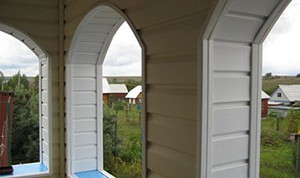
If all angles and levels are observed, the installation is not difficult. You just need to sheathe an already finished window opening decoration material. Difficulties arise only when you need to make slopes around the arched windows. How to complete this task?
 J profile - This is a universal profile used in the edging of door and window openings.
Sometimes the J-profile is used instead of the start and finish strips.
Depending on the area of \u200b\u200bthe window or door openings and their depth, you may need to use a different J-profile. They are of the following type:
 Installation begins with fixing the arched profile. It is fixed quite firmly with a step of a maximum of 15 cm. The fasteners are completely clogged through the vinyl siding.
At the junction with the longitudinal strip, special recesses are cut, which, after joining, are fastened with nylon rivets.
Such fasteners are made so that pruning does not come off over time and does not lose its original shape. The rest of the installation is carried out in the usual way.
 Siding is the so-called ventilated facade. Its specificity is that under it the house continues to breathe. This leaves its mark on the installation process.
Some features apply only to openings with shallow depth.
For the manufacture of such slopes, you can not do the crate. It will be enough to fix the outer corner of the J-profile and the starting strip and put a siding bar between them. Usually this gives a rigid mount and does not require additional manufacture of crates.
For such structures, there is a special one-sided corner. Usually its width is enough to equip the slopes. It is sewn onto a metal profile, which is installed around the entire perimeter of the window.
In this situation, a special flexible arched corner is used for decoration. It requires rigid fixation in increments of 10-15 cm. The rest of the installation is carried out in a manner similar to the wall cladding of a building.
Installation of siding, especially window and doorways requires a professional approach. Manufacturers provide all the necessary fittings so that the work is performed as quickly and efficiently as possible.
We bring to your attention several videos that tell about the installation of window openings siding.
Siding is one of the most common materials that are used in the decoration of facades of country houses. Its popularity is due to ease of installation, weight and, of course, cost. But before you finish the window with siding, you should prepare all the necessary materials in advance and find out how such work is carried out.
In order to secure the siding, the following tools will be required:
We also need scissors for working on metal to trim siding for window openings.
Tools for work
For facing the house, you will need special materials:
In order not to spoil the exterior design of the house, you should pre-select all the fasteners of a suitable color. Fittings can be contrasted, if this is conceived by the design concept. To reduce the cost of materials, you should make all the calculations in advance, thanks to which you can determine the required amount.
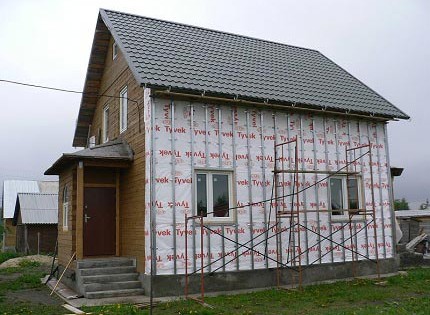
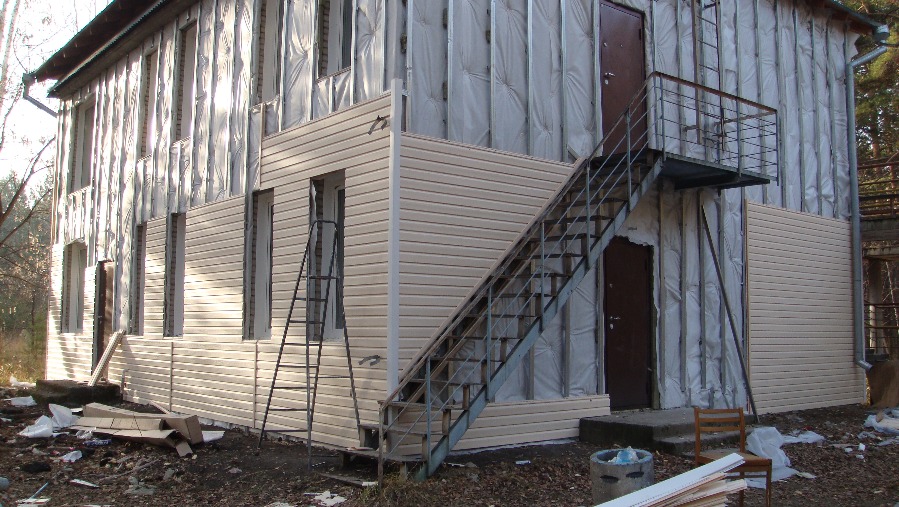
Cladding of windows with siding should occur only after the complete removal of all materials that were on the wall. In order to do this, you must first install scaffolding. At the first stage, the old cladding is completely removed, even if it is firmly held on the wall and has a smooth and undamaged surface.
 Before installing the crate for siding, you need to prepare the surface
 After this, it is necessary to remove all dust, and then fill the cracks with silicone sealants. In order to reliably protect the surface from the influence of weather conditions, it should be covered with a moisture protective composition, and then with an antiseptic. After applying all the mixtures, the surface must be dried, and only then proceed with the installation of the siding crate.
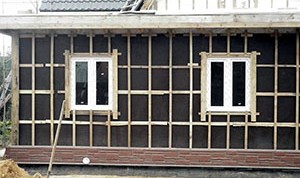
 Siding lathing
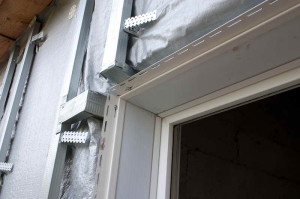
 To install the frame, you need 50/80 mm rails or special metal elements. Before starting the installation, marking is applied to all walls, allowing you to accurately install each bar. If the house is built of brick, then the mounting holes are drilled in advance.
It is important to consider the following points:
After installing the crate, the installation of heat-insulating material occurs, which is laid between the rails so that it can also be installed on it, which protects the walls from moisture. The fastening of such elements is done on mastic or glue close to the bars. But it is worth remembering that between the hydro and vapor barrier there should remain an air space equal to about 1.5 cm.
For proper installation of siding, you must first find the starting point where the first elements will be mounted. To ensure vertical angles, a plumb line should be used.
Thanks to this, you can determine exactly where the first panel will be installed. Usually it covers the upper edge of the foundation, protecting the wall from moisture.
Installation takes place in several stages:
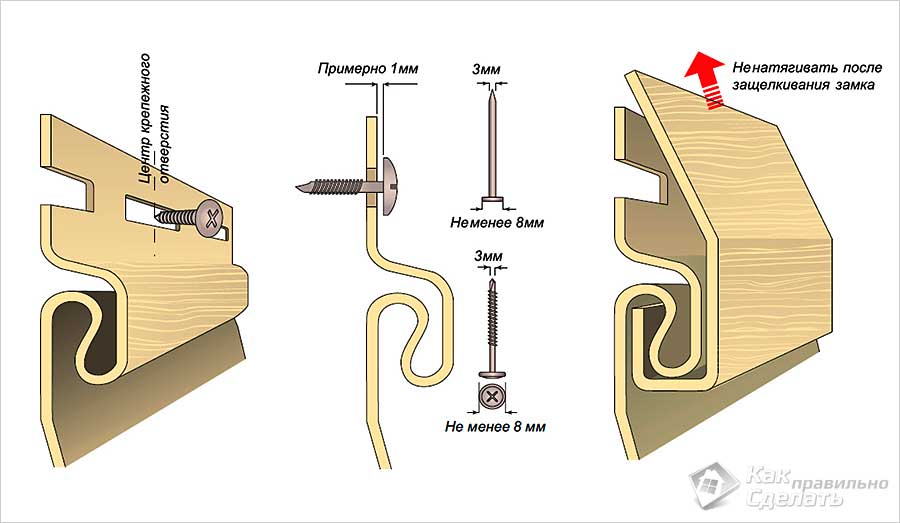
A very important condition for the correct facing of this material is the use of galvanized self-tapping screws, which are not affected by moisture. Otherwise, due to rust, stains may appear on the surface. When installing corner profiles, one important point should be taken into account - the upper fasteners are made with the expectation that the material hangs on it, and the rest of the self-tapping screws are screwed in the middle of each slot. Such actions will eliminate the deformation of the entire cladding under the influence of weather conditions and time.
 During the installation of siding
 When installing each element, you should use a level and a plumb line, otherwise even a slight skew at the very bottom will lead to serious deviations from the horizontal at the top of the wall.
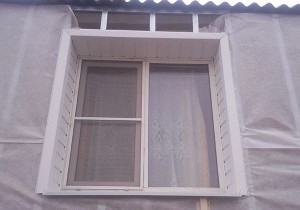
Particular attention should be paid to the installation of window slopes, as they are most susceptible to moisture.
When installing each of the elements, the joints are trimmed and bent by 45 degrees. If the windows are not superficial, then platbands are sufficient.
To dock the siding when using a plumb, H-profiles are mounted. It is enough to install each separate element in the fixed profiles and to press to the previous panels. The upper edge of the wall should be solid, as this will prevent precipitation from entering the joints. It is worth remembering that at the very end, a special finish plate should be used, and not ordinary siding.
Window cladding is as follows:
 Scheme
 For mounting an external corner, either a special chamfer designed for mounting from the outside or a standard external element used on bends is used. Using the first option is justified if the window is deepened by less than 20 cm. The second one is used when the width of standard chamfers for the windows is not enough. The third option is to be flush with the wall. This mount is most convenient as you can mount a simple J-profile around.
When mounting a chamfer, the finish strip is first fastened, into which the external window element is then inserted. In this case, siding is installed only around the perimeter, while the inner part just goes into the finish bar, located near the glass.
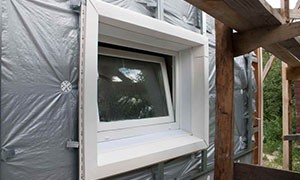
 Installation around the window
 The key to successful installation is compliance with certain rules. One of the main conditions is calculating the length of all panels with the thought that this material expands by about 6 mm. If you fix all the cladding elements too tightly to each other, then after a while you can notice the appearance of deformation.
The second rule, compliance with which is also mandatory, is that only dry wood should be used for the crate. Otherwise, when moisture evaporates, the structure will begin to change its shape, which will lead to a skew of the entire lining. In order to secure the panels, each of them needs to be pressed until it clicks. It will mean that the element reliably interlocked with the previous part.
For fasteners, screws from: are best suited:
When installing the cladding, it is forbidden to drive nails or tighten screws through the siding. When cutting panels (for example, under a window), special holes must be made for nails.
Siding windows is a great opportunity to decorate the facade of your home. But in order to carry out all the work as efficiently as possible, you need to know how to properly mount siding panels. And about this our today's article!
The construction of a country house implies finishing. The materials used for this are high-level requirements, paying attention to reliability, moisture resistance, durability, aesthetic appearance. And it is siding that fits the description perfectly. It should be noted the durability of the material - wood panels can successfully last about 15 years, vinyl - up to 30. The lightness with which the material is attached to various surfaces, including concrete, brick and stone, is also pleasing.
Dust and dirt practically do not stick to the material, and it is also easy to wash it with an ordinary soap solution without spending money on expensive options. If you choose wood panels, be sure to check with the seller if the material has been treated with special antiseptic compounds that protect against fungus. Undoubtedly, like any material, siding has its drawbacks that you should consider when choosing. First of all, it is sufficient fragility.
Despite the fact that the panels are considered very reliable, it should be mentioned that aluminum products can be damaged by strong hail, they change shape under strong mechanical stress. If we take into account wood products, it is impossible not to note the rather high price of the panels, as well as intolerance to moist air, which can lead to "bloating". differs in "sensitivity" to rust, and therefore you will have to spend a lot of time processing with paint or varnish to protect against moisture.
In order for the finish to be successful, we will need tools such as a hacksaw for sawing boards and metal, a lathing hammer, a square, necessary for the correct marking of corners, self-tapping screws, a tape measure, a screwdriver and a cord. The choice of tool also depends on the time of year. For example, in the summer you can cut siding panels with metal scissors. But in winter, it is best for you to use a tool with small cloves.
Do it yourself with the removal of existing decorative elements, cleaning of plaster, if old boards are available, do not ignore them. The facade should be absolutely clean: remove all wires, platbands, remove air conditioners and antennas.
The crate must be installed on the entire surface of the walls. You can, of course, omit this step, but with this design it is easy to smooth uneven surfaces. For the implementation of work, it is best to use wooden slats 4 × 6 cm in size, it is also important that they are smooth, without knots. Before work, soak them with antiseptic agents so that the tree does not damage moisture. Reiki should be installed vertically, preferably at a distance of up to 20 cm from each other. The main thing is not to connect the vertical rails horizontal, which will lead to a violation of ventilation.
After we cleaned the surfaces, the stage of warming the house is suitable. As a heater, you can use mineral wool, which is attached to the facade with dowels with large hats. For one square meter, we need about 10 nails. Do not forget to cover the insulation on top with a plastic film, which will protect the material from moisture. Since the material for insulation is laid between the rails, it is necessary that its width is less than the height of the crate. Next, we close up all the cracks and holes with a sealant, which will allow us to avoid any moisture.
Immediately, we note that you will need a lot of fasteners to securely fasten the siding - for example, about a hundred square meters need about one and a half thousand elements. And it is better if you replace the nails with screws. And all due to the fact that, working with a hammer and nails, we increase the risk of damage to panels, which are difficult to repair. In addition, nails will not allow you to observe an important rule - the panels should be fastened loosely, you need to give them the opportunity to "walk".
That is why under the screws you need to leave a gap of 1-2 mm. It is necessary to leave technological gaps at the ends of the siding that hide the slats; otherwise, the material may be “warped” under the influence of the sun. We install siding from the bottom up, and not vice versa, and when the work reaches the openings, we trim the panels. That is why it is so important to correctly conduct all the necessary calculations, measuring the distance to the window and the length of the panels. After this, we lay the panels row by row, carefully fitting each to the grooves of the previous one.
Drainage is necessary to protect windows and insulation materials. To fix it, it is necessary to measure the material (it can be either a special drainage system or a plastic pipe cut in half) of the required length, cut it and bend the edges, creating a small border. Such a device should deviate from the walls by about 5-10 cm. For fixing, we apply a layer of mounting foam to the ledge under the frame, carefully and evenly apply the drainage system and press it down, fixing it with self-tapping screws.
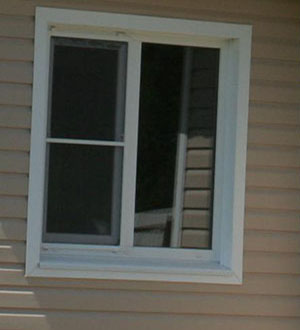
After that, we proceed to install the upper and side slopes - they are narrow stripes of siding. It is necessary to fix them so as to protect as much as possible from moisture. To do this, we set up the side slopes under the upper ones. To make the “docking” as neat as possible, you must necessarily trim the “tongue” of the top element at an angle of 45 degrees. The small gaps formed at the joints can be covered with sealant for reliability.
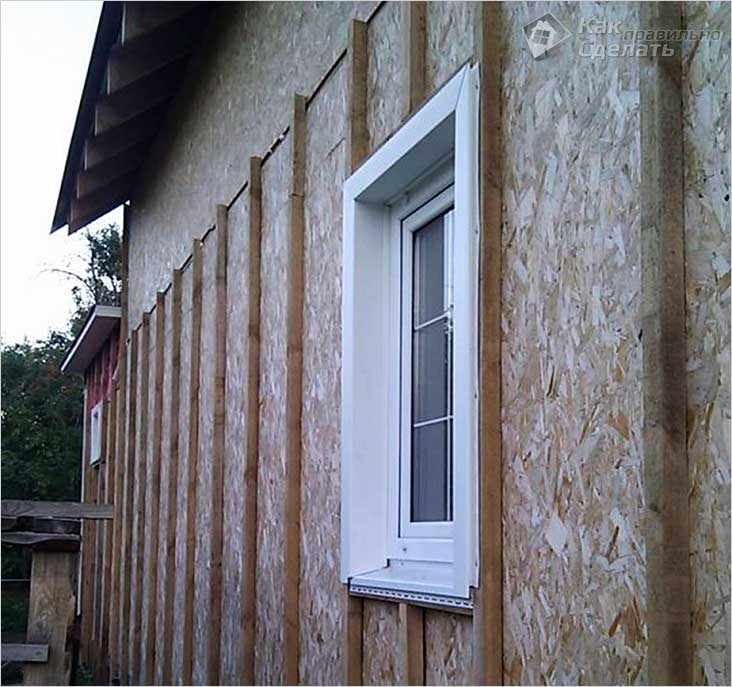
Now you know how to trim the window with siding. And if you have already carried out similar work with siding panels, then the only difference is in the slopes, the creation of which you need to pay special attention to.

In order for your work to pass qualitatively and give a positive result, you need to know some tricks of working with this material. Taking them into account, you will do your job at the level of a professional master, which means you will save a lot of money.
Despite the fact that siding is a fairly unpretentious material, you should know how to care for it to extend its life. In addition, the window slopes are half located on the street, which means they will have constant contact with snow, sun, dust and rain. And so you still need to think about leaving. The panels can be washed with ordinary water, strong contaminants are removed with a soft-bristle brush.
If the water did not help to cope with the pollution, it is necessary to prepare the following solution: mix the detergent with water and trisodium phosphate.
You can also use various abrasive powders, but in order not to damage the surface, be sure to pour water over the panels before applying the solution. In humid areas, mold may appear on the surface of the material. To eliminate it, it is best to use sodium hydrochloride (5%), which is diluted in a liter of water. Important: you can not use formulations and solutions containing organic solvents and chlorine, since they only spoil the siding. For the same reason, it is not necessary to use mixtures designed to dissolve fat and remove varnish.
Gives it a neat and attractive look. This process is quite simple and can be performed without the involvement of builders. The cladding of house elements such as window openings should be done according to existing technology. This small area will require careful measurements and precise trimming of the material. Let's figure out how to sheathe a window with siding.
For cladding buildings with their own hands, steel and vinyl siding are offered. The metal finish is heavier and has a high cost, so plastic material is more often used. It is resistant to all weather collisions - precipitation, wind, high and low temperatures, lasts a long time and is easy to clean when contaminated.
Regardless of the choice of material, the installation of siding on the slopes of the windows occurs in the same way.
Before sheathe the window, you must purchase all the accessories and accessories:
Fasteners and siding must be from the same manufacturer. Only original fasteners are used, otherwise the lining will not be of high quality. To buy the necessary amount of material and accessories at a time, since the selected siding often differs from the main shade. You can calculate the right amount according to the drawing. For counting, the perimeter of the window is measured and 10% is added to the trim. Siding fasteners are made with self-tapping screws.
Before the sheathing, the surface of the slopes is prepared, if necessary, plaster is applied. The surface is primed to protect the slopes from microorganisms. To work on the lining begin after drying.

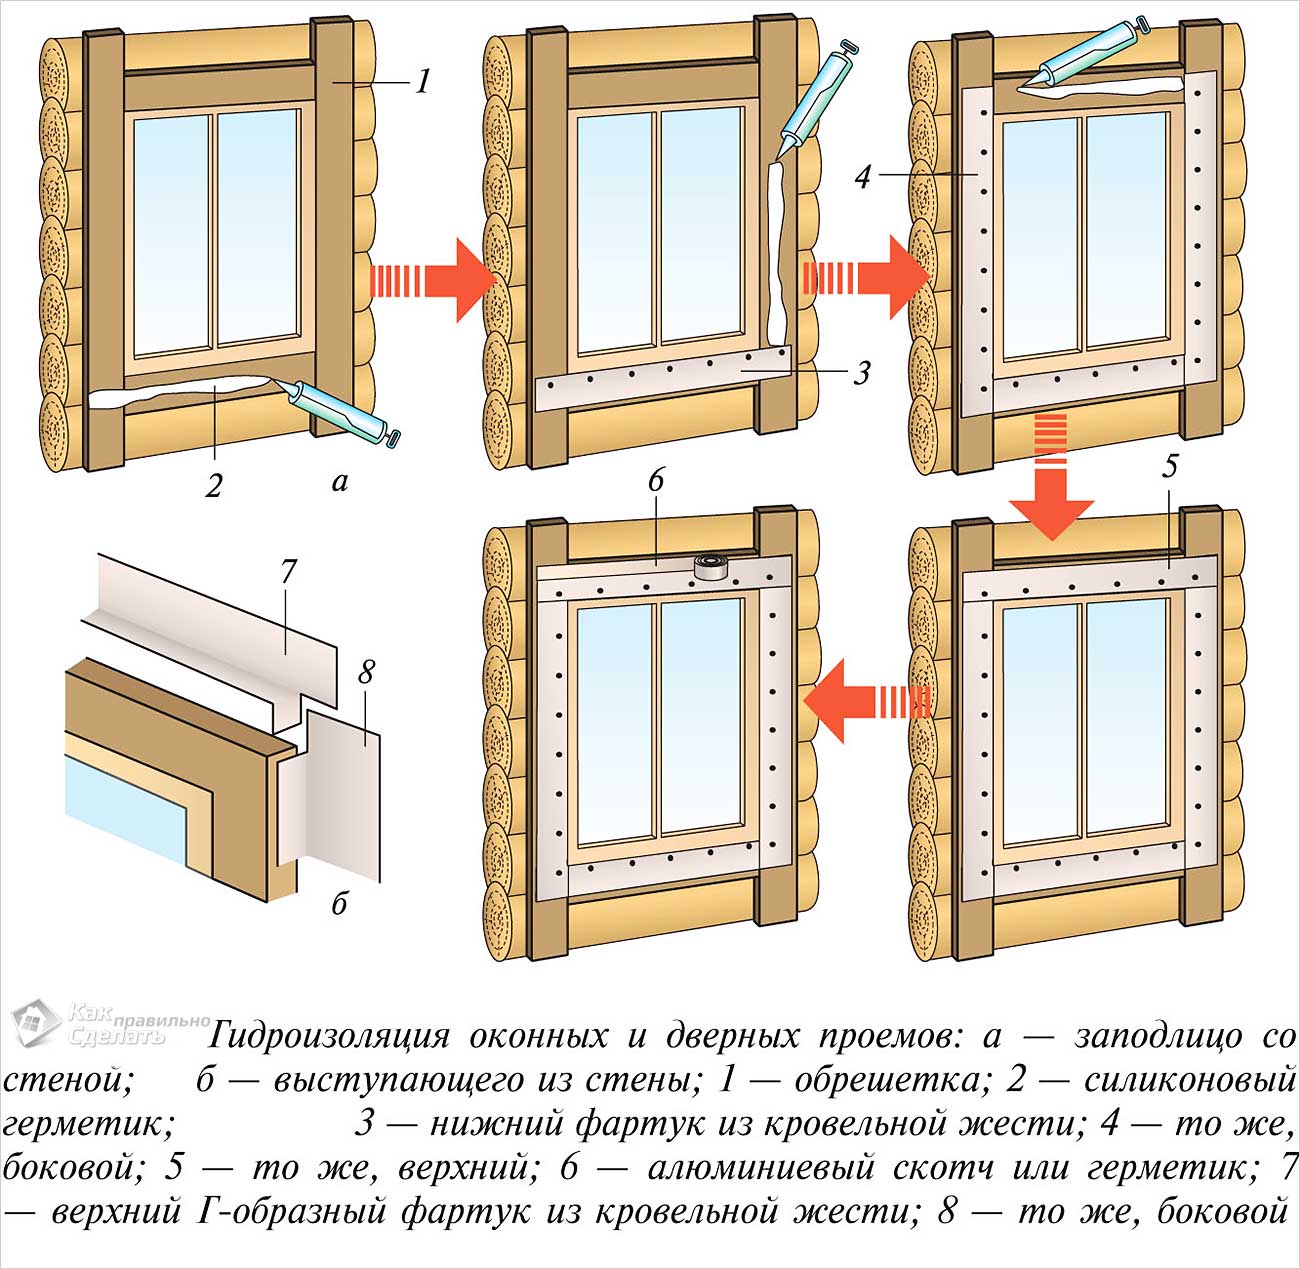
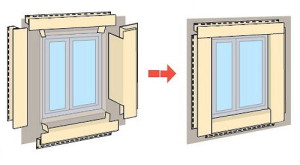
Initially, it is necessary to protect the window openings from precipitation. To do this, an apron of aluminum foil or thin iron is installed around the perimeter. The strips are superimposed on each other, smeared with sealant and nailed. The edge is protected by aluminum tape. The manufactured apron is not attached to the window frame.
If the recess of the window opening is less than 19 cm, you can use a specially made window strip. Its edges overlap the finish profile or the J-profile with a chamfer.
Work begins with the installation of low tide. It runs 2 cm wider than the slopes. In the manufacture of metal casting according to the size of the window, the side parts are not completely cut off, the remaining strips are unbent vertically and fastened with screws to the walls. Before fixing the tide, liquid nails are applied to the area adjacent to the wall.
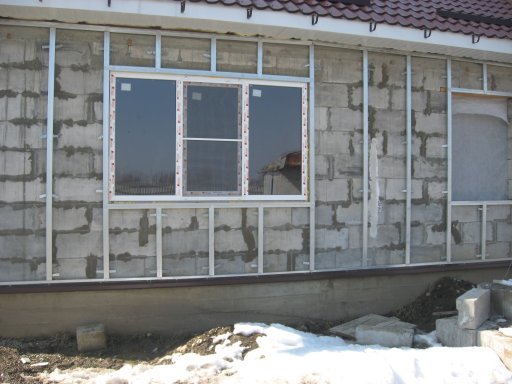
In the case when the window is deepened by more than 20 cm, a crate is installed. The right angle is determined and the start profile is screwed on it. Slopes are faced with siding, and joints along the perimeter are closed by an external corner.
In places of attachment to siding profiles, you do not need to leave gaps, the fixation must be tight.
When facing a semicircular window, a flexible J-profile is used. In the absence of an elastic element, you can take a regular one and cut along the bar. When fastening the profile, a step of 15 cm is observed.
Installation of siding near window openings is a complex area of \u200b\u200bcladding, in order to know how to properly finish, you can see the video tutorial.
This video shows how to make a window siding with your own hands:

From internal pipelines, drains are transported by external ...
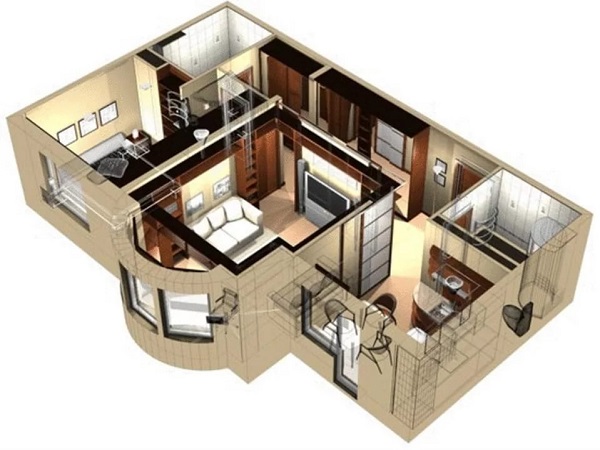
Each apartment, like every family, has its own characteristics, so it is difficult ...