Of the many questions and topics that are asked to tarot cards, not a small one ...


The place where a gas stove or other equipment is installed must be provided for by the design of the house and apartment. Otherwise, you must obtain permission from the state gas service.
It is better to entrust the connection of devices to specialists, but if you want to do it yourself, you should study the relevant rules. Remember that mistakes made can lead to gas leakage, and you automatically lose a number of benefits:
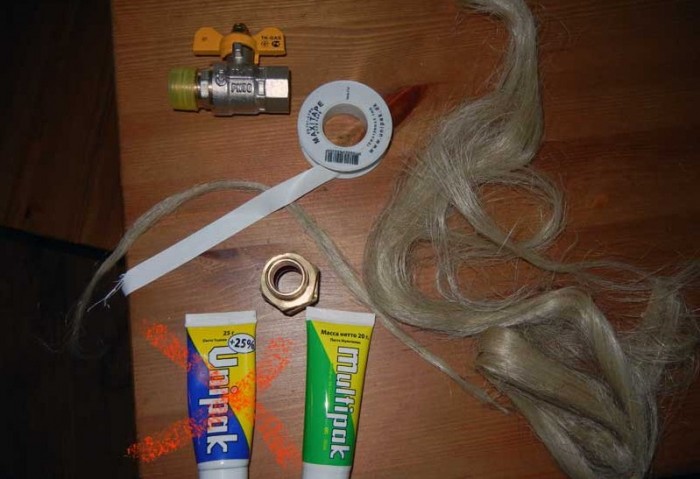
Modern gas stoves are sold with a full set of accessories necessary for connecting: fittings, adapters and hoses. Individual models can have from 2 to 4 nozzles various types. Detailed and visual instructions clearly explain the entire connection procedure. So, after unpacking the stove and checking the availability of all the details, you should prepare the necessary tools:
To check the quality of the connection, you will need a soap or shaving foam and a brush for application.
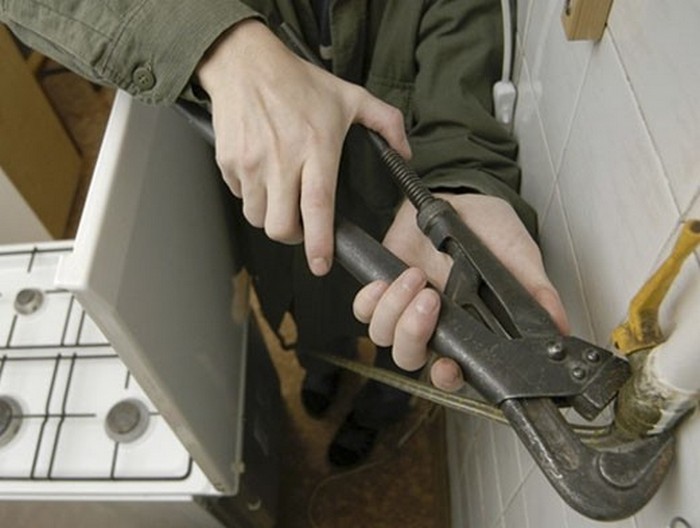
The first thing to do is turn off the gas supply by turning off the tap on vacation. Then check the supply overlap by switching on the burner. Simultaneously with the change of the plate, it is possible to replace the overhead crane.
How to check the reliability of the connection: apply soap or shaving foam to the docking area. In the event of a leak, it will begin to bubble.
Now, in place of the old one or in any other part of the kitchen, it is necessary to put a new stove, maintaining such a distance from the wall as indicated in the installation instructions, usually from 6 mm. Align the plate horizontally with the help of the adjusting feet and the level, make sure it is stable. 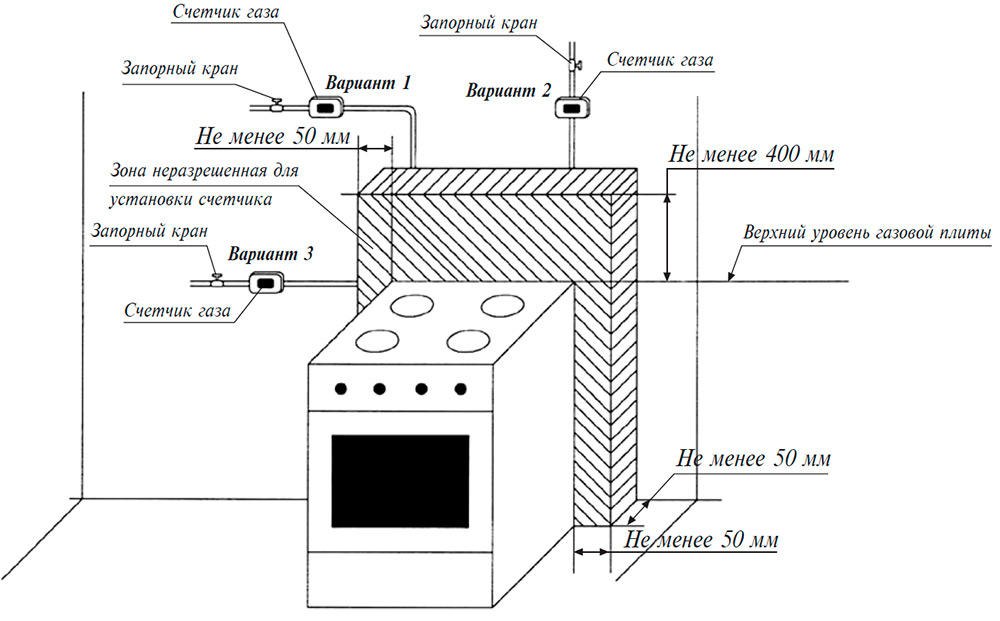
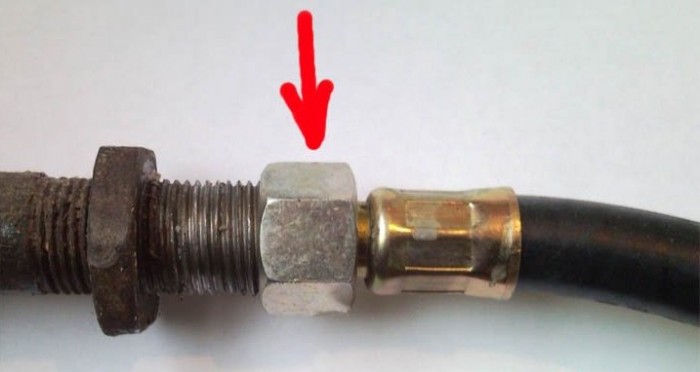
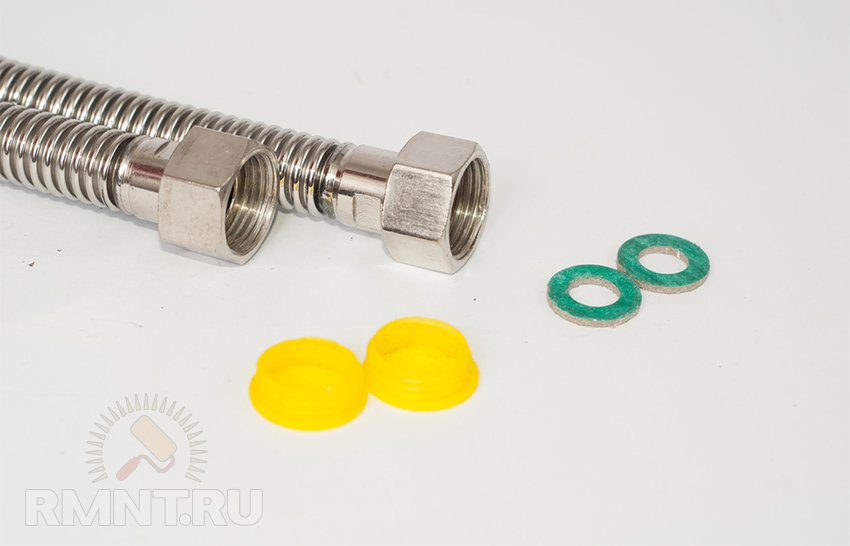
It is assumed that there is already a flexible connection hose, and therefore the next step will be to connect it to the stove, and then to the gas riser. A seal (thread or tape) should be wound around the hose fitting, and then screwed into the release valve. Do the same with the second end, attaching it to the gas stove. Often newer models come with a metal mesh gasket to keep out dirt. It must be installed between the flexible hose and the slab inlets. For the most reliable fixation, the junction is tightened with two keys.
Note! The hose must be flexible and of such length that no tension is created. After connecting, it should sag. You should purchase a special, certified hose in a metal braid with a yellow label. The type of inlet also deserves attention: for plates with a straight line, a hose with an angled end is purchased and vice versa.
The final stage of installing a gas stove is checking the quality of the connection. Use a pre-prepared soap. The absence of bubbles indicates that you did an excellent job with connecting the gas stove!
If the inlet you have purchased has a smaller or larger diameter inlet than the outlet valve and hose, you must purchase an adapter from a specialized store. When installing it, a seal should also be used, and tightening should be done with two ball wrenches. When checking the quality of the connection, do not forget to check the joints of the plate, adapter and hose.
By the way. In industrial gas equipment, avk gas supply fittings are used.
Before installing a gas stove in a country house and in a private house using liquefied gas cylinders, make sure that your room complies with all safety rules. Then you should change the nozzles in the burners to a smaller diameter, since bottled gas has a high pressure. 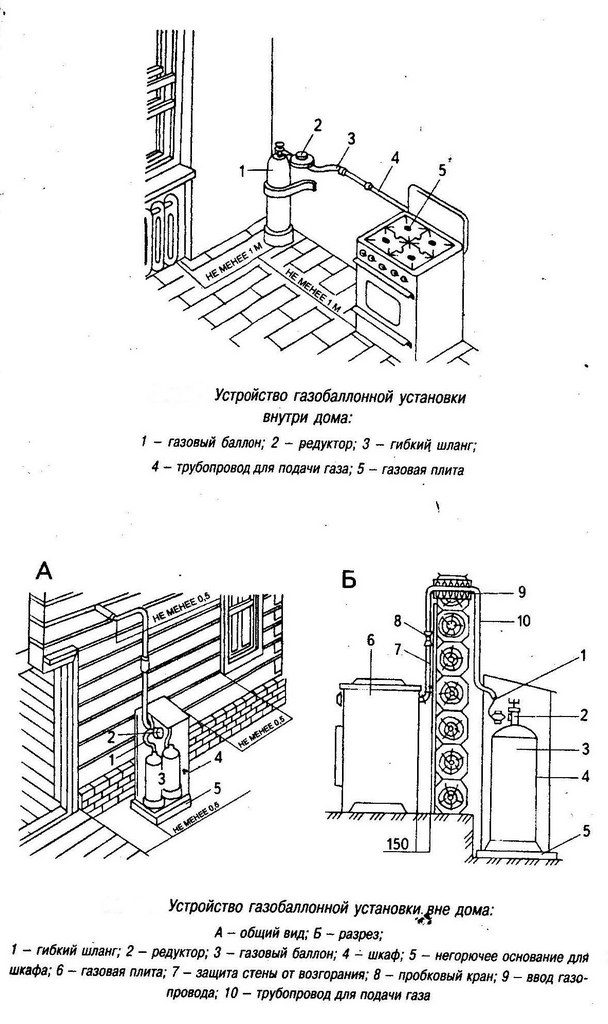
Otherwise, the instructions for connecting and subsequent verification repeat all the steps for connecting a gas stove to a stationary gas source.
The correct connection of the gas stove ensures that there are no leaks, problems with the local gas service and positive emotions during cooking.
When connecting a gas stove, be sure to read the instruction manual for the stove. There probably is a point for safely connecting the stove with your own hands.
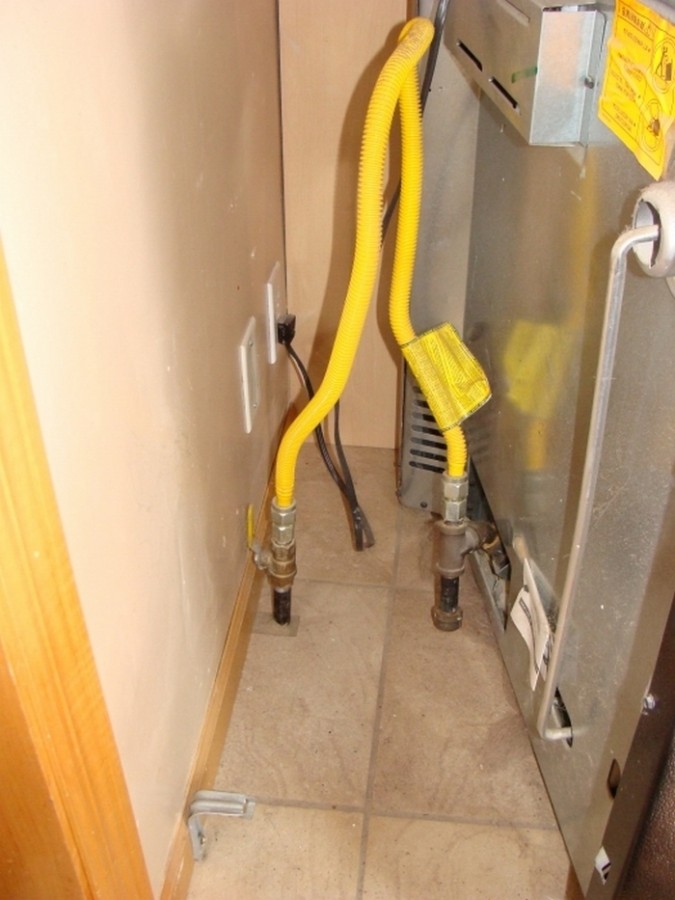
The photo shows how the devices important for the device of the stove are located. And in words, it looks like this: from the pipe in the kitchen, passing from the ceiling in each apartment (called the “riser”), there is a branch called the “descent”, which acts as a place for direct connection of the stove. At the end of the lowering there is a tap from which a rubber-woven hose is attached, or in other words, a gas path.
Rubber allows you to move the device in the direction you need. How the gas stove is connected behind the diagram, you now know, but it’s worth knowing some of the nuances of the connection.
This happens by placing a new valve on the lower pipe, so that the gas cannot escape. Twisting occurs to the extent that the seal no longer allows the valve to rotate. Sealing will be provided by loctail and fum tape. In case of gas leaks, the action is repeated again.
In order to connect the gas stove in the country, you should prepare a cylinder and a flexible hose. Also, the specifics of this installation is that it is necessary to replace some burners so that they do not smoke or stain the dishes, and also check the operation of the electric ignition, if any. For summer cottages, a stove is often selected for low gas, but it does not quite cope with the flame and goes out.
As for rubber hoses for installation, then, first of all, it is necessary to check which outlet on the plate and the thread. For threading, an adapter is immediately selected, which may also be included.
Important! Do not buy used hoses, because no one will give you quality guarantees on them, and your safety depends on them.
You are almost ready to install, but finally, each installation must take into account the following parameters:
Theoretically, it is really possible to connect a gas stove on your own, but if technical work is not your strong point, and there was no honey mushroom before, it may be worth contacting the gas service masters. If, for example, improperly assembled plumbing communications threaten a pipe break and financial expenses, then gas is much more dangerous, and you should not take risks with it.
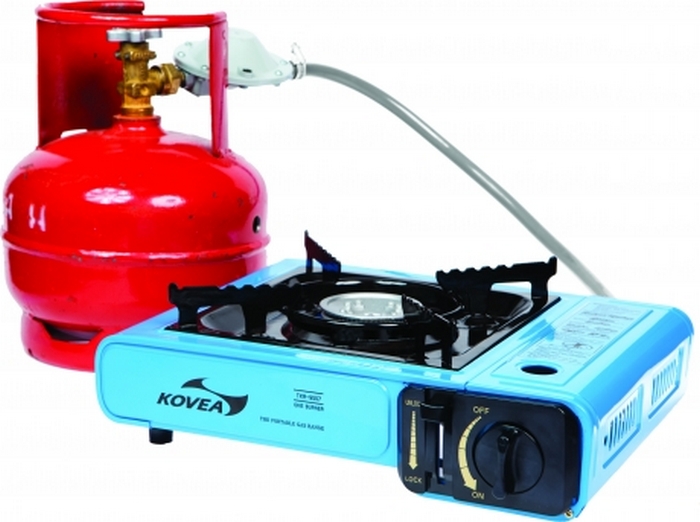
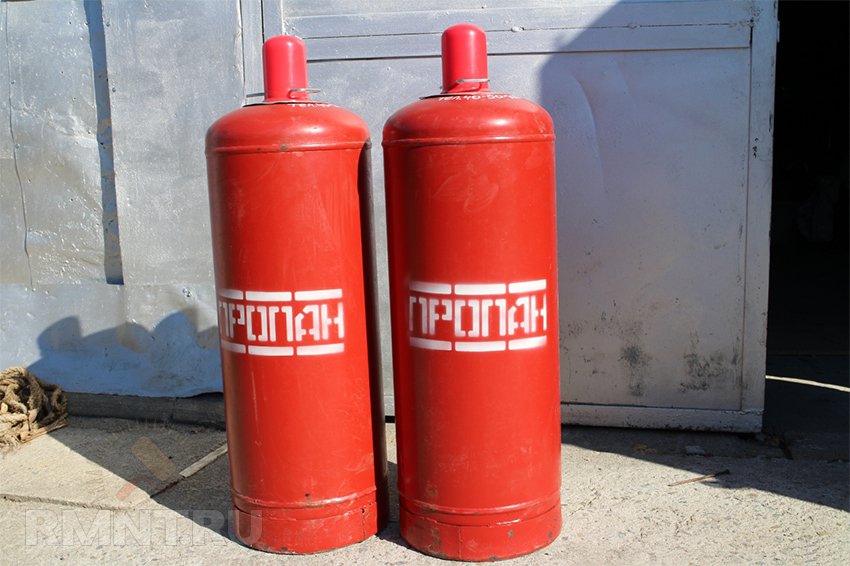
The use of bottled gas requires a thorough approach to ensure safety and ease of use. We propose to consider the simplest example of connecting a propane cylinder to a gas stove: a connection diagram, shut-off and control valves, organization of storage conditions.
The main generalized requirement for the use of gas-cylinder equipment can be called ensuring the safety of people. For this reason, gas cylinders are not recommended to be installed in habitable rooms and technical rooms connected to a residential building directly or through ventilation.
A distinctive feature of propane gas is its high density. Bottled gas is heavier than air and can accumulate in the lower floors of buildings. Therefore, it is strictly not allowed to install cylinders in the underground or technical rooms below ground level. If in the usual case small leaks do not pose a danger due to constant air exchange, then in the lowlands the gas is capable of for a long time accumulate to explosive concentrations. It is possible to install gas cylinders in accordance with SNIP 42-01-2002 only inside buildings no higher than 2 floors, in the amount of no more than one and at a distance of 0.5 m from gas stoves and 1 m from heating appliances.
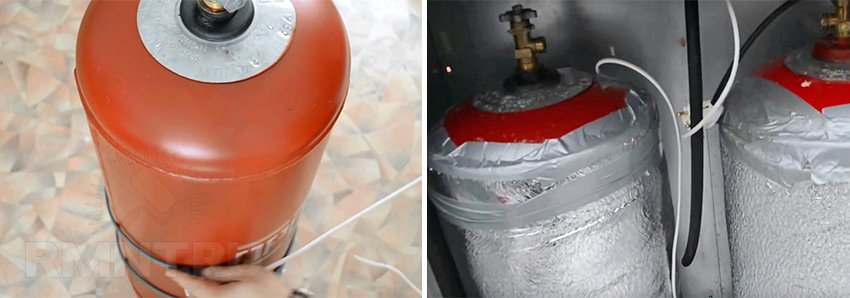
To make the installation safer and exclude unauthorized persons from accessing the gas equipment, the cylinders are placed either in a room with a separate entrance or in an outdoor metal cabinet. It is especially important for outdoor installations to take into account temperature regime operation. Bottled gas is a mixture of propane and butane, each with a different boiling point. When the cylinder is cooled below 0 ° C, only propane will evaporate from the mixture, while the remaining butane in the cylinder cannot be rationally used. With more low temperatures it is possible to completely stop the flow of gas to the stove.
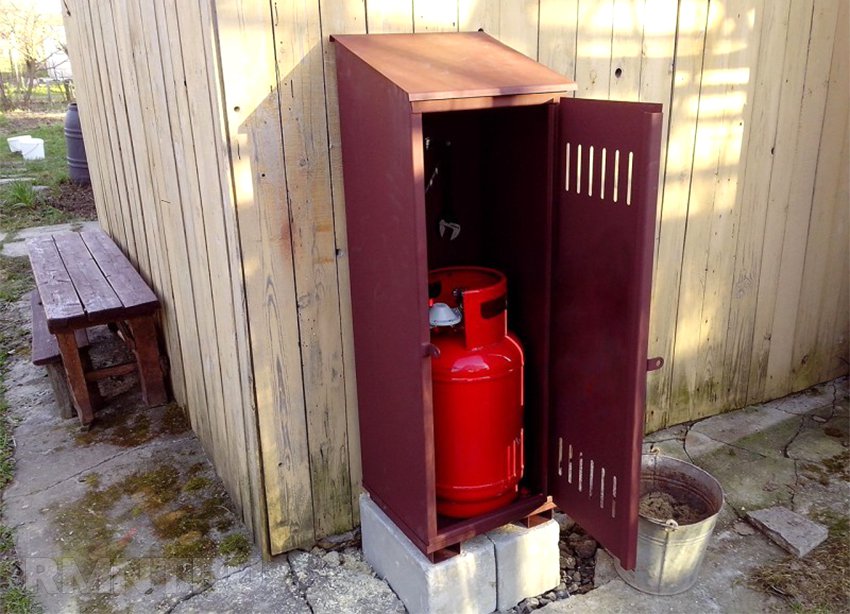
The main way to achieve normal operation at low temperatures is the use of so-called winter gas mixtures capable of evaporating at temperatures down to -40 °C. However, the problem is that such gas may be in short supply seasonally, and besides, the possibility of refueling a mixture of mediocre quality cannot be ruled out. There are two ways to resolve the issue with the guarantee: either insulate the attached metal cabinet, counting on the penetration of heat from the building, or additionally heat the cylinders using a self-regulating cable.
The height of the cabinet should be at least 20-30 cm higher than the height of the cylinders so that they are not installed on the floor, but with a gap, for example, on two metal rails or a high pallet. In this case, the cabinet must be protected from the penetration of melt, rain water and heating from sun rays over 40 °C.
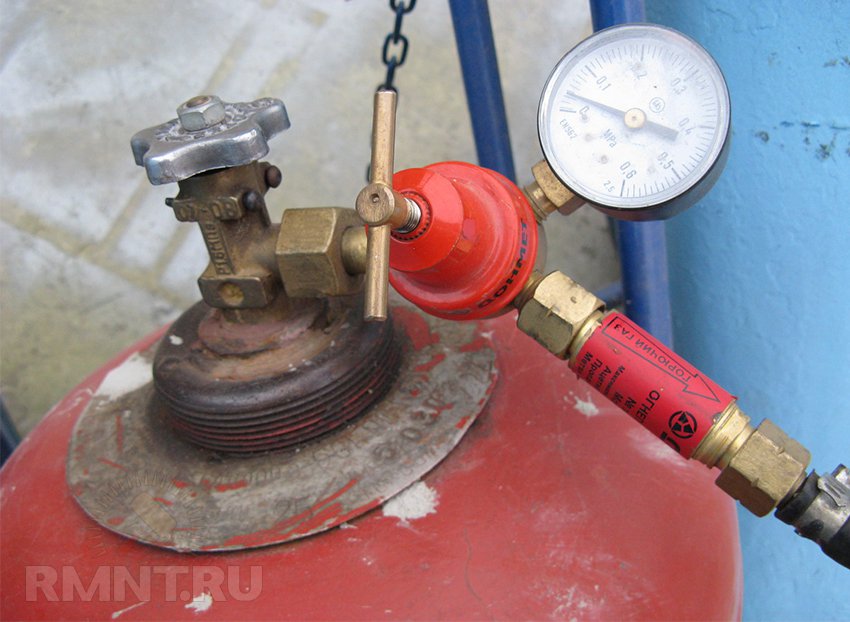
Gas stoves have built-in jets designed for a constant gas pressure, while the pressure in the cylinder decreases with consumption. To normalize combustion, the cylinder is connected to the stove not directly, but through a gearbox. Reducers for liquefied domestic gas are called propane and, as a rule, have a red or metallic body color.
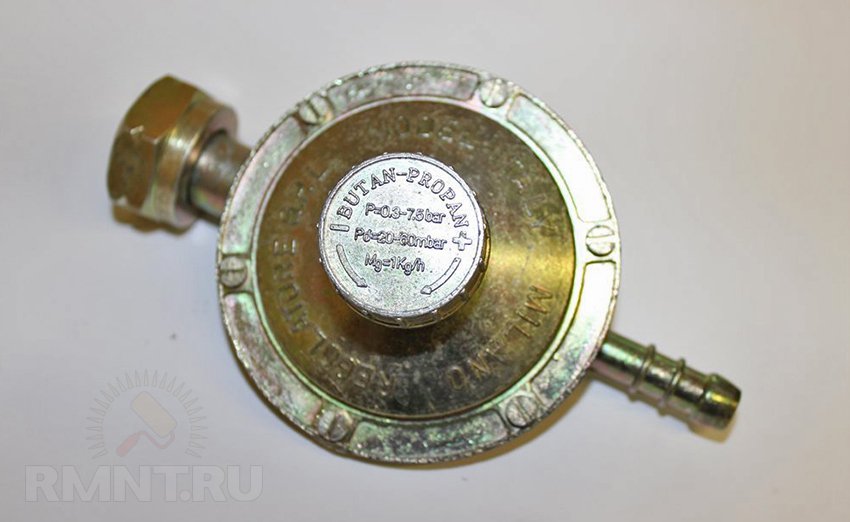
The main characteristics of the reducer - outlet pressure and throughput - must be selected for the parameters of a single plate. If it is not possible to set the passport pressure value, you should purchase an adjustable type reducer and manually adjust it. Also, adjustable reducers are directly shown when using cylinders with a capacity of 20 liters or more, where the pressure drop is more pronounced.
For domestic use of propane, reverse gears are recommended. Due to the low pressure values of liquefied gas and the low difference between the inlet and outlet, the use of multistage gearboxes is not economically justified. The only requirement is to use the reducers specified in their technical standard in conjunction with composite cylinders.
A separate nuance in the choice of the gearbox may be the temperature regime of operation of the cylinders. The fact is that during the evaporation of liquid gas, an intensive decrease in its temperature is observed. So, if initially the propane-butane mixture is at a temperature of -5 ... -10 ° C, in the gearbox itself its temperature can drop to the level of condensation, due to which the gas becomes liquid again, and the gearbox stops working. One way out of such a specific situation is to use gearboxes with a built-in heating system.
According to the rules for the safe operation of gas equipment, it is not allowed to use oxygen and hydraulic hoses for laying gas pipelines. This is due to the high temperature difference between the transported gas and the environment, which leads to accelerated degradation of the hose material and the appearance of microscopic leaks. With the properties of liquefied gas to accumulate in rooms, such phenomena pose an increased danger.
There are three options for connecting a gas cylinder to a stove. The first is to use special flexible rubber hoses for flammable hydrocarbons. In this case, they are connected to the gearbox through a standard fitting with a screw clamp. The same fitting is installed on the inlet pipe of the gas stove, the hose is also connected to it with a clamp. If it is necessary to connect two pieces of hose, it is not allowed to use double-sided fittings, instead of them, threaded connectors with double crimping of the shank with clamps should be used. Distinctive feature such connections for gas pipelines are conical threads and the absence of elastic seals.
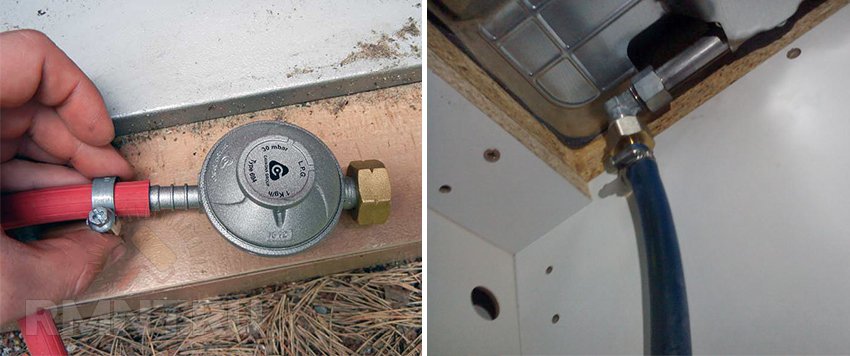
Connecting the plate to the cylinder using flexible hoses has a number of limitations. The length of the hose must not exceed 150 cm, its gasket must remain visible to constantly monitor the condition of the sheath and avoid damage. Some of the restrictions can be partially circumvented by using metal bellows hoses. They form a semi-rigid frame, which can have an almost unlimited length, while maintaining resistance to temperature effects and mechanical damage.
At the same time, safety rules prohibit the passage of flexible and semi-flexible ducts through walls where their condition cannot be visually assessed. If necessary, connect the stove with a cylinder installed outdoors, the hole in the wall should be on cement mortar the case from a steel pipe is immured. Inside the case is a steel tube of smaller diameter with threads at both ends, the space between the walls is filled with a plastic sealant, for example, mounting foam or silicone. The connection of bellows or flexible hoses must only be carried out through threaded adapters of the appropriate type.
A gas cock must be installed at the point where the gas pipeline is connected to the stove, blocking the gas supply in the event of a stove failure. It can be either a ball valve with a yellow handwheel or a plug gas valve. The disadvantage of the latter is the need for periodic maintenance.

Another useful addition to the gas pipeline can be a flow meter. Its inclusion in the transportation chain will help to respond in a timely manner to the exhaustion of the mixture in the cylinder and replace it. The metering device should not have the outstanding accuracy required to control gas consumption in main networks, a device worth up to 2 thousand rubles will be enough.
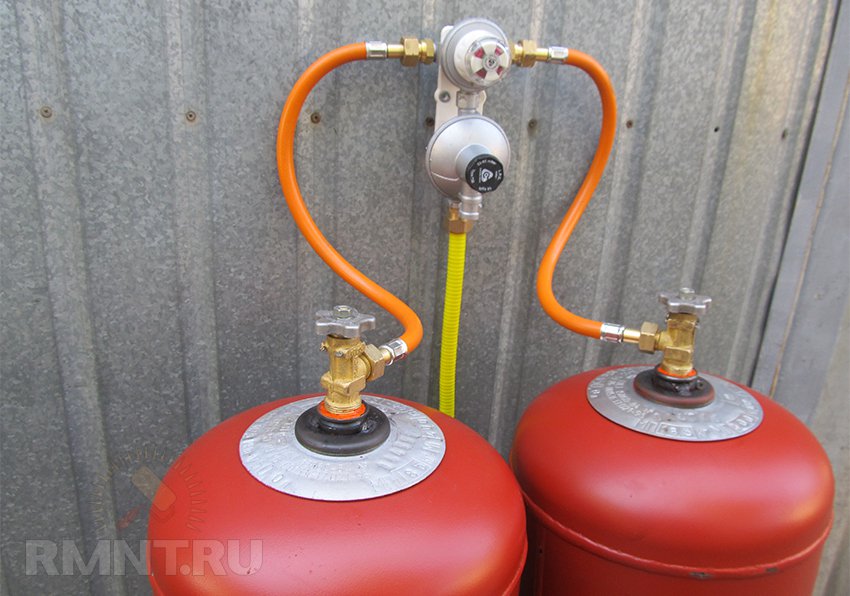
When connecting several cylinders at the same time, a connecting ramp can be used. Its installation helps to reduce the rate of gas evaporation from each cylinder and make the risk of freezing of the mixture in the reducer less likely. The installation of the ramp can be done independently with any material for the manufacture of the gas pipeline.
Not every stove can initially run on liquefied gas. The main obstacle is the higher working pressure, due to which there is a lack of oxygen in the burners, which is expressed in yellow combustion and the appearance of soot.
You can correct the situation by replacing the jets for methane with nozzles for LPG. They have exactly the same form factor, but the hole diameter is slightly smaller. If you plan to connect a new stove, it should most likely come with a set of jets for liquefied gas. If replacement jets are not available, they can be purchased at a reasonable price.
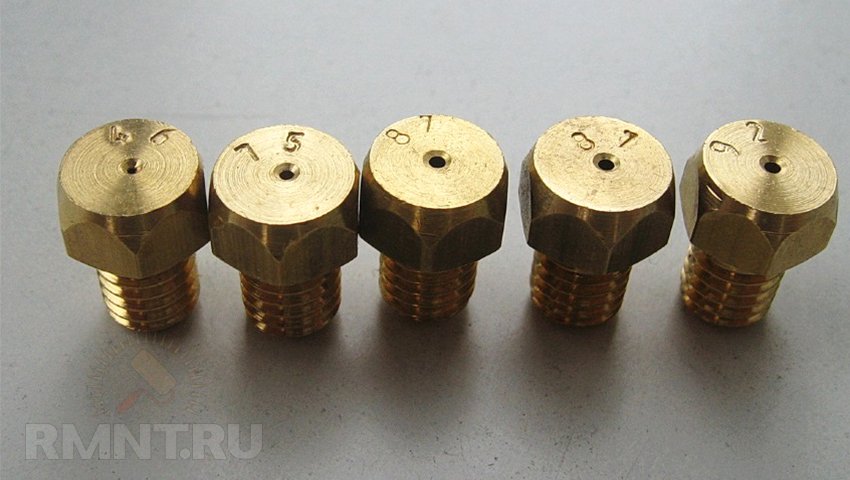
The diameter of the holes in the jets for liquefied gas depends on the pressure in the outgoing chamber of the reducer and the power of the burner. Thus, diameters of 0.43-0.6 mm for a pressure of 50 mbar and 0.5-0.75 for a pressure of 30 mbar are considered standard values for liquefied gas stoves. Individual slab manufacturers may set their own diameters and the use of nozzles with different orifice diameters may void the warranty.
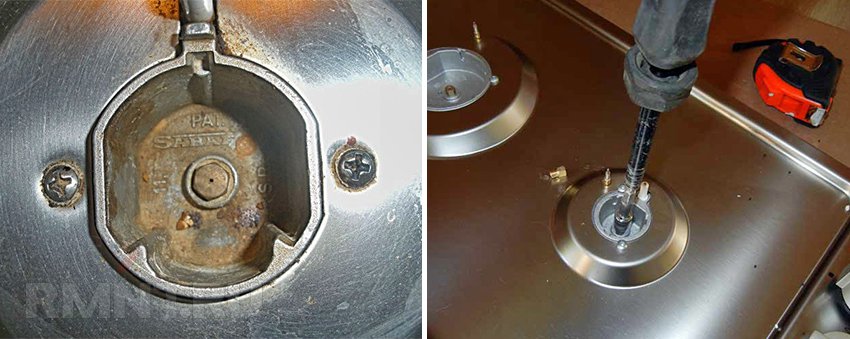
Replacing jets can be done in two ways, depending on the design of the plate. In the simplest version, it is enough to remove the burner body and look inside the seat sleeve. If a jet is visible at the bottom - a hex head with a hole in the center - it is unscrewed with a socket wrench by 7 or 8 mm and the nozzle is screwed in for replacement. If a cone with a hole is visible inside, you will have to remove the top panel by unscrewing several bolts on the sides from different sides. The jet itself in this version of the design does not get out, it is pressed into the stuffing box seals. It is necessary to unclench the mustache of the compression coupling, move the nozzle down along with the inlet pipe, and then pull the jet from the landing fitting and install a new one.
The entire installation of the gas pipeline is carried out without connecting it to the cylinder. When the tubes or hoses are connected to the plate and interconnected, the reducer nut is screwed onto the cylinder valve and tightened. Then, if a flexible hose is used, it is put on the fitting and crimped with a clamp. If bellows tubes are selected, the nipple must be unscrewed from the gearbox housing and screwed into it with a threaded adapter of the appropriate size.
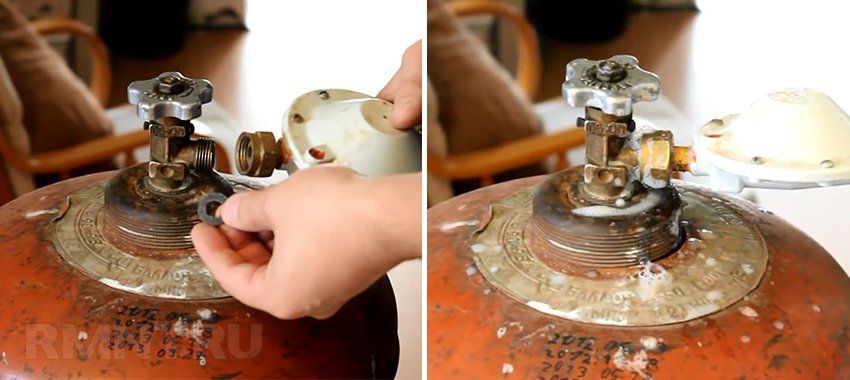
When the unit is assembled, you need to open the valve on the cylinder and, by turning the reducer regulator, set the required outlet pressure. When the gas has entered the pipe and hose system, each connection is thickly coated with soapy foam and checked for leaks. After the integrity of the gas pipeline is confirmed, you can open the stove tap and try to sequentially ignite the burners.
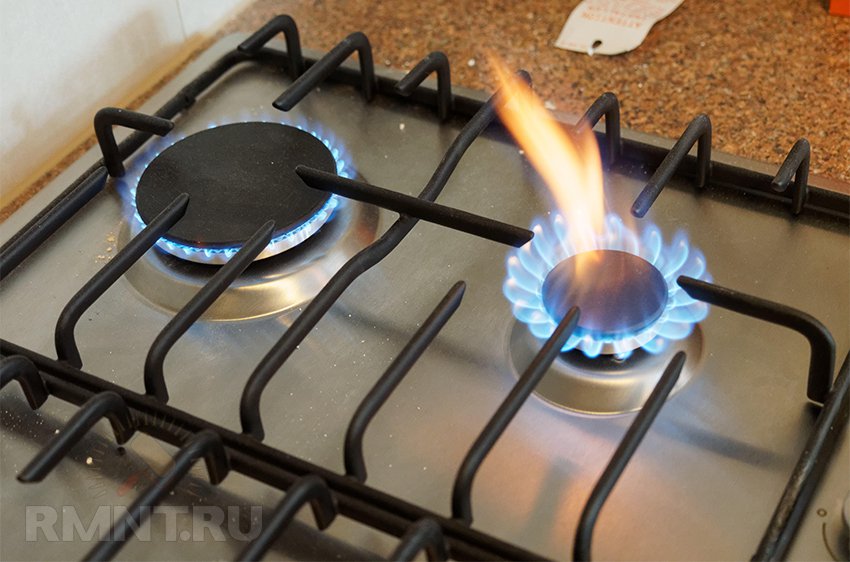
If each of them smokes or the flame burns in a color other than blue or greenish, it is necessary to reduce the pressure with a valve on the reducer. If the malfunction is typical only for some burners, then the jets for them are selected incorrectly. If the burner goes out in the minimum fire position, adjust the low flow screw on the stove tap or try to slightly increase the pressure with the reducer screw.
Of the many questions and topics that are asked to tarot cards, not a small one ...

The benefits and harms of Coca-Cola. Coca Cola is a popular drink all over the world....

Everyone without exception loves sweets. Sometimes even in unlimited quantities. But...