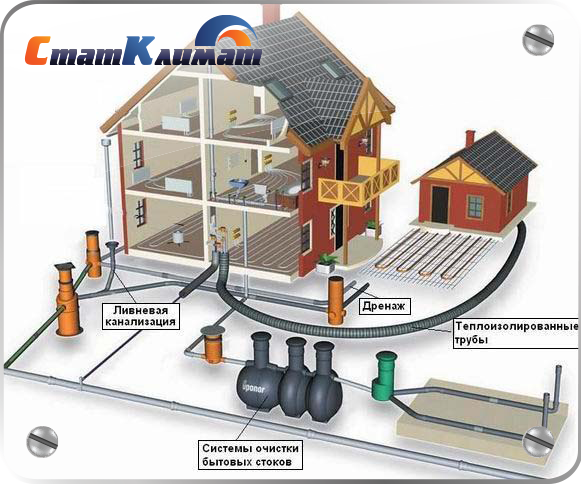
From internal pipelines, drains are transported by external ...
Escape the Prison Room walkthrough can be read below. If you liked the article or have questions - leave your comments and questions at the bottom of the article, and we also look forward to seeing you in the social networks. networks.
- Take the cloth in the far left corner of the room.
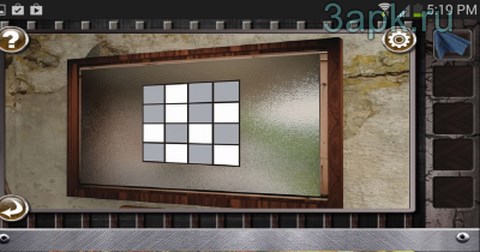
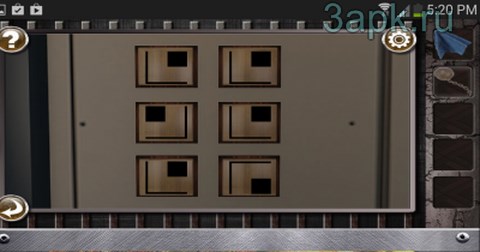
- Use the cloth several times on the mirror on the wall on the right to wipe it and see a hint. Pay attention to the dark squares on the glass and remember the hint: the first column is 1, 2, 4; second column - 3; third column - 1, 2, 4; the fourth column is 1, 3. Click on the panel above the bed to the left of the wall and click on the tiles in accordance with the prompt on the mirror. Take the key.
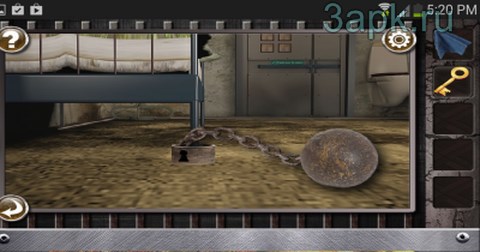
- open the lock on the chain with a ball on the bed
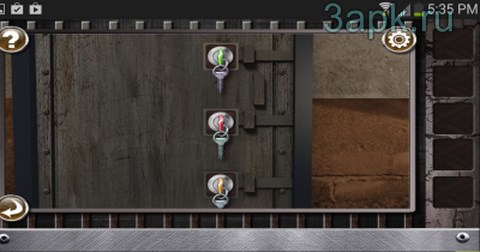
- use a ball with a chain on the wall above the table on the right. Remember the hint: L, L; inverse of L, L; L, inverted L. Turn in the direction indicated on the tile tip on the door to open it.
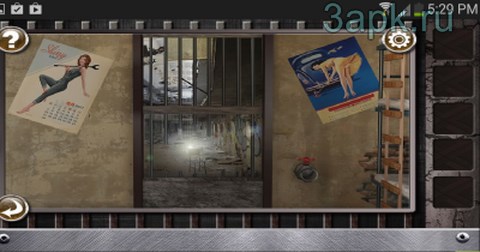
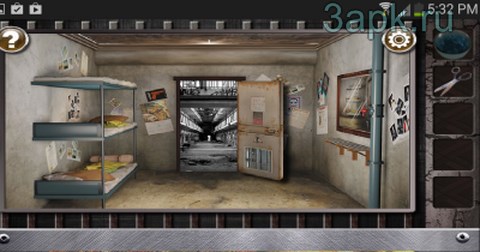
- Take the pipe in the lower left corner under the bunks. Take the screwdriver handle under the orange cushion on the bottom bunk on the right. Take the metal part of the screwdriver on the metal bars at the top on the bunks on the right. Combine both parts of the screwdriver
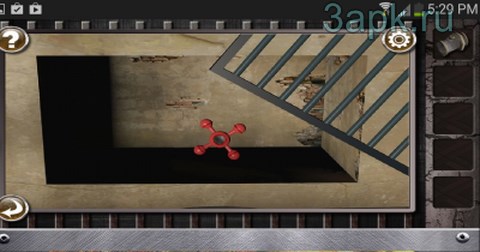
- use a screwdriver to open the ventilation grill on the wall on the left at the middle bed level. Take the red faucet handle
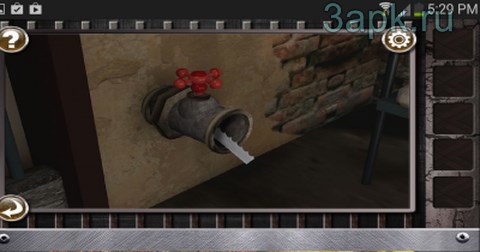
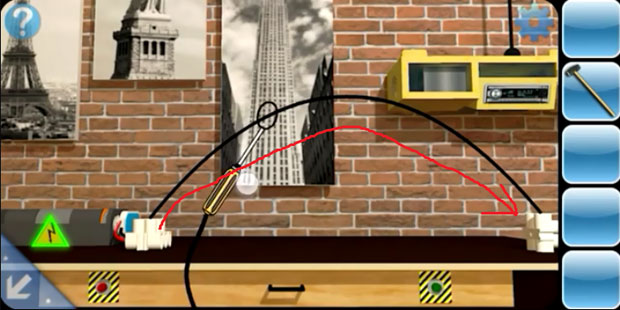
- attach the pipe to the hole in the wall to the right next to the door. Then attach the red tap to the pipe. Click on the red tap to rotate it and take the blade.
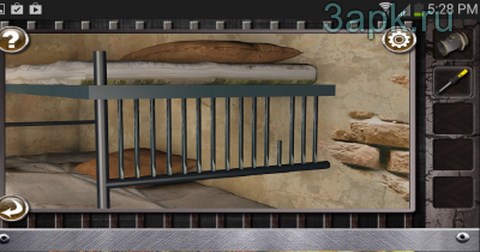
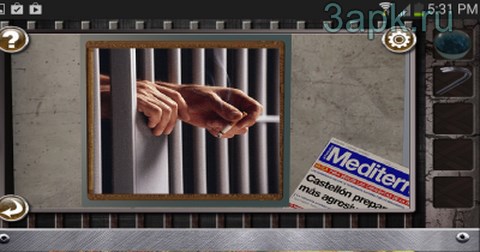
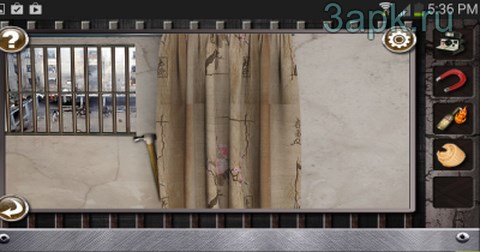
- Take the cloth in the middle bunk on the right. Take the wire on the stairs to the left. Combine the wire and blade with the fabric. Use the saw to cut the metal bars from below on the door.
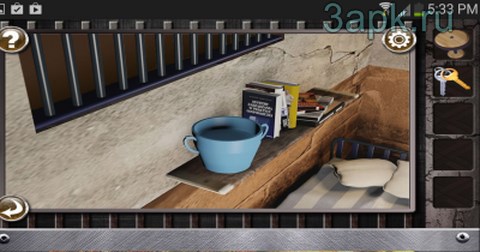
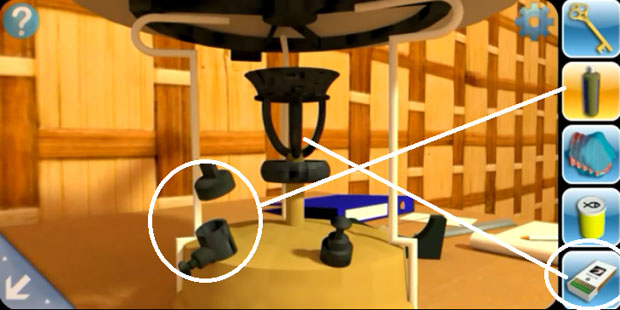
- Take the bowl to the right on the shelf. Take the crowbar on the red tap on the pipe to the right of the bowl (another view). Fill the bowl in the toilet. Place the bowl back on the shelf on the right. Remember the tip in the bowl. Click on the book in the lower bunk, remember the hint. Click on the brown pillow on the top bunk, remember the hint
- assemble the puzzle on the wall next to the door on the right. Use the crowbar to open the cache hidden behind the puzzle.
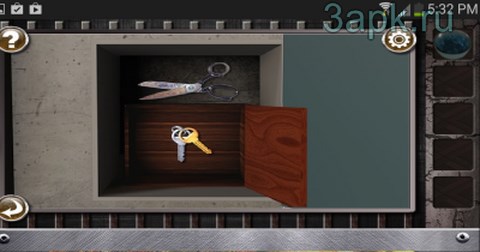
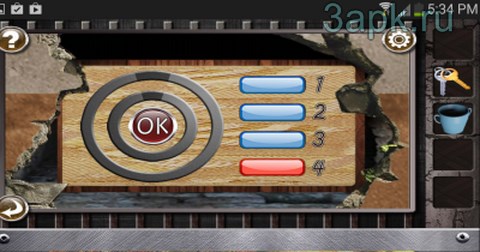
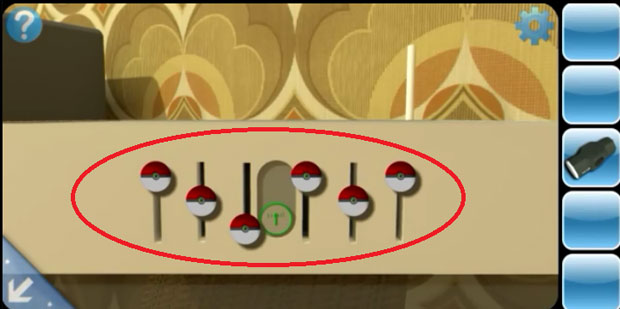
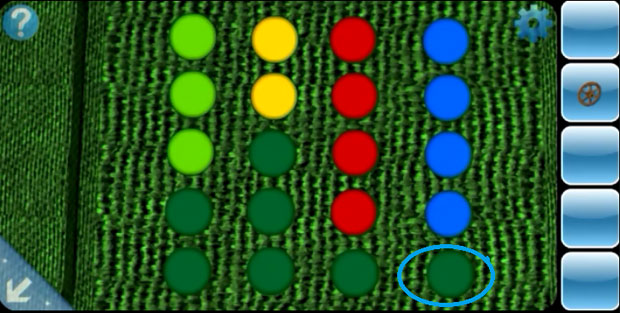
- take the scissors. Enter the colors according to the prompts in the room: yellow square \u003d 1, red square \u003d 2, green square \u003d 3, the number of gray bars in the prompts \u003d 4. Take the keys.
- use keys to open the door
- Take a chair near the table on the right. Take the keys under the covers on the bed on the left. Take the blue bucket on the shelf on the left.
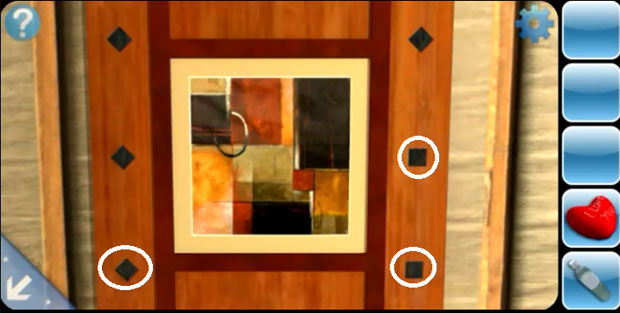
- look at the bed. Click under the bed. Now click on the sides until you see the prompts. Remember the tips: the first is short and long at the top left; the second is short on the left, long on the right; the third is short on the right, long on the top left; the fourth is short and long on top. Break the mirror above the table on the right with a chair. Take the shard of glass. Look at the wall on the left above the bed. Use the glass shard on the wall several times until you see the box. Use the tip from the bed to open the box. Take the green keys
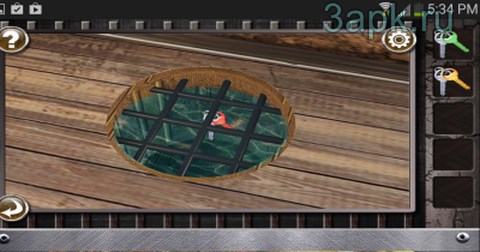
- Fill a bucket with water in a barrel in the far right corner. Pour water onto the grill in the hole in the floor on the right. Wait until the keys appear on the surface. Take the keys
- look at the book on the table on the right, remember the prompt from the arrows: left and right at the same time, right, left, left, left, left, right. Go to the radio to the right of the door and enter a hint. Remember the colors: green, red, yellow. Insert the keys into the keyholes in the order as indicated on the radio prompt.
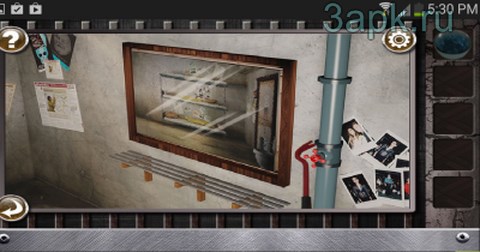
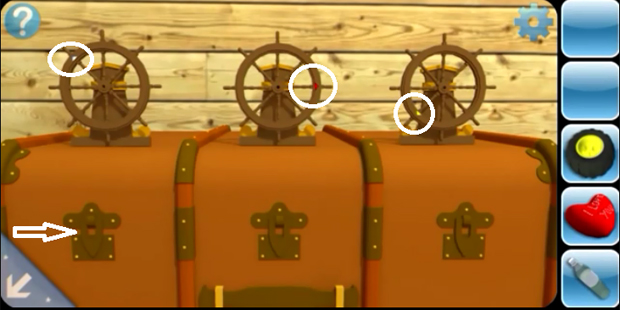
- Take a magnet in a plate with rice on a table in the middle of the room. Take the camera under the same table. Click on the bench next to the table and take the matches. Take a rag on the bottom bunk. Take the green bottle on the table in the far right corner of the room. Combine the green bottle with a rag and matches. Take the rope and hammer next to the curtains on the right.
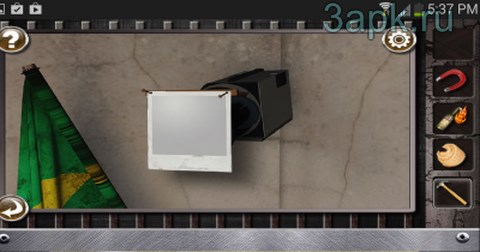
- use the camera on the barred window in the door. Take a photo. Place the photo on the camcorder in the upper right corner of the room. Click on the upper bunk frame on the left. Use a hammer to pick up the nails. Place the nails on the camcorder and attach them with a hammer
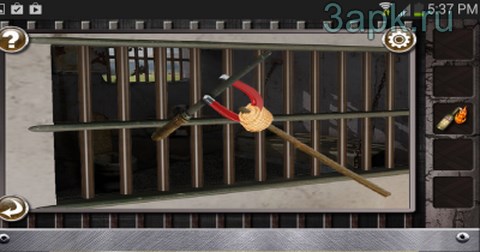
- use a hammer on a broomstick in the far right corner of the room to break the top of the broomstick. Combine the magnet, broomstick and magnet. Use a stick with a magnet to take the chisel behind bars above the top bunk.
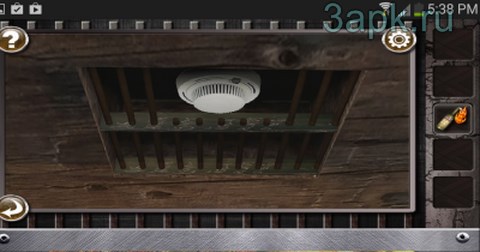
- Use a chisel on the rods of the grill in the ceiling, behind which is the smoke detector. Use the Molotov cocktail on the smoke detector in the ceiling. The door is open.
The first level is training. You will be shown how to control the camera, handle different objects and move around the room to explore its individual sections. By the way, room navigation is an innovation, in the first part of the game there was no such function.
Follow our instructions, and you will easily go through each stage of the game, and without any problems start a new one. Use our tips only in extreme cases, because passing the game is much more interesting on your own.
After acquaintance with the training chapter, you will have to deal with a very difficult box. The first thing to do is to rotate the central element of the box in order to place the parts separated from it. When all the elements fall into place, open the box and take the magnifier. Follow these steps to fix the eyepiece and get a small hexagon.
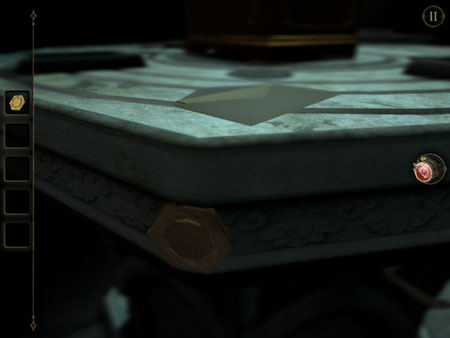
Swirl the camera around the octagonal table where the box that you just opened is standing. In the corner of the table you should notice a small metal hexagon. Take it and go inspect another square table in the room.
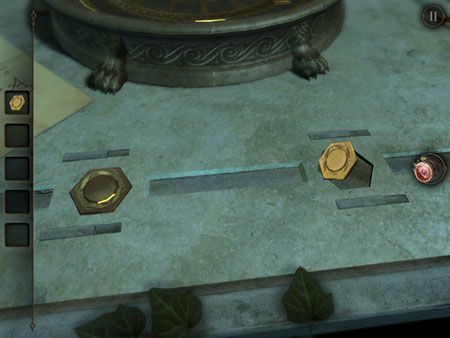
Put the hexagons found earlier in the holes on the table of the same shape. Turn the two metal discs so that a large round hole appears between them. Tap on the brass sphere to take it.
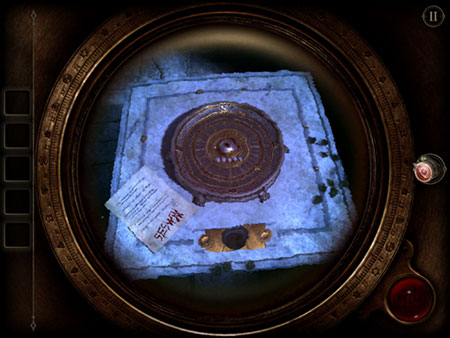
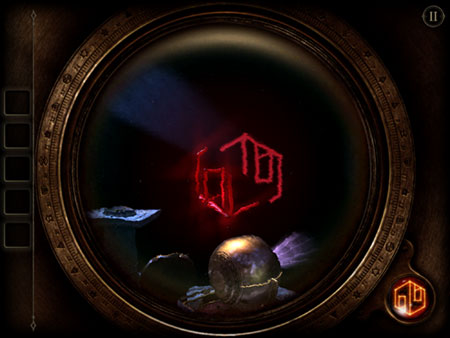
Place the sphere in the center of the giant compass located in the center of the table. Use the eyepiece to see the secret message on the note. You will see the inscription in red letters "SESWN".
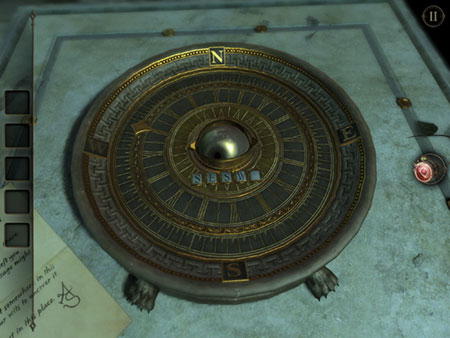
Point the compass needle so that it points first to the South, then to the East, again to the South, West and North. Under the brass eye you will see the letters S, E, S, W, N appearing.
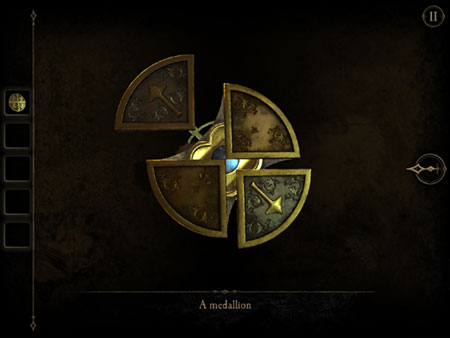
Take the locket and tap on it so that it opens. While the item is made up of individual parts, use two fingers to rotate the parts that depict arrows in the opposite direction. Now the medallion has taken the form of a square.
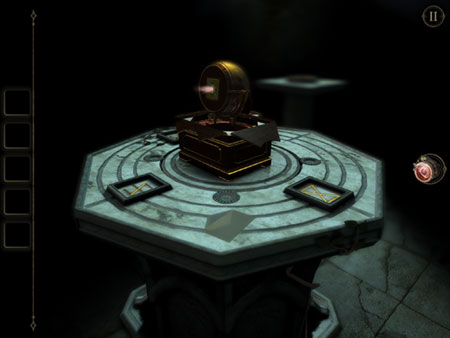
Return to the octagonal table. Insert the square locket into the middle of the box. It will open and a lamp will appear from it.
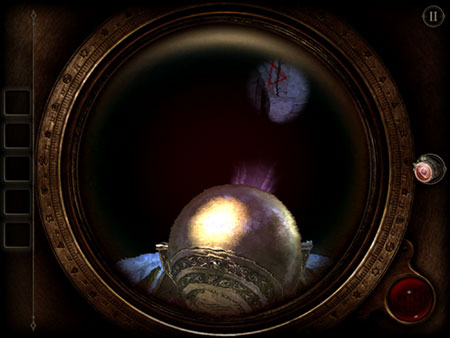
To take the lamp and hold it, tap on it twice. Wear an eyepiece to see in the dark. Now scroll around the lamp to find the mysterious symbol in the background. Repeat this action twice more. You will come across a pale, creepy sculpture that holds a small box. Rotate the top part so that the symbol on the box becomes holistic.
When the box opens, you will see red lines. To complete this level, combine the lines into a symbol.
LEVEL PASSED.
Stuck on another puzzle of The Room 2? Then you are lucky. You stumbled upon the correct article. We will guide you through each level, detailing what action is worth taking.
There is a shelf under the TV, open the drawer in the shelf on the right to pick up the remote control. Use the remote control to turn on the TV, on the screen you will see figures and fruits - this is a tip for us.
On the right of the room on the table, turn on the phone, on the screen you will see a hint of rectangles, and at the bottom of the figure how many divisions you need to raise from up.
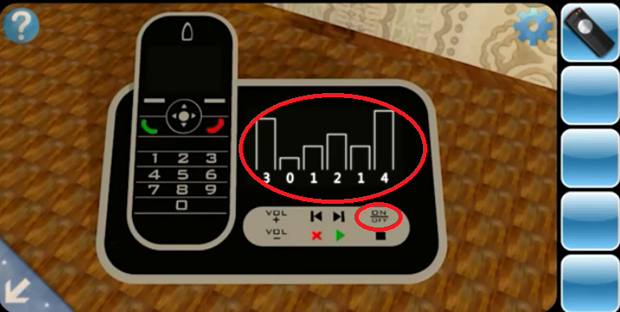
Now in the box in the room, raise the rectangles as many divisions as shown on the phone, inside, take the key. With the key, open the grate to the right of the exit, on the panel, expose the same fruits as on the TV. Exit opens, level completed. Level 1 Can You Escape 2 completed
On the left is a small cabinet with a green edge, lift the lid on top and inside take the tear-out.
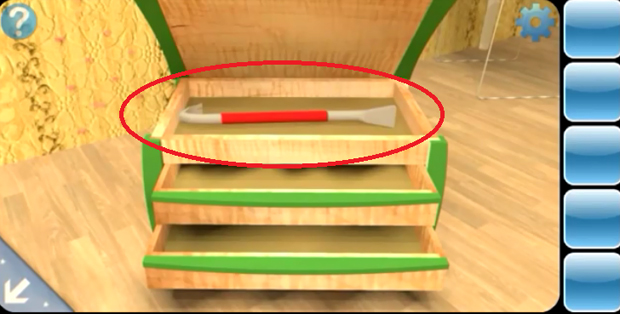
To the left of the cabinet with shelves, you will see the nailed board, tear it off and take the corkscrew inside. Open the green bottle on the table with a corkscrew and pick up the folded leaf inside.
Attach the resulting package to the letters on the shelf of the cabinet will see the letters and at the same time bAF code.
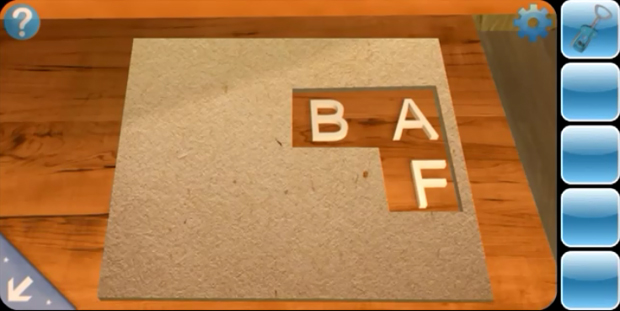
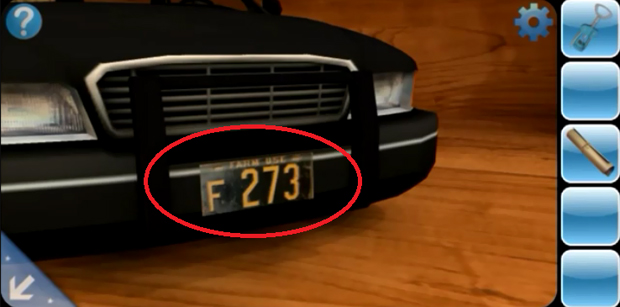
Look at the number of the toy police car this is the second code 273. Enter both codes into the panel and leave the room. 2 Can You Escape 2 completed.
To the left of the exit is a map, on it you can see a hint, in the form of flowers, clockwise. Open the chest by entering the colors as indicated in the PINK, BLUE, RED, BLUE prompts. Inside, take away the Yin symbol.
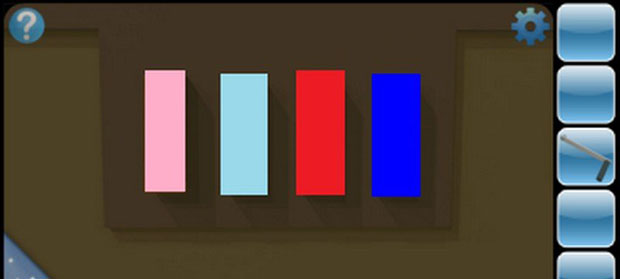
The correct arrangement of colors
To the left of the cabinet is a box, collect a picture from the puzzle on the lid and take the handle inside.

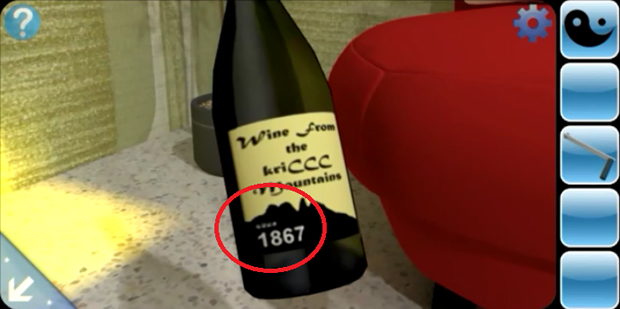
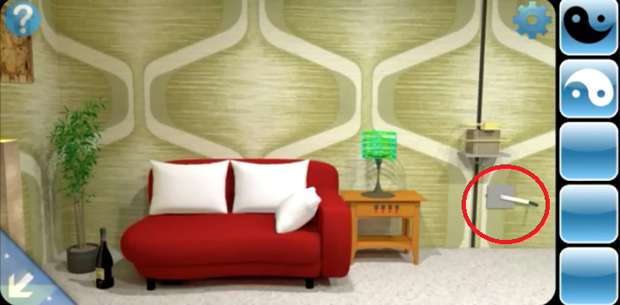
Move to the room to the right with a red sofa to his left is a bottle of wine, on it we will see the date it code 1867 to the drawer of the table, which is to the right of the sofa, enter it and take the symbol "Yan" inside
Also to the right of the little table that we just opened is the device, insert the previously found pen into it and lower the box down, insert both the “Yin” and “Yang” symbols inside and pick up the access card, use it to exit. Level 3 Can You Escape game completed.
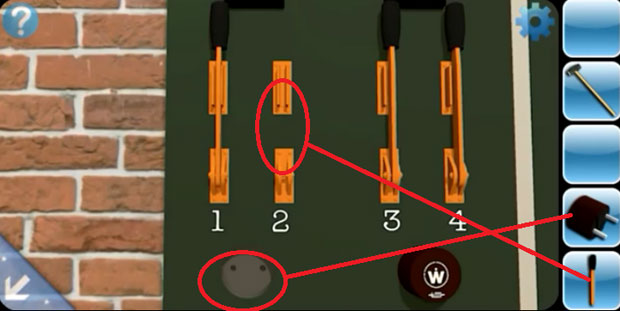
On the left above the computer desk, open the locker and pick up the sledgehammer inside. We need to turn on the current, look at the hint in the white bin. On the left side of the table, place the levers as in the tooltip until you see green in the center.
In the room on the floor are multi-colored cubes with numbers and letters, this is a hint for the password for the computer - password B3C2AA.
At the bottom of the screen you will see numbers, some of them are green, some are white, remember them, they will be useful to us for placing levers.

In the room on the left under the table, take a stick and connect it with a sledgehammer. Return to the central room, to the left of the exit at the bottom of the wall there is a fault, break it with a sledgehammer and inside pick up the lever for the knife switch. Return to the room on the left, open the boxes and drawer, and take the fuse behind them.
Now in the same room on the wall on the left side of the panel, insert the missing switch lever and fuse.
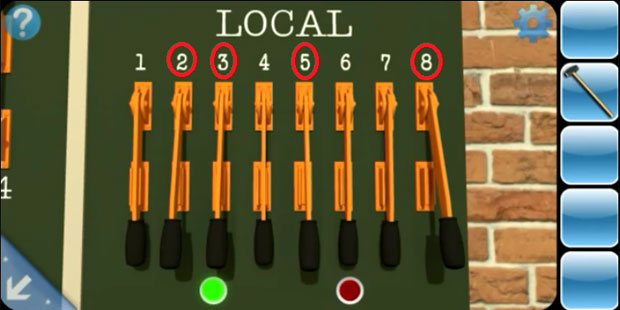
On the right side of the panel we will see 8 numbered knife switches. At the bottom of the monitor, we saw a hint in the form of numbers. Move 2,3,5, and 8 levers on yourself, below you will see how the green light comes on.
In the same room on the table you will see a screwdriver with a ring at the end passing through the wire. Carefully, in order not to touch the wire ring, lead it from left to right to the very end, a drawer will open below, inside which there will be an access card for the exit, use it to leave the level. Level 4 Can You Escape 2 completed.
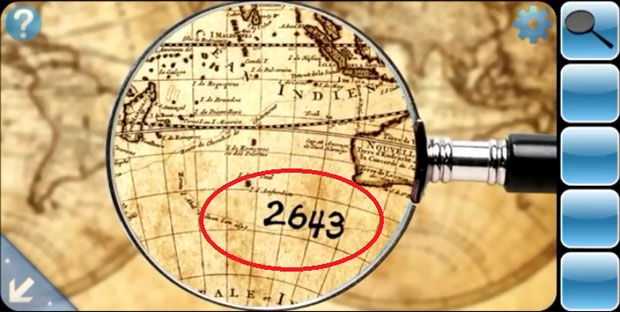
In the room on the left in the center there is a photo projector on the table, open the drawer of this table and pick up the magnifier. Return to the central room, look at the map through a magnifying glass, you will see code 2643. To the left of the room there is a cabinet on its left side, enter the code found, inside, take a film frame.
In the center of this cabinet is a black vase, move it to the side and take a flashlight behind it.
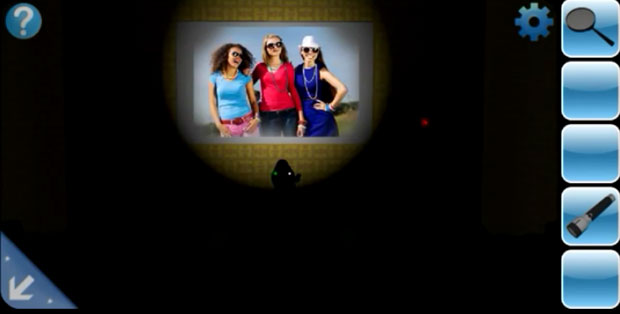
Go to the room on the left, insert the frame into the photo projector, turn off the light in the room by pressing the switch to the right of the canvas. When the light goes out, press the photo projector again to turn on the light and again. to see the photo. In the photo you will see girls in clothes of different colors. This is a hint.
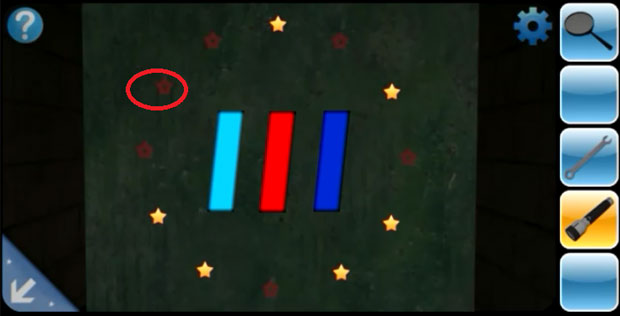
Return to the central room, there is a tablet on the table, turn it on and go into the game with collecting stars - collect all the stars. Having collected all the stars at the end you will see a hint.
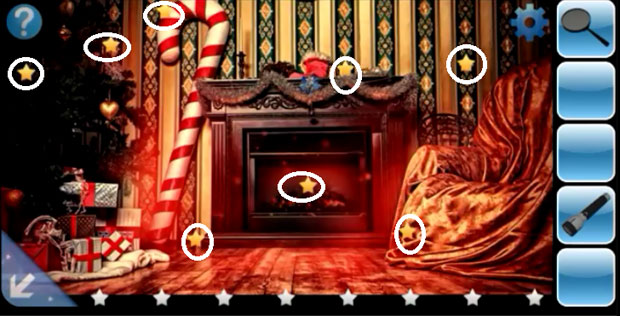
On the left on the shelf under the figure, take the wrench. Under this shelf there will be a grill, unscrew the bolts with a key, shine inside with a flashlight. Inside you will see a box, arrange the colors (the girls in the photo) BLUE, RED, BLUE. and set the stars as seen in the game. Take the green key and use it to exit. Level 5 Can You Escape 2 game completed.
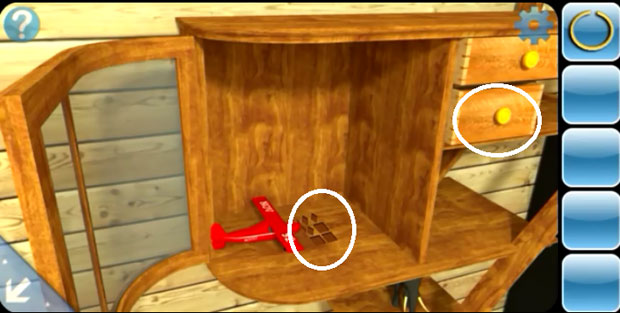
There is a shelf on the left of the room, open the drawer and take the ring inside, there is also a model of a red airplane inside, move the airplane away and you will see a hint under it. Below on the shelf is a mock elephant, remove the tusk from it.
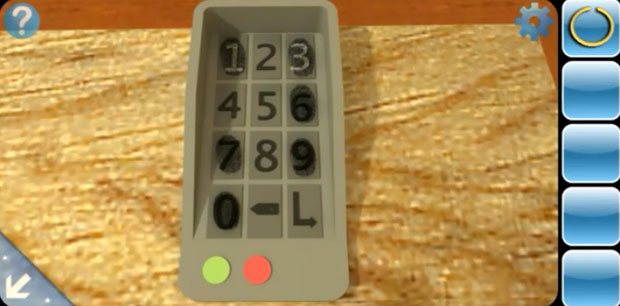
There is a drum in the room, open it with the tusk of an elephant and inside pick up the jar with a brush. Move aside the other "native" drum. Behind the drum there will be a console with numbers, use a jar with a brush on it and you will see how the fingerprints on the numbers highlight ( 13697 ) that clicked.
Inside, pick up a heart that says "I love you." In the same drawer below there is a drawer, insert the ring and pull out the drawer, inside you will see a hint on how to open the refrigerator.
Go to the refrigerator and press the buttons just as in the tip of the drawer of the table, pick up the bottle inside.
Follow the room to the left. See the picture. Place rhombs around the perimeter in squares, as in the tooltip under the airplane. Inside, pick up the toy wheel for.
Near the wall there is a box with valves at the top, scroll through each valve and put it in the desired position (see the screenshot below), then open it and pick up the part for the wheel inside.
Open the cabinet, put the wheel to the toy car on the scales. For medium weights, pour water from the bottle. By the third scales, put the bear in your hands and put the wheel to the machine. Under the scales we see the numbers that need to be summed up, it turns out code 1861Use it to exit panel to leave the room. Level 6 Can You Escape 2 completed.
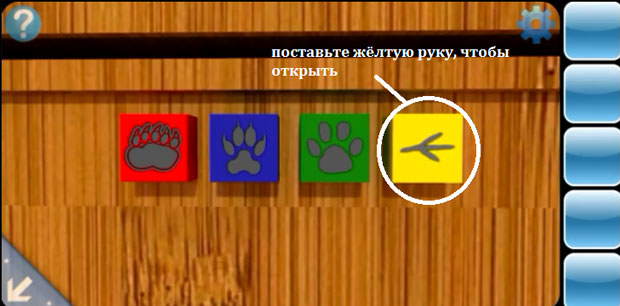
To the right of the table there is a hint in the form of a red paw print. Click on the monkey on the stairs and on the left behind it on the picture frame you will see a green paw print. In the room on the left inside the grill you will find the imprint of a blue paw.
In the central room on the table to the left of the burner with a frying pan you will see the imprint of a yellow hand. Arrange the paws according to the colors on the chest of drawers (see screenshot).
Inside, pick up the banana, give it to the monkey in return receive the key. Use the key to open the lock, on a white box. Take the frozen meat inside.
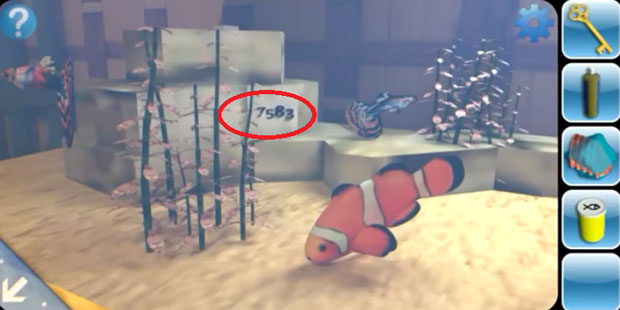
In the drawer of the table, take the vial with a drawing of a fish on the lid (fish food). Go to the room on the left in the locker, open the door, move it to the side, gas bottle, canister and pick up a bottle of gasoline. Open the lid at the top of the aquarium and pour fish food there, you will see inside the aquarium code 7583.
Return to the central room to the desk drawer, enter the code you saw in the aquarium and pick up the matches. Now we are working with the burner, pour gasoline inside it, for this, first lift the cap under the burner and then use the bottle. Put the frozen meat in a pan, light the matches under the burner. Then take the thawed meat.
Go to the room on the left, put the meat in an empty bowl, a leopard will appear near it, and the cage in which it was empty, inside the cage, take the card. Use the resulting card in the device above the cage, assemble the puzzle with the picture of zebras.
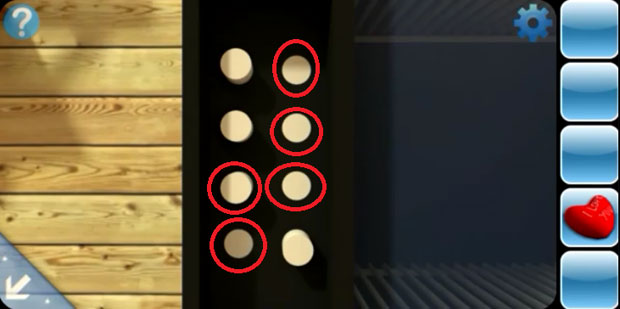
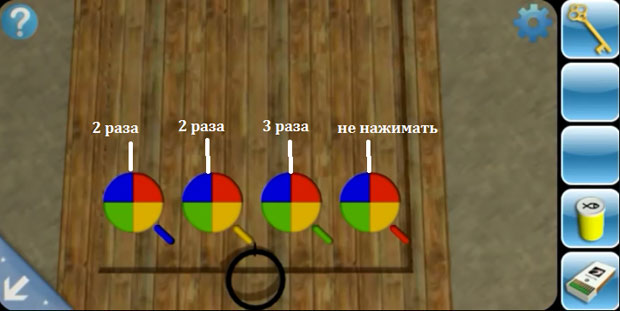
Enter the cage where the leopard was, in the floor you will see a hatch and multi-colored circles on it. Press the first circle twice, the second two times and the third three times. The fourth one does not have to be pressed.
A hatch will open. Press the red button. Go to the exit. Level 7 Can You Escape 2 completed.
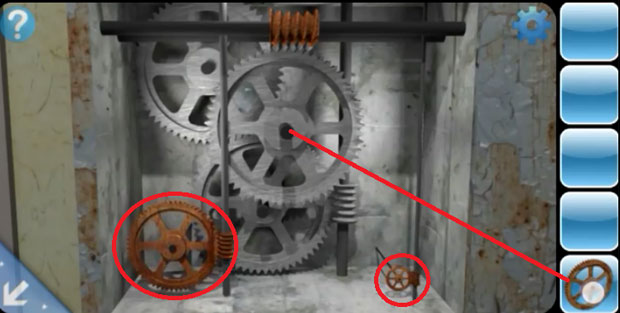
On the table, a machine assembled from Lego from the wheel of this machine remove the gear.

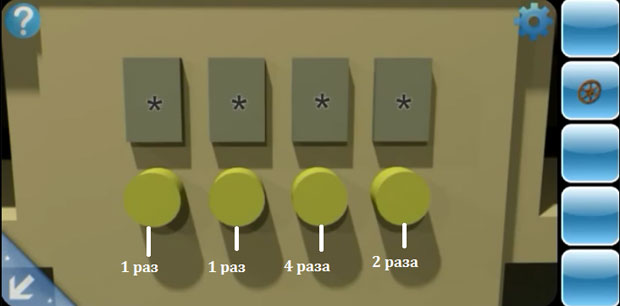
On the same table, click on the palm to turn on the light on the table. code 2436. select this code to the desk drawer: press the first button 1 time, the second 1 time, the third 4 times, the fourth 2 times. Take the pen inside.
Put the handle on the rusty iron box and open it. Take the battery inside. Return to the table on it lies a box with multi-colored lamps. Open it and insert the battery inside. After that, look how many times the bulbs will light up.

Arrange the colors on the green suitcase, just as they light up (see screenshot) and inside take the big gear.
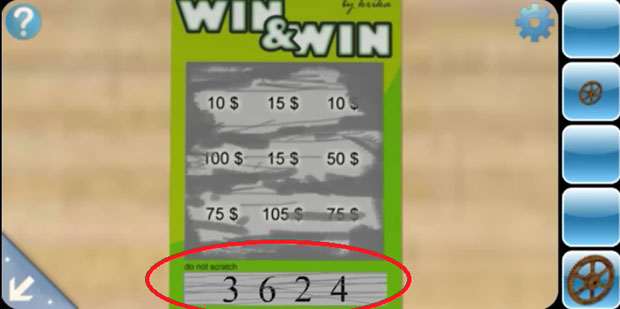
Go to the room on the left. There is a lottery ticket on the shelf of the cabinet, remove the film from the bottom to see code 3624. Enter this cipher to the box in the same cabinet and take the magnet inside.
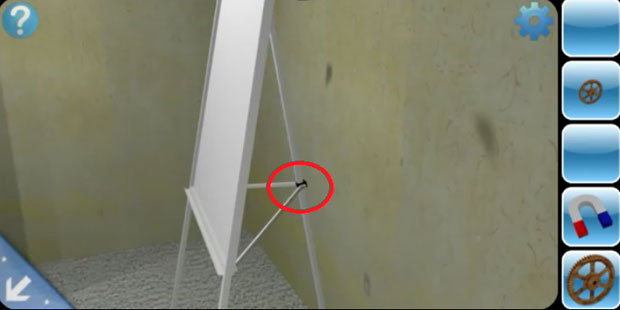
In the same room there is a stand with a cloth, take a stick from its back side at the place of crossing.
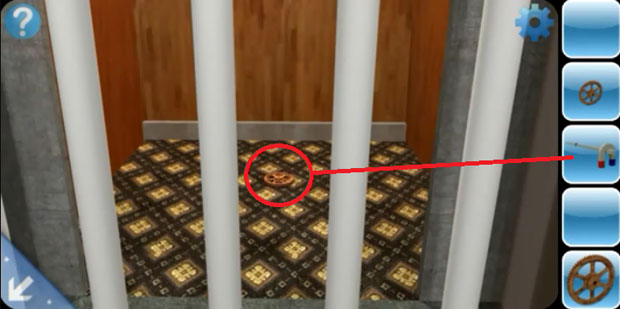
Return to the central room, in the bin next to the table, take a card, use it to open the elevator door. Connect the stick and the magnet together and get the middle gear through the grill.
Now insert all the gears in the iron box, the output grill will rise. Level 8 Can You Escape 2 completed.
Walkthrough Can You Escape 2 End
From internal pipelines, drains are transported by external ...
Each apartment, like every family, has its own characteristics, so it is difficult ...