Extra-curricular event for Cosmonautics Day for schoolchildren....


Each of us in early childhood had to pull a bicycle chain. The design was imperfect, so this element often flew off. A lot of time has passed since then, and the innovations that have come to the bicycle industry have changed the mechanisms beyond recognition. It is now difficult to find a single-speed transmission, and the eight-speed transmission, which was popular until recently, is becoming a thing of the past.
Now the bikes are equipped with nine sprockets and a thin chain that require regular maintenance - such is the price paid for comfortable speed and light weight. Consider what rules you need to follow so that the installation of the chain on the bike is done correctly and its wear is minimal.
During operation, this transmission element wears out most of all at the hinges, where, under the influence of loads, the links lengthen. As a result, the chain pitch increases, and it can no longer perform its functions. Typically, the service life of this element does not exceed 3-4 thousand kilometers, which is no more than 1-2 seasons. The wear of a bicycle chain is checked by its elongation. If the tooth is more than half exposed when pulled away from the leading star, then a replacement must be made. It is pointless to repair this element: after the chain is mounted on a bicycle, it will constantly fly off and you will not be able to enjoy the ride. If properly cared for, this element will last much longer and reduce your costs.
It is important to figure out how to tension the chain on the bike correctly at the first installation, otherwise it will be difficult to move the bike and the gear mechanism will be destroyed. To do this, perform the following steps:
If you follow the theses of this simple technique, you will not have any difficulties with the transmission. All the experience gained during the installation process can be used to teach friends how to tension the chain on a bicycle.
During walks in inclement weather, water and dirt accumulate on the transmission elements, and if these components and systems are not serviced immediately after returning home, then natural abrasive and rust will quickly disable them.

Corrosion is an inevitable consequence of neglect of the chain, its sworn enemy. Too intensive care is also contraindicated - grease (solidol) binds particles of dirt and dust, which leads to accelerated abrasion of the stars and subsequent malfunctions.
In order to set the required tension, the bike is turned over and placed on a saddle or mounting rack. The rear wheel is removed by unscrewing the nuts or loosening the eccentric clamp. The brake lever and the bracket on the stage are lowered so as not to interfere with the work. Next, the chain is disconnected with a lock, its excess part is removed, and after shortening it returns to its place.
If your bike is of an old design (with horizontal dropouts), then all processes are simplified by an order of magnitude. It is enough just to move the wheel further along the guides, and the question of how to put the chain on the bike correctly will be solved. However, in this case, it is necessary to control the wear of the links, since neglecting them can lead to breakage of the sprockets.
Preventive measures to minimize transmission wear should be carried out regularly. To do this, it is necessary to remove the contaminated chain and flush it with a solvent. There are special devices that can help in this process and keep your hands clean.

They are called "washes": they are a box with special brushes, rollers and guides, filled with a liquid that washes away dirt particles. If you carry out such a procedure regularly, then the problem of how to tighten the chain on a bicycle will not bother you, and the part will successfully last several seasons.
If cleaning has not been carried out for a very long time, then rust will form, which is much more difficult to remove. It is necessary to immerse the chain in a container with a corrosion converter or kerosene (it is best to use aviation oil, since it contains the smallest amount of impurities) and stand for several days. Next, it must be removed, cleaned with a metal brush and left to dry in the sun. After some time, each link must be lubricated with oil from a special oiler and set in working position. Like on a bicycle, we already discussed at the beginning of the article, so there will be no difficulties in this matter. It is important to follow logic and your own intuition.

Despite the fact that many bicycle chains are equipped with a special removable link, some of them are not designed for this moment. This can confuse a novice mechanic - there is no desire to spoil the part, and it is not clear how to tension the chain on a bicycle. In fact, this issue is solved simply: a rivet is knocked out of any link with a thin steel rod or a special squeeze device. Work is carried out in the following order:
You are now ready to service your bike drive yourself.
Any experienced feller who knows his job well, before starting work, must check the chain tension and the degree of sharpening of the chainsaw teeth. If you do not pay attention to the condition of the tool, its performance during operation is greatly reduced.
Properly adjusting the tension on your chainsaw chain will prolong its life and also prevent it from slipping off the bar while cutting.
Chain tension plays a vital role in the performance of a chainsaw. If it is not tight enough, it can easily be damaged or slip off the bar during cutting. Conversely, if the chain is too tight, the pressure on the tool motor increases. This greatly shortens the life of the chainsaw, as it begins to wear out much faster. The chainsaw chain has another important purpose: it restrains the tire, which, when idling, goes in different directions.
To check the degree of chain tension, it is necessary to pull it up, taking the tooth in the middle or outer part of the bar. If the tension is set correctly, 1/3 of the tail will be in the groove of the chainsaw bar. Exceeding this limit means that the chain is too tight, and decreasing - too little. The free movement of the chain on the bar is important. This is easy to check by trying to twist it by hand.

The tensioning process is not laborious, you just need to figure out the order of all the necessary actions and pay due attention to this procedure.
Before starting work, you must make sure that the saw is not working and its accidental start is completely excluded. Wearing protective gloves, you need to rotate the chain by moving your hand along its axis. In the case of a strong loosening, a large sag will appear in the back of the tire. It is this factor that you should focus on when checking whether the chainsaw needs to be adjusted before starting work.
First of all, you will need to inspect the tensioning mechanism located to the right under the side cover that fixes the axis of the tool. Most often, this mechanism is a simple bolt, but in some cases, chainsaws are equipped with a special tensioning system that does not require any additional devices.
After that, you need to slightly unwind the hardware located on the side and designed to fix the tire. Next, with a screw for adjustment, you need to select the desired tension by moving the axle forward. To control the smooth movement of the chain, you will often need to rotate it in the direction in which it moves during operation.

After adjusting the chain using the tensioning mechanism, you need to securely screw the tire hardware. If the setting has been done correctly, the movement of the chain will be smooth. It should not jam and have a certain inertial margin. If not properly adjusted, the chain will stop abruptly, and at times it will jam. It should be borne in mind that this happens in the case of a strong stretch. Since this has more of a negative effect on the instrument, it is best to always tune the circuit with a little attenuation. To prolong the life of the chainsaw, it is recommended to carry out such adjustment as often as possible.
Remember that adjusting the tension on a heated tool is unacceptable.
When the chain cools down, it contracts, so if it is pulled too hard, it can pull the bar and deform it, which will lead to irreversible damage to the tool. Before adjusting the chainsaw, be sure to cool it down.
Back to index
The productivity of a chainsaw depends on a number of factors:
If the degree of tension affects the performance of the chainsaw, then sharpening its teeth affects the speed of sawing. Therefore, it is extremely important to pay special attention to this point. With good sharpening of the teeth, the saw cut is much more efficient, accurate and safer.
The regularity of the sharpening procedure does not have special standards, but professional fellers recommend doing it several times a day. This is due to the rather rapid blunting of the teeth in the process of intensive sawing.
Most often, the degree of bluntness of the chain is determined based on the performance of the chainsaw. In addition, the tool needs to be sharpened when the tire begins to drift to the side. Another measure of dullness is the condition of the chips. As a rule, from correctly sharpened teeth, the chips are homogeneous. In this case, sawdust has a rectangular or square shape. In the case of a blunt chain, dust will prevail in the chips, and the sawdust will begin to resemble the shape of a needle from a simple hacksaw.
If you regularly monitor the degree of chain tension and sharpen it in a timely manner, the chainsaw will last for a long time. At the same time, the process of sawing even especially hard wood will not cause you any trouble.
In case of insufficient experience, it is recommended to contact a specialist. Professional lumberjacks determine the condition of the chainsaw and its components at the first inspection. They will determine the degree of its wear, too tight chain tension and the sharpness of the teeth.
In the article we will tell you why it is necessary to adjust the tension of the gas distribution chain, what can happen if this is not done, and how to tension the chain on the VAZ 2107.
When is chain tension adjustment needed?
What is the danger of an untimely tightening?
The valve timing shifts gradually, the engine starts to work intermittently, there is increased heating and wear of the parts of the cylinder-piston group.
What tool is required for tension?
The sequence of necessary operations:
1. Remove the air filter housing from the carburetor. Then we disconnect the thrust of the "gas" from the roller
2. Then you need to remove the lever with rods.


3. And, finally, we disconnect the fuel hose from the bracket, going from the fuel pump to the carburetor.

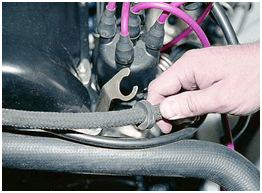
4. With a tubular key for 10, remove the cylinder head cover. This must be done so that you can check the chain tension by hand.


5. Weaken the tensioner. In the engine housing, near the pump, on the right side in front along the course of the car, unscrew the cap nut with a 13 mm wrench.

6. The chain tensioner is discharging, the shoe “clicks” with a specific sound. If there is no click and the tensioner is “stuck”, then you can gently tap the nut with a hammer and release the tensioner plunger.
7. When the cover is open, you can easily determine if the chain is slack by pressing on the side of it. It is worth remembering what degree of its “weakness”.
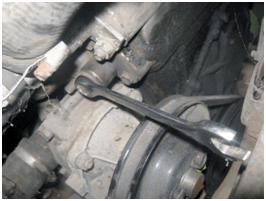
8. With an open-end wrench 38, turn the crankshaft clockwise by an average of one and a half to two turns. When there is the greatest resistance to movement, then the chain will be as tight as possible. The main thing is to make sure that the crankshaft does not turn back due to the stroke due to compression, and the chain tension does not weaken. If there is no key for 38, then you can turn on the ignition and turn the crankshaft with the starter. In order not to "slip" the moment and tighten the chain, a skill is required, because you need to turn on the starter for a split second. You can even crank the crankshaft without a key and without a battery. You will have to hang out the rear axle and turn on the “easy” 5th gear for rotation. Then, turning the wheel clockwise, turn the chain to the desired position.
9. We twist the nut back, holding the crankshaft from the "damping" back. Then we check the result of the tension by again pressing the chain with your hand.
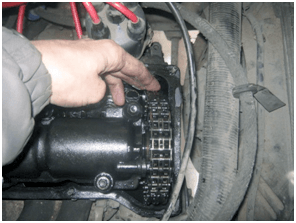
There shouldn't be any deflection. Now install the head cover in place.
10. Adjustment completed. Now we start the engine and check the work by ear. If you managed to tighten the timing chain correctly, then the metallic ringing will disappear.
This method of tension can be recommended to everyone. Experienced motorists do not need to remove the block head cover, provided that by touch, by resistance, they will unmistakably find exactly the position of the crankshaft at which the chain will be as tight as possible.
As a timing drive on different types of engines, a toothed belt or chain is installed. They transmit torque from the crankshaft to the camshaft, which controls the operation of the car's valve system. It is the chain drive that is used in the VAZ 2107 engines, which provides greater reliability in comparison with a belt drive. There are frequent cases of broken timing belts, which leads to damage to the valves of the gas distribution system and requires expensive labor-intensive engine repairs. Unlike a belt, a timing chain ensures that there are no breaks and the consequences associated with this.
During operation, the chain gradually wears out and stretches, starting to make an unpleasant knock. If the malfunction is not corrected in time, a chain that is too loose can jump one or two teeth, which will lead to a shift in the valve timing, loss of power and engine performance. If the chain skips more teeth, the timing valves may “meet” the pistons, as happens on some engines when the timing belt breaks. To prevent this from happening, it is necessary to periodically control the tension and, if necessary, tighten the VAZ 2107 chain.
If you need to tighten the chain, it is not necessary to check the tension. It is enough to use a chain tensioner (this will be discussed below). A tension check is needed if the chain has been replaced or if the chain continues to knock after tension. The knock of a loose chain is easy to distinguish from other noises: as the engine speed increases, it disappears.
To check this yourself, you need to open the hood and start the car. Then ask an assistant to press the gas pedal or independently pull the cable that controls the throttle actuator with your hand. If the knock at the front of the engine has disappeared, the cause is a weak chain tension. You need to pull it up.
The timing chain of the VAZ 2107 is located in front of the engine. From above it is closed by a cylinder head cover, from below - by an engine pan, the middle part passes inside the block and can only be reached by removing the chain.
To check the chain tension, simply remove the cylinder head cover. To do this, unscrew the 8 fastening nuts. After removing the cover, the gasket must be replaced. It is inexpensive, but if this is not done, after installing the cover with the old gasket, it is almost guaranteed that oil will begin to ooze from under it.
When the "valve cover" is removed, access to the top of the chain is exposed. You can check the tension with your hands, but it is better to use a large screwdriver. It must be inserted between the chain and the cylinder block housing and, using it as a lever, try to bend the chain. In this case, the chain should not bend. The tension check must be carried out on both sides - on the left and right sides of the engine. A chain stretched like a string that does not bend when pressed with a screwdriver or fingers is a sign of its correct tension. Otherwise, it must be tightened or replaced.
Important: Do not apply too much force by pressing the chain with all your might. This can lead to deformation of the chain links. Therefore, it is necessary to press "half-heartedly."
“How to properly tension the VAZ 2107 chain” is a common question among novice owners of the VAZ “classics”. The chain tension is adjusted by the crankshaft bolt and a special part - the chain tensioner.

To adjust the chain tension, you need a spanner wrench for the chain tensioner nut and a special wrench to turn the engine crankshaft. The latter can be replaced with a ring wrench for 36.
Tension adjustment begins by loosening the chain tensioner nut. At the same time, if the chain has been loosened, the tensioner shoe should move slightly and tighten it.
If the shoe is stationary and the chain is not tensioned, the tensioner plunger should be released by lightly tapping the nut with a hammer. Sometimes it doesn't help. Then you should remove the tensioner and restore its performance or replace the part. This malfunction (plunger jamming) is quite typical for VAZ engine chain tensioners. That is why it is advisable to remove the engine head cover and check the chain tension, and not adjust it "blindly".
In order to properly tension the VAZ 2107 chain, it is necessary to turn the engine crankshaft with a special key clockwise by 1-1.5 turns, stopping it at the moment when the resistance to rotation is maximum.
Important: some craftsmen prefer to crank the crankshaft with a starter when adjusting the chain tension. It is not recommended to do this, since the correct tension can only be achieved with smooth, slow rotation of the crankshaft and when stopping precisely at the moment of greatest resistance to rotation.
After completing the operation, it remains to firmly tighten the cap nut of the tensioner and install the engine head cover in place.
Most people, when they first encounter the operation of a chainsaw, are wondering how to tension the chain on a chainsaw correctly. Installing the chain and its adjustment does not require much time.

A properly tensioned chainsaw chain will ensure the longevity of its operation.
In order to answer this question, you should study the chainsaw device. The device consists of several main units that ensure its functioning.
The chainsaw consists of the following main structural elements:

The chainsaw drive is based on a single-stage chain drive.
By their design, chainsaws can be attributed to the classic mechanisms that are driven by an internal combustion engine. The design of the device uses the simplest single-cylinder two-stroke engine. Instead of a gearbox, the device uses a single-stage chain drive, which ensures the rotation of the saw chain. The simplicity of the design ensures the reliability and trouble-free operation of the unit in harsh operating conditions.
The propulsion system of the unit includes the following structural elements:
The motor of the device is capable of developing a maximum of 13,500 revolutions per minute. Such high rates impose stringent requirements on the fuels and lubricants used in the process of its operation. The force from the running engine is transmitted to the drive sprocket by means of a centrifugal type clutch, which is activated automatically when the engine speed increases. The clutch consists of a drum and elements with friction linings. When the engine reaches a certain number of revolutions, the elements are pressed against the drum, and the latter begins to rotate, setting in motion the drive sprocket, which is engaged with the saw chain.
The ignition system is a non-contact electronic device that allows you to ensure stable operation of the power plant of the device. The fuel supply system consists of a fuel storage tank, a pipeline and a carburetor. The carburetor is a device that provides the preparation of a combustible mixture for the operation of the power unit.
The working tool of a chainsaw is a saw chain, the movement of which occurs along a special guide rail, due to the rotation of the driving and driven sprockets.
Back to index

The chain alternates cutting and driving links.
The working element of the saw consists of elements of three types:
The assembly of all elements is carried out with the help of rivets. The most complex structural elements are cutting links. This type of structural elements can be of two types: right-handed and left-handed. These elements provide sawing wood.
The tire is the most important structural element of the device, which serves to guide the saw chain. The tire is made using wear-resistant steel, which has high elasticity. On the periphery of the tire design there is a special guide groove. Oil is supplied through the groove to provide lubrication. A feature of the tool is the presence of an open cutting body, which is dangerous to humans. To ensure safe operation, a special device called a brake is used. The device is turned on by pressing the protective shield.
When the brake is applied, the brake band is tightened on the clutch drum and it stops. As a result of these actions, the cutting body stops.
The cutting body tensioning system includes a movably connected screw. When the screw is rotated, the pin moves along the groove in the saw body, which leads to the movement of the bar. The movement of the tire leads to the tension of the cutting element. For the convenience of the operation, the tension screw on some models of the unit is located on the side, outside the cover of the protective cover that covers the drive sprocket of the device. Each new installation of the chain requires adjustment of the tension of the cutting blade.
Back to index

No slack is a sign of correct chain tension.
To check the chain tension, pull the chain up by one of the teeth at the top above the guide bar. If the chain tension is normal, then one third of the tail of the tooth will be in the groove of the chainsaw guide bar.
An increase in this indicator indicates that the saw chain is too tight, and a decrease indicates that there is too little tension. One of the most important indicators of chain tension is its free movement along the guide rail. For this purpose, you need to turn the chain along the guide - it should move under a slight impact.
After that, using protective gloves, turn the chain in the direction of travel. If the chain is loosened too much, there is a lot of slack on the back side of the bar. It is this sign that indicates the need for chain tension.
Chain tensioning does not take much time and is not a laborious process.
After sagging is detected, it is necessary to loosen the nuts or screws, which, depending on the design of the unit, fix the guide rail. Then, using the adjusting screw, the tire is moved forward, choosing the degree of tension. During the tensioning process, it is recommended to rotate the saw element from time to time in order to select the optimal hinge play and control the smoothness of its movement along the guide bar. After adjustment, tighten all fixing elements and restore the unit to working capacity.
After a correctly performed adjustment, the movement should be uniform and without snacks; during the movement of the working element along the guide, a small inertia should be maintained. If the tension is too strong, the movement is difficult, and when the impact stops, the working tool stops instantly. Constriction is much more harmful than undertightening. If a new chain is being installed, the tension should be minimal, since overtightening the working element can lead to failure of the chainsaw guide.
Extra-curricular event for Cosmonautics Day for schoolchildren....

Beautiful figure applications help develop good thinking in little ones...

Fertilizers for tulips are usually applied in autumn and spring. Feeding is needed to...