Job interviews are not easy. If you want to apply for...

From internal pipelines, wastewater is transported through external pipelines to storage tanks or septic tanks. In order for this function to be performed at the proper level, it is necessary to ensure the correct laying of pipes.
Most often, polymer pipes made of polypropylene, polyethylene and polyvinyl chloride, painted orange, are used to mount the sewer network.
In the presence of dynamic loads exerted on the pipelines of the network. It is worth choosing corrugated polymer pipes, consisting of two layers of material. The connection is made with the help of fittings, usually in a socket. Such pipelines are less susceptible to corrosion, are durable and, due to the low roughness of the walls, do not create blockages and fouling. They are laid to a depth of less than 3m.
For the convenience of performing work, the correct and reliable connection of pipelines, it is necessary to measure in advance the depth of the pipe entering the socket and make appropriate marks.
Turns on the main line are constructed with a value of 15, 30 and 45 degrees. Every 15 meters, the pipes are equipped with a revision or cleaning.
For backfilling, it is forbidden to use soil that contains stones or solid blocks larger than 30 cm, as they can damage the sewer pipes.
The trench is gradually filled with earth, each layer about 5 cm thick is rammed into the embankment only in the lateral part of the pipelines. It is forbidden to carry out ramming above them, since the possibility of deformation or damage to the pipe is not excluded.

Pipelines that need insulation are usually those that are located above the freezing mark of the soil or outlets from the internal sewer. Usually, for these purposes, polymeric heaters such as stenoflex or energy flex are used. Thermal insulation is placed around the pipelines and is well secured with ties or wire. Only after installing the insulation and checking the slope of the network can the trench be backfilled.

It should be remembered that in the presence of breakdowns in the sewer network, it would be more expedient not to change a separate element that has failed, but to completely dismantle the system. It will be more reliable and economical.
A process that you can do yourself is building a system and laying sewer pipes in the ground. Its technology is simple, and if you follow all the recommendations described in this article, the life of the sewage system will be long, and its reliability will be high.
During the construction of any modern home sewer needs to be taken care of. Installation of pipes for sewerage must be carried out in compliance with all norms and requirements. This will make it possible to avoid in the future the replacement of deformed pipes, time-consuming cleaning, excessive noise during the movement of waste fluid and other troubles associated with the operation of the sewer.
During installation, gray pipes made of PVC or PP are used for it. These pipes have a lower strength class than orange pipes for outdoor sewerage, since they are not subjected to such a high load as the latter.
The use of gray pipes for the installation of external sewerage is strictly prohibited. For sewerage at home, pipes are most often used, the diameter of which is 40, 50 or 110 mm. The laying of internal sewerage can be divided into two stages. The first is the installation of vertical and horizontal pipes under the floor or in the basement. Simply put, there is a design of piping.
Before starting work, it is imperative to mark the axes of the pipelines and the places where the fasteners will be located. Next, fasteners are mounted and ready-made assemblies are assembled from nozzles, fittings and pipes. The finished nodes are connected to each other, the correctness of their location relative to the vertical and horizontal is checked, and then they are fastened in clamps.
When installing a sewer it should be taken into account that it is not possible to place socket connections in places of passage through ceilings and other building structures. It is also forbidden to change the slope on the outlet horizontal sections. Installation of vertical risers must be carried out from the bottom up without vertical deviations. When this work is done, risers and horizontal branch lines need to be designed. This stage is completed by installing the exhaust part of the pipeline in the attic.
The next step is the installation of horizontal pipelines along the floors of the building with their connection to the outlets of sanitary appliances and siphons. When carrying out these works, it is allowed to mechanically process pipes and branch pipes using hand hacksaws for metal and hacksaws for wood with fine teeth.
The pipe must be cut strictly perpendicular to its axis. The resulting burrs must be removed and chamfered with a file with large serifs. All the above types of processing can also be carried out using special tools. Processing fittings (tees, turns) mechanically is prohibited. It is also forbidden to lubricate pipes during installation with engine oil, grease, etc. Only the use of a soap solution or special lubricants is allowed.
When installing fittings and pipe sockets must be directed against the movement of wastewater.
Name of works | Description | units measurements | Price |
|---|---|---|---|
| Installation of a connection point to the sewer | Installation, connection to the sewerage system | PCS. | 1500 |
| Installation of internal/external sewage pipes (open) | |||
| diameter up to 50 | m.p. | 200 | |
| diameter from 50 to 110 | m.p. | 400 | |
| diameter over 110 | m.p. | individually | |
| Installation of internal sewerage pipes in a trench (brick, gypsum) | Pipe laying with socket connection | ||
| diameter up to 50 | m.p. | 400 | |
| diameter from 50 to 110 | m.p. | 650 | |
| diameter over 110 | m.p. | individually | |
| Installation of internal sewerage pipes in a trench (concrete) | Pipe laying with socket connection | ||
| diameter up to 50 | m.p. | 600 | |
| diameter from 50 to 110 | m.p. | 900 | |
| diameter over 110 | m.p. | individually | |
| Installation of a sewer riser | Installation of a riser, revisions and tees | m.p. | 600 |
| Ladder installation | Installation of a drain in the lower floor level | PCS. | 1000 |
| Installation of a sewer check valve | Installing a check valve with flare connection | PCS. | 1000 |
| Installation of the sololift sewage pumping unit | Installation in place, connection to the system | PCS. | 4000 |
| Drain pump installation | Installation, connection | PCS. | 2000 |
| Drain pump installation | Installation, connection | PCS. | 2000 |
| Installation of a septic tank from concrete rings | PCS. | individually | |
| Installation of a septic tank (Tank, TOPAS, etc.) | Selection of the necessary system, excavation, installation work | PCS. | individually |
| Installation of VOC - Local treatment system | Selection of the necessary system, excavation, installation work | PCS. | individually |
| Installation of SBO - Biological Treatment Station | Selection of the necessary system, excavation, installation work | PCS. | individually |
It must be made in such a way that possible elongations of the pipeline during operation associated with temperature changes are compensated. Pipes can be extended by a maximum of 10 mm per 2.5 meters of pipe. To compensate for such elongations, the socket connection is installed in such a way that the pipe with a smooth end does not reach the stop by exactly 10 mm.
For pipes with a length of 2.5 to 10 m, special couplings are used for compensation - compensation, which allow compensating for up to 60 mm elongation. Now that the installation of internal pipes for sewage is completed, let's talk about external sewage. To install pipes for external sewerage, smooth pipes with an orange outer surface made of PP (polypropylene) and PVC (polyvinyl chloride) are used.
Sewer pipes of red color do not undergo destruction and corrosion while underground, like gray ones. This is due to the fact that these pipes have a very smooth inner surface. During production, special additives are added to these pipes, which makes them more rigid and allows them to withstand large external loads. Laying of such pipes is possible even at a depth of 3 m.
If a very high load on sewer pipes is planned (namely, location under the roadway or their deep occurrence), then pipes with increased rigidity are used, namely, two-layer corrugated pipes made of PE (polyethylene) or PP. The most common among sewer external plastic pipes are pipes with a diameter of 110 mm. IN suburban construction these pipes are widely used to divert wastewater from one small building, as well as from a whole group of buildings to treatment facilities. Sewer pipes of large diameters are also used - for the disposal of sewage of a larger amount. When designing sewers, special fittings are used to connect plastic pipes.
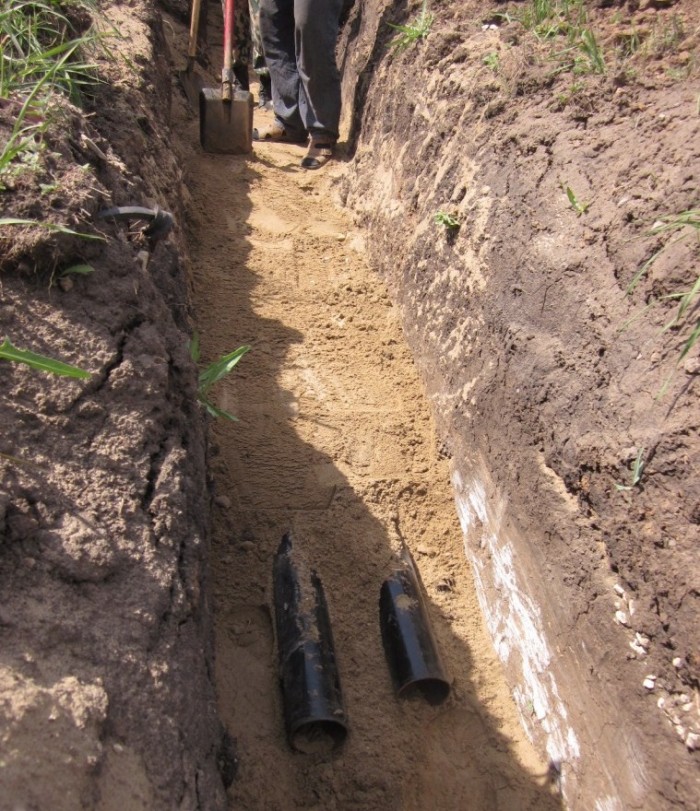
The second way is to dig the trench by hand. When installing pipes with a diameter of 110 mm (the most common), the width of the trench should be the same as in the first case. The installer who will carry out the laying work must stand with both feet (freely) in the trench. Upon completion of the work, it is necessary to level the bottom of the trench and set the required slope for it. The trench must be dug so that its depth is approximately 50 mm greater than the depth at which the pipe should lie according to the plan. This is necessary in order to prepare a sufficiently dense sandy base. In both cases, the sand is filled to a height of 50 to 100 mm and compacted by hand.
When the trench is dug and the sand cushion is covered, orange sewer pipes are being prepared. The internal elements of the sockets must be freed from contamination and the presence of sealing rings in the pipes must be checked.
Sewer installation should begin from the foundation. If the pipe was taken out of the house even when the foundation of the building was laid, then the outer sewer pipe is put on the smooth end of the outgoing pipe with a socket. Otherwise, the pipe is inserted under the foundation or a hole is drilled for it (using diamond drilling).
Sewer pipes and fittings are connected using silicone grease or liquid soap. The smooth end of the pipe is lubricated and inserted into the socket with an elastic band.
Then, on a prepared sand base, a sewer pipe is laid with a slope of 2 cm by 1 m (pipe diameter 110 mm). The first pipe of the external sewer is connected to the sewer pipe of the internal sewer leaving the house. To change the direction of movement of wastewater, smooth (15, 30, 45 degrees) bends for external sewage pipelines are used.
If the length of the sewer route is more than 15 m, then at each turn it is imperative to provide for an audit.
It is necessary that the pipes, unlike the pipes of the internal sewerage, be connected to the stop, because. pipes may expand due to temperature changes.
Docking of pipes is always done manually. In order for the pipes to be easily and tightly connected, the smooth end of the pipe is carefully cleaned of sand and dirt, and the sockets and the sealing ring are also cleaned. The ends are lubricated with soap or silicone grease.
After the pipes have been connected, their slope is checked and they are backfilled with sand with layer-by-layer ramming from the sides. Sand is not rammed directly above the pipe.
Along the entire length, the slope of the pipes should be 2 cm per 1 m. This is explained by the fact that only with such a slope is a smooth flow of liquids along with the substances contained in it ensured, and the likelihood of blockages in the pipe is significantly reduced.
To insulate sewer pipes, a specially designed energy flex (or stenoflex) insulation is used - it is also foamed polyethylene.
Energoflex is put on pipes along the entire length of the sewer route. Insulation on pipes is used to prevent freezing of sewage.
Insulation of sewer pipes is necessary if they are laid within the depth of soil freezing.
When Energoflex is put on the pipes, a control measurement of the slope of the pipes is made. Next, backfilling is carried out from the sides with a rammer and the final backfilling with sand.
After that, the pipe must be finally covered with the soil remaining when the trench was dug. The soil is poured with a slide (to a height of 10-15 cm), because. it shrinks over time. Usually, after the pipes are covered with sand, an electrical cable is also laid in the trench, designed to power the treatment plant. The cable must be laid in a protective corrugation. The pipe is connected to the septic tank according to the installation instructions for the station used.
After all the above steps have been completed, and the station has been prepared for operation, the treatment plant is ready for operation. Masters must check the operation of the compressor and pump, as well as check the performance of airlifts.
The treatment plant is put into operation, the operability of the pipeline is checked for the supply of wastewater and, accordingly, the discharge of treated water. When all this is done, the sewer is ready for use.
Everything land works during the construction of sewerage, drainage, fastening of the walls of trenches, dewatering must be carried out in accordance with the regulation SNiP 3.02.01-87. You can find a list of some of the requirements of the regulation below.
In country houses there is no centralized sewage system, therefore, the owners of such housing constructions have to independently equip an autonomous drainage system on their site. Laying sewer pipes in the ground is not particularly difficult, but there are certain rules and regulations that must be taken into account when working.
Today, almost every household has necessary set amenities for a comfortable stay: a washbasin, a sink, a toilet, a shower or a full bath, a washing machine and other benefits of civilization. Many houses are equipped with not one, but several bathrooms and bathrooms.
All this economy, when fully operational, produces a large amount of waste and sewage per day (according to the standards, the amount of liquid waste per day per person is from 5.4 to 9.5 liters), which must be drained somewhere.
Usually, country houses where people live permanently, have many different plumbing devices, which makes it necessary to equip an autonomous sewer system
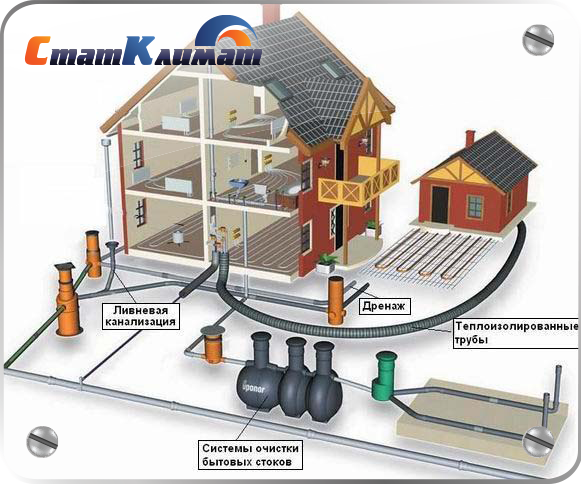
Therefore, the drainage system is an obligatory part of the engineering communications of an individual house. It consists of an internal sewerage system, an outlet from a residential building and an external sewerage network laid on the site.
Many owners of private houses, paying special attention to the intra-house system, for some reason do not always properly treat the arrangement of external networks. Indeed, the process of laying the pipeline seems simple, it is enough to dig a trench, dock the pipes with each other, the house system and the collector, and then cover everything with earth.
But this is only at first glance. In fact, in this, as well as in any other work, there are many nuances that must be taken into account. Failure to comply with technological standards and improper laying of the pipeline can lead to silting and other considerable problems in the future.
In order for the sewer system to function properly and for a long time, when constructing it, it is necessary to adhere to building and technological standards (+)
The drainage system must ensure the removal of all wastewater, exclude the possibility of flooding the building in the event of an emergency, and guarantee the treatment of wastewater when discharged into a reservoir. When arranging the system, it is necessary to take into account such parameters as the material of manufacture and the diameter of the pipes, the type of soil in the area, the depth of the sewer pipes, a certain slope angle.
Autonomous sewerage of private households can be made in the form of separate or joint drainage and cleaning. In the first case, two separate pipelines are made for wastewater from washbasins, bathtubs and sinks and for fecal matter from the toilet. In the second case, all liquid and solid wastes are combined into one common stream and enter the septic tank, where they undergo a purification process, and then are removed.
Previously, when laying sewers, only metal pipes were used: cast iron or steel. Indeed, these materials, like no other, are suitable for laying in the ground. They are strong, durable, low cost, easy to install. However, along with the advantages, metal structures also have significant disadvantages. The downside of steel pipes is the possibility of corrosion, and cast iron pipes are heavy.

Cast-iron pipes have no equal in strength and durability, this material can lie in the ground for decades without losing its qualities, but due to their severity, laying a conduit is much more complicated
A certain difficulty is the sealing of the joints of a cast-iron pipe, as well as its inner surface, which, due to the characteristics of the material, will never be perfectly smooth. The latter characteristic affects the speed and quality of movement of waste inside it; over time, blockages can form in the pipe.
Asbestos-cement pipes can be used for laying sewers. They have a smooth surface, which eliminates the possibility of blockages, they are simply connected using special couplings, their weight is much less than that of metal structures. But they also have a significant disadvantage - great fragility, which complicates their transportation and installation. Ceramic pipes have the same fragility.
Reinforced concrete structures have many advantages: they have exceptional strength, water resistance, frost resistance. It is possible to produce pipes of large diameter from reinforced concrete, which cannot be done from other materials. But laying such pipes presents a big problem. Due to their large weight, it is necessary to use special equipment, which is not always advisable in an individual economy.
Today, when arranging the sewerage of a private household, polymer pipes are most often used, which, for all their strength, are light in weight, which allows them to be laid by one person. They are very simple and easy to connect, and excellent tightness is obtained.
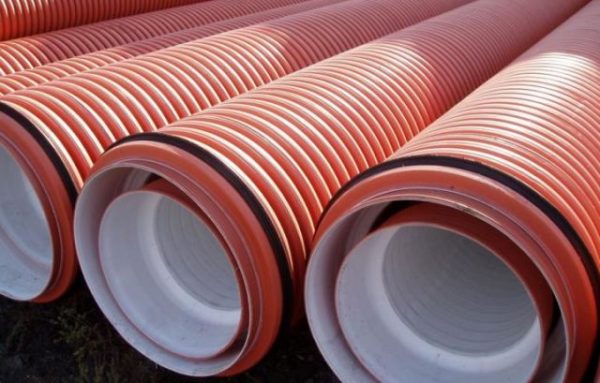
For the arrangement of external sewage, orange polymer pipes are used. They have increased strength compared to gray pipes intended for internal piping, and also have the ability to withstand heavy loads.
There are three types of polymer pipes: PVC, polyethylene and polypropylene. PVC structures, in addition to the above advantages, are also resistant to UV radiation and a slight change in parameters with temperature changes. However, they do not withstand very low and very high temperatures, and can also be deformed under mechanical stress.
The sewer system during its operation is subjected to dynamic loads, which are best withstand corrugated polyethylene or polypropylene pipes. Even when freezing, the integrity of the pipe will not be broken, but deformation of its walls may occur.
The diameter of the pipes is selected based on the number of plumbing equipment installed in the house. So, for a country cottage with two toilets, pipes with a cross section of 110 mm will suffice. If there are three or more bathrooms in the house building, it is necessary to use a pipeline with a diameter of 160 mm.
Some mistakenly believe that the deeper the sewer is located, the more efficiently it will work. However, it is not. The performance of the system will not increase from this, the only thing that will increase is the cost of laying it. In addition, the maintenance of the sewer network will become more complicated. And the biggest trouble can happen if, as a result of heaving or washing away of the soil, the pipes cannot withstand its pressure and burst.
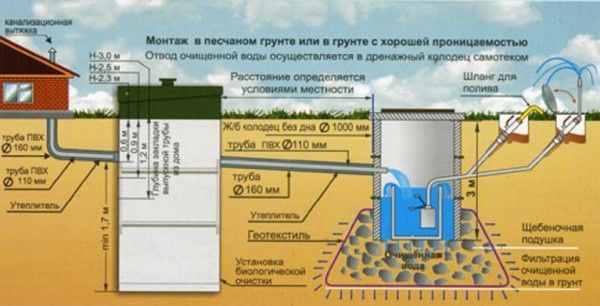
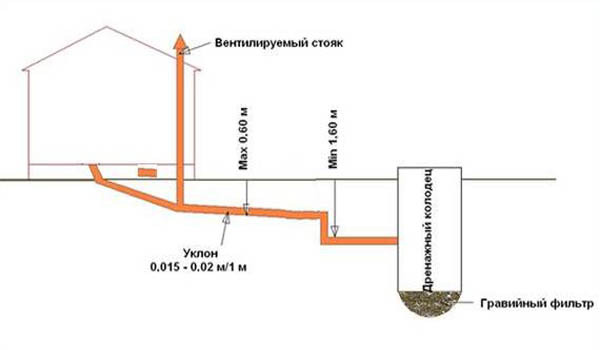
When laying sewer pipes, it is necessary to adhere to the norms and rules enshrined in SNIP 2.04.03-85. An important parameter that must be taken into account when installing the pipeline is the depth of its occurrence in the ground. Despite the fact that the normative act does not provide clear parameters for the depth of the pipes, the document indicates which criteria are decisive when laying a sewer line.

Usually, in central Russia, pipes are laid to a depth of 0.8-1.4 m, which is quite enough for the effective functioning of the sewerage
According to SNIP, it is necessary to be guided by the climatic conditions characteristic of the region, in particular, the level of soil freezing, and the experience of operating sewer networks that has developed in the area. If there is no information on the operation of the sewerage system, then the minimum depth of the pipeline should be 30-50 cm above the freezing level.
At the same time, there must be a distance of at least 70 cm from the surface of the earth to the top of the pipe. If the pipeline passes under a concrete platform or in places where vehicles are moving, the minimum recommended depth of the pipeline should be increased to 0.9-1 meter.
In addition, when arranging an external network, it is necessary to take into account the material of the pipes and the composition of the soil, since the freezing depth different types soil is not the same. Clay and loamy soils in the same area freeze less than fine sand and sandy loam. Coarse and gravelly sand have the highest level of freezing.

The table below shows how different the depth of freezing of different types of soil in the same city is
The efficiency and durability of the functioning of external sewerage largely depends on properly performed insulation. This is especially important in the northern regions and when pipes are laid above the freezing level. To understand how important insulation is, you need to imagine how the system works in the cold season.
During the passage of the liquid, which always has a positive temperature, the pipe is partially filled with liquid effluents. Water vapor also fills the pipe. In winter, at sub-zero temperatures, the part of the pipe that is closer to the surface cools, which leads to the formation of condensate, and then frost, which rushes to the center of the pipe, which often causes blockages.

Molded insulation is selected based on the diameter of the pipe, before laying the sewer line, it is simply put on top
High-quality insulation of the pipeline allows you to avoid the formation of frost and blockages, as well as protect the system from freezing. It can be done using different materials, which today are presented in abundance on the market: foamed polyethylene, polystyrene foam, isover, thermal insulation and others.
Heaters are rolled and molded. The first ones are wound on the pipe during its laying in the basement. A similar application is for a heat-insulating shell made of polyethylene foam.
They are not used as thermal insulation for underground lines. Molded heaters are mainly used, which are made for a specific pipe diameter. The heat-insulating material of the required diameter is simply put on over the sewer pipe.
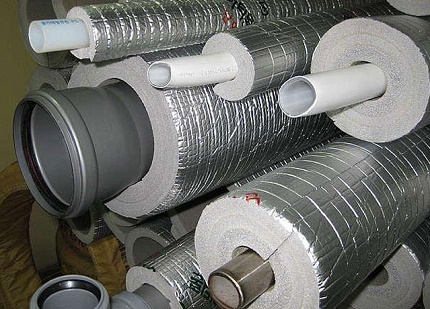
One of the most popular heaters is Energoflex, which is made from extruded polystyrene foam. The closed cell structure of the material excludes the penetration of ground water, which can significantly reduce the insulating properties. Enhances the effectiveness of the foil casing
If the temperature in the region is very low, then one insulation is unlikely to be a reliable protection for pipes from freezing. In this case, a heating cable is usually used, which is laid along the outside of the pipe inside the heat-insulating material. When using a heating cable, care must be taken to completely seal the joints so that moisture does not seep inside.
When laying the pipeline, it is imperative to provide for a slope towards the septic tank. According to technological standards, the slope of a pipe with a diameter of 110 mm should be 20 mm per meter of pipeline. Pipes having a diameter of 160 mm must be laid with an inclination of 8 mm per meter of the laid line.

When laying pipes, the calculation of the slope is done for one meter of the pipeline. The figure shows how much the difference between the sides of pipes with different diameters should be.
The presence of a slope is a determining parameter for the successful functioning of the system. The closer the pipeline indicators are to the normative ones, the more efficient the sewerage system will work. The complete lack of slope, as well as excessive slope of the pipeline, will lead to siltation of the system. In the first case, the waste will not be able to be transported through the pipes at the required speed, which will lead to the formation of blockages.
In the second case, the liquid will move too fast, which will ultimately reduce its transport capacity, and waste will remain in the pipe, which will also lead to blockages and further silting of the pipeline.
![]()
The slope of the pipeline should always be directed from the outlet from the residential building towards the septic tank. This condition is especially important when using non-pressure sewers, which are most often equipped with private households.
You can control the level of the slope of the entire trench using a special device - a level. If the device is not available on the farm, then the slope is checked using the building level.
For example, the total length of the trench is 50 meters, a pipe with a diameter of 110 mm is used. From the side of the exit from the house, the depth of the pit is half a meter. In this case, at the end point of the pit, its depth should be equal to one and a half meters.
If the site has a natural slope that exceeds the recommended standards, it is possible to lay a sewer with several vertical transitions. In this case, on the horizontal sections of the pipeline, it is necessary to comply with the regulatory indicators.
In areas with a large slope, the pipeline can be laid in a stepped way. If the slope angle slightly exceeds the standards, they are limited to one vertical transition (+)
Another option is to lay a vertical pipe at a considerable depth at the exit from the house, and lay a pipeline from it with the desired slope. In this case, the depth of the trench will be greater than when laying the first method. For the same purposes, you can use a differential well, falling into which, wastewater flows smoothly to a lower level of the pipeline.
Technologically, the process of laying sewerage is not particularly difficult. First you need to dig a trench, the depth of which corresponds to the normative indicators characteristic of this region. Before laying sewer pipes, sand is poured into the bottom of the ditch. The height of the sand base is 10-15 cm, so the depth of the trench should also be increased by these values.
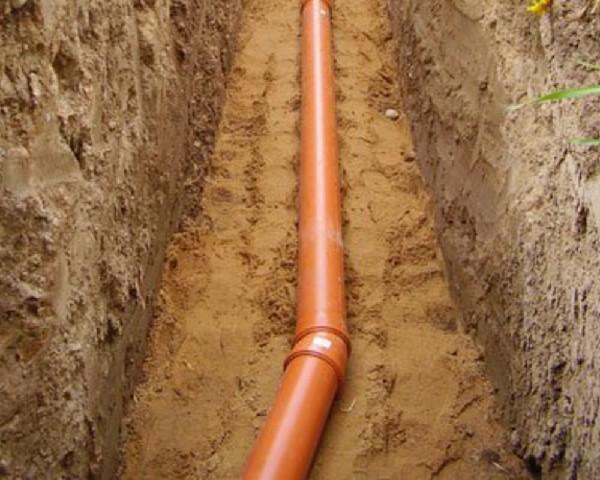
The sand cushion allows you to level the bottom of the ditch. Before laying pipes, the sand must be carefully compacted to prevent subsequent shrinkage.
The width of the trench is laid about 40 cm more than the diameter of the pipe used. In places where pipes approach the septic tank and at the exit from the house sewer, the trench is made a little wider so that it is convenient to carry out installation work.
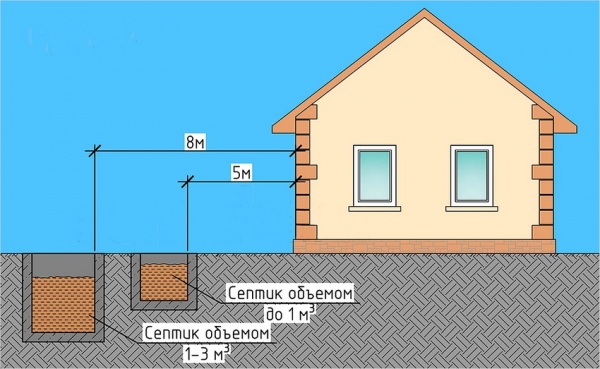
To prevent the foundation and walls of the house from getting wet, a septic tank is installed at a distance of no closer than 5 m from the building.
After the trench and the base are prepared, it is necessary to connect the pipes together, and then lay them. It is not possible for one person to lay long sections of the highway evenly and correctly, therefore it is advisable to involve several assistants in this work.
At the ends of the pipes there are special sealing rubber bands. Before they are joined to each other, silicone plumbing grease is applied along the perimeter of the pipe, which facilitates the process of joining and makes the joint more reliable. But force cannot be used here, excessive force on the pipe can damage the rubber band or tear it out of its seat, which will lead to a violation of its tightness.
Before laying the prepared pipeline, a branch pipe is put on the exit from the house drainage system, which has the required angle. The other end of the line fits into the hole in the septic tank. If the storage well was made recently, it is advisable not to immediately seal the hole with concrete, since the pipe may burst when the septic tank shrinks.

A branch pipe, put on a pipe leaving the house, allows you to direct the pipeline in the right direction
Backfilling of the sewer pipe is carried out as follows: first, sand is poured in such a way that the pipe is completely covered with it. Then it is watered, and after it shrinks, another batch of sand is added. After that, the highway is completely covered with earth.
According to technical standards, turning wells should be installed at the turns of the route, and inspection wells should be equipped on straight sections of the pipeline for every 35 meters. In addition, every 15 meters of a straight line, an audit or cleaning is installed.

Installing a revision is a simple procedure, but it allows you to monitor the condition of the sewer network throughout the entire pipeline and, if necessary, clean the desired area with a cable or a jet of water
The revision can be made from the same sewer pipe, which is installed vertically on the desired sections of the pipeline using a tee. From above it is closed with a plug. With this fairly simple device, you can get quick access to a clogged section of the highway.
If you have not insulated the sewer pipes, or you have not insulated them enough, and they are frozen, first of all, you need to determine the damaged section of the pipeline in order to choose a method for solving the problem. Metal pipes can be heated with a blowtorch.
If the pipeline is made of plastic, open flames cannot be used. You can pour hot water into the sewer, in which you first dissolve salt (2 kg per 10 liters of water). You can direct the steam jet or hot water to the revision closest to the frozen area.
If the damaged pipe is in the middle of the line, you can use a steam generator to warm up the soil. However, this process can take quite a long time. It is best to prevent the system from freezing, and when laying pipes, carry out their high-quality thermal insulation.
This video covers the process of laying external sewerage in great detail, as well as the standard indicators that must be followed during installation:
This video shows how sewer pipes are laid in the ground:
Despite the apparent simplicity, the work of laying sewer pipes requires a competent approach and knowledge of the regulatory rules for laying. Only if the necessary indicators are observed and the work is done correctly, it is possible to equip a truly effective and durable sewer system.
Making a plastic sewer yourself is much easier than plastic plumbing and much easier (physically) than dismantling an old cast-iron sewer. The main thing is to follow a few simple rules outlined below.
These rules are formulated on the basis of the principle of operation of gravity (non-pressure) sewage , and if any of the provisions below are not clear enough, then you can refer to the indicated article for clarification.
Each joint or turn is a potential site for a sewer leak if the connection is poor quality, and in addition, additional resistance for liquid and especially for solid waste.
This is done in order to minimize the risk of sewer leakage. And it is unlikely that you will be able to lay horizontal pipes in a different way. Sometimes, in the case of repairing a sewer pipe, it is allowed to install connecting (sliding) couplings, in which one branch pipe (bell) is directed along the flow of wastewater, but in general it is advisable to avoid using couplings, if you cut the pipe incorrectly, it is better to buy a new one.
Logically and without comments.
Of course, there are formulas that allow you to calculate the diameter of the pipe depending on the slope, the number of joints and turns, taking into account the number of sanitary appliances or, more simply, washbasins, bathtubs, sinks and toilets. But in practice, these formulas for intra-apartment wiring are rarely used, and there is no great need for this. And besides, the exact calculation of the required pipe diameter is the topic of more than one scientific dissertation.
To the riser and to the area where the riser is connected to the well they put pipes with a diameter of 100 or 150 mm, and if you had a cast-iron pipe with a diameter of 200 mm (although this is very rare - they put pipes of this diameter on risers only if the number of connected sanitary appliances is more than 1200, I don’t think this is your case, although everything is possible) , then a new plastic pipe must be installed of the same diameter. The exception is their homes. There, sewerage was not laid from those pipes that are needed for technical specifications, but from those that we managed to get.
With internal horizontal wiring usually they put pipes with a diameter of 100 mm when connecting the toilet to the riser, all other pipes with a diameter of 50 mm (sometimes 40 mm).
If you have some incredibly complex wiring, and you doubt that a diameter of 50 mm will be enough for the normal operation of the sewer, then you need a hydraulic calculation of pipelines. And in order to understand the intricacies of the movement of wastewater and waste through a sewer pipe, sometimes higher technical education alone is not enough. If you still want to try it yourself, then take a look at SNiP 2.04.01.85, or familiarize yourself with the basic provisions of the hydraulic calculation of sewer networks.
There you can also find out the water flow and the amount of waste from any sanitary appliance and, accordingly, the minimum diameter of the connected sewer, and determine whether the main conditions are met: a flow rate of at least 0.7 m / s and pipe filling (the ratio of water height to diameter) of at least 0.3; what to do if these conditions are not met, and a lot of other interesting things that I try in short form present in this article.
Since the sewage system is non-pressure, and pressure losses due to air resistance and friction of the pipe walls occur, some slope of the pipes is necessary to maintain the flow rate. And so that the pipes do not silt up (sewerage self-cleaning occurs), the flow velocity must be at least 0.7 m/s to ensure a turbulent flow of liquid, and the filling of the pipes must be h ≥ 0.3d. Like the diameter, the slope of the sewer pipes is determined by calculation. When the volume of waste water is not sufficient to meet both conditions, the turbulence of the flow comes first. When performing standard intra-apartment wiring or sewerage of a small private house, the following requirements must be observed:
Minimum sewer pipe slope i=0.025 for pipes with a diameter of 50 mm, recommended slope i = 0.035
Minimum sewer pipe slope i=0.015 for pipes with a diameter of 100 mm, recommended slope i=0.02
i is the ratio of the height difference of the center of the pipe diameter to the length of the pipe. Translated into normal human language, this means that if you have a sewer pipe 1 meter long, then if the bottom of one of its cuts touches the floor, then the bottom of the second should be 2 cm above the floor level, of course, provided that your floor is horizontal and the increase in diameter at the pipe socket is taken into account. IN this case the slope of the pipe is assumed to be equal to the hydraulic slope of the fluid flow, thus ensuring a constant flow rate.
Maximum slope for horizontal sewer pipes i=0.15
With large slopes, the speed increases significantly, which in turn increases the force of water hammer and can lead to clogging of the pipe in areas with high local resistances (changes in the trajectory of the movement of the fluid - turns of sewer pipes, connection point to the riser). Although such a limitation is conditional - it is unlikely that you will be able to lay a pipe 10 meters long with such a slope (outdoor work does not count). With a pipe length of less than 1.5 m, this restriction does not apply, since in such a relatively short section of the pipe, the wastewater will not have time to develop a high speed.
The floors may not be horizontal and determining the slope of the sewer pipe by floor level may lead to an error, the foundations of houses may sag, due to which the slope of the pipes may not change in better side. To avoid problems with the operation of the sewer, it is advisable to make a slope of 4-7 cm per meter (for pipes with a diameter of 50 mm). The more turns and joints on the sewer route (see paragraph 1), the greater the slope should be to compensate for local resistances.
If the pipes are laid without a slope or even with a counter slope, then such pipes will clog quite often. The correct solution to the problem would be to eliminate counter-slopes or other causes leading to clogging of the sewer, but this is not always possible, in such cases a check valve will help.
Plastic pipes, unlike cast iron pipes, are easily deformed and long loose sections can sag, which will lead to a change in slope. To prevent this from happening, the pipes must be fixed to the wall or to the floor with special fasteners (sold in the same place as the pipes) every 50-100 cm, depending on the diameter of the pipe. Fastening the riser pipes to the walls is also mandatory to reduce the load of its own weight. In addition, it is recommended to fasten pipes in places of turns, connections for partial absorption of the load from water hammer.
The ventilation pipe, which is led to the roof of the building or to the attic, is designed to equalize the air pressure in the drain pipes, which can drop sharply if a large volume of water is discharged down the riser, for example, from a toilet bowl. A sharp decrease in air pressure in the riser sucks water out of the siphons of plumbing fixtures, thereby destroying the water seal. And this leads to free access to the apartment of sewer gases with extremely unpleasant odors.
In addition, these gases can cause dangerous diseases. As a rule, in all houses with more than two floors, and often even in two-story stalins, there is fan ventilation. Moreover, if you, living on the top floor, want to remove the pipe leading to the roof during redevelopment (and changing the route of the riser is redevelopment), then no one will officially allow you to do this, but unofficially, options are possible.
With a small amount of wastewater, the use of an unventilated sewer riser is allowed. Those. the riser is not displayed on the attic or on the roof. In this case, at the place where the horizontal wiring is connected to the riser (according to building codes and regulations), it is necessary to make a “cleaning” and close it with a plug (so that wastewater does not flow out). And if, in addition to cleaning, you also make a vertical outlet for a check air valve worth $ 4-10:
(of course, if you wish, you can buy a branded valve for $ 100), then in the future you will save time, money and nerves needed to clean the sewer.
If for some reason you do not have the opportunity to put a check valve directly on the riser (this sometimes happens when repairing sewers in your homes), then a check valve with a diameter of 50 mm can be placed on any section of a horizontal pipe, but it is desirable that the valve is located on height of 30-50 cm from the axis of the sewer pipe. The options for installing a non-return air valve can be as follows:
Option A is the correct one. Option B is acceptable in my homes, so, for example, in the country house I installed a check valve according to option B four years ago. Option C is also acceptable in my homes, when it is not possible to put a check valve on the riser, for example, I installed a check valve with a diameter of 50 mm according to option C for my sister, who lives in my house 5 years ago, according to option C, I placed the outlet for the check valve under the bathroom (the fact is that other people did the sewerage for my sister and did not provide for ventilation, and then it was easiest to insert a tap for the air valve under the bathroom). Cleaning outlets are not shown in the diagrams.
The essence of the operation of the non-return air valve is that it allows air to pass only in one direction - into the sewer, when the water in the toilet is flushed, then in the sewer pipe in the area up to the toilet and in the riser (if any), the air pressure decreases and the valve opens. When the air pressure in the sewer pipe is the same as in the room and greater than in the room, the air valve is closed - this prevents gases from escaping from the sewer, so that if installed correctly, there should not be any odors in the room where the air valve is installed.
Putting an air valve on the sewer pipes after the toilet does not make sense, in this case the valve will not work correctly. When the water in the toilet is flushed, and the toilet is a plumbing fixture that creates the maximum flow of wastewater, then the air pressure in the sewer pipe after the toilet will be increased. The higher the air check valve is from the axis of the sewer pipe, the less risk of clogging the valve sewage when the sewer is clogged, so option A is the most correct.
A good rule, but it was observed for a long time, when installing a cast-iron sewer. In old houses, you can still see somewhere under the sink the appendix of a sewer pipe with a wooden chop sticking out of it for a good 20 cm. Now plumbers involved in the installation of plastic sewers do not install “cleaning” (at least I have not seen it) for several reasons.
Firstly, sewer pipes are very often sewn up for aesthetic reasons. Secondly, modern plastic sewage, unlike cast iron, is quite easy to disassemble and, if necessary, you can always disconnect some kind of sanitary appliance, for example, a washing machine or sink, and insert a cleaning cable through the hole formed.
In five-story houses, revisions were installed on the first and last floors. If on your sewer riser at a height of about 1 m from the floor there is some kind of iron plate screwed with powerful bolts and causing unpleasant associations with kingstones, then this is a revision. The revision for plastic sewerage looks much more aesthetic:
If you are going to sew up the riser, then make an inspection hatch to access the revision.
If you have a cast iron riser, it is not necessary to change the cast iron pipes to plastic ones if the riser is in good condition. In addition to significant physical effort, you will also need a lot of moral effort to convince the neighbors not to use the sewer for several hours and, as usual, someone will definitely forget. But even if you completely change the cast-iron riser to a plastic one only in your apartment, you still have to join plastic and cast-iron pipes.
A good rule, the observance of which allows you to reduce the force of water hammer, the turbulence of the flow of liquid waste and thereby avoid frequent clogging of the sewer. If sewerage is often clogged in your multi-storey building, go down to the basement and check if the builders violated this rule when installing the sewerage system.
And if you have your own house and 5-6 sanitary appliances are connected to the sewerage system, then you can ignore this rule.
The first manhole is arranged at a distance of no more than 8 m from the axis of the riser - with an outlet diameter of 50 mm, 12 m - with an outlet diameter of 100 mm, 15 m - with an outlet diameter of 150 mm or more. In general, the last two rules are relevant for owners of private houses involved in laying sewers. Usually these are smart people and they do not need additional comments. But just in case, I will give a link to an article that briefly describes the construction of sewer wells.
When buying pipes and gaskets, insert one gasket into the socket and try to match two plastic pipes. If one pipe fits into the socket of another quite easily, then it is advisable to immediately change the gaskets or look for another seller.
Since a quality pipe must fit very tightly into the socket of another pipe, the use of shampoo or liquid soap (they are usually always on hand) greatly facilitates the docking process.
But do not change the design of the apartment due to the modular dimensions of the pipes, and the modular step is not very happy: 150 mm, 250 mm, 500 mm, 1000 mm, 2000 mm, 3000 mm. If you need a pipe of a different size, then it can always be cut evenly and accurately, as a result you will get a pipe cut sometimes better than the factory one.
Job interviews are not easy. If you want to apply for...

The colon warns of further clarification and clarification. This feature...

Pizza has long become popular far beyond its homeland. This dish...