Denis Valentinovich Manturov Minister of Industry and Trade of the Russian ...


Surely you paid attention to the roofs of houses, at the very top of which a weather vane is installed. Such a device is a "visiting card" and even a part of the culture and landscape of most countries. For example, in Tallinn, Riga and Amsterdam, you can see a weather vane on the roof on almost every building. Not everyone knows what it is for. It turns out that this is not just a home decoration, but also an important attribute with which you can determine the direction and speed of air flows. That is why a weather vane is a necessity, especially in those cities and countries where there is access to the sea.
Currently, the weather vane is more installed on the roofs of houses as a decoration and a kind of visiting card. The device can look differently. In Dahl's dictionary, you can find the following description: “a weather vane is a small movable flag made of iron, which indicates the direction of the wind. Also, the windmill can have a different shape, and is made of a different material - tin, in the form of an arrow with a rotating tube. "
Most of the buildings in famous cities such as Rome and Stockholm are decorated with individual weather vane. The same can be said about the Kremlin in Moscow. The grace and uniqueness of each weather vane makes us pay attention to the small attributes of buildings. From an ordinary piece of iron, you can get a unique object that will not only decorate a cottage, a small house or a summer cottage, but also talk about the individuality of the owner.
A wind direction meter is a small flag made of metal that is attached to a vertical axis. To determine the strength of the air flow, the weather vane is installed on a post that remains movable. In order to find out the strength of the wind, it is not necessary to install a weather vane - it can also be replaced by a conventional propeller. But now, when this small object has become more of a home decoration than a necessity, the popularity of the weather vane has increased. It became not only a meteorological instrument, but also a home amulet.
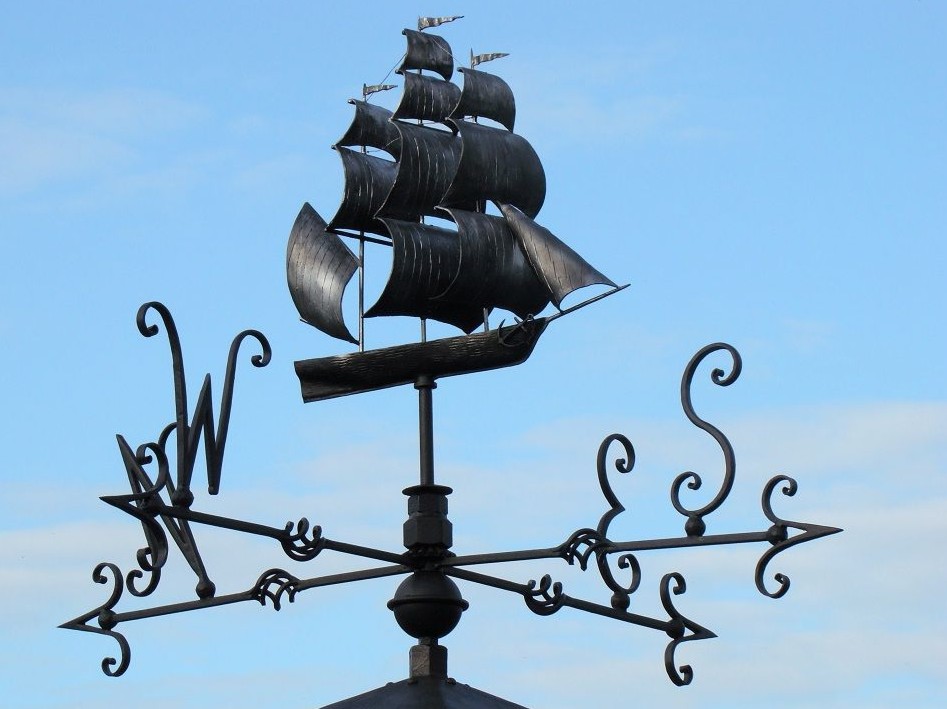
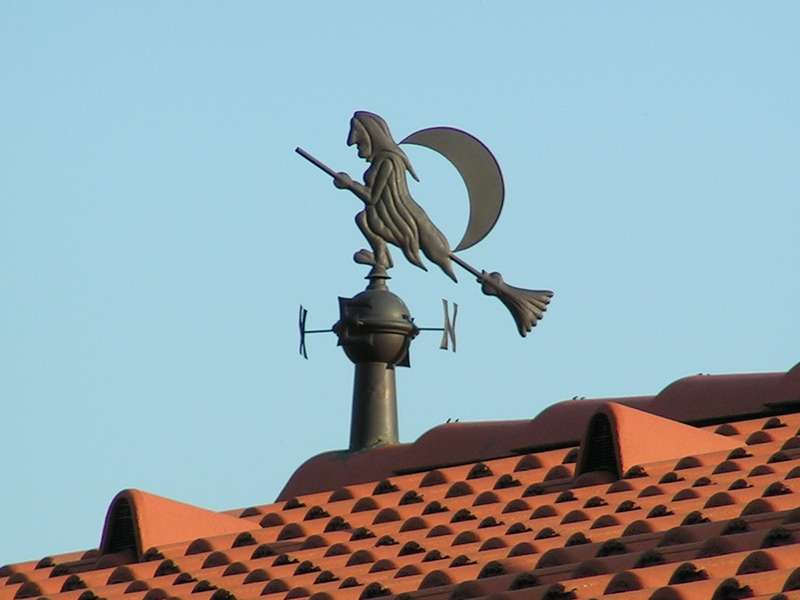
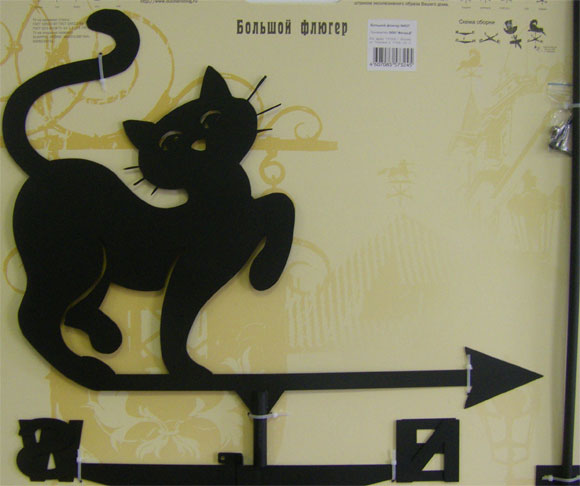
The weather vane can have different shapes. Popular weather vane in the form of cockerels, a ship or an airplane. Also on the rooftops you can find funny frogs, fairy-tale characters and zodiac signs. For example, the roof of the famous Peter and Paul Cathedral in St. Petersburg is protected by a weather vane in the shape of an angel.
You can see interesting models of the weather vane in the photo:

You can purchase a ready-made weather vane and install it yourself. To do this, you need to prepare everything you need:
How to install a weather vane yourself:
Buying and installing a weather vane is half the battle. The main thing that must be observed when installing a small meteorological instrument is that it constantly rotates around its axis. Even if there is a slight wind, the weather vane should still rotate. To achieve this, a bearing must be attached to the weather vane.
If you have a desire to install a weather vane on the roof of your house, but the presented assortment does not satisfy you, then you should make the device yourself. This will be a great chance to highlight the individuality of the house and make your own, unique weather vane.
The device can be made from sheet steel or copper. Today you don't have to rack your brains over the size of the weather vane, they have long been standardized. A standard weather vane (upper part) has the following dimensions: 400 mm in height and 800 mm in length. Naturally, if you want to install the device on a small gazebo, garage or fence, then the dimensions can be reduced.
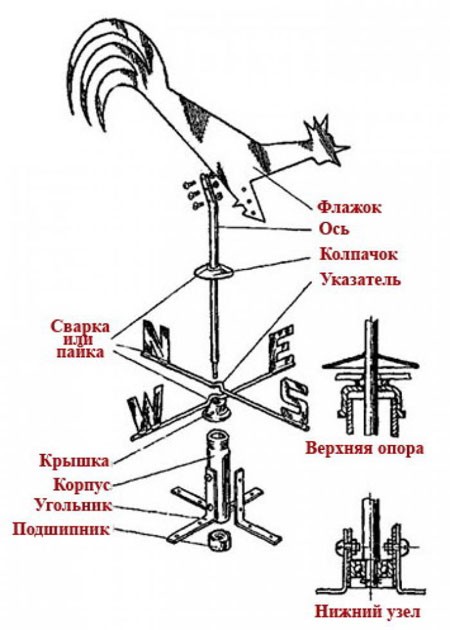
The weather vane has 3 parts:
The weather vane is made according to the drawing. It can be a ready-made drawing or developed on the basis of drawings and descriptions.
Weathervane can be made from different materials... Several centuries ago, a light material - wood - was used to make weather vane. The most reliable and durable weather vane is made of metal. Metal figures will last much longer than wooden weather vane. Even if you make a structure of plywood, impregnated with moisture-resistant agents and layers of paint, all the same, after several months of "service", the weather vane may deteriorate. Confront long time a weather vane made of plywood will not be able to wind and precipitation, but a weather vane made of metal will last for decades.
You can make a plastic weather vane. This modern material is lightweight and will not corrode, which cannot be said about metal weather vanes. Any detail can be obtained from a sheet of plastic, and you can first design it on a sheet of paper, and then cut it out according to the finished sample. Some, small models of weather vane can even be made from plastic bottles. Naturally, for a cottage, this option is not suitable, but for a house in the country - quite.
Real weather vane made by yourself from different materials can be found extremely rarely. Basically, such devices are more likely to serve to decorate houses, and they cannot always cope with their direct duty - they cannot always show the direction of the wind. You can find massive forged products made by professionals. Such weather vane are a kind of visiting card of the owner and indicate his taste and wealth. It is very difficult to make a forged weather vane on your own, so it is better to dwell on simpler decorative models - made of plastic, old discs or sheet of tin. If you decide to make a wooden cockerel on a pole of plywood, then it is worth covering the figure with paint in several layers, and the elements do not need to be connected rigidly. Of course, you can make a weather vane out of thick cardboard, but it will last no more than a month. This option is acceptable for children and adolescents, when during summer holidays a lot of free time and you need to keep yourself busy.
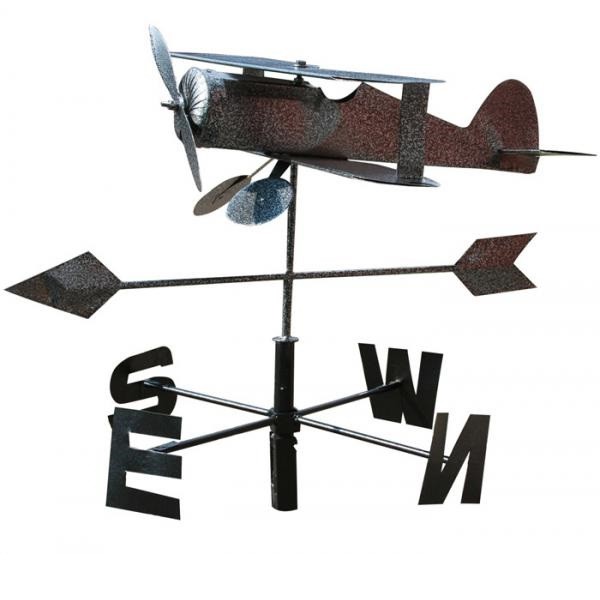
An interesting model of a weather vane with a propeller:

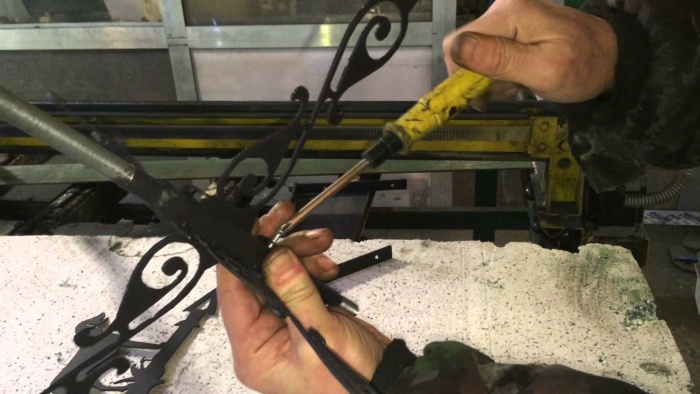
So that there are no questions about how to make a weather vane, it is necessary to prepare in advance everything you need, starting from the drawing, materials and ending with tools and a place suitable for work. For work, you will need a standard set of carpentry and locksmith tools, which every man usually has. If a decision is made to work with metal, then appropriate tools are needed. For plywood or wood, you need to purchase (or rent) a jigsaw, as well as a file and sandpaper. All necessary holes must be drilled in advance with an electric drill. For more serious work with metal parts, you will need a grinder, as well as metal scissors.
Metal weather vane:

How to make an original weather vane yourself, see this video:
By their functional purpose, these devices are used to determine the direction and strength of the wind, so they were originally created. However, being in the most prominent place of the building, weather vane became noticeable and significant decorative elements, giving the building a unique and original look. The location for them is chosen, as a rule, at the ends of the roof ridge.
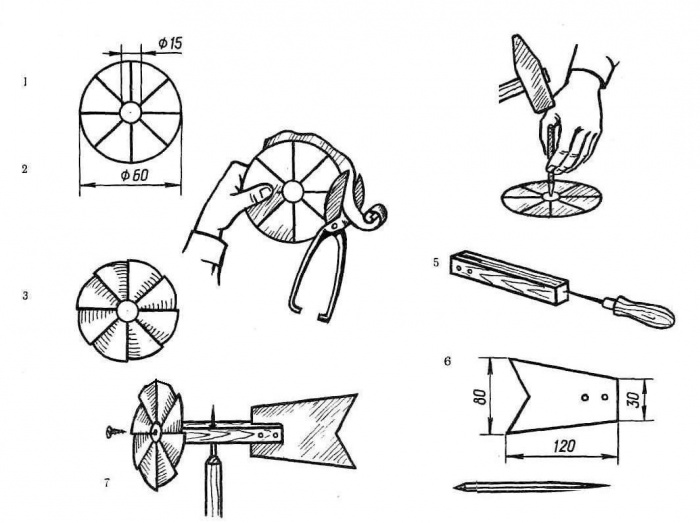
Traditionally, these products are made of metal, the most popular is a steel sheet with a thickness of about 2 mm, products from copper, brass, bronze and other non-ferrous metals are also used. Drawings for the manufacture of parts are practically not needed, the products are simple, and the manufacture is carried out "in place" An indispensable element of the weather vane is the rod on which it is fixed. Here it is better to use a stainless steel bar with a diameter of up to 16 mm, it most painlessly perceives wind loads and does not corrode.
Objects for displaying the silhouette of a weather vane are very different, you can choose a ready-made silhouette or plot you like. And often they use photographs of their favorite pets, as a rule, they are cats or roosters. Often they depict angels or demons, in general - the variety is such that it is impossible to enumerate. The size of the picture must be matched to the size and shape of the chimney.
Even without artistic skills, you can easily transfer your favorite contour with your own hands along a coordinate grid, then cut it out on paper and use it as a stencil for drawing a drawing on metal. Manufacturing is reduced to cutting along the contour.
To perform this operation with your own hands, you can use metal scissors, but with a sheet thickness of 2 mm, this will be difficult. It is better to use a jigsaw, firmly fixing the part to the workbench with clamps. Slotted elements are made with pre-drilling a hole inside such a pattern element, and then finish the operation with a jigsaw.
Attention! At the end of the work on creating the body of the weather vane, you need to carefully clean the part from burrs and dull the sharp edges, otherwise injury during further work is inevitable.
To make the body of a weather vane with your own hands, you will need tools:
And, of course, you will need sheet material of the performer's choice.
The peculiarity of the product lies in the fact that the windage of the rear part must be greater than the same indicator for the front part of the weather vane body, otherwise it will not work. At the same time, a large difference in the weight of the part along the sides of the axis of rotation creates an imbalance in the entire product. V this case proceed as follows:
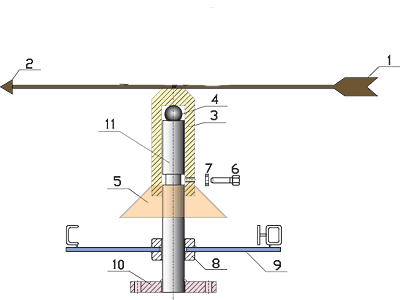
The weather vane is installed on the rod using a sleeve with a cut for the main part of the product. It is almost impossible to make this part with your own hands at home, you need lathe... The hole must be aligned with the axis of the part. The part drawings are so simple that they can easily be done with your own hands.
To facilitate the rotation of the weather vane around its own axis, the design uses a standard bearing ball installed in the bore of the bushing.
The weather vane can be attached in any way that is convenient for doing it yourself. When installing a volumetric weather vane "Airplane", it is better to mount it directly on the rod.
The stem is fastened at the place of installation. An obligatory element should be considered as braces and a reliable base plate in a shape suitable for the installation site.
To install the direction indicators, you need to weld a plate on the rod directly under the bushing, through which you can also install stretch marks. You can determine the location of the cardinal points using a compass already during the installation of the product at the installation site.
It should be borne in mind that all parts installed using welding must comply with the conditions of weldability, that is, you cannot weld a part from carbon steel to stainless steel. The connection will be unreliable.
Still, the most acceptable option should be the use of cold-rolled steel sheet coated with a paint resistant to environmental influences.
All of the above work must be done in a workshop.

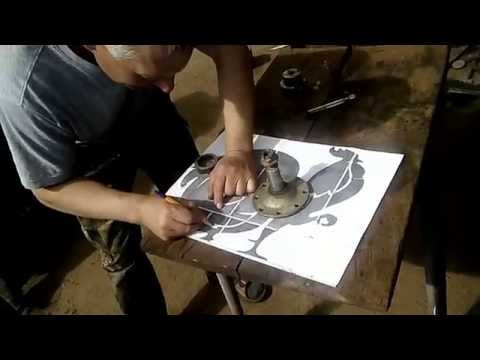
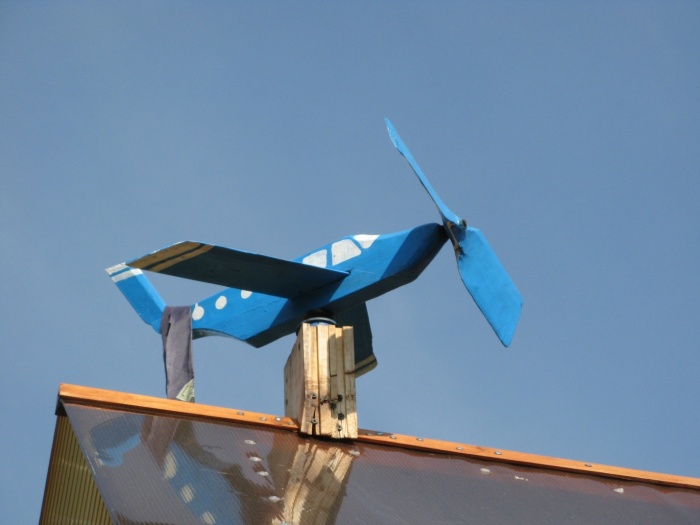
The photo shows an example of an “airplane” type weather vane with a propeller. Drawings of parts are executed during manufacture, depending on the size and place of installation.

In the photo there is a drawing and a model of a weather vane plane. Based on the indicated dimensions, drawings of the main parts can be done by hand. Manufactured from aluminum and foam.
Attention! Do-it-yourself installation of a weather vane on a chimney or roof ridge is a high-altitude work that requires the implementation of certain safety rules.
Such work cannot be performed:
A chimney or a ridge of a house, decorated with a beautiful weather vane, acquire a complete design solution, and those made independently also acquire an aesthetic pleasure from a well-done work. Decorate your life and wish you success!
To know the direction of the wind, its speed and strength in such a science as metrology, a special device is used, shown in the photo, which is called a weather vane. It looks like a flag, for the manufacture of which various materials are used, including metal. It has a counterweight at the opposite end. You can make weathercocks with your own hands.
Relatively recently, many homeowners installed these devices on buildings, especially in coastal cities, but today they are less in demand. True, in the Baltic republics that were previously part of Soviet Union, as well as in the Scandinavian countries and a number of other European countries, they can be seen on many roofs of residential buildings and structures for various purposes. There, DIY weathervanes are popular among the population.
In cities such as Tallinn, Riga, Amsterdam, the weather vane has become a visiting card. Outstanding local craftsmen have turned making a weather vane with their own hands into a real art. So unique in appearance and elegance of execution, these products have adorned the Moscow Kremlin for more than one century. the Russian capital, the building of the City Hall in Riga, and in St. Petersburg the spire of the Peter and Paul Cathedral.
It should be noted that do-it-yourself weathercocks have recently become not necessary metrological devices, but a tribute to national traditions and beautiful toys that can decorate the roof and the exterior of the building. From a practical point of view, they are not necessary, since now they use modern devices that show very accurate results.
To decorate the roof of a building and give it an individual style, you can order this product from a professional or make a weather vane with your own hands - drawings for it are available on the Internet and in special literature. For some craftsmen, a drawing and a sketch is enough.
Small products with moving parts are clearly visible on gazebos, garages, greenhouses, and besides this, for example, a weather vane with a propeller with your own hands, well scares birds away from garden plots.
Most often, there is a steel or copper wind vane with your own hands, which is covered with paint for outdoor work. Forged products are less common. Weather vane made from scrap materials are rare.
Today, many country developers attach particular importance to the uniqueness of their home. The distinctive feature becomes a highlight in the exterior of the building. True, there are not so many such devices, and one of them is a weather vane. It has long been a popular element in Western Europe, but today you can find a weather vane on Russian homes, the reason for installing which is to show the direction and strength of the wind.
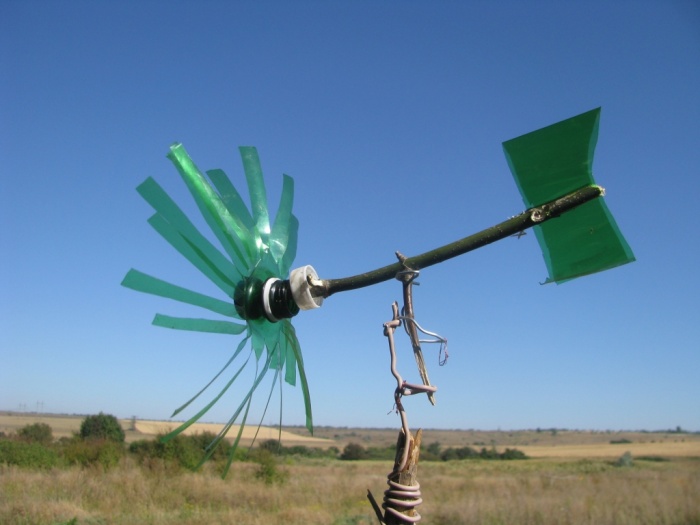
Currently, manufacturers of various design pieces offer a huge assortment of weather vane made from different materials. It makes no sense to talk about forms, design, the choice is actually the widest. True, such a toy costs a lot of money, so it makes sense to figure out how to make a weather vane with your own hands from scrap materials.
Let's start with the materials, because this device is installed on the roof of the house, it is subject to all known natural loads, so you will have to think about its service life in advance. In principle, you can make a weather vane with your own hands from anything. The most common varieties are made of wood (mainly plywood), sheet metal, rarely copper. Although it is the copper version that is considered ideal.

A wooden weather vane, even if treated with protective compounds, will last for several years. Steel will last for several decades if it is tinted periodically, which is not always possible. But copper is an eternal construction. In addition, it is easiest to process a copper sheet, and decorating it will not be a problem.
Many craftsmen have recently thrown their gaze on plastic, since sheet material is now commercially available. The processing of polymer material is simple, there is no need to use any complex tools for this. But such a weather vane can be installed on the roof of a summer cottage. It just won't look good on a big beautiful house. Here, expensive materials are needed to match the structure.
As for the tools, they are ordinary, every owner in the barn has the necessary arsenal. For example, metal scissors, hacksaw, saw, file, sandpaper, grinder, drill, ruler and pencil.
The constructive filling of the weather vane is based on two components:
Important! When making a weather vane with your own hands, it is necessary to take into account the moment that the horizontal part should be evenly spaced.

That is, on both sides of the axis there should be equal parts in weight. In principle, this is the difficulty of manufacturing.

Some additional elements can be attributed to the design features of the weather vane. For example, you can make a weather vane with a screw that will show the strength of the wind. The more intensely it spins, the greater the wind force. The structure can be supplemented with a vertically installed plate. It must be secured in such a way that it remains free. In this case, the plate should swing in one plane. It can also help you learn about the strength of the wind. The greater the angle of deviation from the vertical, the greater the wind force.
As for the form and design, there are no restrictions. Everything is in your hands, it all depends on your imagination and taste preferences. The same applies to the size of the weather vane. True, experts recommend using a width of 40-50 cm, a length of 70-80 cm. For small houses and cottages are the best option. If the weather vane is installed on the roof of the gazebo, then the dimensions can be reduced.
First of all, you need to decide on the shape and design of the device. As mentioned above, turn on your imagination. After that, your idea should be transferred to paper. The drawing must be done in all the smallest details.
Then you need to make a vertical support with your own hands. To do this, you can use any metal rod: reinforcement, pipe. Its dimensions: diameter - 13 mm, length 125 mm. In the upper part, a thread must be cut for fastening the horizontal part of the weather vane. You can do this with your own hands using a die. The process is not very difficult.
A bearing must be installed on the lower part of the weather vane, it is he who will allow the weather vane to rotate around the axis. The fastening of the decorative element itself is carried out due to the four plates installed at the bottom, which are welded on one side to the metal axis, and on the other side holes are made for self-tapping screws. It is with these fasteners that the weather vane is attached to roofing material at home.
Attention! Highly important point- do this so that water and dirt do not get into the bearing.
Therefore, it is necessary to put on a cap made of metal sheet material when assembling the weather vane. Someone manages to make a cap out of a plastic bottle cap.

Air vane is a dynamic design, so it is not placed on tall buildings. You just won't see how the propeller is spinning. Namely, he is the very highlight. The complexity of this design lies in the fact that the rotating part must somehow be freely attached to the airplane figure.
The plane itself can be easily cut with a hacksaw for metal from a sheet of iron, you can make it yourself and from plywood or plastic. But the propeller of the weather vane must be made of metal. It is important to understand here that the blades of the rotating element should be located relative to each other at a slight angle. The propeller can be cut from a galvanized piece of sheet iron using metal shears. A hole is made in the center of the strip for fasteners. After that, the edges of the strip must be turned slightly in different directions.
Now you need to attach the propeller to the aircraft. There are several options here:
It is necessary to decide on the installation site. It is believed that the weather vane should not spoil the symmetry of the roof structure of the house. Therefore, if there are pipes on the roof, then fastening is best done to them. If there are none, then the best option is the ridge of the roof. For installation on a ridge, only two fasteners (strips) are required, which will be located exactly at the angle of the roof slopes.
How the weather vane is assembled at the installation site.
By the way, the inner diameter of the pipe is matched to the outer diameter of the bearing. And one more very important point. All parts and assemblies of the weather vane must be made with a large margin of safety. This is especially true for fasteners. It must be able to withstand sufficiently large wind loads. And the snow will be a great test for him.
Do not forget that a weather vane with a propeller is located in the open air. So the rain will wash over him all the time. Therefore, it is recommended to lubricate the metal structure with grease. And this is after painting it. In addition, periodically you will have to tighten the threaded assemblies, tint the device, lubricate the bearing, and so on. That is, a weather vane is not just a beautiful element of the exterior design of a house, it is a mechanical toy that must be constantly looked after with your own hands.
It is not enough to make a weather vane with your own hands, you need to correctly install it on the roof. First, the body is stuffed with lithol or grease. Then, according to the compass, they adjust the direction of the wind rose to the cardinal points.
There are several ways to mount:
To understand that everything has been done correctly is quite simple - the product should rotate freely around its axis even in light wind. In this case, you can install a vertical plate on the weather vane, its deflection will show you the strength of the wind. After you have installed the weather vane with your own hands, you can install a lightning rod at the same time. Fix one end of the steel wire to the product, and ground the other one and a half meters.
Now you know how to make a weather vane. To prevent the device from failing for a long time, the bearings must be lubricated at least once a year.
The most popular decorative form of the product is the rooster. But this does not mean that you should stop at this particular option. At the moment, you can find drawings for products of completely different shapes. For example, nothing prevents you from making a product in the form of characters from fairy tales, insects, signs of the zodiac, an airplane, a ship or animals.
Denis Valentinovich Manturov Minister of Industry and Trade of the Russian ...

Denis Manturov (born February 23, 1969, Murmansk, RSFSR, ...

, The Arbitration Court, the General Prosecutor's Office and the Federal Penitentiary Service, as well as a brief description ...