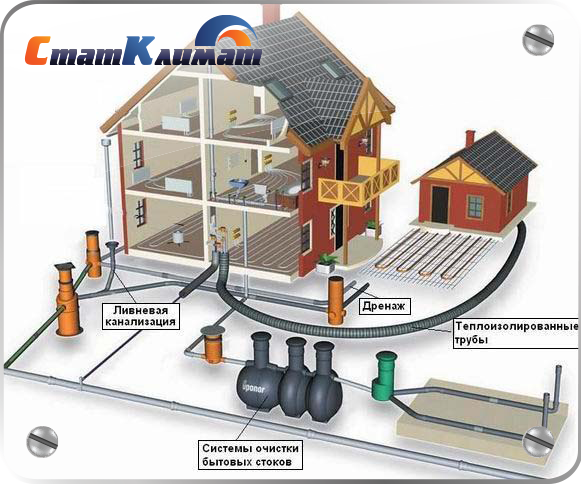
From internal pipelines, drains are transported by external ...
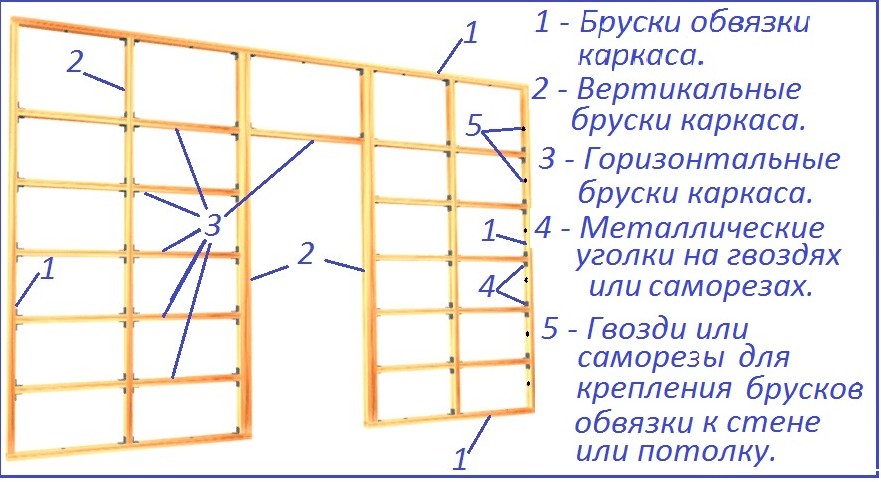
In any drywall construction, the main part is the frame that performs the support task. The appearance and service life of the drywall construction depends on how correctly it is made.
To create a frame with your own hands, use special strips of drywall, wooden boards or metal profiles.
Varieties without stiffeners are used and with them
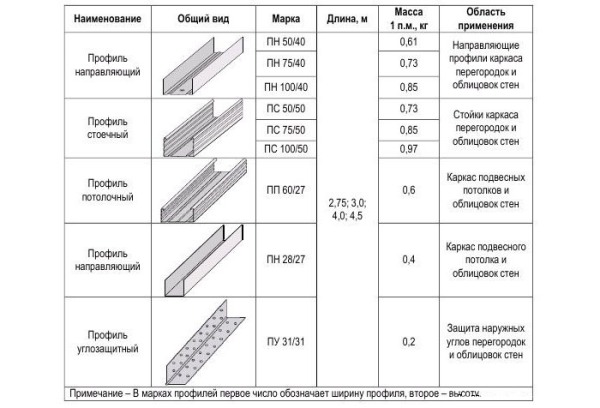
Moreover, the latter option is preferable, since the metal frame is more durable and is not exposed to humidity and temperature changes in the room. In the building materials market you will find five types of metal profiles:
Markings and their decoding for profile varieties After selecting the metal profile, the transition to marking the base of the frame. First, note the indent on which the frame will protrude. For walls they take 10 cm, but for the ceiling in different ways, depending on what communications will be laid inside the frame. This can be electrical wiring, central heating pipes or water supply. For marking, a drawing is necessarily created.
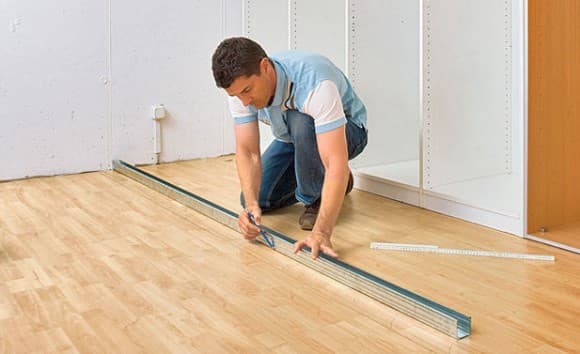
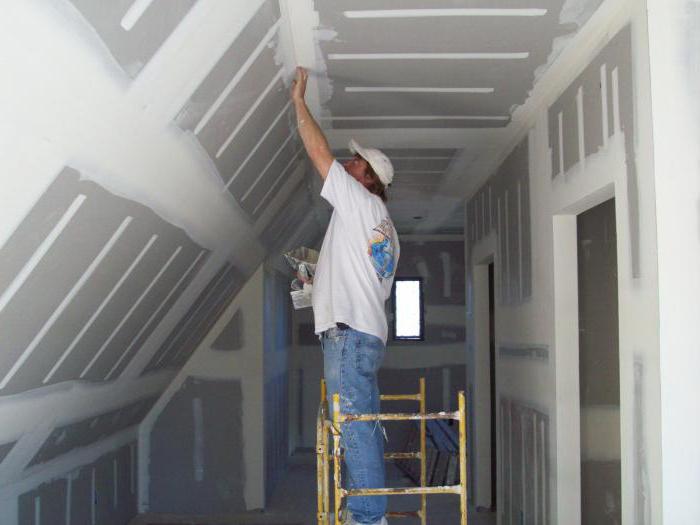
After marking start. It is very important to ensure that it turns out smooth, so measuring instruments such as a tracer, a laser level and a tape measure will come to the rescue. As a result of this stage of creating the frame, a perfectly smooth rectangle is obtained, along the edges of which the starting profile is mounted.
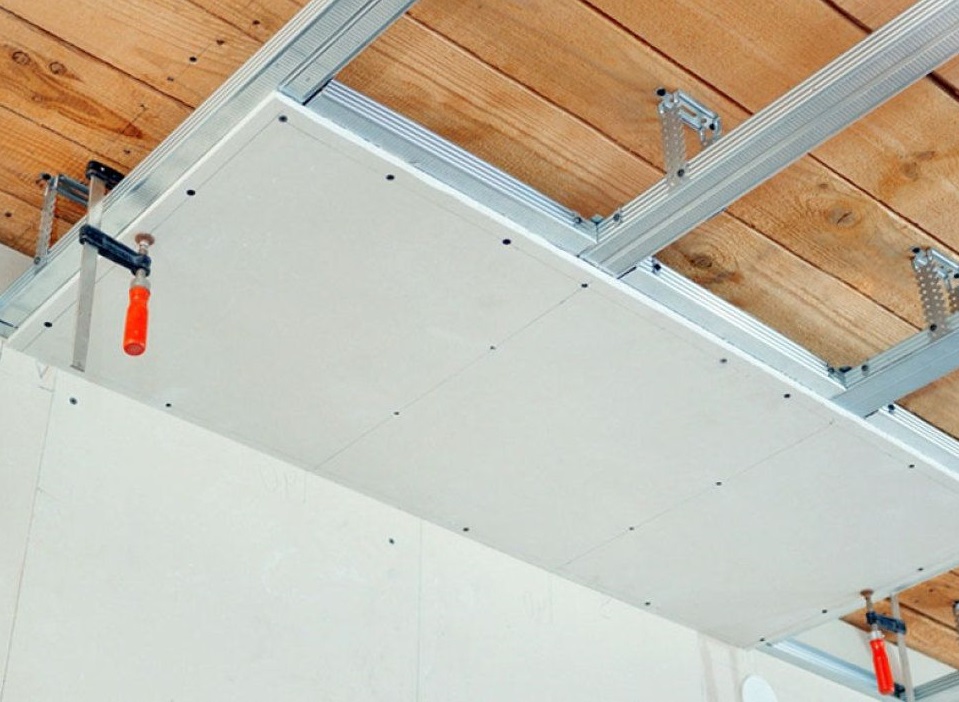
 Ready frame
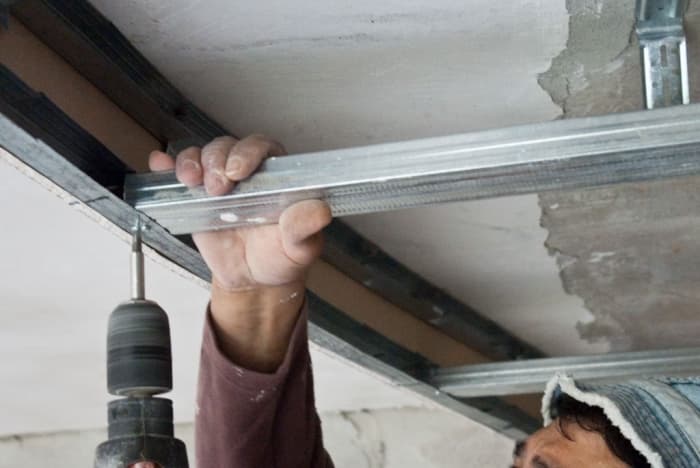
 When the perimeter is calculated and mounted on the wall, they begin to assemble the frame. The metal profile is attached using dowels or self-tapping screws, while dowels are best used on stone walls, and self-tapping screws on wooden surfaces. After that, the main profile is attached to the suspensions, which is inserted into the starting profile. For the design to be reliable, it is better to use cellular technology, that is, first install the transverse profile, and then perpendicular to it - the longitudinal one.
If you move away from the generally accepted and developed technology for mounting the frame, you can get a short-lived design, or spoil the materials so that they can no longer be used. This is especially true on curved surfaces. Remember that during installation, the metal profile should be placed with the smooth side down, since sheets of drywall are attached to it.
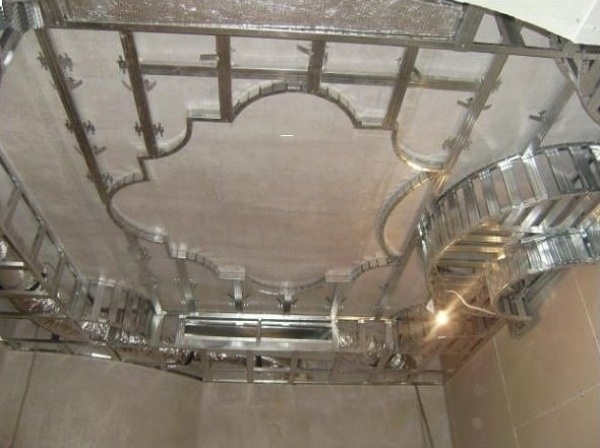
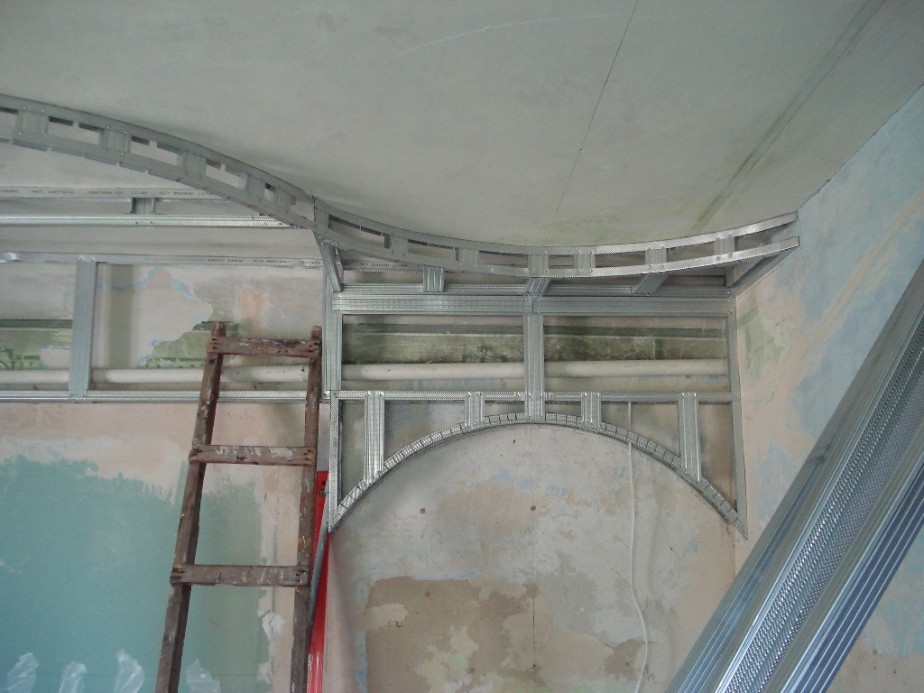
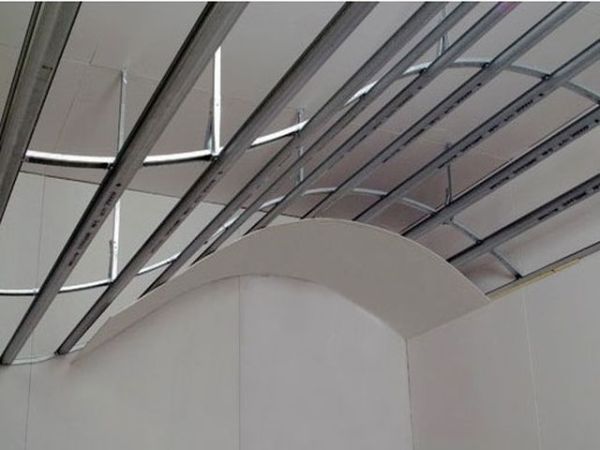 Frame for figured construction
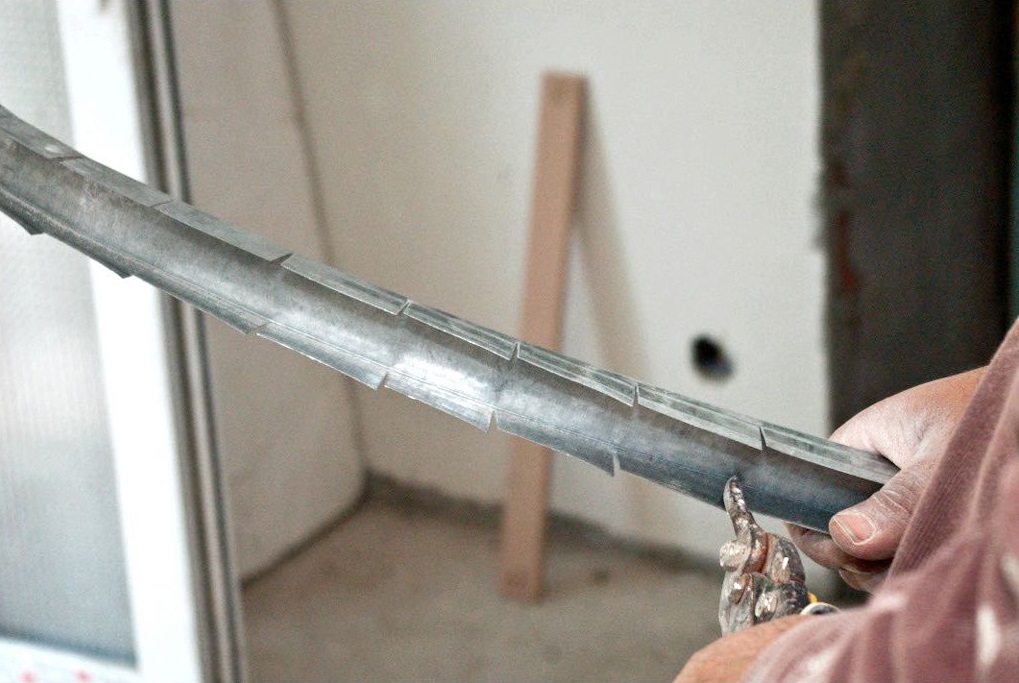
 The saying is relevant here - “Measure seven times and cut once”, because if the profile is cut to the wrong size or crooked, the frame structure will not converge. As a result, either it will turn out to be very flimsy, or it will not work out at all. Therefore, special equipment is used for these purposes, but remember - it is absolutely impossible to use an angle grinder (in other words, a grinder).
The cutting element of the tool rotates quickly enough, as a result of which it heats the metal, galvanizes, and in the future corrosion will occur in this place. It is better to use special scissors for metal, electric or manual. Cut as carefully as possible so as not to damage the opposite shelf, since it is the drywall that will be attached to it.
When buying building materials, choose exactly the types that are suitable for the desired purpose. For example, a wall framework cannot be made from ceiling profiles, and vice versa.
 Poorly made construction will quickly become unusable
 Instead of a guide, you can not use rack-mount and so on. If this condition is violated, no one guarantees that the frame will be reliable and stable, and the structure itself, sheathed with drywall, will cope with its tasks, among which there is a soundproofing function.
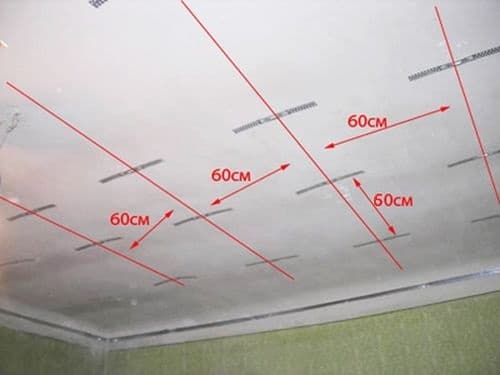
On complex surfaces, many builders decide not to install suspensions, but this is a gross mistake that will cause the structure to begin to deteriorate over time. This is due to the fact that the metal profiles are connected together rigidly and without a layer. After some time, cracks will certainly appear in such a ceiling or wall made of drywall. Note that the distance between the profiles should be the same, approximately 50 cm, for greater reliability.
 The use of suspensions is mandatory
 The metal profile is not the building material that can be bent, then unbent and begin installation.
From such manipulations, integrity is violated, as a result of which it loses rigidity and cannot guarantee the reliability of the future frame.
Such an error will also lead to the fact that the design will quickly fail. The reason is that drywall is a moisture resistant building material. By mounting it on the right side, you will prevent the sheet from getting wet, which means you will prevent the formation of fungus.
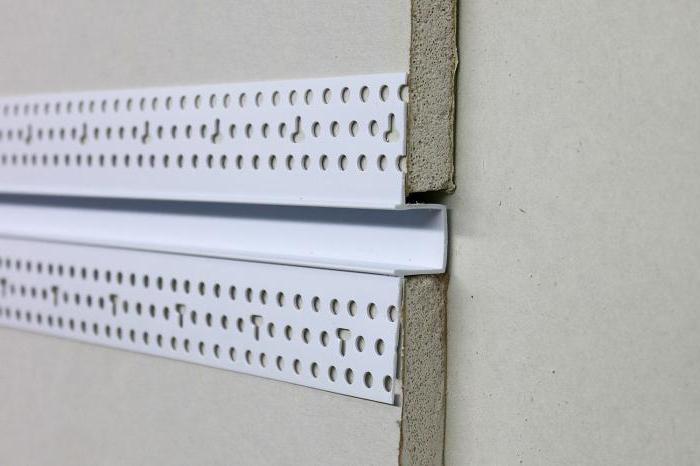
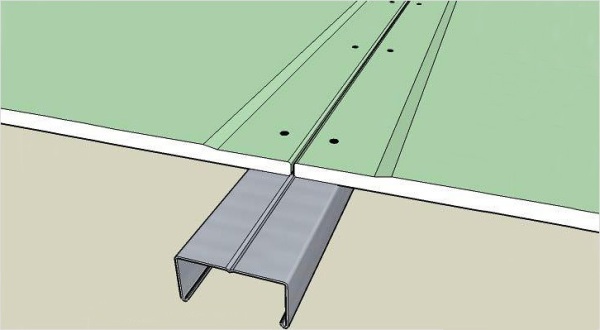 The sheet shows which side it needs to be fixed
 To prevent the occurrence of cracks and chips in the joints of drywall sheets, they must be installed correctly. And so that there are fewer joints, it is better to use large sheets.
In contact with
When working with drywall sheet, three types of frame are most often mounted:
The frame from the profile for drywall must have the strength of the structure, high bearing capacity. In this article, we will consider how to correctly assemble the frame for drywall - general technological recommendations.
We conditionally divide this task into several stages:
According to the prepared installation plan, we will begin to assemble the frame from the layout of the fasteners.
The marking begins with the fact that a line of the future ceiling level is applied to each wall. It should be strictly horizontal and closed.
The horizontal line is achieved by applying a long building level in the process of marking. Ideally, the line returns to the same place where it started and closes.
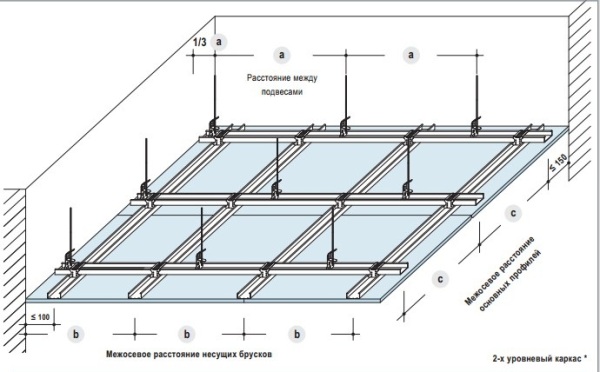
The following are marked places for mounting direct type suspensions. At the end of the marking of the ceiling, a grid with square cells 60 to 60 cm in size should form on it.
There is an exceptional moment - at the edges of the room, such cell sizes may not work out, then their size is purposefully reduced.
The frame from the metal profile for drywall begins to be assembled from the fastening of the guides - PN. Most often, PN 27 × 27 format is used. As the installation progresses, the profiles are glued with a special sealing tape on the side of contact with the wall.
At the corners of the room, profiles are fastened, the length of which is at least a meter. The standard length is 3 meters. If it is fastened without preliminary sawing, then it must be fastened in at least four places.
For guaranteed strong fastening of the guide profile to the wall, a dowel-nail with a head in the form of a "mushroom" is used. It is preferable not to hammer them, but to screw in the dowel itself and then screw in turn.
The next stage, when the frame for drywall is being erected on the ceiling, is the installation of P-type suspensions. Their fastening is carried out by marking in increments of 0.8-1.0 meters.
As for the fastening means, plastic dowels and screws are used. When concrete walls and the severity of the construction uses metal dowels. In those places where the joining of individual profiles is observed, 2 suspensions are installed on each side of the junction.
Installation of the ceiling profile begins with the fastening of profiles from wall to wall. Next, a transverse metal profile is attached. Thus, a cross type connection is obtained.
Each ceiling profile is installed in a previously mounted on the wall PN. During installation, a horizontal level is set and the ceiling profile is attached to the P-type suspension. For fastening structural parts, metal screws are used on each side.
If you look in general and do not take into account certain specific operations, such as creating special insulating layers in the frame, then we can say that its preparation is completed at this stage. Next, drywall sheets themselves are already fastened.
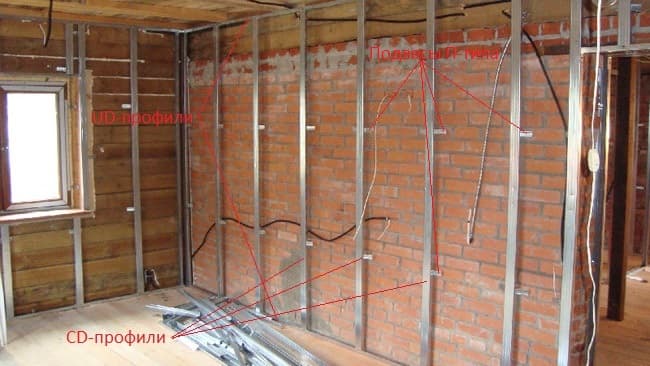
The first step is to determine where the wall has the largest projection.
It is at this point that a line is drawn on the floor surface with the help of a paint cord. This line acts as a boundary for the UD profile, and more precisely for its internal part.
Once the line is ready, it must be transferred to the ceiling using the level and the same masking cord. Thus, we get markup for installing UD profiles.
The above-mentioned profile is fastened with self-tapping screws and dowels. Installation is carried out around the perimeter.
The choice of the type of screws and dowels is made according to the instructions, which are often supplied with profiles.
The next step is marking the positions of vertical profiles. According to the recommendations, they should be located at a distance of about 30 cm. Each of the marked lines should coincide with the axis of the metal profile.
Thus, the number of profiles equal to 4 per sheet of drywall is achieved. This gives structural strength.
Having vertical lines - marks, P-type suspensions are easily screwed in increments of the order of 60 cm to further fix CD profiles on them.
The final step is to cut the CD profiles of the required length and insert them into the upper and lower metal profiles of the UD type. Vertical UDs play the role of structural elements. Control of the curvature of the installation of structural elements is carried out by the building level.
The cycle of operations begins with the choice of the location of the partition in the room. As the place is chosen, two marks are marked on opposite walls, along which we will draw a line up to the ceiling.
To draw the lines were strictly vertical - use the level. We connect vertical lines along the ceiling and floor, thus obtaining a rectangular marking.
Upon completion of the marking of the future partitions, fasteners of the guide profiles begin. They are attached to the ceiling and floor.
As for the profiles for the walls, both the same guides and rack can be used. Which one you choose is not critical.
Each of the fixed profiles must be glued with sealing tape.
This applies to those adjacent to structures of the bearing type. Such a tape strengthens the design of the partition and improves sound insulation.
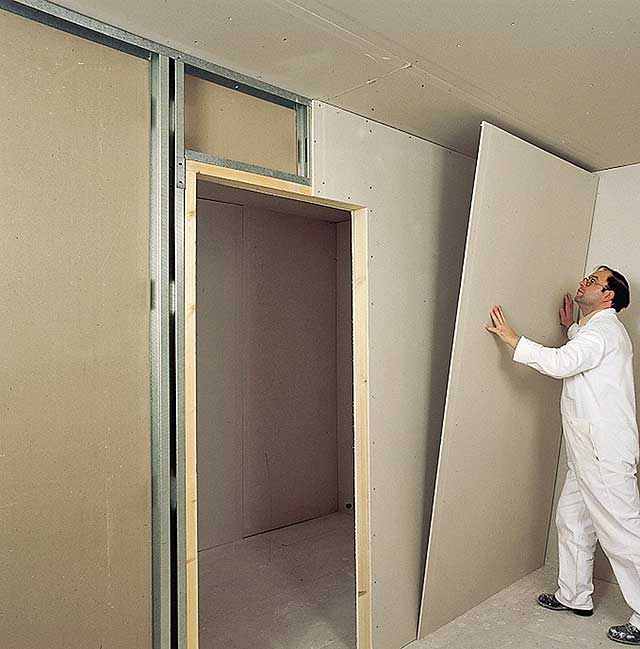
A doorway is created by exposing profiles and further enhancing them. A frequently used combination is two rack profiles that are inserted into each other, but this option does not apply to all types of metal profiles.
In the second case, a block is inserted inside the profile itself.
The heavier the planned door, the thicker the profile is applied.
The doorway should be made with a margin relative to the width of the door. For doors with a width of 90 cm, the margin must be about 9 cm. Substations have a centimeter less than the height of the room.
For the correct collection of the partition frame, the following rule is used: the rack profile is installed so that the stiffener is directed to the side from which the fastening of the drywall sheets will begin.
This is due to the fact that the sheets are attached initially to the edge itself, and only then to the rest of the profile. To make it clearer: if gypsum plasterboard lining will be carried out from left to right, then the ribs should look towards the left wall.
As the door profiles are fixed, a jumper is installed between them from the profile of the guide type. This jumper is initially made slightly longer than the opening width (about 20 cm), since then ears are made from the protruding parts, which are bent to the side profiles.
Do not forget to screw the fixing screws inside the opening.
For greater rigidity, two more profiles are added vertically, starting from the jumper. The distance between these two profiles should be about 40 cm.
Upon completion of the creation of the doorway of the partition, we install all the remaining vertical substations also with a step of 40 cm. At the end of this stage, we can proceed to fastening the drywall sheets.
Thus, we examined how to make a frame for drywall for different types designs. The installation algorithm is simple, it only requires care and accuracy.
Wireframe is the most popular way of partitions, arches and other structures made of this material.
If the technology is understandable and mastered, then with your own hands you can do everything your imagination is capable of in terms of reconstruction and decoration of the room.
But the most important thing is to learn how to make a frame for drywall. It is the basis of any design, therefore, special requirements are imposed on its installation.
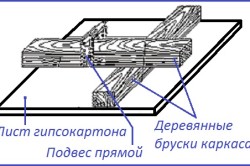
Formerly on wooden frames. With the advent of the metal profile, the need for using bars fell away due to the undoubted advantage of steel:
Therefore, it makes sense to mount a wooden frame for drywall with your own hands if you have at your disposal a sufficient amount of dry timber, which has nowhere else to put on. You can’t count on the timber that is in free sale: in the overwhelming majority of cases, it is freshly sawn and has high humidity. If you mount a frame from such a material, then soon it will certainly deform, since the tree will begin to dry and bend.

Tools that will be needed during the work:
Back to the table of contents
This design is easy to do with your own hands. But there are two ways to do the work: soft and hard.
Hard mounting method:
Technology of "soft" installation of a wooden frame:
Back to the table of contents
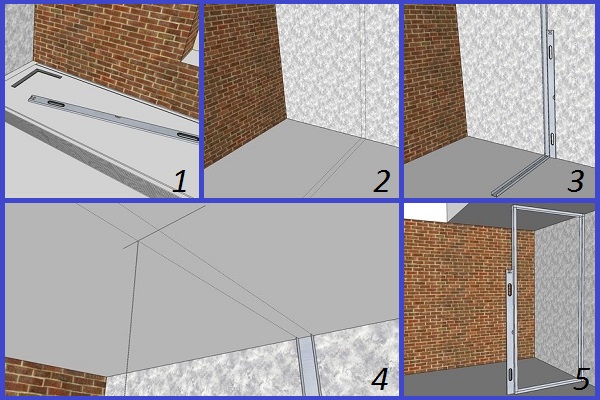
Layout of the frame for the drywall construction: 1 - prepare a pencil, an angular ruler and level; 2 - using a level and a pencil, even marking should be done to fix the profiles; 3 - we apply the profile to the marking and and fasten the profile to the floor and wall; 4 - we use a plumb line to mark the location of the profile attachment; 5 - collect the frame and check its evenness level.
Markup
In order to correctly perform this important stage of work, you need to understand two things: for the installation of interior partitions, niches, for leveling the walls, the marking starts from the floor. Here are marked the lines along which profiles PN 28/27 will be attached. They should be strictly parallel, and the distance between them should be equal to the thickness of the partition or the indent from the base wall.
Second step
Correctly transfer the markings from the floor to the ceiling. Here you will need a construction plumb. With its help, we carry out the necessary projection of the markup: several points are put on the ceiling, which are combined into solid lines. Next, we calculate the location of the vertical racks for work with walls, and horizontal - for the ceiling. The step of the racks is 40-60 cm. On these lines we make marks on which we will mount the suspensions. The distance between them is 40-50 cm.
We establish the directing profile PN 28/27
If from drywall, then the profile is fixed along the lines on the walls. They determine the height of the first level of construction. It should be checked whether the markings are correctly applied and whether they correspond to the horizontal. If we sheathe the wall, then the guides are fixed along the lines on the floor and ceiling.
Install the rack or ceiling profile
We cut the racks of the required length with metal scissors. At the marking points for suspensions we drill holes for dowels or anchors. If the frame for a suspended ceiling is mounted, then in no case can plastic dowels be used for quick installation. The fact is that they have a fairly large weight and over time, the screws from the plastic will come out and the ceiling is deformed. We insert the prepared racks from the ceiling or rack profile into the guides and fix them in suspensions with self-tapping screws SMM 3,5 / 51. The sides of the suspensions ("mustache") are bent to the base surface.
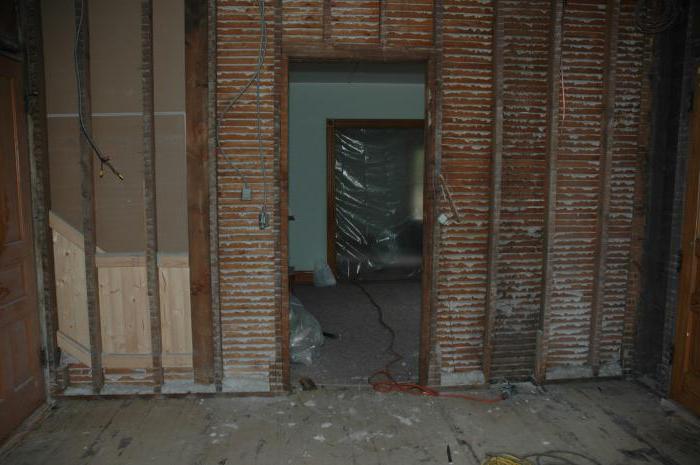
To the surface of the ceiling or walls. These works can be called the construction of a new frame-type wall. For the reason that drywall has a certain weight, requirements are made to the crate, which are rigidity and strength. Not so long ago, the frame was erected from wooden bars, which had the form of battens. However, this technology is a thing of the past, as it was replaced by high-quality materials - metal profiles.
However, even today, slats are used, but extremely rarely. After all, wood changes its initial linear dimensions under the influence of temperature and humidity. The bars dry out, become moldy and crack. In humid rooms they are deformed. All these shortcomings are completely absent and therefore it has today become the main material for the construction of a frame for drywall.
If you want to build a frame for plasterboard from a metal profile, then you need to deal with its main types, each of which has its own purpose. For example, it is designated by the abbreviation PN. This type of product is used to construct the contour of the crate. It is fixed to the ceiling, floor and walls. The profile shape is U-shaped, and the legs have a standard size that is 40 mm. A shelf can have sizes ranging from 50 to 100 mm.
It is designated by two letters - PS and represents the same guide. The design has longitudinal gutters that increase the rigidity of the profile. The width of the legs is 50 mm, while the shelves have the same dimensions as in the case described above. This profile is used to build the frame on the wall.
There is also a ceiling profile PP with longitudinal grooves, its dimensions are 60x27 mm. Directing ceiling profile - used for constructing a contour for a suspended structure. It is indicated by three letters of the PNP and has dimensions of 27x28 mm. The angular profile is used when there is a need to make a convex structure, this may include niches and built-in cabinets. The element is perforated and its angle is 85 °. The profile can be internal or external. For the construction of the type you will need an arched profile, with which you can build a wave-like structure on the ceiling.
Direct suspensions can be added to profile products, with the help of which rack-mount and ceiling profiles are fixed to the ceiling and walls. With their help, a suspended structure can be created on the ceiling. Another element, which is a special fastener, is a crab, with which you can connect several profiles at one point. If you decide to build a frame for drywall from a metal profile, then you will need self-tapping screws. On sale you can find several varieties of this fixture, each of which has its own purpose. Self-tapping screws with the following dimensions are used for a wooden wall: 6x70 or 6x80 mm. For concrete walls, it is better to use self-tapping screws with plastic dowels or dowels. If there is a need to connect the profiles to each other, then you should stock up with self-tapping bugs, which are popularly called "seeds" and "fleas."
If you decide to install a metal profile for drywall, then you need to stock up on a certain set of materials and tools, among them:
Roulette and a square will act as measuring instruments. At the preparation stage, marking is necessary. The amount of waste, as well as the strength of the structure, will depend on this. If the system is skewed, then you will waste material in vain.
If you decide to create a framework for drywall from a metal profile, then you need to start from the ceiling. This surface rarely has equal angles. If you start with the walls, then adjusting the size will be quite difficult. You will end up with a large amount of waste. At the first stage, the master determines the lowest angle in the room. To do this, use a tape measure, with which you need to measure the distance from the floor to the ceiling in each corner. The results are compared, and the smallest size will be the value that you need. This method can be taken as a basis if the floor has been pre-aligned. In the selected corner near the ceiling, you should set the laser level. The place will determine the height of the suspension structure. Light rays will indicate the contour, which will be located in a horizontal plane. According to this marking, PNPs will be installed.
When the frame is installed under the drywall from the metal profile to the ceiling, it should be borne in mind that in the direction of the long side, which is perpendicular to the wall where the window is, sheets of drywall should be laid. If we are talking about a square room, then place the panels also in the direction of the window.
Installation of such a structure as a frame for drywall from a metal profile with your own hands at the next stage involves the installation of PP, for this, parallel lines should be applied to the ceiling. Work should start from a long wall, the distance between the elements should be 60 cm. This is due to the width of the drywall, which is 120 cm. Under each canvas, 3 profiles should be installed, one of which should be located in the center.
It is important to take into account the fact that two adjacent panels must be laid on one profile. The lines on the ceiling will point to the center of the profile. Every 40 cm, suspensions are installed along these lines. Once it is possible to complete this manipulation, you can proceed to the installation of profiles, the ends of which will be based on the PNP. When creating a metal one should remember that the profiles will bend under their own weight. Between the guides you need to pull several rows of strong rope that will create a horizontal plane. PP is aligned with it, after which it is necessary to mount the suspension.
The antennae of the suspensions protruding beyond the profile must be bent up. In order to make the structure more rigid, it is necessary to install the cross-members, they are made of PP. The distance between the profiles will be the same and will be 60 cm. The crossbars are located along the room, the gap between them can vary from 30 to 60 cm. A crab is used here, it is installed on top of the PC, namely in the place where the connection with the cross members is made. For fixation, fleas are used.
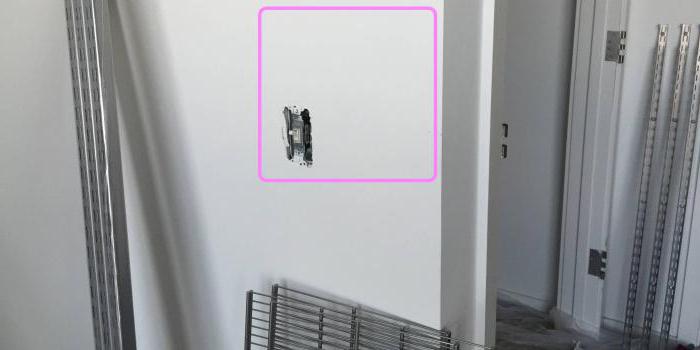
Before the frame is installed under the drywall from the metal profile on the walls, it is necessary to finish the electrical work. Wires should be led to outlets, to lighting points, as well as switches and appliances. The technology of the work will be different from the installation of the ceiling structure. It is necessary to finish one wall, install profiles and drywall, only after work begins on another wall. If walls are supposed to be insulated, then vertical profiles are installed with a step from the base surface, this distance should be 5 cm.
The width of the windowsill also matters if the finish begins after installation. After all, the markup is carried out from the window. It is important to take into account the thickness of the sheet, which can be equal to the limit of 9.5 to 12.5 mm. In addition, you need to attach a square, not forgetting about 5 cm. The same manipulations are performed on the other side of the opening. Work must be entered using the same technology if the room has several windows. Marks will indicate the edge of the wireframe. At this stage, the PN can be fixed to the bottom of the window sill, in this case, the distance between the uprights will be 60 cm.
A level is applied to the marks, and after they are transferred to the sides of the windowsill. Using the level, you can mark the edge of the frame on the ceiling and floor. To install the metal structure, you need to use a two-meter level, with which you will get more accurate values. When the frame is installed under the drywall from the metal profile, at the next stage the marks on the floor and ceiling must be connected, along the received lines a guide profile is set. PS should be installed on the sides of the window, so the verticals should be marked at a distance of 60 cm from these profiles. One of them should be located in the corner of the room. Suspensions should be installed every 70 cm, their center should be located along the line.
The rails are installed in the rails, their middle groove should coincide with the marks on the floor and ceiling. Using the level, you can control the vertical at the base of the ceiling and floor. The next step is the final fastening with screws. Before starting work, you should draw up a skeleton diagram for the drywall of the metal profile, this will eliminate errors.
Now the crossbars can be installed using a crab, special attention must be paid to installation in the window area. A jumper located horizontally must be installed above the opening. After the installation of the frame to the wall is completed, it is necessary to draw the location of the transverse and longitudinal profiles. You may need a diagram if in the future you will place paintings on the wall.
The frame for the metal profile is quite simple to install. The main thing in this case is to observe the horizontal position of the elements when it comes to walls, as well as the vertical if the system is installed on the ceiling. When you manage to master the installation principle, then at the next repair you will be able to realize more complex solutions like two-level ceilings, as well as doorways in the form of arches. When the metal profile with your own hands is installed on an uneven surface, you can make the future base more even with the help of drywall linings.
Wall and ceiling sheathing is not only a budget, but also an extremely convenient option. That is why many masters prefer this material. And to make such a lining perfectly perfect, they use a trick - a metal profile frame. With this approach, the technology for performing work changes and becomes somewhat more complicated, but the appearance of the room becomes solid and correct.
First you need to understand what a metal frame is and why it is needed under drywall. This is the supporting structure to which the sheathing material will be attached.
Metal profiles have quite a few advantages:
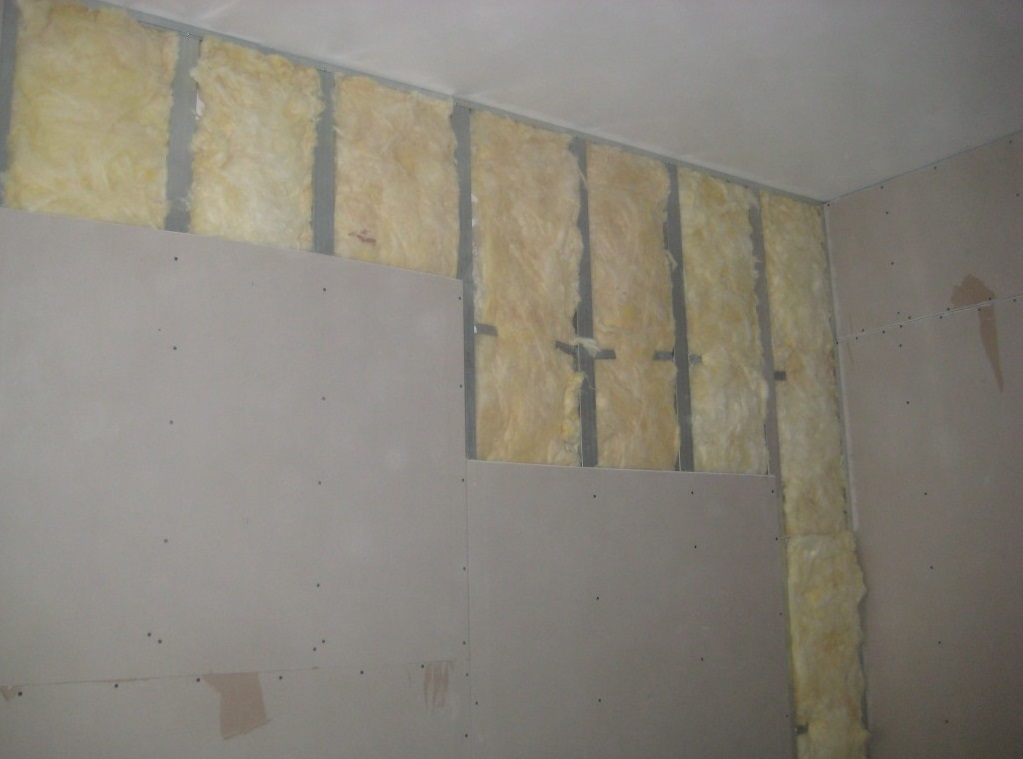
An important point is that the wall lined with drywall (GCR) with a metal frame becomes absolutely flat, even if the differences were significant.
It is for this reason that gypsum plasterboards are the leader among the casing materials. Due to its properties and a properly arranged frame, it is possible to build interesting structures on the ceiling. For example, multi-level and non-standard shapes / sizes.
In addition, such a lining device helps to make unusual and doorways. For example, in the form of an arch.
When installing the frame and cladding, various unforeseen situations may occur.
Here is a list of the most common errors:
Fixing the sheet with the wrong side can affect not only the further painting finish, for example, staining. For example, the installed one is not as it should, it will deteriorate much faster.
But the incorrect distribution of sheets during installation will lead to the appearance of cracks at the joints, as well as to deformation of the profile due to improper distribution of loads. Another big mistake is the use of ceiling profiles for wall cladding. This is possible, but we can’t talk about strength.
Non-compliance with the installation technology of the metal profile is one of the reasons for damaged structures. A bad or incorrectly fixed profile will surely fall off. Especially scary if this happens to the ceiling.
In the absence of such an important part as suspensions, cracks will inevitably form. In addition, then the installation scheme will be violated, which also affects the strength.
Extending a profile is an extremely thankless task. Rigidity decreases, the profile is deformed. This reduces the strength to zero. Therefore, it is very important to observe the installation technology so that the design lasts a long time.
It is worth noting that if the sheathing of both the ceiling and walls is planned, then the installation must begin with the ceiling. Then it will be difficult, especially when doing it yourself. At points of additional loads (chandelier, shelf, large picture), experts recommend reinforcing the frame with additional profiles and fixtures.
Then it is necessary to determine what kind of metal profile is needed for the construction of the frame:
Sometimes a long profile is required. Therefore, to connect two metal parts, a coupling is used, that is, a connector for PP. And to resolve the intersection of the profiles, crabs are used: they strengthen the frame by connecting parts of metal. Direct suspensions are attached to the walls or ceiling, and then bent along the lines that are on the product. A metal profile is inserted into the resulting connector. And the suspensions themselves are mounted using hardware.
For wall sheathing with sheets of drywall with the installation of a metal frame, materials and tools are required.
Here is the list:
The first step is to make markings for suspensions, which should be located at a distance of 80 cm from each other. It is necessary to choose the most protruding part of the wall, and from it to carry out calculations. The profile on the walls should be placed in increments of a meter. Profiles are fastened with crabs, screws and screws. In the resulting box you can hide the insulation, wires and communications.
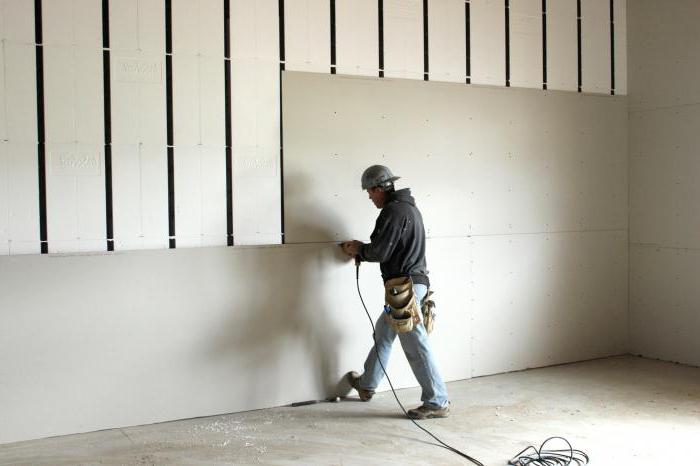
Drywall must be cut according to size. Then it is fixed with self-tapping screws. Seams must be glued with paper tape. You can use a tape in the form of a grid, but the masters recommend the use of a paper self-adhesive tape.
Then a thin layer of putty is applied to the joints, and it can also be used to hide some recesses if the sheet is slightly deformed during installation. The seams are processed with sandpaper, and then the walls can be further finished. Sealing and processing of joints should be carried out at a temperature not lower than ten degrees above zero. During installation, it is necessary that the humidity is normal and drafts are completely absent.
The metal frame is able to withstand almost any finishing materialeven decoration with bas-reliefs. True, it is better to use polyurethane products.
From internal pipelines, drains are transported by external ...
Each apartment, like every family, has its own characteristics, so it is difficult ...