What winter holidays would be complete without a mountain of tangerines and a couple of juicy...


Although paper flowers will never replace the charm of real flowers, they can still be an excellent decoration for parties or as an addition to a gift. They're relatively easy to make, but you're always surprised by how subtle and graceful the results can be.
In this lesson I will show you several ways to make paper flowers with your own hands with unique step-by-step photographs using a variety of techniques. Paper flowers have become quite a trend over the past few years.
It’s incredible how “alive” some paper flowers can seem, and how beautiful “fantasy” flowers can be. However, what they will be like depends on the craftsman creating his own paper flower. Some may be large, others small. They can shine and sparkle and look almost natural...


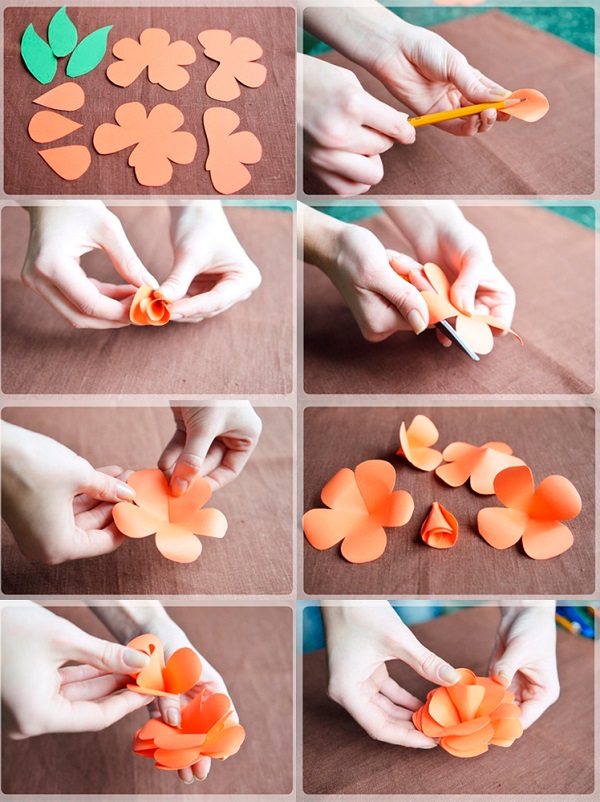
To decorate any holiday, appropriate decorations may be required. Often these are flowers used to decorate a room. The easiest way to make such decorative elements is from paper. This master class shows how to create a lush flower, which can be of different sizes.

To make such a paper flower you need to take:

We cut out several squares of different sizes from paper. In our case, the largest is a square with a side of 13 cm, and the smallest is 6 cm.

Each of the cut out squares will be a subsequent layer of petals. We start making the flower with the largest square, fold it in half.

Then we make another fold in the transverse direction.

Now fold the resulting square diagonally.

Finally, we make another fold, folding the workpiece in half.

Using scissors, cut the edge into a semicircle.

We unfold our workpiece.

We cut with scissors between the petals, not reaching the center.

Use your fingers to make folds on each petal. This will add volume to our paper flower.

We do the same with the rest of the petal blanks.

We begin to connect them together using glue. To do this, we place a circle of smaller petals on top of the largest one.

In this way we connect all the petals.

For the center of the flower, you need to cut a strip of paper (about 2.5 cm wide) and fold it in half lengthwise. Then use scissors to make cuts along one edge with scissors, not reaching the other edge.

After this, we begin to twist the strip, periodically fixing it with glue.

This is how we formed the middle of the flower.

Glue it in the center of the flower.

Our lush paper flower is ready.


Very cute and delicate craft.
Moderately complex, requiring accuracy and patience rather than special skills. A real find for those who like to use scissors.

For the craft we will need:
Shall we begin? We take a notebook piece of paper and draw on it a leaf of a water lily measuring approximately 14x12.5 cm. If you know how to draw, then you can skip this “intermediate” stage and draw directly on the cardboard. If not, no problem. We select a picture of a suitable size on the Internet (query: “water lily leaf coloring, drawing or picture”), place the notebook paper on the screen and carefully redraw it.

Cut out the workpiece.

We put it on the back side of the green cardboard and trace it.

Cut it out.

Take blue paper and cut off the corners, turning the rectangular sheet into an oval (the perfect shape is not required, so you can cut by eye). Glue the lily leaf as shown in the photo.

We cut stripes-waves, stopping a couple of millimeters from the sheet. You shouldn’t make them too thin - you’ll get tired of curling them and they’ll easily come off due to a bad move. The width shown in the photo is the minimum. You can make the strips much thicker, the craft will not suffer from this.

We curl the waves using scissors - the blade of the scissors is on the white side, the thumb is on the blue side.

Now let's decorate our leaf with a natural pattern. Draw a drawing with a pencil and color it. For coloring, I chose a felt-tip pen. Its main disadvantage is that it smudges a lot (this also depends on the cardboard) until it dries. When coloring, try not to touch the areas that have already been “traversed” with your hands. If you are left-handed, paint from right to left; if you are right-handed, do the opposite.

While our handsome leaf is drying, let’s take care of the main “decoration” - the lily. To do this, take a white A4 sheet, fold it in half twice and tear/cut it. We will get four identical rectangles.

Take one of them and fold it 2 times. Using a ruler and pencil, draw a petal 5 cm long (along the fold line).

We cut out, erase the pencil marks, lay out and bend the petals (more precisely, 2 of them) so that they are all “opened” in one direction.

We make another 5 cm and two 4 cm flowers.

Glue paper flowers.

Now you need to make the core of the lily. For this we need a small piece of yellow double-sided paper. We tear it into small pieces and crush them into balls (in the end I only needed 3).

Glue them to the center of the flower.

We've reached the finish line! All that's left to do is take the lily and glue it onto the leaf. Try to press it only in the center so as not to damage the volume of the petals and waves. Ready!


DIY large decorative flowers made from office paper
In this master class we will make such bright and beautiful poppies from crepe paper.

Materials and tools:

Cut a wide strip from a roll of red crepe paper.

Then draw a template of a poppy petal on a piece of cardboard and cut it out.

We apply it to the crepe strip and cut out the petals along the contour.

Without unfolding the petals, stretch their central part to form a depression.


We create poppy stamens from black threads. We wind 20-25 turns of thread around the index and middle fingers. We tie the turns in the center or clamp them with thin wire. Remove the resulting bow from your fingers and cut the ends of the loops.

Roll out the center of the poppy from a piece of green paper. Then we wrap a piece of black thread around the paper ball. We fix the intersection of the turns with a drop of hot glue.


Now glue the ball to the bunch of stamens and evenly straighten the tips around the pistil. The poppy core is ready.

Glue six petals to its bottom.

The first flower bud made from crepe paper is ready!

We form stems from the wire and wrap them tightly with a green crepe strip. We make leaves from the same paper.

Tulips are an unconditional symbol of spring and the favorite flowers of many women. Fortunately, nowadays you can buy tulips all year round. And some men are ready to present their loved ones with freshly cut flowers every day. But why throw so much money down the drain?
To have tulips in your home all year round, make them from paper. Very beautiful flowers are made using the origami technique.

For work you need the following materials:

Take a sheet of bright colored paper, always double-sided. For example, a lilac shade.

We turn the corner to the opposite side and cut off the excess paper.


The result is a square (rhombus).

Fold it into a triangle again.

We unfold it to its original position.

Fold in half to form a rectangle.

We hide the corners inside.

It turns out to be such a small triangle. Place it with the top up.

Bend the bottom corners towards the top. First left, then right.


Then we turn our workpiece over to the other side and repeat the manipulations again.


We open the resulting figure so that the folds are in the middle.


At the bottom we place a corner that does not open, and at the top is one that has many corners. Bend the right and left corners towards the center so that they overlap.


We do the same process on the reverse side of the workpiece.

We insert these corners one into the other on both sides.

Cut off the bottom corner.

Holding the connections on both sides with your fingers, we inflate air into our paper flower.

It is now voluminous.

All that remains is to bend the top corners.

Here is a tulip bud.

Cut out an oval leaf from green paper.

We form a flower stem from a thin green strip of paper and a wooden skewer.

Use PVA glue to glue a leaf onto it.

And we fix the flower on top.

The tulip is ready!


Other options on our website - how to do it with step-by-step photographs.

3D origami flower


Iris using origami technique

Lotus using origam technique

Banknote flower

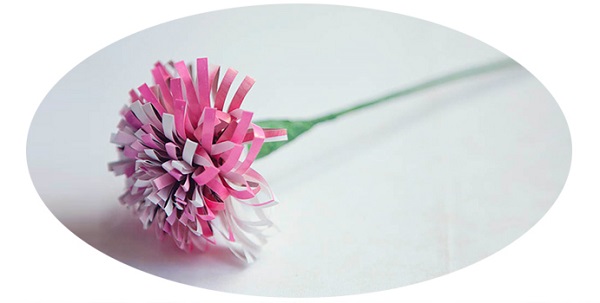
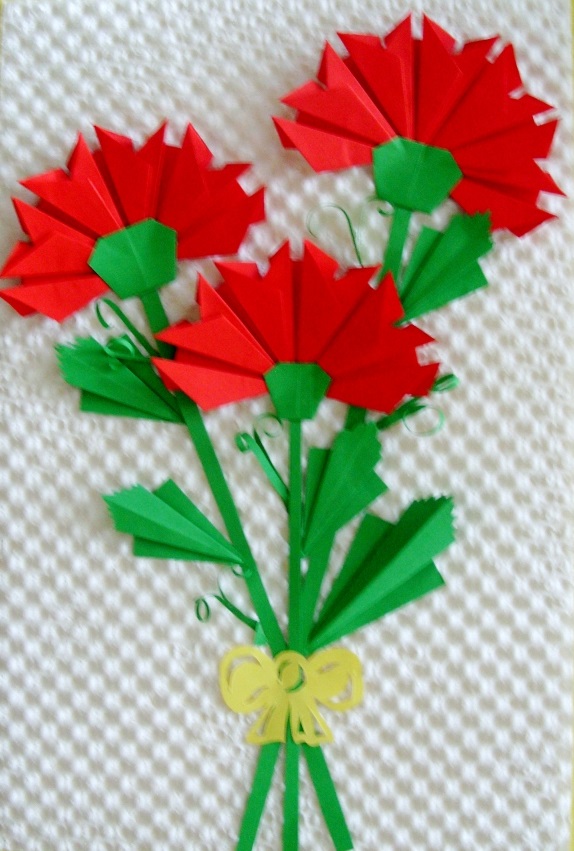
In this master class we will make a very simple, but lush and beautiful carnation from paper. It can be used to make holiday cards.

To make cloves you will need:
This flower is made very simply and quickly, so you can make a lot of carnations in a short time. It is advisable to use red or pink paper.
First we need to add 12 identical modules. To do this, cut out 12 identical squares. In this case, their size is 5 by 5 cm, but you can cut out absolutely any squares. The larger the square, the larger the finished carnation will be.
We cut out 12 squares of red color and 1 square exactly the same, only green. It is needed to form the sepals at the bottom of the flower.
Take 1 square. We begin to fold the module. The main thing is to remember only once, all subsequent parts are added in the same way.

We will need to bend the square 3 times. First, bend it diagonally, forming a triangle.

Then bend it one more time. We will get a smaller triangle.

Now it is important to position the part correctly. We turn it so that the opening sides face to the left. Take the top right side and bend it back.

This completes 1 piece! It is very important that the last fold is on the right side. Otherwise, later we simply will not be able to collect the flower. So you need to make 11 more exactly the same red parts and 1 green one.

Now let's start collecting paper flowers. Take 1 piece and open it, bending the right side slightly back. This is the side that we folded at the end of each piece.

Now we need to insert the back part into the left side of the other module. A pocket is formed there from the first fold.

You can lightly coat the side with glue to help the parts stick better. And bend the right side of the first part back.


We will only have 2 red modules left. We assemble them and glue them on top of the part from the 4 modules below.

Now we take the green modules and glue its sides so that they do not puff up. Glue the parts on the bottom. This is a sepal.

The paper carnation flower is ready!


The blooming cactus is extremely beautiful! But because of the prickly needles, not many people grow cacti and you can only see them blooming in pictures. Let's make a cactus that will be both safe and very beautiful!

We will need:

Let's start "growing" the cactus! First, let's decorate the flower pot - attach a decorative ribbon to the jar. You can wrap it once or twice as you see fit.

Now take the green napkins and cut them into 4 parts. You can cut several napkins at once.


Let's start “growing” greenery on the trunk. Take the box and apply glue to it using a glue stick.

And then we glue the resulting “leaves” on all sides. You need to glue it tightly so that there is no gap. We leave free space at the top - this is where the paper flower will be located. This is what a “cactus” looks like!

The flowers of the cactus are very bright and lush. Take 2-3 brightly colored napkins and connect them in the center using a stapler, crosswise. Let's draw a circle and cut it out.

Now we begin to crease the edges of the napkins towards the center, starting from the topmost circle. You should get such a lush flower!

We glue the flower to the place that we left empty on the trunk.

We use dark-colored napkins to make preparations for the soil, just as we did the greens.

Apply glue to the bottom of the pot, especially in the middle. First glue the cactus and then the soil around it.


Using a thin brush and white paint, you can mark the needles. This is such a beautiful cactus! Bright and not at all prickly!

Every day we come across different, at first glance, completely unnecessary things. But, if you think carefully and imagine that this is not just garbage, but a future work of art. So are cardboard egg cartons.
We buy eggs all the time, but the cartons seem unnecessary and go in the trash. But it is from them that many interesting things come out.
From these we will now try to make a wonderful picture with beautiful daffodil flowers.

To make a painting you will need:


So, let's begin. Take an egg tray and cut it crosswise into two cells.

Now we cut out petals from each cell. As shown in the photo.

From one such mold you will get four petals. Out of the entire box, there will be eight colors for ten eggs. But you can not cut everything out, but make five colors.

In addition to the petals, you need to cut out as many small circles as there will be flowers. The petals will be glued to them. Also cut out five small petals. You can easily cut them out from the remains of the box.

Also, flowers need stamens. They can also be cut from any scraps. And cut with scissors into small strips. And also, the core. For it, you can cut off the top of the cell. And bend the edges with your hands so that the paper flower looks more like the original.

When all the parts are cut out, they need to be glued together. Glue six petals in a circle onto a small circle. There are just as many of them in a real narcissist.

The finished flowers are painted with acrylic paints. You can paint them with any shade, but so that they look like flowers.

While the painted flowers are drying, you need to cut out green leaves and grass from colored paper. Approximately as shown in the photo.


So the spring picture with paper daffodils is ready.

Content
Just celebrated a friend’s birthday, or is it already a colleague’s anniversary at work? We celebrated an anniversary, do you need to go congratulate your boss? The boss was congratulated, no ideas on how to surprise a picky aunt/grandmother/mother-in-law/mother’s friend/neighbor? Come on, come up with a gift for someone who has everything. This person just needs to be surprised with your skill and a gift made with your own hands from the heart! And large paper flowers are suitable for this. By the way, if you still have a gift, then the box in which it probably lies can be decorated with paper flowers instead of the usual packaging.
Large, voluminous floral installations with your own hands can be made very quickly and at minimal cost. Corrugated paper is not very expensive, it is sold in rolls and is enough for many products. So, prepare:
To make large flowers we will need a petal template. It can be cut out of cardboard and attached to corrugated paper.
Now you need to think about the core: it can consist of many small petals or you will need to prepare the stamens. In addition, before assembling, think about whether the flower is intended to be mounted on a wall or whether it will be on a stem. If the latter, then wrap the wire with green paper and start assembling the flower from the middle, i.e. from the smallest petals, using a glue gun.
The centerpiece can also always be a delicious chocolate candy. It is attached to the wire and only then decorated with petals. It turns out to be a very original and useful bouquet.
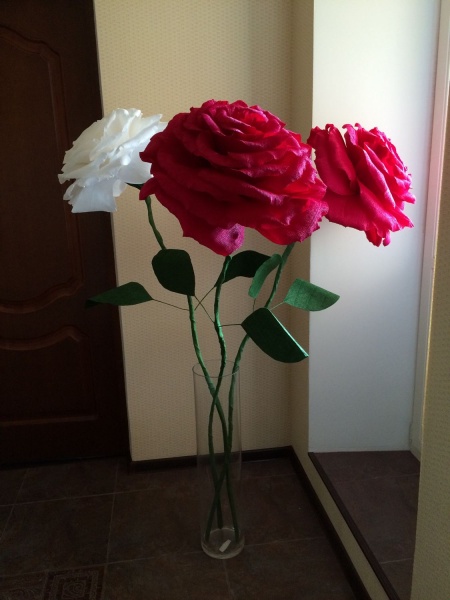
Using a similar method, using a stencil, you can create large interior roses that are placed in glass vases. There may be several such vases around the apartment.
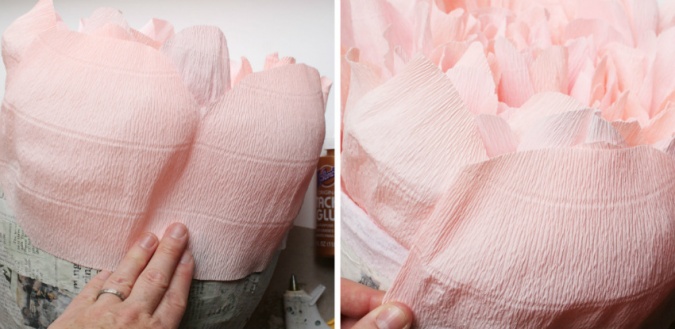
How to make large peony flowers from corrugated paper? In the interior they look simply gorgeous. By the way, you can even make a very interesting headdress, so, take the following:
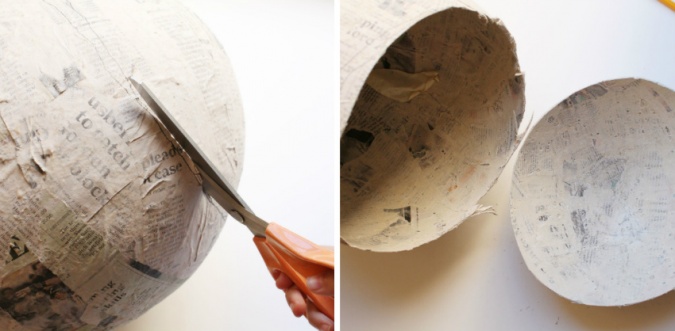
First you need to make a base from newspaper and a ball using the papier-mâché technique. You need to glue squares or strips of newspaper onto the ball. There should be many layers so that the base is dense. You need to leave the base for 24 hours until it dries, then carefully deflate the balloon and cut the base.
Now you need to put one half into the other and sew them along the edge. It is also advisable to glue the edge of the halves.

Now let's start making the petals. They should be of different shapes; prepare a stencil to make it convenient to cut them out.

There should be really a lot of petals and they should be diverse.

Each petal must be cut out in quantities of at least 10 pieces. Now each petal needs to be stretched well, and the base needs to be slightly bent to the side so that you can later glue it to the base. The petals should be voluminous; this is the main point in the question of how to make high-quality large flowers from corrugated paper.

The thinnest petals go to the center, place slightly larger petals around the core, there may be a small distance between the rows. The edge of the workpiece also needs to be covered with paper of the same color.
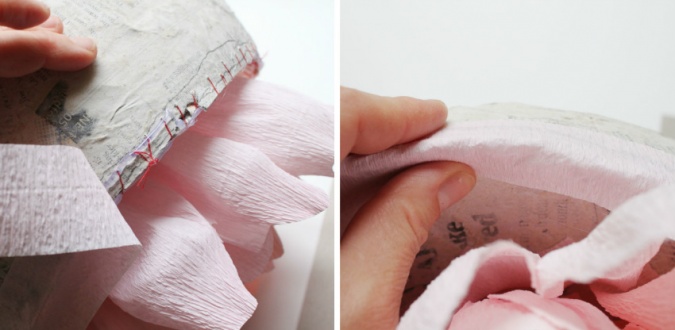
Continue filling the space with petals. Take your time, before gluing it, attach the petal and see how it looks.
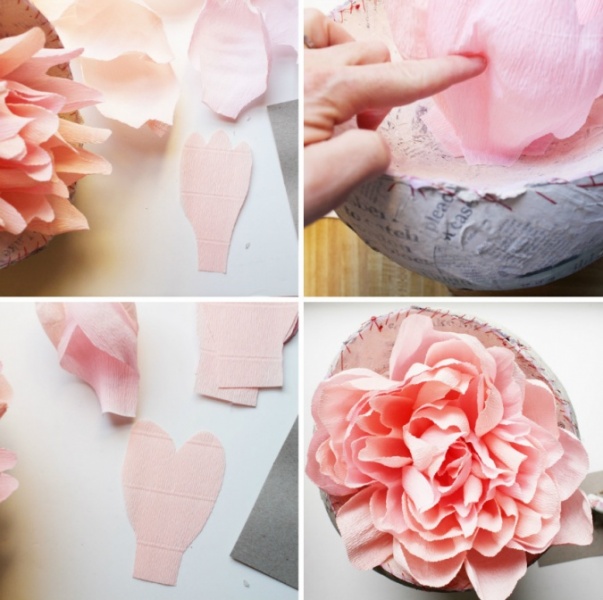
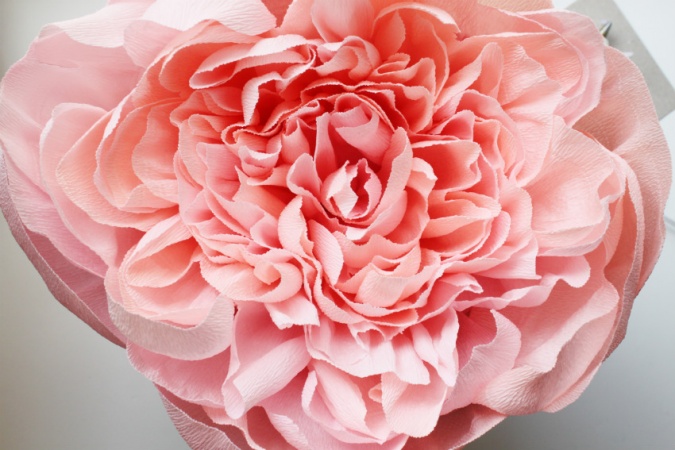
Now you will need to prepare several very large petals, which will be used for the external design of the workpiece.
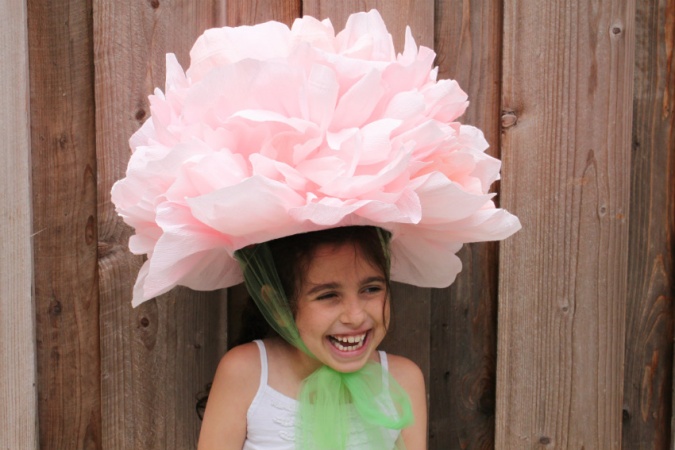
As a result, you should end up with such a chic peony that can be used as a headdress for the holiday.
You can give this flower as a gift to your child for his birthday. The birthday girl had definitely never had such a charming gift before.
In addition, such flowers can be used to decorate a wedding venue.
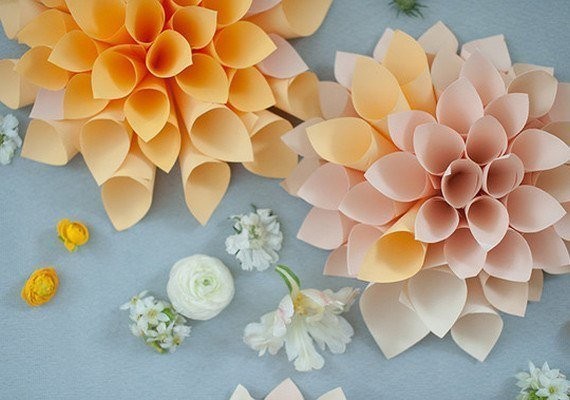
The master class on large paper flowers continues, next up is a giant dahlia.
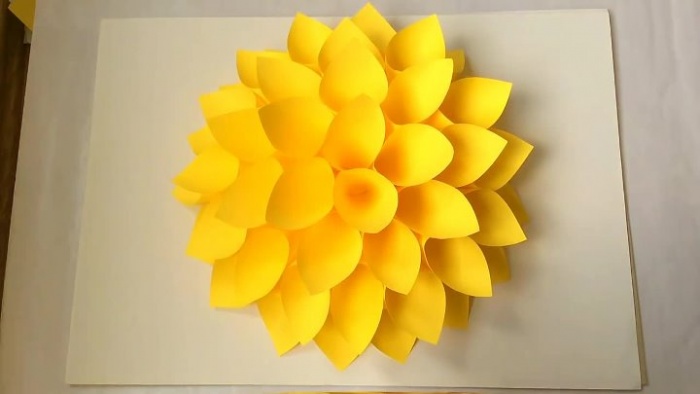
Such a flower can be made using a ready-made pattern, or from many petal parts. That's what we'll do. Making these paper flowers with your own hands is very easy. What do we need?
Cut out a circle for the base from the same paper. Then you need to cut a lot of squares for future petals; the larger the square, the larger the flower. Then each clapstick needs to be folded into a paper envelope, rolled into a horn shape.
After this, all the horns need to be glued to our base, observing the order, so that you get such a beautiful flower made by your own hands.
Large flowers made of corrugated paper can be made even easier, with virtually no stencil and many details. Using this method you can make full-size flowers. These decorations are perfect for decorating a festive interior and will become the subject of photographers' attention.
To do this, you need to cut out many circles from corrugated paper; they should be of different sizes: from huge to small. The edge of the workpiece can be lightly processed with scissors - cut with a wavy line. After that, all the blanks need to be folded one into one, fastening the layers with glue.
In general, on our website you will find a lot of interesting master classes on large paper flowers, including life-size flowers.

There may be several of these paper flowers around the room, but don’t overdo it. Let there be fresh flowers on the table. A huge rose can become the queen of the holiday.
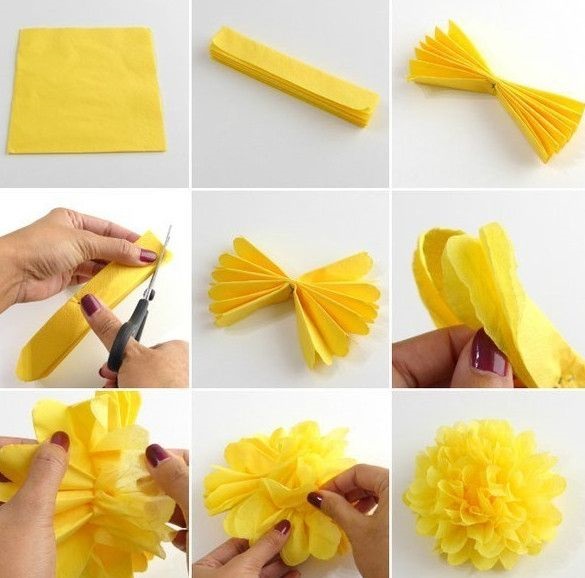
Flowers are a pleasant addition to everyday life and holidays for every woman. And what could be more beautiful than flowers, made in an unusual way and presented by your own child? To experience the joy of giving your child a craft gift, we suggest showing him how to make flowers from colored paper with his own hands. Step-by-step instructions are given for parents who want to turn the learning process into a comfortable game.
To make big interior you don’t need to be a specialist: just master the simple technique shown in the colorful photo tutorial. Let's get started:
By spending just an hour, you can make a magnificent flower. It is proposed to show this material to children aged 5–6 years, who can easily master the nuances flower creations made from tubes. Mini instructions at your service:

Making flowers with wavy petals is very simple. For this observe the following items.
Prepare colored paper. It’s better if you use a different shade for each flower, because in a lush bouquet such brightness will look amazing. Prepare separately green paper - it will serve as the basis for the stem and leaves.
Make a stem: twist A4 sheet into a tight tube and secure the edge with glue. Cut out shaped leaves using a template or make a fence from a small piece of green paper.


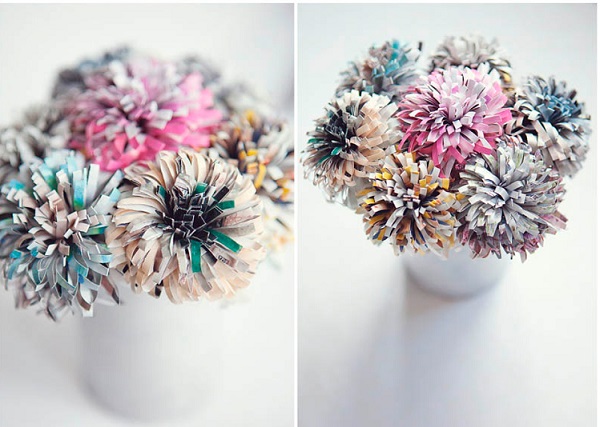
Move on to the flower head. Divide a sheet of colored paper with 4 identical strips. Cut each strip into a fringe, the edges of which are curled with scissors. Start twisting the fringe onto the stem, moving in a spiral. A leaf of the same color will produce 4 flowers.


Bouquet of wonderful Any preschooler can make flowers: beautiful decorated ribbons, it will be a great gift for the holiday to relatives and close women.
A 4-5 year old child can make excellent flowers from fringe after you show him a master class. Follow photo instructions to make a wonderful and colorful craft.
The most beautiful roses are made from colored paper or ordinary newspaper sheets. Roses will come in handy For decoration children's and adult rooms, and are also suitable for various crafts that the child will have to do in the future. Let's start the master class:
Cut out from a small rectangular sheet of colored paper oval. Make an incision, then continue moving the scissors along the contour of the oval, but stepping back from it by 1–1.5 cm. Continue cutting until the scissors rest in the middle of the template. You can do it spiral workpiece

Start twisting the template strips so that front side looked up. After the flower is completely curled, secure it to the base-core.

Straighten the spiral and give it shape roses.

If you are the parent of a small child 3–4 years old, it’s time to teach him how to do the simplest daisies made from colored paper. Step-by-step instructions will help you better understand the nuances of the creative process, once you understand them, you can teach your child a valuable lesson. Go:
Fold A4 sheet accordion along the entire length. Find the middle and secure it with a stapler.


Give the petals a beautiful look figuratively finishing the edges. A semicircle is enough for this. cutting down both ends of the workpiece.


Open the workpiece, pulling the outer petals towards each other. Staple tape and straighten the chamomile.

Cut out core from a sheet of contrasting color. Glue to the finished flower.

Daisies will do for room decoration for birthdays or spring holidays. It is better if you use several flowers, fastening them into a garland.
Making flowers from colored paper is easy. Especially when you have detailed step-by-step instructions at hand. We hope this article will inspire you to get creative, which in turn will make your family nights fun and happy.
Paper flowers are not only pleasant to see, but also to make with your own hands. In addition, they have a couple of advantages over their natural counterparts - they are much more affordable and durable. By the way, having learned how to make flowers with your own hands, you will never be at a loss if you suddenly need:
From this material you will learn how to make flowers with your own hands from corrugated, colored or tissue paper (tish). You will find 4 step-by-step master classes with pictures and templates, as well as a selection of 70 beautiful photos and useful videos.
Later we will tell you about techniques for making flowers from paper, but first we suggest you be inspired by photo examples of their use.

Paper flowers in silence


To make such a garland of flowers with your own hands, use ribbon petal blanks (see MK No. 1 below, step 3) and skip the steps of making the stem and pistil


Photo zone with flowers for a child's birthday


DIY flowers made from corrugated paper can look surprisingly lifelike. Although at some stages of their manufacture you will have to tinker a little, even a beginner can cope with the craft the very first time.
This selection of photos shows examples of paper flowers that you can make yourself by following our step-by-step master class.

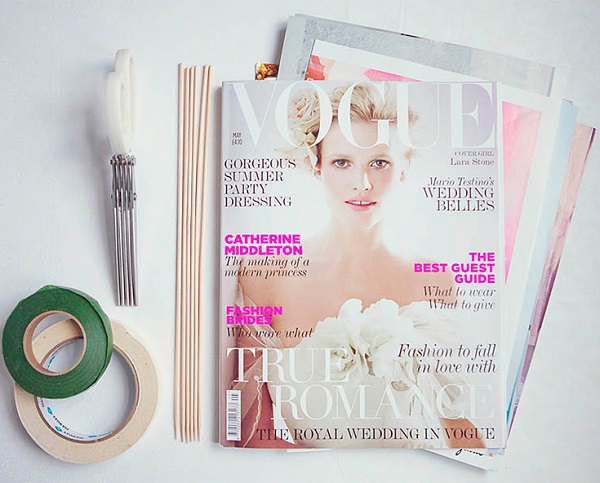
To work you will need:
Master Class
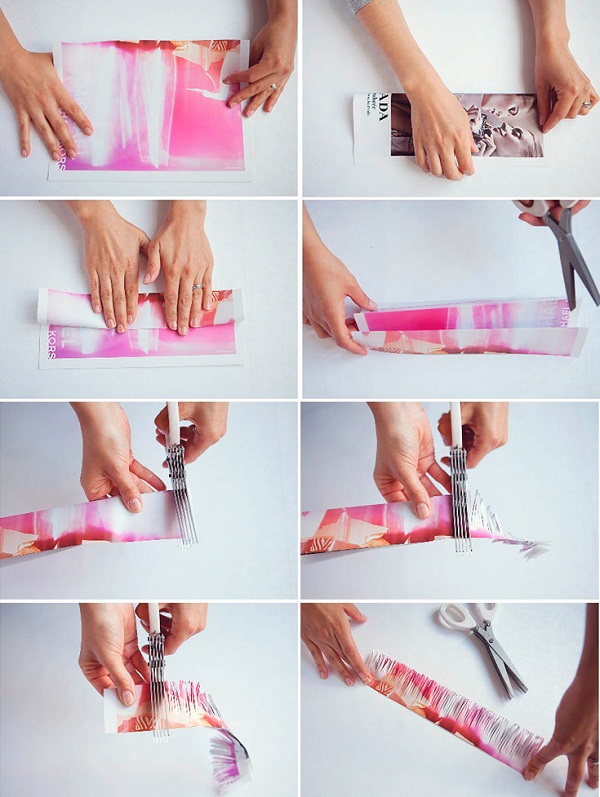
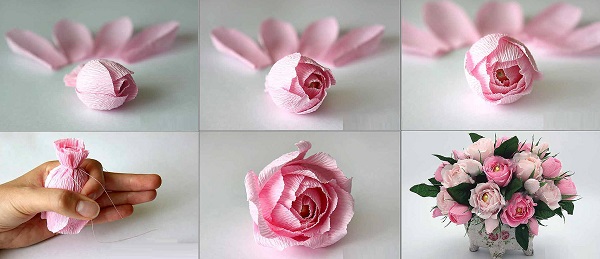
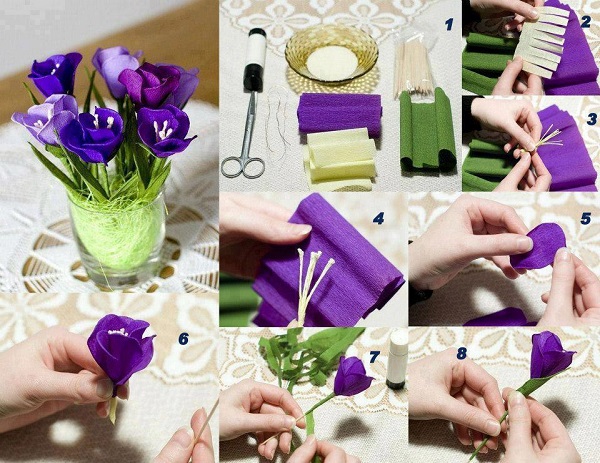
Although almost any flowers can be made from corrugated (creped) paper - from roses to tulips - the principle of their manufacture is approximately the same. The main difficulty is to make the right petals: give them the desired shape, volume, size, choose the color of the paper, guess the quantity.
Step 1. So first we need to make the stem. If you use floral wire, then simply cut it to the required length: a stem about 30 cm long is suitable for making a bouquet, and for, say, a boutonniere, 15 cm is enough.
Step 2. Since the pistils and stamens of all flowers are different, and sometimes there are none at all, there are many techniques for making the “cores” of artificial flowers.
The following photo illustrates blanks for making cores of different colors.


Step 3. Let's start making petals and forming a bud. This stage is the most important, so it should be given more attention. Depending on what kind of flower you want to make, choose one of two working methods.
As the name suggests, the method involves forming a bud one by one, petal by petal.

These templates will help you navigate the sizes, shapes and number of petals. Keep in mind that the length of rose, peony and tulip petals should be approximately 9-11 cm, and lily - 13.5-15.5 cm

Corrugated paper easily stretches, curls and takes the desired shape

To make a peony, you will need to make 35 petals and a stem with a button. How to make petals: based on the photo, cut out the petals of the desired shape, then stretch them slightly and bend them inward, gather the base of the petals a little. The central petals need to be glued lower, and the rest – higher. When the flower is ready, slightly tuck the tips of the petals inward

To make a rose, use 5 small and 7 large petals (see template above). Round the petals just below the middle, and twist the upper edges onto a skewer/toothpick outward. Attach the small petals to the core first, and then the larger ones.

To make a lily, use 5 petals (see template above) and a pistil with stamens from red and white corrugated paper. Fold the petals in half lengthwise to form pleats, then unfold them. Give the petals a bend by turning them outward at their widest point.

Tulips made from corrugated paper are the easiest to make. You only need six petals, they need to be slightly rounded and the ends pleated

The difference between this technique is that the petals are cut out not individually, but from a strip of corrugated paper, when the workpiece becomes like a fringe. In this case, the petals acquire volume and bending (sometimes several layers at a time) only after the fringe is attached to the stem.


The central petals of the chrysanthemum need to be wound around the pistil quite tightly, the rest - looser and slightly higher

The carnation is made from three stripes (see template). The first strip just needs to be tightly gathered into a bundle and secured with tape/tape. The second and third strips need to be wrapped around it, holding and aligning the lower part of the bud. Next, the bud is fixed with corrugated tape or glue. Finally, pull the petals outward to give the carnation a rounded shape.

To make a dahlia, start winding the blank just below the pistil, but then wind the petals, rising higher and higher. Shape the petals into a round shape, curl the tips inwards slightly and finally pinch the tip of each petal to form a fold.


The following video tutorial will help you better understand how to make flowers from corrugated paper with your own hands.
Large hand-made flowers are good for decorating photo zones, ceilings and walls at special occasions (for example, at a wedding or birthday). They can also become spectacular props for a photo shoot.

To work you will need:
How to make large paper flowers:
Step 1. First we will make the stem. Take a sheet of white A4 paper, place a pencil on the corner, then roll the paper into a tube.

Step 2: Unroll the crepe paper roll completely. First fold it in half, then double it again, then fold it again... is it a rectangle? Now fold it in half to make a square measuring approximately 25x25cm.

Step 3. Cut the folded paper into a square at all folds using scissors. You will get two identical stacks of square sheets, from which we will then cut out the petals.

Step. 4. Fold each stack in half. From the first rectangular stack, cut out a half-heart shape, as shown in the diagram below. From the second stack, cut the same shape, but smaller.

Unfold the stacks to make petals like this.

Step 5. Twist the ends of the petal with a pencil or pen, and stretch the petal itself a little and bend it inward.

Step 6. Give the petal an even more rounded shape by making two folds at its bottom and securing them with hot glue.

Step 7. Let's start forming the bud. Roll one of the small petals around the stem quite tightly.

Step 8: Start gluing on the remaining small petals, following a staggered pattern. When the small petals run out, continue to grow the bud with larger petals. In total, your rose will “overgrow” 15 petals (+1 petal in the center of the bud).

Step 9. Fold a square sheet of green corrugated paper (25x25 cm) diagonally to form a triangle, then fold the triangle in half 2 more times. From the resulting multi-layered triangle, starting from the fold line (!), cut out the shape as in the picture below. When you straighten the cut out piece, you will get a quatrefoil.

Step 10. Make a small cross-shaped cut in the center of the quatrefoil (see picture above), through the resulting hole, put it on the stem up to the bud, then glue the leaves with hot glue.

Step 11. Hurray, our big rose is almost ready. All that remains is to wrap the stem in green paper. To do this, you need to roll it into a roll, then cut off an approximately 2-centimeter wide piece from the edge (that is, the same as if you cut a piece from a roll). Now unravel the resulting tape and wrap it around the stem, securing the upper and lower ends with glue.


From the following video you will learn how to make large flowers from paper with your own hands.
These hyacinths look like they were made by a quilling expert. In fact, even a child can make such paper flowers with his own hands! Making the first hyacinth will take some time, but you will spend no more than 5 minutes on each subsequent flower.

To make such a bouquet of flowers with your own hands, you will need a little more than half an hour.
To make paper flowers you will need:
Master Class
Step 1. Cut a strip of approximately 21 x 2.5 cm. If you are using A4 colored paper/cardboard, then you just need to cut the sheet crosswise.

Step 2. Stepping back 1 cm from the top edge, draw a line along the strip with a pencil using a ruler. Next, using scissors, cut your workpiece into strips approximately 5-7 mm wide, not reaching the previously drawn line. You will end up with something like a fringed ribbon. Try to cut the paper into even strips parallel to each other, but don’t worry about mistakes, because they won’t be noticeable when folded.

Step 3. Using a knitting needle or wooden skewer, carefully roll each strip into a log until it stops. Make sure the pencil line is on the back of the paper.


Step 4. Now let's work on the stem. From green paper (cardboard will not work!), cut out a strip 21x2.5 cm.

Step 5. Twist one corner of your strip diagonally, then lightly go over the entire strip with a glue stick (see photo) and finally roll the entire strip into a thin tube.

When you're finished it will look something like this:

Step 6. Now it's time to roll the bud and glue it to the stem. To do this, take the bud blank (a strip with curls) again and lubricate its base from the wrong side with glue.

Step 7. Hurray, your first paper flower is almost ready, all that remains is to add leaves to the stem. To do this, cut out a piece of green paper about 2.5 x 8 cm and fold it lengthwise into an accordion about 1 cm wide.

Assemble the accordion and, stepping back about 1.5 cm from the bottom edge, give it a leaf shape using scissors.

When unfolded, your workpiece should have 3-4 leaves and look something like the photo.

Step 8. Apply glue to the bottom of the leaves and place its corner about 5 cm below the bud and at an angle, as shown in the photo below. Next, wrap the workpiece tightly around the stem.


Well, that's all, the hyacinth is ready! Repeat the process using different shades of paper to make a paper flower bouquet.


DIY paper flower bouquet
This master class will come in handy when you need to make flowers with your own hands super-quickly, easily, on a budget and in large quantities.

To work you will need:
How to make paper roses:
Step 1. Cut out a square piece of paper approximately 12x12cm.
Step 2: Draw a circle on your square and then draw a spiral inside it. It doesn’t have to be perfect for the roses to have texture. If you wish, you can make it completely wavy, then the rose will have pronounced petals.
Step 3: Cut out your circle, then cut along the spiral line. As a result, you will get something like a spring.

Step 4: Take the outer end of your “spring”, roll it into a log (loosely), then begin to twist the entire ribbon around it. Hold the flower from below to prevent the paper from unraveling.
Step 5. When you reach the base (the inside of the blank), glue the bud to it with enough glue. Voila, the first flower is ready!
Step 6. If desired, the rose can be supplemented with leaves. They are cut out into any shape and glued.
Step 7. If you want to make a bouquet, then glue the buds onto skewers or a newspaper/paper tube. It is advisable to wrap the stems in green paper tape.

Here are a few more ideas for making flowers with your own hands, which you can implement with the help of our master class.

Wedding garland of flowers made of colored paper and book pages


Making an accent in your home, decorating a souvenir package, or complementing a gift with a unique bouquet - this is now available to everyone. It only takes a little effort to get the desired result.
How to make beautiful flowers from paper? – about this below the article. In it you will find several detailed master classes.
Recently, floral arrangements made of paper have become an alternative: both in the design of halls and souvenirs.

Try making these simple but beautiful flowers yourself. Detailed instructions and diagram are located below.
To work you will need:
Manufacturing process:
There is another interesting option for simple but lush paper flowers.
They are made using the quilling type.
What you need for work:
Step-by-step instruction:

Here's how to make a bouquet of paper flowers very simply and effectively.
Huge buds allow you to create a unique interior for celebrations. Thanks to them, you can accent or highlight a place for a photo shoot.
Large flowers can be grouped into arches, various compositions on the ceiling or wall. Making such a decoration will be quite simple.
Materials for work:
How to make a paper rose?

These roses can be made as a souvenir or decoration for a photo shoot.
To make beautiful buds, you can choose one of the instructions presented below. Small or huge flowers can be made in a few hours.
Wonderful lush peonies or a pink bouquet will be a wonderful addition to your interior or souvenir.
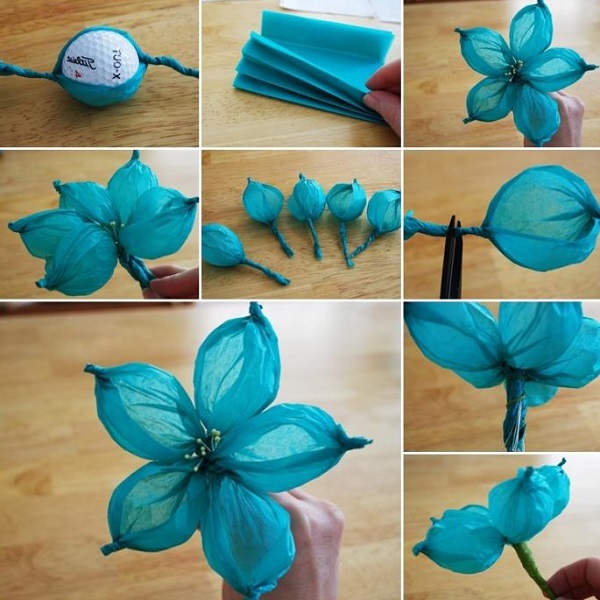
These wonderful blue flowers can be made from crepe paper with your own hands if you follow the step-by-step diagram in the picture.
You can use crumpled paper to create beautiful bouquets, such as a composition of crocuses.
To work you will need:
Composition making process:
Decorating souvenirs makes every giver think about how to decorate the packaging in an interesting and original way.
A simple ribbon bow is a thing of the past, replaced by paper flower arrangements.

Even handmade flowers from cardboard will allow even a little person to create unique gifts for friends or family.
What is required for labor?
How to make small decorative flowers?
These are the interesting master classes with step-by-step instructions for your attention that were selected and presented in this article. Imagine, create - everything will work out!
What winter holidays would be complete without a mountain of tangerines and a couple of juicy...

Amethyst is a quartz mineral with a deep purple-pink color. He...

You can make an imitation of stained glass without using glass, i.e. from colored paper...