Compatibility of Snake and Monkey according to the eastern horoscope does not promise a happy...


Greetings, friends!
As you know, friends, I am not a supporter of overpaying and I believe that even the most desperate handymen can easily install a lock or latch on their own!
I will show the whole process using the example of MDF doors, which are the most fragile and delicate (and cheap:).
It is necessary to start installing the latch only after and, and of course after.
Necessary tool
As you can see, the tool is quite simple and should be present in almost every handyman! So, if everything is available, then you can get started!!!
The first step is to decide at what height our castle will be. The standard recommended height is 965mm, but I usually make the top edge of the lock 1005mm. The difference is insignificant, but it seems to me that it is more convenient.
IT IS IMPORTANT TO KNOW!
When marking the lock, you should not go too far beyond the recommended dimensions, since MDF doors have a special additional beam for installing a lock. And if you deviate too much from the norm, you can ruin the door :(
After marking the height of the lock, we beat off the top edge of the lock with coal.
We attach the latch to the side of the door so that its upper part coincides with the mark and place a mark in the place where the handles will be attached.

Next, use a drill bit to drill a through hole.

At first I tried to drill with a screwdriver, but it turned out that it was a little weak and I had to resort to a drill.
IT IS IMPORTANT TO KNOW!
Friends, when you drill a hole for inserting locks into an interior door, under no circumstances press on the drill or crown (if you are installing a knob handle). The thing is that if you press hard, you risk tearing out a piece of the door on the exit side of the drill, so you need to drill slowly, adjusting the pressure.

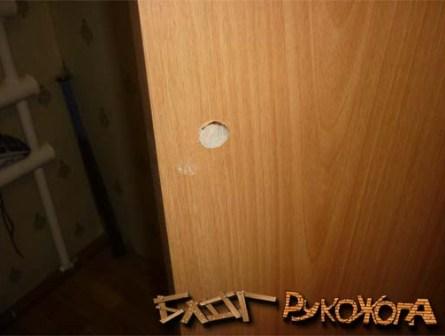
In the next photo you can see that the drilled hole is a little small for the lock.

Use a chisel to widen the hole so as not to split the door. Slowly tapping with a hammer, we achieve the desired size.

We work hard and voila...

I am satisfied with the result - the lock moves freely to the end.

Having fixed the lock (you can immediately put it on the screws), you need to use a sharp wallpaper knife to very carefully trace the contour of the lock. If in doubt, you can simply use a well-sharpened pencil. The point of this whole operation is to recess the lock flush with the surface of the door as accurately as possible.

Friends, if you get a little hands-on, it’s okay. With each door there will be more and more experience! After you have outlined the outline, you need to use a chisel to select a piece of wood to the depth of the castle. When the lock is flush, it can be attached with self-tapping screws.

IT IS IMPORTANT TO KNOW!
When working with a chisel, always hold it as shown in the picture above. If you turn the chisel over, then when you hit the hammer you will probably select more material, which, of course, can be corrected by adding all sorts of wood chips, but this is already “jamming”, and we can’t “do that”!
Now you can proceed to installing the handles. By the way, the guide for door handles should be mounted with the groove down.

By the way, a few words about the castle. I used a EURO lock.

Not the most expensive, but not the cheapest either. As a result, the plastic latch did not work even for one day - it slammed shut and left my wife and my youngest locked. I had to climb into their room through the window (luckily it was a private house) and open the latch. The next day I purchased PALLIDUM locks - no problems.
We put the door handles on the guides and use a screwdriver to screw each one onto three self-tapping screws.

As we remember, the guide is installed with the groove down. This was done so that the pin that directly holds the handle itself would secure it well.
 Door handles are installed.

We screw decorative rings onto them and move on to inserting the striker plate.
We close the door and make marks at the point of contact between the lock tongue and the door frame.

We attach the striker plate and trace it just like the latch itself. Here I used a pencil.

We repeat all operations:
And here is the result.

We fasten the bar and the lock is ready.

When closing/opening the lock, the door should close easily. If, when opening another door, a draft is created and the door seems to vibrate in the groove, then you need to tighten the tongue, which is located in the striker.

Well, that's all, friends. I hope I was able to answer the question: “How to fit a lock into an interior door.”
Now you can begin installing the slopes and the final step is installing the casings.
Thank you for your attention!
To prevent strong drafts from wandering around the apartment, and also simply so that a person can always have the opportunity to “isolate” his own space for a while for proper rest, the right solution would be to install locks on. This is not that difficult to do if you have the right tools and basic skills in working with them.
In this publication we’ll talk about how to insert a lock into an interior door yourself, without calling a locksmith. Different models of locking devices will be considered, which, by the way, may also make it possible to decide on the choice of the most suitable model.
The most popular for interior doors are, perhaps, simple latch locks with handles located on both sides. However, there are various life situations in which it becomes necessary to install more reliable locking devices in the door leaf. Therefore, further we will consider various options from which you can choose a suitable model.
So, today you can find the following types of locks on sale:
To have an idea of the above-mentioned structures, it is worth considering them in more detail. And it’s probably necessary to start with the simplest of them.
An espagnolette is the simplest device for closing doors. Most often it is installed in the toilet or bathroom. This lock is easy to install and operate, therefore, despite its primitiveness, it is still in great demand among consumers.

The convenience of this device is that even a child can handle its operation. Espagnols can be installed either on one side of the door (from the inside of the room - so that you can close it), or on both sides - so that the door does not slam in drafts.
A latch is a simple device that allows you to lock a room from the inside. This lock is a crossbar (plate or rod), which progressively moves from left to right by turning a special handle.

The latch can be called the simplest device after the latch. There are different models of bolts - most of them are simply fixed to the surface of the door leaf. But there are also designs that cut into the end of the door.
Latches can also be installed on the front door as an auxiliary locking device.
The rim lock is simple in design and installation, so the demand for such products does not fall. However, these models are rarely installed on interior doors - more often they are used as a second (third) lock at the entrance to the apartment. However, this locking device is also suitable for, for example, a communal apartment, when several families live in different rooms.

Modern overhead models are equipped with an aesthetic body, so they can even become a decorative element of interior design. In addition, they are easy to use. The lock does not require a complicated mortise - it is installed on the door leaf from the closing side, and for the key cylinder it is enough to drill only one through hole of the required diameter. Deep cutting of grooves from the end of the door is not expected.
This type of lock has the simplest mechanism and is designed specifically for installation on interior doors. Its design consists of a cylinder, a metal or plastic tongue and handles with which the tongue is controlled.

The lock is simple and reliable to use and can have a variety of designs, so it can be chosen for any door style. The disadvantage of this design is that the door from either side can be opened by simply pressing the handle. That is, the tongue cannot be fixed in one position, and in order to be able to “isolate” in the room, another bolt or latch will need to be installed.
The design of this lock can be called very similar to a regular latch, but it differs in that it is equipped with a latch that blocks the door from opening. This type of locks is divided into push-button and lever versions. Lever, I must say, is more practical and reliable. A push-button lock is no less reliable, but if a draft occurs, the door may accidentally lock if it slams hard. True, as a rule, the possibility of emergency opening is provided from the outside, just in case.

A lock equipped with a lock has a number of advantages - easy installation, simple design and a wide range of models. It is the best option for interior doors, as it allows you to close the room if there is a need for privacy.
When purchasing such a product, you should check that the tongue moves smoothly and that it returns inside the door when the handle is turned. If the tongue does not go completely into the door leaf, it means that the lock spring is not working well enough.
In some cases, for example, if two families live in an apartment, a lock is required for interior doors, which can be locked with a key if necessary. For this purpose, a mortise model of a locking device equipped with a key cylinder is suitable. In appearance, it resembles a lock for entrance doors and has the same, but simpler and less resistant to breaking mechanism.

Lock cylinders for indoor use can be of two types - “key-turner” and “key-key”. In the first case, upon entering the room, you do not have to insert a key into the cylinder to close it - you just need to turn the turntable.
This type of lock, thanks to its simple design, is quite reliable and durable.

The lever lock also belongs to the category of mortise devices; it is distinguished by its reliability and high degree of protection. This version of the locking device is used for both entrance and interior doors. To fix the latch tongue, these models use lever plates with grooves of different shapes. Each lever has a specific groove marked on the key. The lock can only be opened if the plates are in the correct position, clearing the passage for the movement of the bolt. Such locks on internal doors are often installed in office buildings; they are used extremely rarely in residential premises.
The disadvantages of mortise locks include the relative complexity of installation, as well as the dependence of the choice of device on the thickness of the door, since for it you will have to select a deep and rather high groove from the end in the door leaf.
It must be said that few people are familiar with such a mechanism as a magnetic lock. Meanwhile, it is very well suited for closing bedrooms and children's rooms, as it operates almost silently.

The operating principle of magnetic locks can be compared to magnets installed on cabinet doors. The device consists of two magnetic or magnetic and steel pads, one of which is fixed to the door frame, the other is mounted in the door leaf. When closing the door, the distance between the magnets shortens and they attract each other, holding the leaf in the door frame until the lock is unlocked.
The mechanism opens by turning the handle or even simply by pressing on the door with force. When the canvas is opened, the distance between the magnets naturally increases, so their interaction stops.
Thanks to their simple design, magnetic locks are durable and easy to use.
The advantages of these types of structures include the following:
There are several types of magnetic devices - these are passive, electromagnetic and equipped with a crossbar.


This type of magnetic locks is highly reliable, which is why it is popular among consumers.

The design of the lock includes its magnetic part and a strike plate. When locked, the supplied power generates a high-intensity electromagnetic field and the door cannot be opened. To open, a special key, card or pressing a button interrupts the power supply to the electromagnet coil for a certain time - the field disappears, the blade is not attracted to the strike plate.
The lock is characterized by silent operation and reliability in the presence of an uninterruptible power supply. The disadvantages of these models include their high cost and impressive size. And, by and large, for interior doors this still looks like overkill.
Naturally, if you decide to install the lock yourself, you will have to prepare some tools, a list of which is given below:
This section will discuss the installation of a latch lock, since it is the most common option used in interior doors. Following the step-by-step instructions, installing a lock in the door leaf will not be difficult for most owners. There is no need to rush - special attention is paid to the accuracy of the markings, otherwise it may happen that the mechanism simply will not work.
The easiest way to install a lock is on a wooden door. It is more difficult if the canvas is made of MDF board. Natural wood, unlike other materials based on it, is easier to drill and does not crumble, maintaining its given shape. If the door is made of MDF, and there is no experience in installing locks, then for a guaranteed result it is better to entrust the installation of the locking device to a specialist.

All necessary parts must be included in the purchased mechanism - this must be checked upon purchase.
In this case, the kit includes the following parts:

The table below shows the step-by-step process of installing such a model:
| Illustration | Brief description of the operations performed |
|---|---|
 | The first thing you need to do is to very carefully study the instructions for assembling and installing the lock provided by its manufacturer. As a rule, such a “manual” is included in the general delivery package. |
 | Next, you should remove all the parts of the mechanism from the packaging and try to assemble them into a common structure - while “on your knees,” that is, outside the door. This will help you fully understand the principle of connection and interaction of all parts and assemblies of the lock. In addition, all the tools necessary for the job are immediately prepared. This illustration shows a chisel and a feather drill. |
 | As mentioned above, you will need a core drill to drill a through hole in the door to install the cylinder mechanism. This hole will then be covered with handle rosettes. |
 | To be sure that the crown will fit the chosen model, you should attach it to one of the parts of the lock. It is clear that the window cut out with a crown should be smaller than the diameter of the rosettes, but sufficient for the mechanism and for the screws holding the two halves of the lock together. |
 | The next stage is marking the door, and it should be approached as responsibly as possible. If an error can be made with the installation height of the lock - this will not affect its performance, then the determination of the point - the center (axis) of installation of the cylinder mechanism must be determined extremely accurately. As a rule, locks on interior doors are installed at a height of 900÷1100 mm from the bottom of the door. First of all, this distance is laid down on the canvas and marked with a pencil. It is at this horizontal level that all other marking points will be applied. |
 | From the intended point, strictly horizontal lines are drawn along the front surface of the door leaf and along its end. To do this, you should definitely use a square, since even a very small mistake can lead to the impossibility of subsequent installation of the lock or the need to cut the holes wider, which can ultimately ruin the appearance of the door. Next, the required distance (specified in the installation instructions) is set off from the corner on this marked line and the center of the through round window is marked to accommodate the lock mechanism. Sometimes the task is simplified - the manufacturer includes a full-size paper template with the instructions, and it is difficult to make a mistake with the center of this window. |
 | On the end side, on the drawn line, it is necessary to find and accurately mark the middle of the door thickness. |
 | The next step is to drill a hole at the end of the blade using a drill and a 22 mm wide drill bit to the depth specified in the instructions. This depth should allow the cylindrical body of the latch to freely enter the resulting socket, taking into account the fact that the mounting plate of this mechanism will be recessed into the wood at the end of the door. It is very important to carry out drilling, holding the drill exactly at a right angle relative to the plane of the end, so that the socket does not move to the side. |
 | Next, a core drill is clamped into the drill chuck. The center of the drill is set at the point marked on the main plane of the blade, and drilling begins. The process continues until the center drill of the crown comes out of the back of the door. |
 | Then the drill is installed in the hole formed on the other side of the door, and drilling is done again. At this stage, work is carried out until a through hole is formed in the canvas. If you try to drill such a round through window in one pass, only on one side, then the teeth of the bit at the exit from the wood will almost certainly break the upper layers of wood fibers, and the edges will be extremely sloppy. |
 | Now you can try on the latch. It is inserted into the end groove - it must fit completely into it. If the latch does not go all the way in, the hole will have to be deepened somewhat. In a large through opening, drilled with a crown, approximately in its center, there should be a figured socket through which the pin of the cylinder mechanism will pass. |
 | The latch mounting panel is outlined on the end of the door with a pencil. This must be done quite accurately, since along this contour a portion of the wood will be selected for the thickness of the panel. At the same stage, the points of the holes for the fasteners are marked, and after removing the latch, holes are drilled at these points with a thin drill (3 mm). |
 | Next, take a chisel 20 mm wide and a hammer. the cutting edge is set on the contour line and the chisel is lightly struck with a hammer so that the blade enters the wood to a depth approximately equal to the thickness of the metal plate. The chisel is then pressed against the top edge of the intended area at an angle, beveled edge down. And again the teardrop is hit with a hammer, since it is necessary to remove the wood from the area previously marked with a chisel. If necessary, the finished groove is slightly modified with a chisel by hand. You should end up with a recess that is even in shape and depth for the latch mounting plate. |
 | Once the wood has been selected, the latch is placed back into the groove. The plate should be flush with the end of the blade. If it protrudes even a little, you will have to remove the latch and modify the groove. |
 | Next, the latch is fixed in the groove with self-tapping screws, which are screwed in with a screwdriver. |
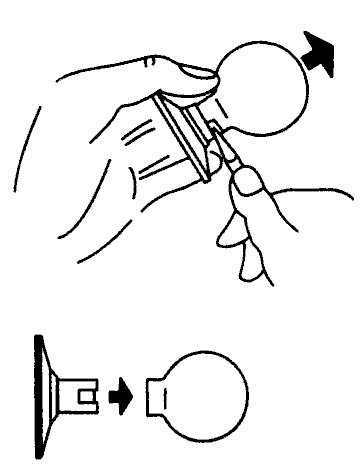
 | Now it's time to install the handle on one side. First, a non-separable one is installed, that is, the one into which the screws that tighten both sides of the lock will be screwed. The cylinder of this handle is inserted into a hole drilled with a core drill. In this case, the central core of the cylinder mechanism must pass through the figured socket of the latch mechanism |
 | Then the second handle with a cylinder mechanism is taken. It, together with the socket, should be removed from the cylinder using the special key included in the lock kit. The key is used to press the stopper through the existing hole - and the handle and socket are removed. |
 | Under the rosette there is a round plate with holes for installing screws that will fasten the two handles together. |
 | A cylinder mechanism with a mounting round plate is installed on the other side of the door in a drilled groove so that the mounting holes coincide with the holes in the latch and the threaded sockets located on the handle installed on the other side of the leaf. |
 | Next, a screw is screwed into each of the holes, which should tighten the handles on both sides of the door together. In this case, the rotary core of the lock must finally kinematically connect both handles and the latch mechanism. |
 | Then, a socket with a handle is put on the cylinder, which is simply pressed and latched - without using a key. |
 | Now you can test the installed lock. If the handles are pressed easily, without jamming, and the latch moves simultaneously with their pressing, and after removing the force, the handle independently returns to its original position, then the installation has been completed correctly. |
 | All that remains is to install the lock mate in the door frame. To do this, follow these steps: - the lock handle is pressed and the door is closed into the door frame; - lines are drawn on the jamb that determine the height of the latch itself and the plate through which it moves; - the distance from the corner of the door end to the sharp edge of the latch is measured; - the same distance is placed on the door frame - this will be the beginning of the groove into which the latch will fit; - according to the marks made on the jamb, it is necessary to attach the mating part of the lock and circle it with a pencil; - after this, using a feather drill, the central zone of the lock’s counterpart is drilled, and then holes for fastening are drilled with a thin drill; - from the jamb, in the same way as earlier from the end of the door, at the intended boundary it is necessary to select the top layer of wood to the thickness of the plate of the counter part, since it must stand flush with the surface of the jamb; - the plate is installed in place and screwed with self-tapping screws. |
At this point, the installation of the latch lock is completed, and the door can be closed. If all measurements were made correctly, the canvas will easily be locked in the closed position.
Installing a mortise lock is a somewhat more complicated task, since it involves a fairly large amount of wood sampling when forming a socket for the locking device body. However, you can handle such an installation yourself, you just have to be patient and do everything very carefully.

The table below will discuss the stages of “installation” work for installing a mortise lock:
| Illustration | Brief description of the operation performed |
|---|---|
 | When creating a nest for a mortise lock, work also begins with marking. The installation height of the lock from the floor can vary from 900 to 1100 mm. In the example shown, the lock handle will be at a height of 1050 mm from the bottom edge of the door. The markings are made with a pencil using a construction corner. On the end side of the door, the upper and lower boundaries of the lock, as well as the front fastening plate, are marked. In addition, on the main plane of the door, dots mark the locations of future holes for installing a handle and a turnkey cylinder. A full-size paper template may also be included with the lock. |
 | Cutting a deep groove will be much easier if you select the main part of the wood with several large diameter holes located in a row. Therefore, next, the middle of the door thickness is determined in the place where the lock will cut in, a vertical center line is drawn, and the centers of the holes that will be drilled are outlined. The depth of the holes should be 5 mm greater than the depth of the lock body. To ensure that the depth of all holes is the same, a special limiter is installed on the drill. If it is not there, then you can simply make a mark on the drill using a strip of electrical tape. The diameter of the drill should ideally be equal to the width of the lock body. |
 | Holes are drilled at the designated points, starting from the top, using an electric drill. They should be located as close to each other as possible. When working, the drill must be installed and held at a right angle to the end of the door, otherwise the lock may become crooked. It is especially important to drill the top and bottom holes evenly, which, in principle, form the edges of the top and bottom of the selected space and set the overall shape of the nest. |
 | After the main part of the wood from the groove has been selected using a drill, the internal space must be leveled using a chisel and hammer, removing any remaining wood. Having aligned the walls, top and bottom of the groove, a lock is installed in it for fitting. If necessary, the space of the seat is cleaned and leveled, also using a chisel and hammer. |
 | Once the lock slot is ready, you need to mark the location for the front mounting plate. It is marked with a pencil, then the outline is filled with a chisel to the depth of the thickness of the strip, since it must be embedded flush with the surface of the end of the door. Then, a layer of wood is selected from the marked area - this will become a seat for the plate. After this, you should install a lock in the socket and determine the points at the end where small-diameter holes for fasteners will be drilled. The holes are drilled after the lock is removed from the groove. |
 | The next step is to make holes for the door handle and the turnkey mechanism. The centers of these holes should once again be specified using a square and checked against the dimensions indicated in the diagram. For drilling, a feather drill of the required width corresponding to the size of the cylinder mechanism of the handle and the diameter of the cylinder is used. Drilling is done from one side of the door until the end of the drill appears on the other side. This will be the point at which it will be necessary to install a drill for counter-drilling the blade, before joining the channels |
 | Now all that remains is to assemble and secure all the parts of the lock into a single structure. To do this, a lock is installed in the socket and fixed from the end side to the door with two self-tapping screws. Further. The cylinder is inserted into its place and secured using the screw included with the lock. After this, you need to insert the key and check the operation of the lock by turning it to close and open. If the lock works without failures, then you can attach the handles. To do this, a core having a quadrangular cross-section is inserted into the hole, then handles are put on it on both sides, which are fixed to the door leaf with self-tapping screws. |
 | The final stage is the installation of the strike plate on the door frame. To make it easier to determine the location of drilling holes for the bolt and latch tongue, their ends are thickly lubricated with toothpaste. Then close the door and turn the key to release the bolt - the location of the lock parts will be imprinted on the door frame. Based on these marks, you need to drill holes using a feather drill, or select a socket using a chisel and hammer. The depth of the grooves should be 5 mm greater than the length of the bolt and tongue. Since the striker must be installed flush with the surface of the box, it is applied to the installation site, outlined with a pencil, and from this place wood is selected to the thickness of the plate. Once the seat is ready, the strike plate is installed in place and secured with self-tapping screws. Next, final tests of the mechanism can be performed. If the bolt and tongue move smoothly when turning the handle and key, do not rest against the bar or rub against it, the lock is ready for use. |
Read the step-by-step instructions from our new article on our portal.
* * * * * * * *
Having carefully studied the installation instructions for various locks, which are most often installed on interior doors, you can cope with this task yourself without much difficulty. That is, the money that could have gone to the master will remain in the family
At the end of the publication, there is a video in which the master shows in great detail and clearly his work on installing an interior lock.
After purchasing and installing interior doors, the question of installing fittings arises. This problem can be solved by calling a specialist or studying the technology of cutting in a locking device and performing the procedure on their own.
Experts recommend purchasing and installing interior doors with a built-in lock. In this case, there is no need to install it. But they cost much more. In order to minimize financial resources, some craftsmen try to attach locks themselves.
These instructions will help you install a lock on an interior door. Beginners who have not yet encountered such a process will be able to understand all the nuances and perform the procedure for installing the mechanism with their own hands.
Before choosing a castle, you need to familiarize yourself with its types. When purchasing a mechanism, special attention is paid to color and design. The fittings should be in harmony with the interior and match the furniture.
Some craftsmen choose a ready-made door handle with a lock, others choose a lock without a handle and then install it on the inside and outside.
Mortise locking mechanisms are divided into the following types:
Before purchasing, the accessories are carefully inspected and examined for defects.
After the door handles and locks have been selected, before installation they study their features, the procedure for carrying out the work, prepare the necessary tools for embedding the lock, and make markings.
At the preparatory stage, the following points are taken into account:
How to properly embed a lock is described in the lock installation instructions, which are included with the hardware.

Door handles with a locking device can be assembled and installed in the door yourself using the following set of tools:

Do-it-yourself insertion of an interior door lock must be carried out in accordance with the installation norms and rules. At the preparatory stage, the canvas is always marked, which consists of the following:
The installation of the locking mechanism depends on the accuracy of the markings.
Installing a lock on an interior door is as follows:
To complete the work, you can insert a round or L-shaped door handle into the holes and install the door leaf into the hinges.

The handle with a lock for interior doors is attached after marking and drilling holes for the latch at the end of the door leaf and the handle on the surface.
The work process for embedding a lock with a handle is as follows:
During installation, you must make sure that the latch tongue remains recessed into its body.
An electromagnetic mortise lock for a wooden door is installed as follows:
When working, follow all the steps for inserting a lock and the installation manual.
Requires a minimum set of tools:
So, let's start cutting into the lock.


Drill a hole in the center with a 4mm drill bit.

We place the lock flush with the door and make a mark according to the fact

We drill through the hole with the same drill, maintaining a right angle.

Using a 50 mm crown we make a cut on one side of the door.
Attention!
Your specific case may require a different size crown.

Let's finish on the other side.


We take a self-tapping screw of a suitable length, close the door along the door frame and through the 50 mm hole, insert the self-tapping screw into the remaining 4 mm hole and, using pressure, make a mark in the door frame.


Using a 23mm feather drill, we cut a hole at the mark to a depth sufficient for the lock latch to engage.

Using the same drill, we drill a hole for the lock along the mark.

We insert the lock and make a mark with a sharp pencil to recess it into the door leaf.


Using a chisel, we make notches strictly according to the marks and make a selection so that the lock sits in the pocket, then we fasten it with self-tapping screws.

We begin to assemble the lock, insert the outer part into the grooves (as a rule, it does not require disassembly).


Then carefully remove the decorative “cup” sitting in the grooves, then press the latch and remove the handle.


We connect the two sides with screws.

We insert the handle so that the latch operates.

Snap the decorative “cup” into place.


We attach the striker, make a mark, use a chisel to remove the excess and screw it on.

Done!))) A correctly embedded lock closes freely by pressing the door leaf until it slams.
1.Marking the door

Apply markings on the door leaf to install the knob (lock) according to the template. Recommended distance from the floor is 965 mm.
2.Marking holes

After you have made the markings, drill two holes: 50 mm in diameter for the knob (lock) handle and 23 mm in diameter for the latch mechanism.
H. Installing the strike plate

Install the strike plate at the same height as the latch so that the additional tongue of the latch remains recessed into the body of the latch when closing, which is an obstacle when pressing.
4 Disassembling the knob (lock)
To disassemble the knob (lock), use a special key to press the spring-loaded latch at the place where the handle is attached and remove it.
5. Latch length adjustment

6. Installing the latch

Install the latch into the groove of the door (make sure that the bevel of the latch is directed towards closing the door). Install the cover plate with the rod so that the rod and coupling sleeves fit exactly into the grooves on the latch body.
7. Installing the knob trim(castle)

First, slide the inner jujube trim plate onto the rod and secure it with screws (or screws). Then screw on the outer part of the trim.
8. Handle installation

Install the handle so that the groove on the rod coincides with the groove on the knob handle, press the handle until it “clicks.”
9. Rearranging the mechanism in the halyard handle

For models of latches with a halyard handle (versions 01 and 03), installation is also provided for both left and right doors. To do this, it is necessary to remove the cylinder mechanism and the fixing mechanism from the handle body and swap them (according to the figure), in accordance with the side of the door opening.
Installation procedure.
1. Determine the installation location of the knob and apply markings, following the template and installation instructions.

2. Using the installed latch body, mark the installation location of the strike plate on the door jamb and select a groove for the strike plate.
3.Install the strike plate and secure it with screws.
4. Alternately check the operation of the knob from outside and inside the room.
5. For models of latches with a halyard handle (versions 01.03), installation on left and right doors is also provided. To do this, it is necessary to swap the locking mechanism and the cylinder mechanism from the handle body.

As you can see, fitting a lock into a door is not such a difficult task, the main thing is not to rush.
—————————————-
Photographer: Vladislav Mazitov
The reliability of metal doors will never replace the beauty and environmental friendliness of their wooden counterparts. However, such products have their own characteristics, and they also relate to the installation of locks. You can even do this kind of work with your own hands if you know how to do it.

Inserting locks into wooden panels requires the use of:

The selection of the lock plays a very important role. In this case, they focus on the size of the structure. An excessively thick lock will not allow the required mass of wood to be provided on the left and right sides. If there is less than 1 cm of wood left there, the door will not be strong enough. A kick is enough for the entire canvas to crack.

Additionally, it is necessary to control the depth of the lock entry. Some of the canvases are thicker on the outside than in the center. The glazed part can also present difficulties. If you have to prepare a place to insert a large lock, it is easy to deform the material. As for fasteners, they must be selected in accordance with the instructions from the manufacturers.

Often you can't get by with a drill or angle grinder. The optimal device for inserting locks into doors made of solid wood or other wooden materials is considered to be a manual router. Although "almost ready" lock mortise kits are relatively inexpensive, professionals advise choosing each tool individually. This allows you to finally be sure of its quality (both when purchasing and when renting). In addition, this solution helps to save money.

If the product is selected properly, you need to correctly embed the lock into the wooden door. They start by applying the lock to one of the sides, in the right place. Using a construction marker, trace the part - using the drawn lines you can finally determine whether the choice of lock and location is correct. If there are no errors, the position is marked on the end face of the door. When the set contains a special paper template, use it.
Take a feather drill, the thickness of which is chosen very carefully. Then, using a screwdriver, passes are prepared to form a vertical line. The outer edges of the holes must be mutually adjacent. If the required drill is not available, smaller drills can be used. They arrange holes in 2 or 3 tiers.

Now you need to take a chisel, which allows you to remove excess wood. A slotted screwdriver is a substitute for a chisel, but such a tool is not convenient enough. Then they insert the product into the prepared place, trace the end strip with a marker and pull out the closing part. Strictly along the line, 0.2 - 0.3 cm of wood is removed. This will allow the lock to be deepened into the door, placing the bar flush.

This technique is used when installing locks to prevent the strip from hitting the surface of the box. If the gap is large enough, you can skip this stage. The next step is to mark on both sides the space for the key hole or for the lock cylinder. If the structure has handles, marks are also made for them. The lock is pulled out and drilled in the marked places.

Now you can insert the lock back and evaluate the correctness of the prepared holes. The larva (if any) is fixed with a screw from the end. Next, insert the square base from the handles, screw the handles themselves. The key is inserted and the lock is immediately checked. Opening and closing should be easy, without the key rubbing against the wood.

Then it’s time to mark the holes for the crossbar elements and the striker plate. The easiest way to do this is to do it yourself using paste. When the door is fully open, the lock is locked and the end of one or more bolts is lubricated. Next, you need to open the bolt, close the door, and lock the lock. Normally it will not lock, however, paste tracks will appear. They will indicate how and where to make the holes for the counter block. They are drilled immediately to eliminate mistakes.

A counter plate is applied to the holes and a mark is made along its contour with a pencil. Using a chisel, remove part of the wood. This will deepen the bar. All that remains is to secure it. Now the door is closed and the lock is checked again. When everything works fine, decorative overlays are installed. That's it, you can enjoy excellent results. There is nothing complicated about it.
To ensure an exact match between the actual and planned depth of the holes, electrical tape is glued to the drill. You can select the remaining wood with a chisel. Later the walls are leveled with a chisel. We must strive for groove sizes that will allow the inserted lock to coincide with the end face of the door. This means that when hollowing out a socket, periodic fittings of the product are required.

To make a shaped groove for a keyhole, you need to use a hacksaw. The edges are brought to an ideal shape using sandpaper. Since they are not comfortable enough to work by hand, you can attach the paper to a screwdriver. It is best to use a thin drill bit. The installation of the strike plate for mortise and overlay mechanisms is no different.

It is recommended to choose a drill bit that is thicker than the lock. Usually several notches are drilled so that the web filler can be removed. When drilling is completed, use a chisel and chisel to remove excess debris. But all these rules may turn out to be useless if one more principle is not followed: as soon as something is measured with a tape measure, you must immediately mark it with a pencil or marker. Relying on your memory in such a responsible matter is extremely frivolous.

This manipulation definitely deserves a separate analysis. Experts recommend playing it safe and sealing the end of the door, as well as its surface, with masking tape. This should be done to prevent possible damage. As practice has shown, it is much more convenient to apply individual marks on the tape. And it will also serve as a clearly visible boundary, which you absolutely must not cross during work.

It is recommended to install lock handles at a height of strictly 100 cm above the floor. This type of lock must always be supplied with a template. Therefore, there are no special problems in marking. Since cylinder mechanisms can be different in size, you need to look for a suitable crown only after purchasing the lock. When using a template, do this:

In these places a hole is drilled in the plane of the door. It is not advisable to pierce through it. As soon as the guide drill comes out from the opposite side, they pause and start drilling with a crown from the inside out. This approach is truly professional and avoids splitting the wood. Then it's time to prepare the holes for the latch.

At the same time, they work in the marked places with a 2.3 cm drill bit. You need to go to the previous hole. The drill is held strictly at an angle of 90 degrees to the door. Otherwise, there is a high risk that the latch will jam and work poorly. When the passage is ready, the latch is inserted into it.

Now you need to align the location of the element with respect to the edge. A pencil will help you trace the outline of the decorative frame. Next, removing the latch with a utility knife, cut the canvas along this line. When this work is completed, using a chisel, select a secret cavity, which should be slightly smaller in size than the latch frame. You cannot clean out the cavity initially; this may result in damage to the film with a chisel.

Having prepared the groove, return the product to its place, tightening the latch with self-tapping screws. The holes for them are drilled in advance with a 2 mm drill. If the part moves slowly, you need to trim the contacting places. The assembly of the handle itself is done according to the manufacturer's instructions. It is imperative to pay attention to how the tongue is positioned (normally it always faces inside the room).
To learn how to embed a lock into a wooden door with your own hands, watch the following video.
 How to fit a lock into a wooden door is a difficult and important question. You can’t do this without certain construction skills and a careful approach to business. Sometimes we are faced with the problem of self-repair, and when we need to change the door lock, we often take on this simple task ourselves. With some skill and basic knowledge, we can complete this task easily.
 Before choosing a lock, you should determine which mechanism will be best suited for a particular door. Having chosen the right one, it’s time to start preparing for the actual installation of the lock. If you need to insert the mechanism into the door yourself, prepare the following tools:
Before you start cutting in the lock, you will need to determine its future location. You should not rely on your eye - you should circle the location of the future hole with a pencil. You will also need to choose an approximate height that will be convenient for you and the rest of the family. The most optimal height is considered to be 1 meter from the floor. After you determine  location and the required height for the future handle, you will need to cut a hole for it.
Cutting out the space for the door handle is a major step towards successfully installing the lock itself. In order to place the door latch in the right place and without chipping or jamming, follow these steps:
 When you have decided on the location, the next step is to drill the hole itself in the end of the interior door. There are different types of locks: with and without built-in handles. You can cut the hole with a router, but it is important to ensure that the drill is in the center of the end part. It is necessary to complete the cutting of the place for the lock with another recess from the end of the door so that the visible part is recessed, otherwise the mechanism will touch the jamb. Having prepared the front side of the door, it was time to start working on the inside. It is not recommended to drill through the door, as chips may form. You need to drill into wood carefully and slowly, clearly following the contour marks you made.
According to the method of installation, locks can be overhead, mortise and padded. The most practical type is considered to be mortise. You can put such a lock with a key on an interior door  well and latch.
For the front door, a lock with a deadbolt is most suitable, as it will allow you to lock it from the inside. Basically it is a metal rod that prevents unwanted elements from being contained in an object. To ensure that cutting the hole does not cause inconvenience, the drill must be held level.
An overhead lock is installed when the old lock has become unusable and the door simply does not close.
By following these simple rules, you can easily cope with the task of installing a door lock. It should be remembered that installation requires some care and attention. Properly installing a lock will allow your door to last for many years, or you can give a second life to an old door by just changing the door lock.
Installing doors in a doorway is a task that requires prudence and accuracy. But this door will not close without a lock. It cannot be opened without a handle. Embedding a lock into a wooden door means protecting yourself and your property from strangers, keeping you warm in the winter, and making the interior more interesting.

Mortise lock in a wooden door
How to install a lock on a wooden front door? To do this, you first need to prepare. Wood is a material that can be easily finished, but it requires experience working with wood flooring. You should know the type of wood and its abilities. To install a lock in a door you need:


This is what a mortise door lock looks like
The work involves stages that should be performed sequentially. If you don't follow certain, simple rules, the lock may stay in place, but will it work?
Before choosing a lock, you need to answer questions about the lock:


Mortise lock option
Door locks are divided into types - rack, code, electronic, cylinder, lever. The rack lock is a simple design that is easy to break, you can break it yourself, and has a primitive appearance.
Cylinder lock – inside the lock there are cylinders located at different heights. If the element is not in its position, the lock will not open.
When forced, the lock is drilled or the core is knocked out. But, manufacturers add special elements to the lock material, against which the drill bit breaks. Such a lock has a long service life, is easy to change, and may have special plates, which are also a barrier for a burglar.

This is what a cylinder mortise lock looks like

The lever lock is a reliable design. This type of lock is practically unbreakable. To open without a key, a professional uses 2 master keys. Inside the lock there are levers that are driven by a key. 
Combination lock – to open the lock, you must enter a specific code. This lock cannot be installed on a wooden door. 
Electronic lock – does not have a keyhole. It has one button to open, which is located indoors. To open without a button, there must be a signal from the side. 
Once the issue of the lock has been resolved, you can begin to assemble the necessary tools.
In order to embed the lock into the door, you will need to make a groove for the lock. After which the mechanism is installed. To do this you will need a cutting tool:


Set of tools for inserting a lock into a door
All these tools will be needed to install a mortise lock. To install the overlay mechanism, you will need a slightly different set of tools.
Before embedding the lock into the door, you need to take measurements and markings to cut out the groove. The instructions for the purchased lock indicate the different distance at which the handle should be located from the lock. This distance ranges from 95 to 100 cm, but many craftsmen correlate this distance with the height of the people living in the apartment or house. The taller the person, the higher the castle should be.
Making a groove for a lock:

Distance to the lock from the floor

Marking the holes for the lock plate
After the work has been done, you need to carefully and carefully try on everything. If there are any errors, they should be carefully removed with a sharp knife or chisel. So that nothing interferes with the insertion of the locking mechanism into the door.
When working with a drill, you need to keep the tool level. If the work is done at a degree of inclination, then the groove may be uneven.
When the groove is ready, you can begin marking for the cylinder and handle. When applying the lock to the hole, you should clearly mark the location for the keyhole. To do this you should use a ruler. 

Making holes for the cylinder and handle
Using drills of the required size, you need to make holes for the cylinder and handle. When trying on the lock, you need to do everything so that the cylinder stands level. To do this you need to use a chisel or file.
Now we need to adjust the operation of the lock, and also make holes for the latch.
Consistently carrying out the work:


Scheme for making a hole in the jamb for the larva

The work is finished. If the stages were followed, installing a mortise lock should be easy to close and open.
Watch the video for instructions on how to properly install or replace the lock.
No less famous is the overhead lock. Its installation differs from a mortise one, but it also requires accuracy, step-by-step actions and precision in work.
The set of tools is standard for cutting locks into a wooden door.
This locking mechanism is installed from inside a room, apartment or house.
So:


The process of attaching the rim lock mechanism

The process of installing the plank with screws
Thus, you can install locks on entrance and interior doors with your own hands.

Ready mounted rim lock
More modest locks can be installed on interior wooden doors, which are mounted directly into the handle itself.
The question of how to embed a lock into a wooden door yourself often arises before those who decide all repair issues themselves. In other life situations, such skills and knowledge can also be useful, especially since there is nothing complicated about it.
First, you need to figure out which doors you need to install a lock on and, in accordance with their type, choose a suitable locking device.
Wooden doors are intended for:
By appearance and type of operation:
Have you decided on the type of door? Let's start choosing the optimal lock.
There are three types of locks:

A rim lock on a wooden door leaf does not look aesthetically pleasing.

You cannot find a better mortise-type locking device for both interior and entrance doors. Installing such a lock will require some knowledge and skill, but, if desired, anyone can do it. When purchasing, you should take into account the direction of opening the door and, accordingly, choose a “right or left” lock. There are also universal models suitable for any occasion.
For an interior door, it is better to choose a lock without a keyhole with a magnetic or halyard latch, when turning the handle activates the mechanism.

For sliding types of doors, there are models of locks on sale with a special hook that secures the doors in the closed state.
For entrance doors, locks with bolts are chosen; this is the most reliable type against burglary.
The first step in preparing for work is selecting the tools that will be needed to install a mortise lock. You will need:

It should be noted that it is necessary to drill 1-3 mm larger than the size of the lock body, since it must fit into the drilled groove without obstacles, and the front plate must be placed completely in it.
During drilling, the drill must be held level, perpendicular to the blade, so that there is no displacement of the groove being drilled.
Is the groove ready? Proceed to installing the locking device.
Now you need to adjust the operation of the lock and drill holes for the bolts and latch.

Everything is ready - you have managed to install a mortise lock on a wooden door. Use the handle and key to make sure everything is level and the lock is comfortable to use. Using a chisel, correct the location of the lock parts if you made a mistake somewhere.
Compatibility of Snake and Monkey according to the eastern horoscope does not promise a happy...

“The Prayer of Detention” (see the text at the end of the article) has become...

Eastern Zodiac – Your zodiac sign gives you a certain...