Compatibility of Snake and Monkey according to the eastern horoscope does not promise a happy...


One of the important auxiliary elements of furniture are furniture handles for cabinets, which give not only an attractive appearance, but also increase its functionality during operation. The technology for the production of furniture accessories is constantly evolving, responding to modern trends; products are made of high quality, reliable and easy to use.
An important piece of furniture, thanks to its diversity, gives a certain character to the object. Thanks to the development of modern technologies, furniture handles are being improved, acquiring new shapes and sizes. Today, on the market, the main accessory of any cabinet facade is presented in different colors, textures, styles, and processing technologies.
A useful detail, as a component of complementing wardrobe doors and cabinets, combines practicality and unique design, they have both strict lines and classic shapes. A necessary attribute of furniture of various designs, made of high-quality material, making it easier to open, it retains its original appearance for a long time. There is a wide range of handle collections on the furniture fittings market, among which the most popular are:
Currently, furniture fittings are not limited in color and are presented in different colors, the most popular of which are gold, bronze, steel, and chrome. Natural shades and simplicity of patterns are the hallmark of modern furniture handles, which, without merging with the overall color of the furniture, emphasize its uniqueness and value.
It is important to know that the color of the fittings is selected to be a tone lighter or darker than the main color of the furniture. When choosing them, it is important to know their purpose and the location of the cabinet.


Sinks


Today, global and domestic companies for the production of cabinet door handles, taking into account modern consumer tastes, produce the most important element of furniture decor from ceramics, porcelain, plastic, glass, wood, and metal. Recently, stainless steel, aluminum, and acrylic have become widely used to create facial accessories.
The manufacturer, taking into account the diversity of the material, has expanded the range of additional surface treatment of products, using different types of coatings, these are:
The most common coating method is electroplating. To apply a thin layer of metal to the surface of a product, chromium, nickel, copper, zinc, and silver are usually used. Galvanic coatings are characterized by high density and uniform thickness, and are easily applied to fittings with very complex topography. By improving the decorative characteristics of the processed product, the coating gives the decorative elements strength, wear resistance, and increases resistance to corrosion.

Metal

Wooden

Glass
Along with the unusual design and style of a furniture accessory, its ergonomics are of no small importance. Products should not only aesthetically match the furniture, but also be as comfortable as possible when grasped by hand, and be safe when performing an action. Their shape, size, location and method of fastening determine how easily the furniture doors will open, maintain strength and performance under the influence of long-term use.
Today, the most affordable, popular and practical accessories are bracket handles, presented in the form of curved arcs or metal strips in the shape of the letter “P”. Fitting elements of flat or semicircular shapes are an ideal addition to any cabinet, especially for fans of minimalism. Products with a simple design are as comfortable and functional as possible when used.
Button handles, which are a cup-shaped design with a flat decorative disk at the end of the product body, also do not lose their relevance. A furniture accessory of different shapes and designs suitable for both classic and modern cabinets. Simple connection to the surface makes them convenient to use, where touching the furniture facade is excluded. The handles of this collection are compact, always look stylish, and guarantee reliability and safety.
Leading companies producing furniture fittings, expanding their collections of handles, are offering a new trend in fittings: long handle ratings. Simple, strict lines, functionality, practicality, and durability of the products are ideal for the latest examples of modern furniture.


Furniture fittings, integrating into any cabinet facade, are easily installed, taking a convenient position. Considering that the product is located on the front side and has different design features, there are different installation methods. The handles can be attached using glue, screws and screws. The most reliable, durable connection is a metal rod with an external thread and a cap, which minimizes deformation of the surface of the cabinets.
Fastening steel screw, installed at one or two points on the back or front side of the door, diameter 0.4 cm, minimum value 6.4 cm, pitch 3.2 cm. Suitable for any front fittings, except handles “brackets”, “profile” – handles”, which are fixed with a self-tapping screw on the outside of the furniture. Fasteners are installed using a regular screwdriver or screwdriver.
Installation of a furniture accessory involves the use of carpentry and acrylic glue. This method is used extremely rarely, only in cases where the front fittings are presented only as decoration, where the cabinet and handles are made of wood and plastic. Such fixation is not reliable, has low adhesive strength, and cannot be reinstalled if broken.
When installing yourself, in order not to damage the coating of the furniture façade, it is not recommended to turn the handles during fastening. Small products fastened with one screw are not practical to use.

Railing

Furniture handles are not simple elements of furniture fittings that solve two problems: aesthetics and functionality. The range of products in style, color, shape is quite extensive; to choose the right manufacturer of furniture handles, you need to know that:
When choosing a product, it is important to pay attention to the size of the handle based on the center-to-center distance, which is the space between two fastening screws, so that during installation it does not extend beyond the surface of the door, is proportional, and is integrally combined with the design of the cabinet. Decorative elements must have a smooth surface, be free of chips, roughness and be in the same color.
Despite the high technical characteristics of furniture front elements, dust accumulates on their surface over time. Proper, regular care of them will extend their service life and preserve their appearance for a long time. So, if the product becomes loose, it needs to be tightened. To remove dirt, use a special spray cleaner that does not contain an abrasive substance.
After wet treatment, the fittings should be wiped dry with a soft cloth or sponge. It is not recommended to clean it with metal brushes, cleaning agents, or washing powders, so as not to spoil the coating of the handle or lead to their complete replacement. If the structure after cleaning has a dull appearance, then you can use a special polish or furniture wax to shine it.


The traditional arrangement of handles on cabinets (facades) of floor-standing kitchen cabinets is strictly in the middle. However, I believe that need to approach outside the box.
When the cabinets are the same in height, then - yes, of course - in the middle. After all, in this case the distances between the handles will be the same.
But if the cabinets have different heights? After all, different sizes are a necessity. The top one is often made shallow - for knives, spoons, forks, etc. For any oversized items. And if you place the handles in the middle, then the distance between the handles will not be the same. What should you give preference to: equal distances from the handle to the edge of the drawer or equal distances between the handles?
Ill. 1 shows two options for a set of cabinets. In the first (lilac color) the top drawer is very shallow, in the second (burgundy) it is one and a half times deeper. In each of these cases of facades, in turn, there are two ways of arranging handles. The image on the right - in each pair, reflects the standard: in the middle, and the image on the left - when handles are located at the same distance from each other. In the latter case, the arrangement is based on the two upper drawers, in which the handles are also in the middle. A on the lower facade the handle is located at the same distance as the middle one from the top. Also here the distances from the handles to the edges of the facade are the same. Having a picture of various options, we can make a comparison and draw conclusions.
Ill.1. Options for placing handles on cabinets with different heights of facades
I think you will agree that a non-standard approach will look no worse than a traditional one. Apparently, any of the presented methods has a right to exist. - A matter of taste. But we also need to take into account the height of the cabinets in other cabinets. After all, the whole kitchen should look harmonious. The only thing is clear: only when the fronts of the cabinets on different cabinets are of unequal height, the handles in the middle - there are no options.
There is only one general conclusion. The option of arranging handles on floor kitchen cabinets can be successful not only “in the middle”. And when designing a kitchen, you need to try both, and not blindly follow existing stereotypes. The unequivocal opinion of furniture makers on this matter – “in the middle of the facade” – can be explained simply: it’s easier for them, less labor intensive.
I used a non-standard method in my kitchen. And I decided to place the handles at equal distances from each other. At the same time, the set of drawers on different cabinets is the same.
Actually, this “non-standard” approach was born at the design development stage.

Ill.2. Floor cabinet handles with non-standard arrangement
This article will help you figure out how to embed a latch handle into a door leaf. By adhering to the work algorithm described in the article, you can easily perform this operation yourself, with a minimum set of tools and very quickly.
No door can do without a handle. The most popular type of handle for interior doors today is the latch handle.
The design of handles of this type is such that, regardless of appearance, they are all installed in the door leaf in the same way. This article will tell you how to do it yourself.
The handle itself, that is, the visible part of it, can look completely different. So:

or like this:

All these latch handles essentially consist of two parts - the handle itself:

and the latch mechanism:

Both parts of the latch handle require separate insertion into the door leaf.
Latch handles come without a latch - a door with such handles cannot be locked from the inside, with a latch - an additional turning mechanism installed on the handle and allowing you to lock the door from the inside, and a key - on one side of the handle there is a key holder that allows you to lock the door from the outside, on the other there is a latch . All handles have design differences that do not in any way affect the insertion process. The internal part (latch) is also the same, that is, it cuts in the same way for all types of latch handles.
So let's get started.
To make the process of installing the latch handle as easy as possible, you will need:
The crown and drill can be purchased separately, or in the form of a set, which is called “Kit for inserting latch handles.”
1. We begin the installation process by marking the door leaf for drilling. The marking diagram, as a rule, comes complete with the handle.

If there is no diagram, you can mark it manually. To do this, place a mark at a distance of 60 mm from the edge of the door.

2. On the side edge of the door, along the center marking line, mark the center for drilling.

3. Using a chisel, hollow out a three-millimeter recess under the face plate of the latch. It makes sense to first mark the center with an awl so that you don’t have to mark it again.

4. Using a crown with a diameter of 50 mm, drill a through hole. It is better to do this on both sides of the door to avoid damage to the door covering at the exit of the crown when drilling.


5. As a result, we get the following hole:

6. Move on to the side edge. Using a wood drill with a diameter of 23-24 mm, drill a hole for the latch into the marked center. You shouldn’t make it too deep, otherwise you risk drilling through the door all the way to the panel.

7. We now have two holes.

8. Install a latch in the side hole and screw it with self-tapping screws.

9. Remove the upper part of the handle. To do this, look for a hole on the side.

Using the included key or any other thin flat object:

press the tongue inside the hole:

and remove the handle itself:

10. Remove the decorative trim and thereby open the mounting holes.

11. Insert the outer half of the handle.

12. Insert the inner half. We tighten both with the screws included in the kit.

13. Put on the decorative trim and handle body. Don't forget to press the inner tongue with the key.

14. With the door closed, mark the place where the door jamb latch tongue touches, and then hollow out a recess for the latch tongue in the resulting location.

15. Insert a decorative plastic pocket.

16. Screw on the metal plate.

17. The handle is installed.

If you don’t have a drill, then all the holes can be made using a suitable chisel, however, in this case, installing the handle will require more serious repair and construction skills and may turn out to be an overwhelming task for an untrained person.
If you order a kitchen set, you can immediately make additives for handles on kitchen facades in production. This is convenient if, for example, you plan to install button handles, which are small in size and attached to the facade with one screw. But with handles-rails or handles-brackets it is a little more complicated; the fact is that on a sketch of a kitchen set it is not always possible to determine the best position of the handles, vertical or horizontal. If the handles in the kitchen are placed incorrectly, blocking of neighboring cabinets or cabinets may occur, this especially often happens on corner kitchen units. In such cases, they apply it to the facade and try to open it, but no obstacles should arise. Depending on the situation, handles on kitchen fronts can be arranged: all vertically, all horizontally, or combined.
If you decide install handles on facades yourself, you will need the following handle installation tools: square, pencil or marker with a thin rod, screwdriver, 4 mm or 5 mm drill and screwdriver.
For more accurate and quick installation of handles on kitchen facades, you can use a furniture handle template. The template is a rectangular piece of thick paper or plywood with holes for fasteners. Thanks to the furniture handle template, you can quickly mark holes for fastening handles on all facades. Regardless of how you are going to make markings, with or without a template, the first thing you need to do is measure the center distance on the handle, although the manufacturer usually indicates it. Based on existing standards, the center-to-center distance of handles, this is the distance from one fastening to another, is always a multiple of 32. The most common center-to-center dimensions of furniture handles are 96 mm, 128 mm.

When furniture handles are placed horizontally in the kitchen, it is necessary to measure the width of the facade itself, subtract the center-to-center distance of the handle from this width, and divide the remaining value by two. For example, a front with a width of 600 mm and a handle with a center distance of 128 mm. We get: 600-128 = 472/2 = 236 mm. It is necessary to leave 236 mm on both sides to the center distances of the handle. At the bottom you can leave a distance equal to the width of the ruler, this is approximately 20 mm - 30 mm, depending on the type of square. To do this, you need to align the outer edge of the ruler flush with the horizontal edge of the facade.
When placing furniture handles vertically in the kitchen, you can also use the width of the ruler. Place the outer edge of the ruler flush with the vertical edge of the façade. In this case, you can immediately use a ruler to measure the distance from the horizontal edge of the facade, for example, 20 mm. If you install handle rails vertically on kitchen facades, consider the distance from the horizontal edge of the facade to the edge of the handle, and not to the first mounting hole, as with the handle bracket.

For a wooden kitchen facade or MDF facade, use sharp step or core drills with a diameter of 4 mm or 5 mm. A drill with a diameter of 5 mm is used in the case when the shape of the handle during installation can block the hole, this gives more accurate positioning of the handle, the bolt can be slightly shifted in the hole. But there are forms of handles that do not cover the hole; in this case, it is better to use a 4 mm or 3.5 mm diameter.
If the hole in the facade for attaching the handle is quite deep that it is impossible to tighten the handle, pour sawdust into this hole so that the furniture handle can be tightened.
In order to make holes in glass at home, use special diamond-coated drills. Also holes in glass Can do using molten tin, this will help prevent accidental cracks from appearing on the glass. This method requires tin used for soldering and sand. Markings are made on the glass and sand is poured. Make a funnel of the required diameter in the sand and pour molten tin into this funnel. After a few seconds, when the solder has cooled, it can be removed along with the sand and glass tube.
It should also not be forgotten that when installing handles to glass facades It is necessary to install an additional washer on the bolt side. The washer will protect the glass from cracking and prevent the fastening from becoming loose.
Do the drawers of your furniture set have no fittings? A strict and minimalist look is great for maintaining the overall style and aesthetic appeal of the interior, but such elements lead to some problems (for example, brittle nails).
If you are tired of such furniture, then in today’s story we have prepared for you an easy and uncomplicated DIY project that will tell you how to transform your chest of drawers and give it greater functionality.
Here's what you'll need to get started...

Note: This guide applies to wooden crates. For other materials, you may need to use specialized devices or techniques.
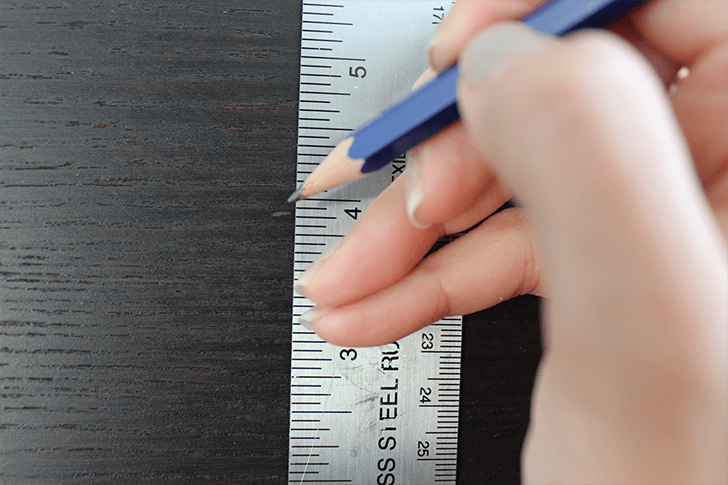
Before you begin, cover the floor surface of your apartment with sheets of paper, film or newspaper to protect it from falling objects, dust and debris. Then, using a ruler, measure the point where you want the hardware to be mounted.
You can install one model in the center of the drawer or two symmetrical objects on the sides. When marking, carefully check the results obtained to avoid mistakes in the next step.
Make all necessary notes
After marking where the screws will be installed in the future, form a pilot hole by hammering a nail into the surface of the designer furniture. It should go deep enough that you use the tail end of the hammer to remove it. Such a hole prevents the possibility of wood splitting and greatly facilitates the drilling process.
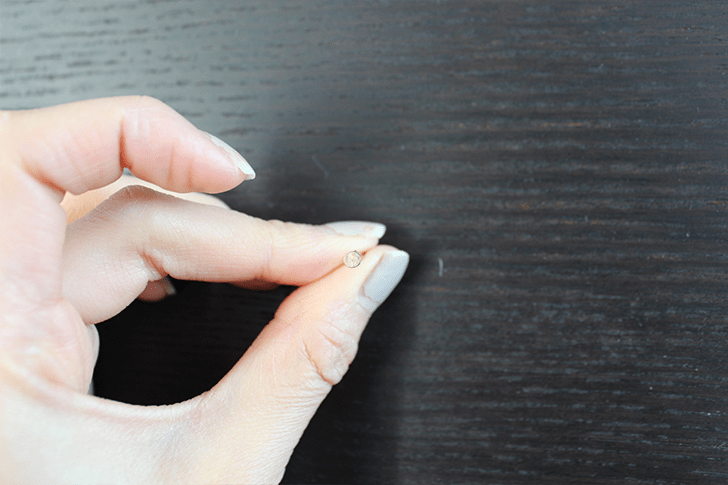
Use nails and screws for fastening
Next, place the drill bit into the drill. If you are not sure about the size, try comparing them with the hole in the drawer and choosing the appropriate option. Remember that if you drill a hole too small, you can always make it bigger. Repeat the procedure as needed if your handle has multiple fasteners.

Drill a hole using a special tool

Clean the surface of the headset from any dust and dirt.

Use screws to securely and securely fasten the product.
Clean up the trash and admire your magnificent handmade creation!

We presented to your attention a unique and interesting master class that showed you how you can easily add handles to a chest of drawers and inexpensively update your closet or furniture. Did you like the decor ideas and valuable recommendations presented in the article? Then share your opinion with us in the comments below...
Compatibility of Snake and Monkey according to the eastern horoscope does not promise a happy...

“The Prayer of Detention” (see the text at the end of the article) has become...

Eastern Zodiac – Your zodiac sign gives you a certain...