Filchakova Tatyana Among the branches a spider made himself a net. The web is so...


A wonderful summer has flashed by. The longest and most beloved holidays have come to an end - it’s time for the children to get ready for school and kindergarten. How will the school year start? Will he be successful? We can only guess about this for now. One thing is certain - already in September, during labor lessons, children from 3 to 9 years old will create like real artists and a little bit like sculptors. They will make unusual crafts with their own hands from chestnuts, acorns, cones, leaves and plasticine. The most original works on the theme “Autumn” will traditionally take part in competitions, and soon their winners will receive long-awaited prizes. Your child can also be among the winners: look at our photos and videos with him - they will help you come up with your own original craft and surprise all your classmates.
Chestnuts are a ready-made building material. Even a kid can make the cutest craft on the theme “Autumn” with his own hands (but not without your help). Ideas for such creations are often born spontaneously: for some, round chestnuts resemble the head of a future doll or a toy turtle; to others they appear to be the beads of a giantess. When going to the park with your child, take a cloth bag with you. Collect chestnuts, branches, colorful leaves in it - all this will be useful in your work.
You can make various funny figures and crafts on the theme “Autumn” from chestnuts. Here they are:
The simplest animal that can be quickly created by adding a little plasticine to natural materials is the Australian Platypus. The work will take no more than half an hour, and the resulting cheerful animal will delight your child and you for a very long time.
To work you will need:

When creating a Platypus from plasticine and chestnuts, start by making the animal's legs, tail and nose.

In kindergartens, teachers devote a lot of time to children's creativity. They make crafts with them, using not only traditional plasticine, but also natural materials, including chestnuts. Doing something new with your own hands is always incredibly interesting!

Thousands of crafts and souvenirs can be made from chestnuts, including the Pig from the popular game AngryBirds. The main thing here is to find light green plasticine.
So, before you start, prepare the following:

You can make a few more pigs in the same way. At the end of the work, you can coat the craft with colorless varnish - the product will not get dirty and will “live” for many years!
Chestnuts and acorns can be wonderful materials for making crafts. Once you make them at home, you can always bring them to school for a competition. Well, winning it is as easy as shelling pears - carefully study the master classes, watch the videos and photos presented on our website.
The most versatile natural material, suitable for creating a variety of crafts, always remains acorns and chestnuts. Over time, they do not deteriorate, dry out or rot, maintaining their natural appearance for many years. By combining chestnuts and acorns and joining them with plasticine, you can prepare many works for a school competition.
Mushrooms

Cats

Fairytale animals

Bouquets

In the senior group of kindergarten, children aged 5-6 years can already come up with original crafts themselves. Children are always interested in autumn themes, especially since the nature of September-October generously shares chestnuts, pine cones, and acorns with them. Preschoolers use them to make funny animals, unusual bouquets, panels, gifts for parents and beautiful installations.
In the senior group of kindergarten, the child already knows how to handle plasticine and natural materials. Having started making crafts with their mother or teacher at the age of 3, by the age of 5-6, boys and girls themselves are happy to invite adults to participate in their creativity - to create wonderful animals, beetles, houses, people, robots from pine cones and chestnuts... In the photo you will see the most unusual creations of children.
Hedgehog family

Mushroom glade

Funny squirrel

Curious owls

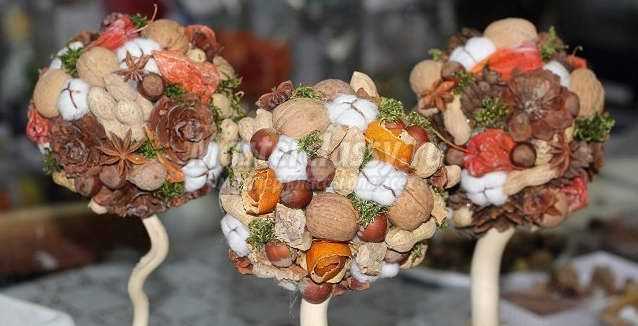
Not only children are interested in crafts made from natural materials. Adults, especially people inclined to creativity, create the most unusual products. They make wonderful, unique gifts for a birthday or other occasion. Using autumn leaves and chestnuts, you can collect a large bouquet or make a topiary (mini-tree) that is fashionable today.


To make a topiary, you must first prepare a flower pot with filler (gypsum, cement) instead of soil, glue, a trunk for the future tree (a thick branch), newspapers. You should start working with the base of the craft - a ball of crumpled newspaper, wrapped in thread and holding its shape well thanks to glue. It needs to be attached to the trunk and immersed in a pot filled with liquid gypsum. After the filler has dried, begin decorating your topiary with leaves and chestnuts.

Children 3 years old can already do the simplest crafts. Of course, parents should help them with this by telling the kids how to properly fasten chestnuts with plasticine and how to decorate the finished product. The easiest animals for three-year-olds to hatch are hedgehogs, kittens, bear cubs and other animals.

In the younger group of kindergarten, teachers are already making the simplest crafts from plasticine with children aged 3-4 years. These can be giant caterpillars, birds, fish and mice. If a child ever asks you to explain to him how a simple chestnut can “turn” into a funny little man or mouse, show him examples of works made from natural materials.


September-October is the best time for walking with children. Be sure to go with your child to the park and forest: there you will find real treasures - natural materials for future unusual crafts from chestnuts, acorns, leaves and cones. Children begin to make such products on their own only at school. In kindergarten, teachers help children 3-5 years old to cope with this work. We are sure that the photos and videos of original DIY crafts on the theme “Autumn” posted on this page will give them many interesting ideas.
Do chestnut crafts The kids really like it not only because of the end result. The fact is that chestnuts are so beautiful, so pleasant to the touch, that working with them turns into a complete pleasure. At the same time, when creating with your child, be sure to praise all his successful actions, do not focus on failures, pay attention to the fact that with the help of the most trivial movements you will together create figures of various animals, insects, birds and people. Creating crafts using such natural ingredients will allow the little one to see the beauty of nature and the unlimited possibilities that handmade products open up.
To make a funny figurine, you will need to stock up on a couple of fruits, the smaller one will play the role of the bunny’s head, the larger one will be the body. Please note that the natural material must be fresh - only then will it be easily pierced with toothpicks (they will be needed for attaching other parts). However, you can also take dried specimens, only then mom or dad will have to make holes in them with an awl.
Insert a couple of toothpicks into the head and cover them with plasticine to create ears. This measure is necessary, because bulky plasticine parts themselves adhere very poorly to slippery chestnut surfaces. But you can try to attach plasticine eyes, a mouth and a nose - they should not fall off.
Now move on to the body - you will need to attach the tail and legs to it. Then, using half a toothpick, connect the head and body of the animal together. As a decoration, you can also fashion a bright plasticine carrot for the bunny.
Make it and the child will also certainly like it.
Birdie
Attach the eyes and beak to the chestnut head of the bird, you can make them multi-colored - it will be more fun. Just like the bunny, you will need to attach the bird's head to the body - to do this, make holes with an awl in the corresponding places of the chestnut fruit. Connect them together using toothpicks. Now all that remains is to make the wings.
If you wish, you can build a nest for the bird from plastic mass and dry twigs.

To make a horse, select large fruits. Punch 5 holes in the chestnut body with an awl - for the legs and for the head. Sharpen 4 matches and insert them into the leg holes. Do the same manipulations with the match for the head, only it will need to be sharpened on both sides. Connect the chestnut head and body.
The mane and tail are very easy to make - for this you will need to use woolen threads. Then they will need to be attached to the craft using an awl.

A funny bug will come not only from the fruit, you will also need its peel. Secure the torso and head with plastic mass. Make the eyes using any suitable natural material, for example, cereal. Legs and antennae are leaf petioles or thin twigs.
The kids will really like it - we bring to your attention a master class with step-by-step photographs.

The spider is also very easy to make, only to make it you will need to take a couple of fruits. Connect them in a way that is already familiar to you. Cut eight plastic tubes (you can simply halve 4 pieces), place them on plasticine - these will be the legs. Don't forget to sculpt the eyes.

Collect fresh fruits; they should all be approximately the same size. Drill them through with a thick awl, but if you have a small drill, then by all means use it to make your work easier. You can also make holes with a nail, hammering it in with a hammer.
Prepare small wooden beads in advance. You don’t have to do anything with them - the wooden texture looks unusually harmonious, or you can paint them with acrylic paints in the color you want. After the acrylic has completely dried, assemble the beads onto the fishing line, alternating “beads”. Make a knot in the fishing line and melt the ends so they won’t come undone. You can hang such decorative beads on the wall to create an autumn atmosphere in your apartment.
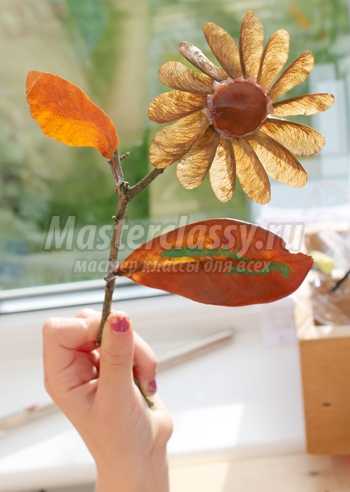
One more children's crafts made from chestnuts and other natural material can be called a delightful flower. The center chestnut will need to be attached to a branch of the desired shape using a glue gun. Using the same tool, attach maple winged petals to the center, and leaves made from beautiful autumn leaves to the stem branch.
Place a small one on a large chestnut - you get the body and head of a bear. You can use the same technique with toothpicks, or you can use some kind of plastic mass. Glue ears to the head - a couple of tiny chestnuts.

The eyes for the bear can be made using two miniature buttons; roll up the nose and mouth using plasticine of the appropriate color. Attach to your head. Making the paws for the bear cub is very simple - place it on four acorn pads, fixing it with plasticine.
If you want to do crafts made from pine cones and chestnuts, then you can plant the bear cub near a large pine cone, previously painted with green gouache. It turns out that the bear is sitting under the Christmas tree.
Cow
Our main material will act as the body of the cow. For the legs, roll four brown or black plasticine sausages and place the body on them. A thin plasticine sausage attached to the back will imitate a ponytail. Attach a small plasticine cake, cut with scissors, to its tip.
The cow's head is an acorn without a cap, and should have a pair of sculpted white horns, eyes and ears attached to it. In place of the nose there should be a molded cake - make two holes in it - nostrils. Attach the head to the body.
Mushrooms
Line the lid of the box with autumn leaves - they can be either fresh or dried. Using plasticine, connect together an acorn without a plus and a chestnut. Select acorns that are not very thick so that the result looks like a mushroom. Glue several blades of grass or leaves onto the surface of the hat, this will help achieve greater realism. Place the man-made mushrooms on the clearing cover - and there you have it craft made from chestnuts "Autumn", extraordinarily beautiful and harmonious. Or you can place a cute animal in such a mushroom clearing.

Make others too, because this time of year gives us a sea of natural materials and ideas for turning them into real handmade masterpieces.
The base of the craft will be a ball. You can use a variety of materials, for example, you can purchase a foam base at a handmade goods store. We suggest you use the most ordinary newspapers - they are very inexpensive and are perfect for your workflow. Wrinkle them well and tie them with thread so that the newspapers keep their shape. The base ball should be dense, which is why it should be lightly coated with glue. You can also disguise protruding pieces of newspaper sheets.
Place the base on the trunk. For the trunk, you can take either a wooden or a plastic stick. First make a cut on the ball, through which you pierce the stick.
Select a pot for your topiary in advance - it can be ceramic, glass or plastic. Pour the gypsum solution inside, and when it begins to slowly harden, insert the stem into the pot. Provide support for the topiary until the plaster has completely hardened. If the container does not look very attractive, then now is the time to decorate it, for example, by wrapping it with twine or gluing rhinestones.
Sort out your natural “treasury” by selecting flat chestnuts, which will be easier to glue and will also look more attractive on the crown. Starting from the top, begin gluing using a glue gun. Try, of course, to glue the fruits as close to each other as possible, but if there are gaps, don’t be upset, because they can later be disguised with sisal or tea. Tea or sisal are also useful for decorating plaster in a pot.

Would you like to make your topiary fragrant? Then in between you can place crushed vanilla sticks, aromatic spices or herbs, tea with fruit additives. The fragrant decor may crumble, which is why it needs to be fixed - sprinkle the “tinker” with odorless hairspray.
You can decorate the crown with whatever you want - bows, butterflies, sparkles, decorative ladybugs.
In order for the “lifespan” of topiary to be longer, you need to keep the chestnut fruits in a cool place after picking, this will allow them to dry naturally without undue acceleration.

You can also use woolen spider webs to decorate your interior, especially on Halloween. The craft is so simple that even a three-year-old, under the supervision of an adult, can try to do it. To make it, you should make six holes in a large chestnut tree; insert a thick branch 10 cm long into each hole, placing it on glue for greater reliability. Wait for it to dry.
Tie the end of wool yarn in the color you like to the first stick, then pull the thread through and wrap it around the next stick. Continue to do these actions again and again with all the “rays” of the web. If you want to change the color, simply cut the thread and tie a different color to it. When you finish the web, simply tie the thread to the last stick, leave the end of the required length for hanging and cut it off.

As you can see, there are many ideas that allow you to decorate your home and create a great mood, do it quickly crafts from chestnut cones, various animals and autumn compositions, because the service life of such natural material is not very long.
Expecting the summer holidays to end soon, most children are a little upset: their fun adventures will have to be postponed until the end of the school year. However, autumn is just as beautiful as the warmest time of the year. She presents the children with her amazing gifts - you just need to be able to see them! Go to the forest in September-October, stop for a minute and look around. What beauty surrounds you! A carpet of colorful leaves, under which you can see acorns and cones that have fallen from oak trees, pines and spruces, fancy snags, and dry branches. All this can be taken home to later make toy animals, New Year's souvenirs, gifts for friends. However, the simplest and most interesting are crafts made from chestnuts. Even children 3-5 years old, not to mention older preschoolers and schoolchildren, can easily make them with their own hands. After reviewing the photos and videos, and studying the master classes presented below, they can easily make unusual products from natural materials, take part in competitions for the same works, and perhaps win them, winning an unexpected prize!
You can make many children's crafts with your own hands from chestnuts. The most important thing in making such works is to give free rein to your imagination, and our photos and videos with examples of children's works will help with this!
It is impossible to list everything that you can make with your own hands from the most ordinary chestnuts. These include vases with leaves and dried flowers on the theme “Autumn”, and cartoon characters, and houses for dolls. The little ones can make hedgehogs, caterpillars, and Smeshariki. Look at the finished children's works and you will have your own ideas for crafts made from these natural materials.
Older children can make such a topiary - the trunk of the miracle tree will be a thin birch or aspen log, and the crown will be chestnuts, leaves and flowers.

Ideas for crafts made from chestnuts should be suggested to children by adults. They can also help them make hedgehogs, bunnies, squirrels and other cute animals.

To make a Hedgehog from chestnuts, you will need other materials. The teacher will help you find them. She must first show the kindergarten children a master class, explaining in detail each step.
So take:
Start with the basics of the craft.

The best autumn-themed crafts are made from acorns and chestnuts. These are universal natural materials - they do not deteriorate over time, they are easy to work with even for children who have not yet entered the senior group of kindergarten, and they look great in a home interior.

When making autumn-themed crafts, chestnuts and acorns are often used. This natural material is easy to handle, can be stored for a long time and does not deteriorate if properly processed - preliminary cleaning from dirt, soil, dust and drying. In the photo you see how imagination helped children create amazing crafts from natural materials.
Remembering the ripe, fragrant summer berries, autumn acorns can be turned into strawberries! All you need is paint and a brush!

The “lids” of acorns can easily be used to make a tea set for a doll.

Plant mushrooms from chestnuts and acorns on the moss - such crafts look like real boletus!

And this strange hedgehog has already found fresh mushrooms with acorn legs somewhere and is in a hurry to hide them in a secluded place.

The photo of this excellent children's collection will tell you what kind of crafts a child can make.

In the fall, schools regularly organize competitions for children's crafts made from natural materials. The most creative guys create real works of art from chestnuts and cones - large fir trees, New Year's decorations, flower baskets, home decor, frames for photographs and drawings, etc.


It is not easy to win a school competition for crafts made from natural materials - modern children have a well-developed imagination, most of them are helped by their parents to make works from pine cones and chestnuts. And yet it is possible to get the coveted first place! A great idea is a large wall panel or composition on the theme of Russian folk tales. The larger and more original the finished product, the greater the chance of winning for its author. Pay attention to the photo: when working with natural materials, children additionally use beads, rhinestones, paints, varnishes, and plasticine.

Simple crafts look no worse than the most complex compositions. For example, this hedgehog that looks like a pig looks so cute!

From ordinary fir cones, twine and plastic boxes of Kinder Surprises chocolates you can make wonderful Easter decor!

These crafts have a good chance of winning the children's art competition!


Chestnuts and colorful leaves make the most unusual crafts. Ideas for such work are often shared on the Internet by experienced labor teachers and leaders of children's creativity groups. They publish master classes on making works from natural materials on their websites and blogs, explaining each step with photos or videos.

Summer has flown by, autumn has arrived, and lo and behold, winter will soon come! For her meeting, you can prepare interesting decorations and make home decor. Chestnuts and cones, for example, can make Father Frost and Snow Maiden.
For the craft you will need:


To make a magic tree you will need a lot of decor, but the main decoration of the craft will be the leaves.
The following tools and materials will serve you:

Chestnuts are the most versatile material for crafts. Using it, you can make funny animals, fairy-tale characters, original bouquets, magical trees and much more. Children 3-5 years old use plasticine to hold chestnuts together.
Making handicrafts from chestnuts is a creative process, interesting even for children 3-5 years old. Working with this material and plasticine parts improves fine motor skills and develops imagination.
Even the little ones can easily make this cute hedgehog - you just need to prepare plasticine and Christmas tree or pine needles.

But here is the “chestnut” caterpillar, quickly moving with its forty legs - it is in a hurry to feast on the leaves that have not yet turned yellow.

By making crafts from chestnuts, leaves, cones and acorns, 3-5 year old children attending kindergarten develop fine motor skills. Older children, schoolchildren, can already make large panels and home decor on the theme “Autumn” from these natural materials. You will find examples of such work in the photos and videos in the article.
Chestnut crafts for children are the most popular type of needlework. Chestnuts are a natural and popular material for making various crafts. They are quite easy to work with. Despite the fact that they have a hard shell, it is easily pierced with an awl or needle. This allows you to insert connecting elements such as matches or toothpicks, wire or thread.
In contact with
It is better to wash the collected fruits and wipe them with a towel. In order for the crafts to be stored well and for a long time, it is better to dry them, but for primitive children's products this step is not necessary. Dried chestnuts are more durable and stick together faster, however, they quickly crack and crumble when you try to pierce or cut them.
Topiary is a small, neat, cute tree. To make it, you need to choose fruits that are flatter in shape, so that it is more convenient to glue them to the base.
The word topiary means a craft in the form of a tree of an ideal shape. They also have the following names: “European tree” and “tree of happiness.” Such souvenir trees in pots are very popular and look beautiful in the interior. They are made from a wide variety of materials.
To make a craft in the form of a souvenir tree, you first need to stock up on the following materials:

So, when all the necessary materials for the topiary are prepared, you can begin work:

Now the topiary is ready and you can decorate it. Anything prepared as decoration is suitable for this. These can be small cones, beads, bows, ladybugs and so on.
Tea or sisal can be useful to decorate the plaster in the pot, as well as to fill the voids between the chestnuts. The tree will also look beautiful if you cover its top with silver or golden acrylic paint.
This kind of painstaking work is more suitable for older children. And younger children will have to help.
To make a wonderful house out of chestnuts we will need:
Just like when building a real residential building, young architects need to decide on the size of the chestnut house. The subsequent steps for making a chestnut house are as follows:
You can make a clearing around the house and decorate it.
The easiest way to make such a vase is from two-liter plastic bottles. You will need the following materials for the craft:
Now let's get started:
The vase can be supplemented with any decorative elements, such as small cones, acorns, beads, and so on.
While developing the motor skills of your child’s hands and instilling in him a sense of beauty, try to involve your baby in helping, and in the future, in independently making crafts from natural materials. To make your little one interested in your joint work, invite him to make his favorite animals from early childhood out of chestnuts.
This is a simple craft, which a preschool child can make. You need to prepare:
So let's get started:
The bear can be placed on a piece of cardboard. And we recommend decorating the cardboard as a clearing.
The craft is suitable for preschoolers. Before you start crafting with small children, you first need to make holes in the chestnuts with an awl. The following materials will be required:
The technology for making the craft is as follows:
All that remains is to glue on the eyes and mouth. That's it, the craft is ready.
The turtle is easy to make and looks real. Prepare in advance:
Let's get started with the craft:

This animal looks funny with carrots. It's easy to do. Prepare the following materials:
Stages of our work:

You can insert plasticine carrots into the hare's paws.
Making a monkey is easy. She will need a stick for her to grab onto. To make a monkey, you need to make four parts: the neck, ears, front and back legs. Let's prepare materials:
The sequence of work is as follows:
After all the parts are ready, you need to start assembling.
Then you need to attach a stick to the monkey’s front legs. It will look like she is hanging on a tree branch.
Snails look quite funny and cute. They can be easily made. Materials needed for work:
Sequence of making crafts:
You can paint a spiral on the snail's house.
A caterpillar is an excellent craft option. It turns out to be quite funny and mobile, as it is held together with a strong fishing line. You need to prepare for work:

Let's get started:

 You can glue on ready-made eyes for dolls, which are sold in hobby stores.
The process of making crafts develops creative thinking in children. They quickly become involved in the process, which becomes an educational game for them. After all, making crafts develops a child’s fine motor skills, flexibility and dexterity of the fingers, as well as coordination.
Children can be asked to make a variety of animals and insects, such as a spider, hedgehog, cat, lion, owl, beetle, and so on. You can also make mushrooms, beads, wreaths and even a beautiful chestnut tree with them.
Chestnuts are a good natural material for children's crafts. They are easy and pleasant to work with. A variety of chestnut crafts are quite easy to make with your own hands. You can decorate your home with them. This fruit serves as the basis for a huge number of creative ideas.
Crafts from chestnuts


Chestnut fruits, if you have imagination, plasticine and twigs, make very interesting crafts. They can be done together with children, or just for kids, because there is nothing complicated here. The main thing is to collect them in time in the fall, while they are still soft, and save them for creativity. Picturesque crafts made from chestnuts with your own hands will decorate not only a shelf in a child’s closet, but will also be suitable for exhibitions in a kindergarten or classroom.
Together with your kids you can try to make animals such as a spider, a hedgehog, a bear. Children can easily make a Cheburashka or a caterpillar, and together with their mother it is very easy to build a house or decorate a topiary. You just need to prepare scissors, glue, plasticine, the rest will depend on your skills and imagination.
Caterpillar made of plasticine and chestnuts

You need to take:
several chestnuts, for example 7 pieces
colored plasticine
matches
It's easy to make a funny caterpillar:
We connect even fruits using plasticine; for reliability, you can fasten them with matches
We sculpt eyes, nose and mouth, you can make them in any color
We stick horns from toothpick halves with plasticine balls at the ends into the head
To make the caterpillar even more interesting, you can place it on the leaves and add tree branches to the composition.
Spider made of toothpicks and chestnut

All you need is toothpicks and one large, evenly shaped fruit:
Take 8 toothpicks, break them slightly in the middle and stick them into the body of the spider
Eyes can be made from plasticine
Ant made from straws and chestnuts
You need to prepare:
2 smaller chestnuts for the body and one larger for the head
plasticine
plastic cocktail straws
To make an ant, you need:

Connect the head and body with plasticine, sculpt the eyes and mouth
Cut the straws for the paws, it is better to do this from the bendable side of the straw
Stick them in the torso
The ant turns out even more beautiful if you add small antennae to it and select elongated fruits for the body.
Cheburashka with big chestnut ears

Making Cheburashka is simple, you just need to prepare toothpicks and fruits of different shapes
We connect the stomach, head and ears with halves of toothpicks, make arms and legs
You can use a felt-tip pen to draw eyes and a smile on your face.
Chestnut bear

You need to prepare:
2 chestnuts, more for the stomach, less for the head
brown plasticine for paws
We fasten the head and stomach with plasticine; we also need to make paws and ears from plasticine balls. Add the nose and eyes.
DIY chestnut beads

Little fashionistas will like making such simple beads:
Prepare a strong fishing line of the required length
Make a hole in each small fruit with an awl so that you can thread a fishing line through it
Collect beads, optionally complementing them with colored beads
Vase decorated with chestnuts

You need to make such a vase with adults.
You will need:
many small even fruits of the same size
tall canned fruit tin
glue
paint of any color in a can, you can take gold or silver
The vase is simple to make:
The jar is pasted over the entire length with fruits, you can make the rows even or at a diagonal angle
The resulting voluminous vase dries until the glue hardens
The finished product must be coated with spray paint.
This vase looks good with dried flowers and tree branches.
Flowers of their acorns and chestnuts

You need to prepare:
more acorns for the petals
chestnuts for the flower core
glue
long branches for the stem
Making flowers is easy:
Glue the acorns to the centers using chamomile glue
We stick sticks into the finished flowers
Chestnut tree in the painting
Have to take:

a lot of fruits
glue
cardboard for background
spray paint
The panel is made like this:
Cut out a tree silhouette from cardboard
Glue the fruits onto the cardboard with glue. The larger ones will go to the trunk, and the smaller ones to the branches.
We paint the wood and dry it
Glue the craft to a fabric panel or photo frame
House decorated with chestnut fruits
Anyone can make a house.

You will need:
2 liter juice boxes for the walls of the house
roof box cut at an angle
dry leaves, twigs
scissors, glue
chestnuts
To make a craft house, you need:
glue the boxes, cut out windows and doors in them, glue the roof
cover the roof with leaves, imitating tiles
decorate doors and windows with branches
coat the entire house with glue and attach chestnuts to the walls, imitating stonework
Hedgehog made from a plastic bottle and chestnuts

You will need:
plastic bottle
plasticine to make a hedgehog's face
glue
a lot of chestnut fruits
twigs and leaves for decorating crafts
The hedgehog is made quickly:
We pour dry sand into the bottle for balance and stability.
Coat the lid and the beginning of the bottle with brown plasticine, this will be the face of a hedgehog
We make a black nose and eyes from white plasticine
Glue the oblong chestnut fruits with glue, the larger they are, the fluffier the hedgehog will be
You can paint the tips of the “needles” with white paint
The hedgehog turns out to be very beautiful; to be authentic, you need to decorate it with leaves and berries.
Topiary of flat chestnuts
You need to prepare:
flat-shaped chestnuts - topiary from them turns out more beautiful
pot
a thick branch for the trunk
glue
foam ball for the crown of the topiary, if not, you can make a lump of newspapers and tie them with threads
gypsum
threads, ribbons, moss for decoration
Topiary is done like this:
Stick a branch into a ball of foam or newspaper
Place the branch in a pot without holes, fill it with a mixture of gypsum to fix it
We cover a regular plastic pot with rope or gray twine for beauty.
Glue the fruits to the ball around the entire circumference with a glue gun, trying to leave only small gaps
Decorating the almost finished topiary:
The top of the plaster should be decorated with small pebbles and sealed with pieces of thread
It is recommended to make a bow from a piece of ribbon under the ball; you can decorate the topiary with paper flowers or butterflies
All these crafts will delight you for a long time, reminding you of autumn walks.
Filchakova Tatyana Among the branches a spider made himself a net. The web is so...

A painting without a frame is like an actor without an audience. Both are incomplete. Nothing like that...

Winter came. Children switch from bicycles and strollers to sleds. For that...