


What winter holidays would be complete without a mountain of tangerines and a couple of juicy...


Decoupage bottles with fabric. Master class with photos.
The simplest and, at first glance, unsightly objects can be transformed with the help of decoupage.
The decoupage technique is a type of needlework that involves decorating various objects using paper cutouts, napkins and other materials. They are applied to the surface using varnish and glue. And at the end, the product is coated with several layers of acrylic varnish in order to protect the image. Using decoupage you can make beautiful and original crafts with your own hands. They will decorate your home. The most famous and popular is napkin decoupage. But this technique has many variations. Today we will decorate the product with fabric.
Option number 1 "Pink vase"


Option No. 2


You can turn a simple bottle into an object of art using several technical techniques:
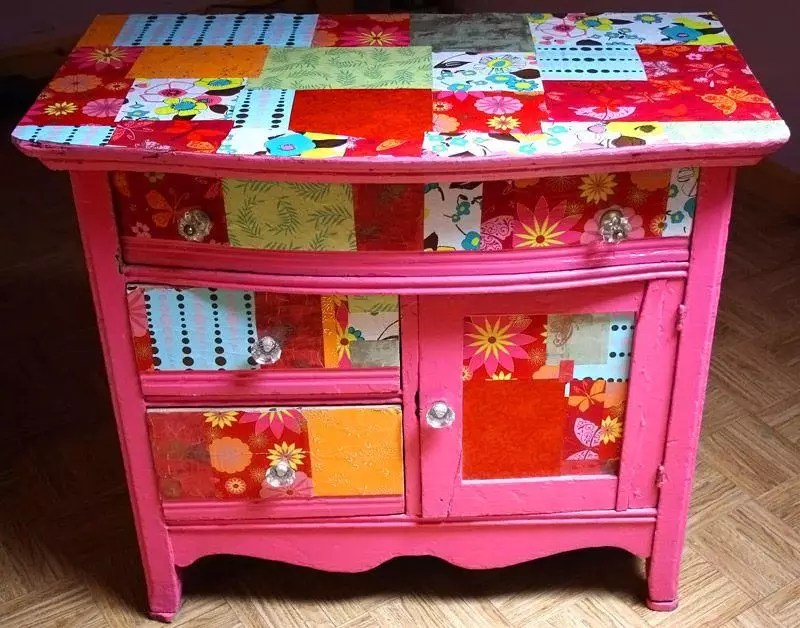
An item decorated in the dekopach style will resemble a patchwork quilt. There is special paper on sale that is used for decoping. You can also use improvised material, but it is recommended to choose one with a certain type of stylization (like fur, like the texture of the material).

This is a direct method of applying an image to the surface of a bottle. Both napkins with images and rice-based cards are used.


This method of decorating a transparent surface is called mirror in relation to the classical application of an image. The selected design is applied on the front side of the item of decoration, and on its reverse side. Typically, plates, flowerpots, and containers with a wide neck are decorated in this way.

Decoupage technology allows you to create an imitation of painting when patterns are matched to the background design. The integrity of the picture is created. This decoupage is also called smoky.

Decoupage combines images on paper with a relief surface. Natural materials (egg shells, shells, grains of various cereals) are suitable for creating relief; special paste that can be purchased commercially; textile.

Each type of material that is chosen for decoration requires a special approach. Decoupage of bottles also consists of certain rules:

Decoupage technology will allow you to decorate glass products in the form of bottles, ceramic dishes, furniture, flower pots, and small wooden household items.

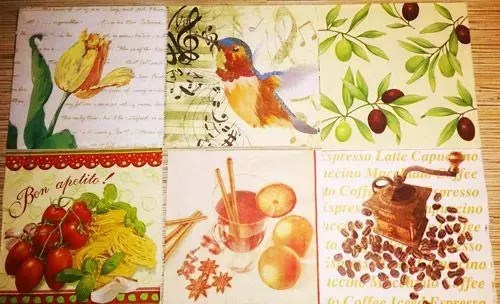
Both materials with images that are purchased in the store, as well as pictures from magazines and newspapers, and black and white photos are suitable for work. The following pictures must be prepared before application:

Necessary tools for decoupage: alcohol tincture, glue, varnish, acrylic paint for tinting, apply everything with a flat synthetic brush, sandpaper for sanding, prepare a rag, a piece of foam rubber. Decoration is done with various beads, shells, ribbons, lace, burlap, and bows. It all depends on your imagination.

All work can be divided into several stages:

The work is based on the use of rice paper:

Decoupage helps breathe new life into completely ordinary things. Decorated items will transform your interior.
The article will tell you in detail what decoupage is for beginners - step by step with photos we will analyze the rules of use and how to decorate the room. The article is conventionally divided into three parts:
Let's start with a definition. Decoupage is a decorative technique using a cut out (torn out) image, which is glued to the surface of the workpiece and then secured with varnish. It doesn’t sound that complicated, but there are a huge number of subtleties. Let's try to understand the features of the technology.
 With flowers
 Decoupage is applique - most of us are familiar with such activities from kindergarten. The technique itself requires both attention and perseverance, so the ideal candidate for a decoupage artist would be a person who would like not only to do beautiful work, but also to have fun and escape from the everyday hustle and bustle.
Important: There are no health restrictions when practicing, but you need to remember that some substances used in gluing can cause allergies.
That is why it is necessary to carefully familiarize yourself with the composition of the mixtures before you sit down to work. Otherwise, decoupage is a great activity both for evening relaxation for adults and for children's entertainment.
The process should not be particularly difficult if you approach the matter progressively. The sequence of decoupage actions for beginners (step by step with photos) looks like this:
 Decoupage example
 Each stage is important in its own way and has a number of its own characteristics. We want to tell you a few secrets that will simplify your work.
 Furniture
 To start creating your own product you don’t need to be a professional - the technique is suitable for a beginner. What is needed for decoupage? We will provide a list further in our material.
Let's decide on the materials. For classes you will need pictures:
Model name
 Tools for work
 Let's try to figure out what items are decoupaged and what comes out of it as a result.
One of the most common techniques is bottle decoupage for beginners. Step by step with 17 photos we will analyze this process further. What will it take to turn a bottle into something attractive?
 | 1. First, you need to prepare the surface of the future craft. For this, any empty glass bottle is selected. Remove the label and wipe it with alcohol. |
 | 2. Apply primer to the glass with a brush or roller. The soil is sold in a specialized store. |
|
3. Apply a layer of paint. Acrylic or water-based will do. |
 |
4. Place a sheet of napkin with a pattern in the water. At the same time, apply decoupage glue or PVA. |
 |
5. Remove two layers from the napkin and apply it to the surface of the bottle. Iron it with a roller so that there is no air. |
 |
6. After drying, apply a layer of varnish. |
 |
7. We will make decorative elements on the sides of the drawing using putty. To do this, first outline the contours of the picture with masking tape. |
 |
8. Apply acrylic putty over the entire surface. Next, use a match to make lines, imitating a stone. |
 |
9. Immediately remove the tape before the putty dries. |
 |
10. Dry the surface completely and sand it with sandpaper. |
 |
11. Take dark acrylic paint and apply it to the surface with a brush. |
 |
12. Cover everything with another layer of varnish. |
 |
13. Apply gold wax with your fingers to create an antique effect. |
 |
14. Apply moment crystal glue to the neck of the bottle. Next we apply the chain. |
 |
15. Paint the lid with bronze acrylic enamel. |
 |
16. Apply a layer of glue and then wrap several layers of twine. Next, we attach a decorative lock to it. |
 |
17. Wait for the composition to dry. The product is ready. |
Decoupage for beginners on wood (step by step below) requires a special kind of adhesion of the surface to the application.
 | 1. Prepare the surface. First, we remove the previous paint from it (if any) and clean it. Afterwards we cover it with a layer of acrylic primer. After drying, apply another layer. |
 | 2. Take a three-layer napkin and separate two layers from it. After this we apply it to the surface. We will glue it onto yacht varnish. Apply the first layer. |
 | 3. Upon completion, decorate the top of the board. |
 | 4. Cover the board with a layer of varnish, then apply another 2-3 layers. After this, dry for 24 hours. |
 | 5. Rub linseed oil onto the other side of the board. |
 | 6. Let the product dry, the composition is ready. |
Here we need plastic - it is sold in any hobby store.
 | 1. Take a piece of file and place the napkin face down on it. First, separate two layers from the napkin. |
 | 2. Pour some water onto a napkin and smooth the edges with a brush. |
 | 3. Apply the file to the surface and remove excess air bubbles with a brush. |
 | 4. Slowly tear the file off the surface, leaving a pattern on it. |
 | 5. Apply a layer of glue over the design with a brush. After this we cover it with a layer of varnish. |
You can see more clearly how decoupage is made from napkins in the video.
Using technology, they also decorate a wooden board. How to do it? We follow the instructions:
 On a cutting board
A few words about the technique of decoupage on fabric.
 On fabric
 Advice: A little advice - to prevent the work surface from being damaged by glue, place a plastic bag or a stationery file under the fabric.
Full version of the master class on video.
Interesting patterns can be made using ordinary eggshells. Let's see what comes of this.
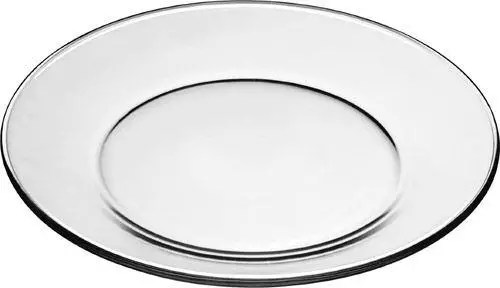
 On the plate
 Use a plastic plate that has been pre-plastered and degreased.
Decoupage is a fascinating and uncomplicated activity that has many techniques and is accessible to even the youngest craftswomen. With its help, you can make exclusive interior items that will decorate not only your home, but also the exhibition halls of art galleries. In this review, we will look at how to perform with your own handsdecoupage for beginners step by step with photo. Don't worry that things won't work out, it's actually very simple. With the help of this technique, old furniture, dishes, shoes and many other things will find a new life in your home.
Products with decoupage are works of art
First of all, let's understand the definitions. Decoupage is gluing a design onto a surface. The picture can be placed on wood, leather, fabric, glass and almost any other product.
Reverse decoupage is the same process, but has only one feature - the picture is glued under the material. This can only be done on transparent surfaces: glass and plastic. Of course, in this case the picture is pasted face up.

For your information! If a plate is used for direct decoupage, then in the future it will only serve a decorative function. And when using the reverse technique, the dishes can be used as usual.
| Materials and tools | Note |
| Using this technique you can decorate a book, dishes, flower pots, bottles, furniture, etc. In general, literally everything that is in your home. |
| Pictures can be used from special decoupage cards and napkins. In addition, for this purpose, craftswomen use drawings on fabric, old newspapers, and magazine clippings. |
| You can use regular nail scissors or a special tool that is sold in craft stores. The main thing is that the edges of the blades are very sharp. This is the only way to carefully cut out the desired image on a thin napkin. |
| You will need flat soft brushes. The pile in them should be tightly fixed. Lost lint can be a serious problem. It is better to have several brushes of different widths for smoothing and applying glue and varnish. |
| It is best to use regular household PVA. You can buy a specialized composition, but it will cost more. Among varnishes, it is better to give preference to acrylic. It does not emit toxic substances and is easy to use. |
| To decorate your work, you may need acrylic-based paints, sponges, primer, sandpaper, and craquelure. |
Decoupage kits
There are different ways to fix a drawing on a surface, let's look at them:
Method one
A simple technique of decoupage from napkins consists of placing it on an object and securing it with glue. After drying, the surface is varnished.

Method two
For reverse decoupling, a transparent base is used. The image is glued face down to the glass. After drying, fix with varnish.

Method three
Artistic composition. To make it, many images are used, which, when glued, are combined into one. To make the picture look like one whole, painting, shadows and accents are added.
Method four
This technique is called "decopatch". For it they use pictures from magazines, drawings on fabric. To get rid of clear boundaries, the edges of paper drawings are torn off. The surface is completely filled with images.

Method five
Creating a three-dimensional image. This is a technique that requires the talent of an artist. First, an image from a paper napkin is pasted on. And then painting is done on it with careful drawing of all the smallest details.
- the simplest and most affordable material from which you can make an original gift. You can buy a bottle of wine or fill the container with your own homemade drink. Luxurious decoration will make an impression in any case.

We have already listed the materials and tools necessary for the work, so we will not dwell on this in detail. The only thing that needs to be added to the list is a windshield wiper. They pre-treat the bottle, which has been cleared of labels.
Important! It is better to work with a glass vessel while wearing gloves. Your fingerprints are unlikely to have artistic value, so it's best not to leave them.
Bottle decoupage sequence for beginners, step by step with photos:
| Illustration | Description of the stage |
Applying primer 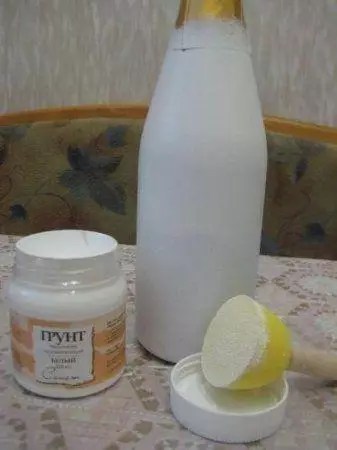 | For priming, you can use acrylic varnish or PVA. The soil should dry well. |
Making the background 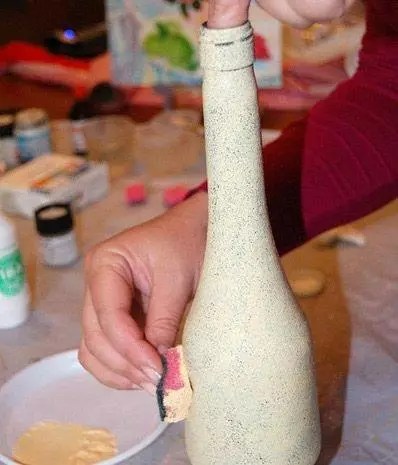 | For the background you need to use white or light acrylic paint. You may need to apply two or even three coats to achieve a completely opaque surface. |
Applying images 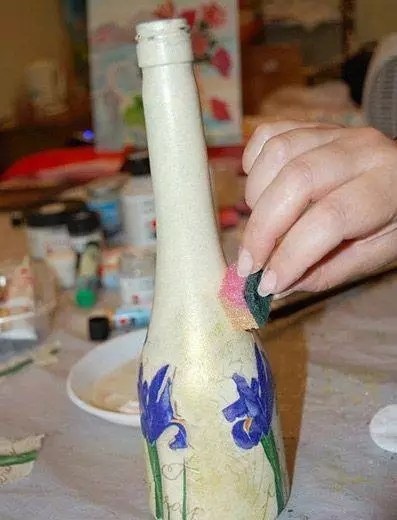 | The design on the napkin is carefully cut out with scissors. If the background of the picture and the bottle matches, do without scissors and carefully tear off the napkins. To make the design on the print easier to apply, it should be soaked in a plate of water. |
We fix the drawing  | You need to apply varnish over the surface of the drawing. This can be done with a soft flat brush or a spray bottle. You should make sure that the picture is not covered with wrinkles. If necessary, it must be carefully straightened with a brush. |
Finishing  | After complete drying, you can carefully sand minor imperfections in the work. To highlight details, use a brush and dark paint. Once finishing is complete, apply a final coat of varnish. |
Another option for original design is decoupage of a bottle with tights. Master class on video:
The first experience of gluing a napkin can be unsuccessful: wrinkles and folds inevitably appear, which spoil the whole result. Some tips on how to avoid this:


The smooth surfaces of a cardboard shoe box are an excellent basis for decoration. This interior box will become a favorite place for household little things.
| Illustration | Description of the stage |
Surface preparation 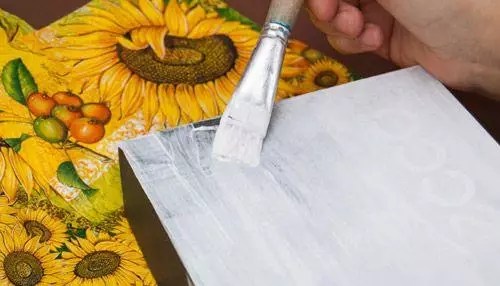  | The corners of the box need to be strengthened with pieces of masking adhesive tape, and then the surface should be primed with acrylic primer or paint. After drying, the primer should be lightly sanded with fine sandpaper. You may need to repeat the procedure if the layer does not lie flat enough. Then you need to paint the box with the color chosen for the background. |
Drawing 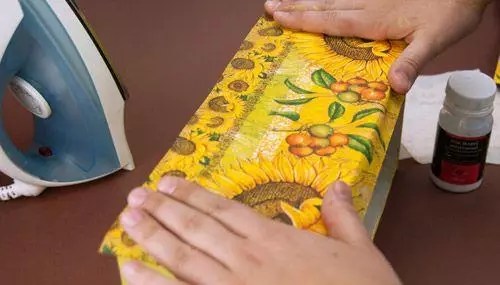  | The place for the drawing is covered with decoupage glue. After the layer has completely dried, a pattern is placed on top and smoothed with a hot iron through a sheet of paper. Afterwards the napkin is covered with a thin layer of varnish. A layer that is too thick will cause the design to become blistered. This procedure is repeated over the entire surface of the box. |
Decoration and finishing   | Using a foam sponge, apply background paint and other shades to match the image. Small details are drawn with a brush. To add some casualness, you can squirt white paint on top using the bristles of a toothbrush. Afterwards the final varnish coating is applied. |
Having tried your hand at simple things, you can safely start decoupage with your own hands using napkins. In addition to the usual list of working materials, you will need wood putty. It is used to pre-level all the cracks, cracks and other irregularities on the surface of the chest of drawers, cleaned of old paint.
Sequence of decoupage of kitchen furniture with your own hands, photo and description:
| Image | Operation description |
Preparation 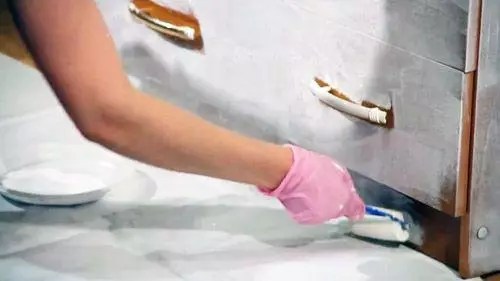 | The furniture must be thoroughly cleaned of all layers, and defects must be smoothed out with putty. After drying and sanding, all surfaces are coated with a primer and sanded with fine sandpaper. |
Preparing pictures  | The design on the napkins is carefully cut out or torn off by hand, and the bottom layer is removed. The picture is coated with glue and applied to the furniture. The application is carefully straightened with a brush. |
Finish coating 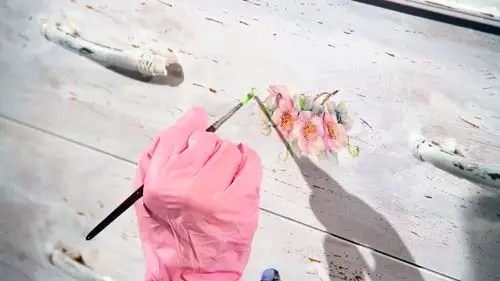 | No need to hurry. All drawings must dry. You need to varnish all the furniture, not just the place of decoration. For large areas it is convenient to do this with a spray bottle or spray can. This way the varnish will lay down in a thin layer. For the best effect, you need to apply 3-4 layers in succession, waiting for complete drying between treatments. |
 | Result. |
Helpful advice! If you need to apply a design to a polished surface, the polishing is pre-treated with sandpaper until the shine disappears.
When decorating furniture with fabric, the process is practically no different from that described.
Decoupage of bottles is one of the varieties of this technique, and the most popular. Just remember how many souvenirs, gifts and decorative items are made from an ordinary bottle. Perhaps you can start getting acquainted with this handicraft by making decoupage of bottles with your own hands.
Decoupage bottles sounds much scarier than it actually is. A little time and patience and you will have an original handmade item.
First, we will look at the general principles of how to make decoupage on a bottle, and then we will begin to practice. After all, without practice you can’t get anywhere. And if you don’t have experience yet, we recommend that you familiarize yourself with the basics in the article on what decoupage is, different types of needlework are collected there, so you can choose something to your liking.
And so let's return to the question of how to do decoupage on a bottle, as well as what methods there are and how to apply them.
Most likely, you already have all the necessary materials at home. Well, if you want to do something more advanced, you will have to visit a handicraft store, which you probably have in your city. You will need:
This is perhaps the most common type of this technique. Therefore, I recommend that you first do decoupage of bottles with napkins with your own hands in order to get acquainted with the process and materials for work. After all, the easiest way is to go from easy to difficult, gaining experience.
The name speaks for itself. As a basis, we will use an ordinary table napkin with a pattern and it doesn’t matter what it is. Go! Let's make our first decoupage of bottles with napkins step by step.
Step 1: preparation. Choose a glass bottle (don't forget, preferably without inscriptions or embossed elements). First you need to remove the label and stickers. To do this, soak it in warm, slightly soapy water. After a while, go through the metal mesh to remove any remaining glue.
Step 2: Prime the base. Degrease the surface using solvent. Then, using a sponge, apply acrylic paint, which will act as a base.

If you have a beautiful transparent bottle and you think that the design on it will look “cool” without a background, then skip this step.

The paint color must be chosen a tone lighter or darker than the design so that it does not blend into the background and the decoupage on napkin bottles looks contrasting. Apply several layers of paint to give the background texture and deep color.
![]()
Step 3: preparing the drawing. Choose a table napkin with a pattern you like. A napkin usually consists of two layers: the top one is the picture and the bottom one is the paper itself. We will be working with the top layer, so carefully separate it from the bottom.


Step 4: secret. This step is optional. But if you want to get the effect as if the design was drawn on a bottle, you will need to glue the picture from a napkin onto paper and apply several layers of varnish over the motif. Let it dry and then put it in water to soak the paper. Rub the soaked paper with your hands and remove it. This way you will only have a drawing on the varnished surface.

This step is useful for those who know how to make decoupage from napkins on a bottle, but do not know all the intricacies of this technique.
Step 5: drawing the picture. Place the dried pattern from a napkin on the previously primed surface. Then coat it on top with PVA glue. Carefully remove air bubbles from under the paper and straighten the picture so that there are no folds. And let the glue dry.

This step must be approached with extreme caution so as not to tear or spoil the picture. The first time, not yet knowing how to make decoupage from napkins on a bottle, I ruined more than one bottle. But it’s easier to learn from other people’s mistakes, which is why I wrote a lesson on how to decoupage a bottle step by step from a napkin.

Step 6: applying varnish. The picture is already on the bottle, but it must be protected from exposure to air and moisture; in this state it will not last long.
Apply acrylic varnish in small portions to the surface of the bottle and smear it with a brush. It is necessary to cover the surface completely. Much easier to apply from top to bottom. For complete protection you will need to apply the varnish three times.


In this tutorial I'm using regular clear acrylic varnish. But you can also decoupage bottles with your own hands using craquelure napkins to give the craft an aged look. This varnish creates the effect of paint cracked from age.

In this example we looked at decoupage of a glass bottle. But there are other types of technology using bottles. Let's talk about them, because you already know how to make decoupage of glass bottles with your own hands.
This type of technology is very similar, but has one distinctive feature. Before you begin, the surface of the object must be carefully prepared. Namely, “sand” the surface of the plastic with fine sandpaper so that roughness appears and there is adhesion to the pattern.


In essence, this is the same decoupage of plastic bottles with napkins, but with preliminary preparation of the plastic.
For those who want to master this type of needlework, I would recommend just decoupage for beginners from napkins on a bottle. This, in my opinion, is the easiest and most accessible way to try yourself in something new. The above describes in detail bottle decoupage for beginners step by step and there should not be any difficulties. And we can safely recommend it to beginners, since you don’t mind spoiling the bottle, and the cost of decoration is quite minimal.

I also want to give newbies an idea. You don't have to use napkins or decoupage cards. Using a printer, you can print a photo on paper and make decoupage with photo on the bottle. It will look cool when you give your friends a soda bottle with your photo on it. So go ahead, the more you know where to start decoupaging a bottle with a photo. It can also be a great gift for a birthday or wedding. In this way you can make a unique gift champagne.

Now you know what you need to decoupage a bottle for beginners. So go ahead, take everything that’s worth it and “ decoupage«!
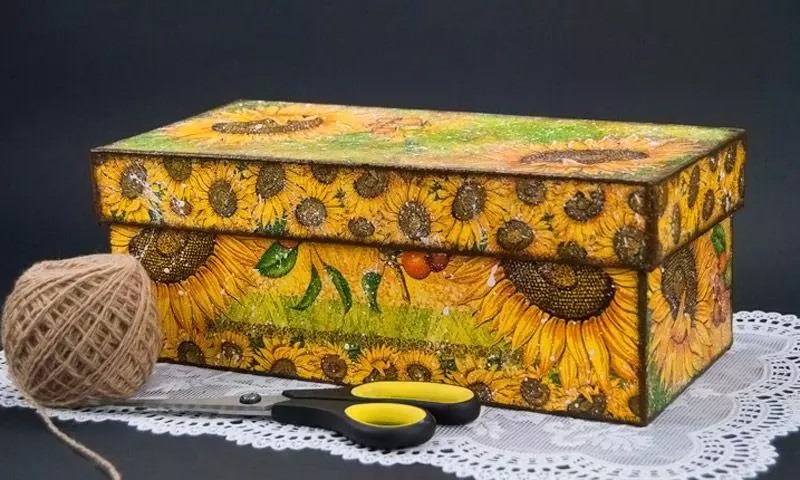
This section contains a selection of finished works. Perhaps some of this will help you decide what your work will look like. We have selected the best ideas for decoupaging bottles so that you know what you can get.

Even handicrafts do not stand still and develop. Examples of work that amaze the imagination are increasingly appearing on the Internet. Here are some of them.


In this article, we looked at the basics of the technique, and also made decoupage and bottle decoration. Practice and create masterpieces.
People of all age groups are engaged in creativity. Decoupage for beginners is considered an inexhaustible topic. Step by step with a photo of a bottle you can start making your first craft. Once you try it, you can easily decorate a wicker basket, any piece of furniture, or update an old lamp.
The advantage of this technique is that it can be used on different surfaces. Decoupage is reminiscent of an ancient technique. This decor is especially popular when creating items in a vintage style. An original solution is the use of retro accessories in interior design.
An ordinary interior is diversified by original decor
Decoupage of bottles with tights is considered an unusual craftsmanship technique. The master class involves creating three-dimensional forms. This produces an imitation of waves or beautiful relief patterns.

Decoupage comes in the following types:
Helpful information! The preference for a particular technique depends on the style of decorating the room, the capabilities and design of the product. For decoupage, you can use any pictures you like, newspaper clippings, bright magazines and labels. Napkins, textured paper and special cards for decoupage are also used.
You can start step-by-step decoupage for beginners with a photo of a bottle and preparing certain elements and materials. You will need any bottle with a smooth surface, acrylic paint, glue, varnish, scissors and an alcohol solution. An ornament on a napkin, newspaper photographs or printouts from websites are suitable for decoration.
| Image | Stages of work |
|---|---|
| Remove any paper stickers. To do this, place the dishes in a soapy solution, and then remove all excess from it with sandpaper. Then the surface is wiped with a solvent. |
| To create a more beautiful design, prime the surface. The paint can be applied using a sponge or brush. For rich color, apply paint in several layers. |
| You can cut the image out of a napkin. In this case, the part with the pattern needs to be separated from the rest of the paper. If you use a newspaper clipping, the pattern is covered with several layers of varnish, dipped in warm water, and then the varnished area is separated from the wet paper and glued to the bottle. |
| To glue the image, a pattern is applied to the dry surface of the bottle and varnished on top. |
| The design is strengthened with varnish. |
 | Leave the craft to dry. |
Provence style is often present in original ideas for do-it-yourself decoupage of kitchen furniture. Photos can be seen on the website. If you have old pieces of furniture from your grandmother’s time, then with the help of this technique you can give them a second life.

The interior in Provence style is distinguished by its extraordinary beauty. To decorate a room in this style you don’t need to spend a lot of money; you can make a stylish thing with your own hands from scrap materials. To decorate furniture in a similar style, motifs characteristic of the French province are used. These are flower gardens, lavender fields, picturesque streets and vineyard plantations.
You can see how to make a masterpiece in Provence style in our master class using the example of a chest of drawers.
| Image | Description of actions |
|---|---|
 | Prepare a chest of drawers, beautiful designs on napkins, paint, glue, roller, brush, sandpaper and scissors. |
 | The piece of furniture itself is painted with paint. Apply layers with a roller, and after drying, sand down any imperfections with sandpaper. |
 | While the chest of drawers is drying, you can cut out elements of napkins for decoration. |
 | The glue is distributed over the location of the pattern and over the image itself. To create a scuffed effect, sandpaper is used. |
 | The surface is varnished. You need to apply 10 to 15 layers. |
 | It is recommended to sand every fourth layer with a varnish compound. |
 | Excess paint is removed. |
 | To complete the work, you need to wait until the chest of drawers is completely dry. |
You can use an interesting decoupage technique using napkins on glass. To do this, you need to prepare paint compositions, themed napkins, varnish, glue and brushes. Choose a suitable glass container. Its surface must be treated with alcohol.
| Image | Job |
|---|---|
| The glass must be tinted using the chosen method: paint, primer or sticking rice paper. |
| Beautiful decorative elements are cut out of napkins. |
| The prepared paper with patterns is applied to the surface and smeared with glue. After drying, the drawing is varnished. |
 | You can outline the drawing using a glass outline and complete small details. |
Helpful information! If you want to apply decoupage to dishes that are used for eating, then use special glue for glass and porcelain. The finished product needs to be dried for a day and then baked in the oven.
It’s worth trying to repeat a simple master class on decoupage of a shoe box. The materials you will need are a thick box, napkins, acrylic paints, glue and brushes.
| Image | Stages of work |
|---|---|
| Apply white paint to the box and then dry it thoroughly. |
| Cut out a pattern from napkins. In this case, we separate the top layer. Glue is applied to the part, which is glued to the box. |
| The glue is applied from the middle to the edges with slight pressure. |
| After the image has dried, you can decorate the surface using decorative stamps. |
| To give an aged look, you need to go over the edges with dark paint. |
| The drawings are fixed on top with acrylic varnish. |
| This is what it looks like after the work is done. |
It is necessary to familiarize yourself with some rules before creating decoupage for beginners. Step by step, you can create unusual compositions with a photo of a bottle and napkins. Napkins provide a particular challenge. Some types of napkins cannot be applied wet, as they immediately begin to unravel. To glue smoothly and without wrinkles, you can use the hot method. PVA glue is applied to the surface. Then, after drying, the napkin is applied to this place and ironed with a hot iron through the paper. In this case, the napkin will stick without wrinkles. On a napkin glued in this way, you need to carefully apply varnish, especially the first layer.
There are a large number of ideas for decorating a kitchen using decoupage techniques. It is worth trying the following options:

Decoupage can be combined with gilding, tinting, the effect of artificial aging and the craquelure technique. To decorate the kitchen, styles such as ethnic, shabby chic and country are used. For decoration, you can use all kinds of gastronomic motifs: berries, cupcakes, cakes and fruits.
Kitchen decorating ideas:


To create a unique interior, you don’t have to spend a lot of money. From available materials you can create magnificent accessories and pieces of furniture for any design idea.
Article
When, after another holiday, you cannot throw away the bottle because the shape of the vessel is very interesting, it means that the feeling of beauty has overcome the arguments of reason or you already have an idea for decoration.
Your soul requires a creative act - decorating bottles with your own hands.
At your service there is always a master class in the company of a master or an online version of the work process. Design ideas can be seen on forums where needlewomen share their achievements. A simple way to decorate is decoupage with photos. After processing, a picture, photograph or postcard is pasted onto the bottle. There are many techniques and master classes where bottles are decorated with twine, salt, leather, ribbons and even tights.
![]()
In order to get a taste for decorating, simple manipulations with the object are enough. Elementary decor of glass containers is made with your own hands using paint. A transparent object can be painted inside or outside.
For interior painting, pour acrylic paint into the bottle using a syringe without a needle and rotate the bottle to achieve a dense coating on the interior.

Alternatively, you can paint the inside of the container in several colors. To do this, each color layer should not cover the entire surface, but only a part. The colored decor of the bottle adds mood to the interior.

The outside of the bottle is painted with a sponge or brush. Pre-treat the vessel with alcohol and apply acrylic paint using tangential movements. For white acrylic paint, purchase several toners or use gouache - mixing colored toners with a white base, get the desired shades and create colored bottle decor.

You can quickly decorate a bottle with your own hands using ribbons and lace. Make a small bow from ribbons, sew them onto a lace base, add a brooch, beads and put it on the neck of the vessel - an exclusive decorative item is ready!

A bright and sparkling effect is achieved using improvised materials, such as salt. Treat the outside of the prepared bottle with glue and sprinkle with salt with large crystals, carefully place on a flat surface until completely dry. Decorating an item with salt is appropriate for a winter or New Year themed interior.
If a continuous layer of salt seems boring or you need to decorate several areas with salt, then apply glue only to those places where sparkling is needed and cover with salt. A master class on this topic will help in mastering the technique.

Even just by painting a bottle with your own hands, you can achieve an incredible effect of silver or gold gloss, shimmering with the lights of a New Year's fairy tale, covered in carnival sparkles or a vintage treasure.

To get a stylish effect of gold/silver plating on a future art object, it needs to be prepared. Preparing glass for subsequent decoration with your own hands, at the initial stage, is the same for any painting method: the object should be washed, dried, degreased and treated with a universal primer.

The prepared glass vessel can be painted. Car paint in a can is suitable for these purposes. It should be sprayed at a distance of 15 centimeters from the object, in the open air or on the balcony.
If you don’t have a spray can, purchase gold/silver acrylic paint from hobby stores or hardware stores. For application use a foam sponge. You should paint with point-to-point (tamping) movements, leaving a mark on the surface, not a stripe, the surface will be smooth, without streaks.
Gold, like silver, can be colored, i.e. has several shades, which makes working with these paints exciting.

You can complement the decor in several ways. For example, wrap the thick part of the container with lace, securing it with a glue gun. Or partially wrap it with twine, colored threads, or beads. Glue on hearts or ribbons. Decorating bottles is a fun activity, and you can use all available materials for each idea.

A popular technique for decorating bottles is decoupage. Attend a master class on decoupage and you will fully appreciate the technique.
Simple manipulations with napkins, decoupage cards or printed pictures allow you to get a charming decorative item of exclusive design.

The easiest way to decorate an object is to paste a cut-out picture. To get a taste for handmade work, visit a master class on the technique you are interested in and find ideas. Prepare the container as described above, select the scene you like (from a postcard, magazine, decoupage card), cut it out and stick it on the surface. Add accessories, brooches, beads, ribbons, gluing them with your own hands using a glue gun. Sometimes that's enough.

Decorating bottles with a more fundamental approach requires preparation; a master class will always come in handy. For the technique in the classic version, a colored layer of napkin is used. That is, a three-layer napkin requires only a layer with a pattern; the class of the napkin is also important - it must have a bright pattern.
To work you will need:

Stages of the master class:


![]()


Having mastered simple decoupage of bottles with napkins, you always want more. You can create an interesting surface with tights or stockings. A master class on this type of decor can be found on the Internet.

To do this, cut one part from a pair of tights, soak it in a mixture of PVA glue and water (proportion 1 to 1) and put it on the bottle. Lay out coattails, waves, any texture.
Instead of tights, you can use decoupage with fabric; the procedures for materials and techniques are similar.
![]()
Leave a few spots flat to apply the napkin. Dry completely, prime with a special compound or acrylic paint. Now you can decoupage the bottles, tint them, bring your ideas to life, or leave them as is.

Another way to get texture: wrap the bottle with threads; colored threads are quite suitable for sewing of different thicknesses. Colored thread decor is also quickly obtained when using cotton yarn for knitting.
Using alternately threads of different colors you can get a very stylish decorative item; secure the threads with PVA glue. The decor of bottles with twine and threads should be varnished and used as a vase, or you can prime, paint and stick on napkins.

Decorating bottles with leather is one of the most beautiful opportunities to recycle leftover leather or outdated jackets, boot tops and get an interior item for home decoration. You can decorate any glass surface with leather. To work, you need “Moment” type glue, tweezers, scissors and a knife, as well as imagination.

To make folds, the pieces of leather need to be soft. the class can be found on the World Wide Web. Coat a bottle and a piece of leather with glue, apply the leather to the surface and form folds.
Working with leather is a little more difficult than decoupaging bottles with fabric, but folds are also formed directly on the glass bottle.

The formed decor should be given time to dry completely and, if desired, additionally paint, gild, or add other elements - it all depends on the idea.
Coins are suitable for decorating a piggy bank; a beautifully made thick cork would not hurt for a gift wine container; it is also trimmed with leather.

Don’t throw away empty beautiful bottles; with their help you will create a unique art object for your home. And it doesn’t matter whether it’s decorating bottles using decoupage technique, leather finishing or dyeing, uniqueness and creativity are the most important things in decorating.
Using the techniques discussed in this article, high-quality images are applied to decorative interior decorations and functional items. The main advantage here is not so much cost savings as the ability to create unique products with your own hands. It will be easier to show your talents if you carefully study decoupage for beginners step by step, with a photo of the bottle, descriptions of tools and materials. This article provides information that will help you reproduce the technology at home without errors.
Not every person has the skills of an artist. But you can use ready-made pictures on paper. If you transfer them to a suitable base and protect them from adverse external influences, you will get the desired result.
Similar techniques have been used in practice for hundreds of years. But these days, tools and consumables are more accessible. It won’t be difficult to find a suitable illustration in a magazine, or create a unique picture using a printer. But the most convenient thing is napkins, or other ready-made printed products with repeating patterns. They decorate, for example, a set of a table and several chairs.
There are the following types of decoupage:
The techniques listed are not mandatory. After mastering the skills, they are used together, in different combinations.

Below is a standard napkin decoupage technique:
Important! If an air bubble is too large, it is pierced in the center. Irregularities are removed using movements from the edges to the middle.
Before learning decoupage for beginners step by step with a photo of a bottle, you need to clarify the following points:

Important! It’s easier for a beginner to understand the nuances of the technology if they purchase cards for decoupage on thicker paper.
The following professional techniques are used to obtain special aesthetic parameters:

What winter holidays would be complete without a mountain of tangerines and a couple of juicy...

Amethyst is a quartz mineral with a deep purple-pink color. He...

You can make an imitation of stained glass without using glass, i.e. from colored paper...