DEGREES OF COMPARISON OF ADJECTIVES In English, as in Russian, ...


Much depends on how to plant an ax on an ax handle. The quality of the tool, the responsible approach to its preparation and maintenance determine whether the work will be convenient and how good the result of its implementation will be. This is especially true if we are talking about hand tools, the use of which involves significant and continuous dynamic loads.
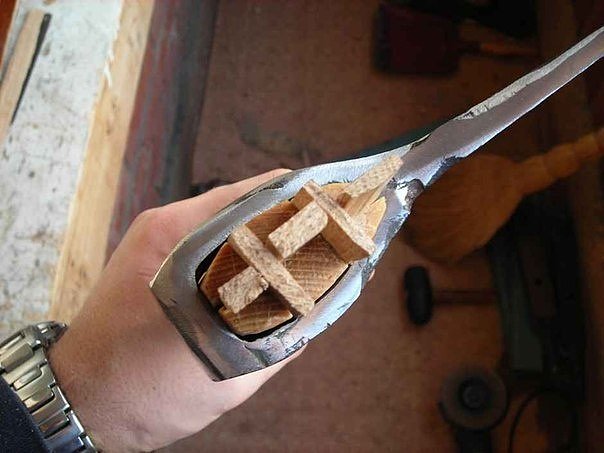
Photo 1. The ax can be designed for different work, the final result of which depends on the quality of its nozzle on the ax handle.
There are dozens of types of axes, each has its own design features and purpose. The carpenter's ax is significantly different from the tourist ax, the woodcutter's ax is not at all the same as the battle ax. But one thing in common is the fundamental structure. The ax and the ax itself, its metal part, are the main components of this universal tool. And how they are combined with each other, largely determines the quality of the ax.
Modern technologies allow a lot even for such a tool as an ax. There are several ways to attach an ax handle to an axe:
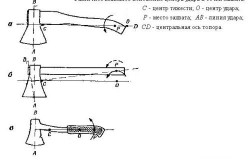
Figure 1. Different relative positions of the center of impact and the gripping point of the ax.
A well-welded or all-metal ax is completely reliable in terms of integrity. Breaking it is quite problematic even if desired. The only problem is that such a tool is very difficult to work with. It is hard, the return is very strong, the hands feel it from the first blow. Professionals believe that such an ax dries hands.
The ax glued in the factory has good cushioning and is held extremely securely. But, firstly, it does not use wooden, but plastic ax handles, more precisely, ax handles made of polymer compositions. Secondly, to produce manually, without special chambers, high-quality bonding with epoxy glue is very difficult and not even always possible.
Under normal conditions, it is customary to plant an ax on an ax handle. The next stage is wedging, it finally determines the reliability of the connection. This approach, of course, has distinct disadvantages. It requires good qualifications, a lot of time to work, and does not always give the desired result. But, on the other hand, this is the most affordable connection method; it does not require any special conditions or particularly complex tools. And if the structure is loosened, all operations can be repeated.
Contrary to the seeming simplicity, it is not so easy to properly plant an ax on an ax handle, there are quite a few nuances and ways to do this work.
Back to index
Each job, even the simplest, consists of several stages. Ax assembly is no exception. In order to get a tool ready for work, you must:
So, before planting an ax on an ax handle, the latter must be picked up and purchased. As for the material, professional carpenters and lumberjacks recommend well-dried birch. This material is quite common, and also has properties that create convenience when working with the tool. Harder woods are good for decorative options, but not for workers. The most convenient form of the ax handle, which gives the least return on the hands, has long been determined. Ideally, when the axis CD (Fig. 1) intersects with the capture center P, or there is a slight shift back and up. In the other two cases, when hitting, you have to make unnatural movements to compensate for the recoil.
Fitting an ax to an eyelet means trimming it to the required shape. For this, some kind of woodworking tool is useful, for example, another ax, a sharp knife, and the like. And there is one point that must be taken into account.
The axis of the ax blade and the longitudinal axis of the ax must be in the same plane. Simply put, the blade must be aligned with the ax handle.
A few words about the eye. It can be either straight or conical in a certain part of the ax. The tapered shape of the lug is considered to be more suitable for good attachment. Before cutting the ax handle, you need to carefully adjust the shape.
It was the turn of cuts on the upper end of the ax handle. Their number is determined by the chosen method of wedging, of which there are quite a lot. It can be only one longitudinal groove, it can be two or three lateral, one longitudinal.
Many consider one longitudinal and four lateral to be professional. This can be seen in photo 1, but these are far from all options. You can select both a slight offset of the cuts and a longitudinal cut divided into several parts. Many people decide this question based on their own ideas about the mechanical properties of such compounds.
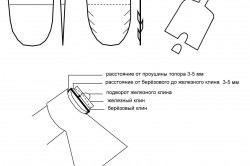
Figure 2. Scheme of mounting an ax on an ax handle.
Particular attention must be paid to the depth and width of the cuts. The depth should be such that the resulting groove is completely hidden in the eye. Otherwise, the ax handle may be split when wedging or during operation. The width of the cut should be related to the thickness of the wedges. The wedge should not go into the cut too easily, then there will be no point in it, but it should not go in too tight, then it will not be possible to drive it in.
Wooden or metal wedges (fig. 2) can be bought or made independently. Both methods work equally well. They are inexpensive, but if there is nowhere to buy, you can simply cut them out of well-dried birch. The shape and dimensions must correspond to the parameters of the cuts. A metal wedge can be made from sufficiently hard tin, for example, from an unnecessary shovel. (Fig. 2)
If the preparatory stage is completed correctly, then no special problems should arise.
For chopping firewood, building a log house, finishing boards - the versatility of an ax is amazing. It is quite understandable that every master wants to have a good ax so that it does not break or become dull. If you know how to put an ax on an ax handle, in what conditions to store it, it is possible to extend the life of this tool.
Axes can be light, carpentry, heavy, small, large.
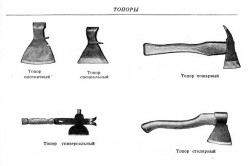
The main types of axes:
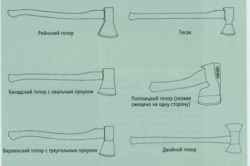
The first and second options are ideal for hiking or cycling, with an overnight stay in an open field or forest. They will help with cutting a clearing or fighting bushes in an overgrown dacha. It is good to butcher the carcasses of small animals. Light products with a short ax handle.
The carpenter has a comfortable one-and-a-half handle and a medium-weight ax. It is suitable for processing logs, chopping firewood and clearing areas of large shrubs.
The name of the fourth speaks for itself. It is good for splitting, although it also performs carpentry functions well.
Lumberjack - A two-handed ax that fells upright tree poles. Chopping firewood and carpentry work is also included in its functionality. But it is too heavy and therefore uncomfortable.
The Vityaz is a powerful tool for splitting thick sections of trees. It is also convenient for them to butcher the carcasses of large animals.
Taiga is named so because of its peculiarity - a long handle, due to which it is convenient to make clearings in a thick thicket.
Bogatyr is a heavy ax with a long ax handle, designed for large trees.
Back to index
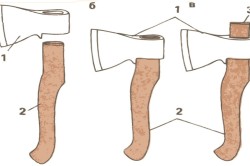
Attaching an ax to an ax handle: a - fitting, b - attachment, c - wedging; 1 - an ax, 2 - an ax handle, 3 - a wedge.
All axes, regardless of type and purpose, consist of an eye or an eye, a butt, a blade on which there is a toe, a chamfer and a heel. Also, to protect the wooden ax handle from blows, a beard is located under the blade. On ancient battle axes, the heel was lengthened, which is very convenient in battle.
The hatchet must be made of hardwood, needles are not suitable. It can be beech or oak. Very often birch, acacia or mulberry are used. Just keep in mind that the wood you need is not old, but not freshly cut either. Cross-layering is practically not allowed for an ax handle. This can lead to delamination and damage to the instrument.
The wedge is most often made of wood from soft woods, which is not entirely true. Softwood tends to dry out, which is practically not observed in hardwoods. There are also steel wedges.
Back to index
Necessary tools and materials:
Most often, the lining is done by hammering an iron wedge into the handle from the butt to the blade. Sometimes, after splitting a tree with iron, a wooden wedge is driven in. The most reliable method will be this: fit the handle under the eye and remove it from the ax. Make cuts with a hacksaw: one; two - in rare cases, if the eye is large; or three. The cuts are made two-thirds of the width of the ax. Then you need to clean the ax with sandpaper and apply drying oil with ocher. After drying, you can proceed further with the lining and the attachment of the ax to the ax handle. If there is no dry and high-quality oak, beech in the house, you can look for old chairs in the pantry or in the attic. They are usually made from oak.
Next, you need to cut wedges for cuts from a bar of high-quality oak or beech. After fitting and fitting, they can be postponed for the time being. Gauze is needed the most common, medical. Folding four times, impregnate with epoxy. While the resin has not hardened, wrap the end of the handle with gauze so that after the ax is mounted, the gauze hangs under the blade.
An ax sits tightly on top, and gauze is cut off.
It should not be visible from under the ax. This is done for high-quality shrinkage of the tool. Pour epoxy resin into the bottom of the cuts. The resin on the gauze and in the cuts will soak into the wood and prevent it from getting wet and rotting. It also plays the role of a filler for microcracks in wood.
This method of high-quality and almost eternal ax attachment is called the five-wedge method.
Despite a lot of good advice (I used many), I have never seen a clear instruction on how to do this in the form of successive steps. Preferably with a photo.
In fact, I did not invent anything, but only combined what I read in a clear and consistent way. The result is a very reliable way to mount an ax.
I'll start over.
 Examining the axes of eminent masters, I noticed that they were not wedged in the way that is usually customary on Hozmage axes. Not one long, vertical wedge, but several. I was especially impressed by the axes of Artemyev, Vereskunov and, oddly enough, Trud Vach. Method 5 wedges
Therefore, if the ax is large and the eye is long, it makes sense to make not one cross cut, but two. As if dividing the eye into 3 equal parts, and then you get something similar to Vereskunov's ax Krepysh (photo taken from the author's website). Such a wedge is made with 5 wedges, two transverse and 3 vertical. I immediately warn you, it didn’t work out just as beautifully either the first or the second time.

We need an ax handle, a carpenter's ax weighing 1 kg or more (it has a large eye), several wedges, epoxy, gauze and crazy handles.
The 5 wedge method is further enhanced by the use of gauze and epoxy. In this example, I am combining 2 proven baiting methods in one.
 1. A place for landing an ax.
When cutting out a landing site, you need to make sure that the ax protrudes from the eye by about 1 cm, then you will have an additional piece of wood, which after wedging will be larger in diameter than the eye and therefore the ax will hold more securely.
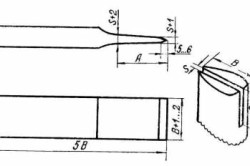
2. Cuts.
Cuts in the handle must be made with a hacksaw for wood, to a depth of at least 2/3 of the depth of the eye + the height of the protrusion above the eye, see item 1
3. Wedges.
The wedges are cut from hard wood, beech or oak is better (they go to furniture, in particular chairs, do not throw away old chairs).

I had to read the recommendations that for wedges it is necessary to use the same tree from which the handle is made. I just want to say that this is a mistake. The wedge wood should be strong no matter what kind of wood you use for the handle. The wedges will have to be hammered in with a mallet or hammer. Moreover, the effort will be very significant, and if the wedge is made of birch, it will break. The direction of the fibers must be parallel to the narrowing of the wedge, otherwise, upon impact, the wedge will break before reaching the desired depth. Accordingly, without wedging the ax as it should, it will not be possible to get it out of there.
Sample of wedges.
Transverse wedges must be made to the full width of the eye, and not to the width of the shaft that protrudes outward, because the ax handle will open to the sides after the wedging. Vertical wedges must be made in such a way that their total length plus the thickness of the transverse wedges is equal to the height of the lug.
Whether we like it or not, we will never be able to make an ideal eye and an ideal ax for this eye. Therefore, there will always be small gaps, even after a perfect wing. To avoid them, I use gauze or a bandage impregnated with epoxy. Epoxy resin, in addition to being a good adhesive, has an invaluable property. It does not shrink, and the presence of gauze acts as a very elastic reinforcing material that does not allow the epoxy to crack. Also, epoxy is resistant to water and impregnated wood does not allow it to get wet.
After hardening, a very strong monolith is obtained, which fills all the smallest irregularities and cracks, while possessing high strength.
4-5 layers of gauze are made depending on the size of the gaps on the ax and put on top of the end of the ax handle.
The number of layers is selected so that the ax sits tight, but without extra effort.
After that, the ax is planted. After landing, the gauze is cut from above and the excess is cut off.
 Pour into the cuts, resin. The amount should be such that 1/4 of the depth is filled. But this should be done only after the ax is mounted, so that the resin does not leak out. Filling the kerfs with resin makes a lot of sense. Quite often, especially if a cut of insufficient depth is made, when driving a wedge, the ax handle gives an imperceptible crack (and sometimes very noticeable) inside the eye. A crack can make itself felt later, at the most inopportune moment. So the resin will fill the crack and prevent it from developing. Well, in general, it will also allow you not to leave voids in the gap after driving the wedge. We rub the wedges with epoxy and carefully hammer in, first transverse. And then vertical.
If everything is chosen correctly, then this process ends. With the remnants of gauze, you can putty holes, if any.
We wipe everything that has leaked out and put it to dry. Next day. Feel free to cut off the protruding parts of the wedges, sand the remaining gauze and resin and use. Your ax will never dry out and loosen up. Don't believe? Try it yourself.
How to plant an ax correctly so that it does not fly off the ax handle during intensive felling and reliably serves the owner? There are many ways to mount an ax on an ax handle on sites on the Internet, but all of them are not practical. With intensive cutting, the ax quickly flies off the ax handle. In order for the ax not to fly off, the following conditions must be met:
1. First of all, you need to choose the material for the ax handle. The best hatchet from a well-dried whole b e r e z s. It is durable, does not beat off (does not dry) hands and is always at hand. An ax made of mahogany, beech and other similar material, especially iron, as suggested by some experts on the Internet, I do not recommend. Such an ax beats (dries) hands and is inconvenient to use.
2. We put the ax on the handle in the usual way.
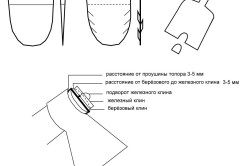
3. Cooking thin b e r o z o v y k l i n from dry birch, with the second ax we mark a place for the wedge in the middle of the end of the ax handle and hammer it. We cut off the excess remnants of the wedge together with the ax handle with a hacksaw so that the distance to the ax eye is 3-5 mm.
4. Cooking w e r e n w e n from thick sheet and cut with a chisel, as shown in the figure. A shovel is best suited for this purpose. The teeth of the cuts are slightly expanded in different directions, as shown in the figure.
5. We mark with the second ax a place for an iron wedge. It should recede from the birch wedge by 3-5 mm. We hammer the iron wedge so much that it can be bend on a birch wedge, as shown in the figure.
The ax is ready to go. Keep it always dry. This design is reliable. The teeth of the cuts become thrust, crashing into the handle, and the bent part of the iron wedge securely holds the birch wedge, preventing it from coming out.
Every gardener should know how to properly put an ax handle on an ax and make it yourself. The selection of an ax is a rather serious problem, because the specifics of working with this device are associated with high risks. Not always those axes that are presented in hardware stores meet the needs of a carpenter, so more often a specialist has to make an ax with his own hands.
The ax is an indispensable tool in the private sector, so you need to be able to properly prepare it for work and maintain it in “combat readiness”.
According to the height and strength of the master, the length of the ax handle itself is determined. The quality of the wood is very important. Lighter variants of axes have a weight of 800-1000 g with a handle length of 40-60 cm. Heavy tools are 1000-1400 g in weight, while the length of the ax handle is 55-65 cm.
Most axes today have a fiberglass handle, which cannot be made by hand in everyday life. But an excellent wooden ax can be made with your own hands wisely no worse than a factory one. At the same time, the tool will also be comfortable to use and, importantly, economical in terms of money.

The most commonly used material from which the ax handle is made is birch. Its wood is quite strong and has excellent impact strength, that is, it increases the impact force. Of the minuses can be called: susceptibility to decay, increased absorption and return of moisture. This material is mainly used for carpentry axes.
For tourist axes, it is desirable to use maple wood. It does not decompose and almost does not dry out. However, its impact strength is lower, but it is quite acceptable for hiking in the forest. Since birch wood is very difficult to process by hand (it is very hard), the choice of the most optimal material for any ax handle falls on ash wood - very strong and almost not subject to compression and expansion.
Of course, when purchasing an ax, or rather its piercing part, you need to focus on the quality of the metal from which the tool is made. It must have a GOST mark on it, confirming state requirements and standards for the quality of the metal. Be vigilant, other signs (TU, OST or MRTU) mean that the manufacturer has made changes to the production technology.
Checking the quality of the metal is carried out as follows: 2 axes are taken and the blade of one of them is hit by the blade of the other. If there are no notches left on the product after impact, then it is of high quality. Another sign good quality is a specific sound that comes from tapping on an ax that is currently in limbo.
In addition to these checks, the following factors should be taken into account:
However, do not despair if you cannot find an ax that meets absolutely all the requirements. All detected differences can be eliminated by sharpening the burrs, boring the eye and giving the butt a symmetrical shape.
In order to properly plant an ax on an ax handle, you will need the following:
In order to make an ax with your own hands, a log with a diameter of 140 mm is taken, preferably from the root part of the tree. When choosing the length of a log, one should take into account its reduction due to the cut of the ends cracked after drying, presumably it should be somewhere 200 mm longer than the length of the forthcoming ax handle. The log is split lengthwise (in half) and peeled off from the bark. In total, two blanks for the ax handle come out, which are stored at room temperature at a humidity of about 12% for a year to ensure better drying and the greatest safety of the ax handle.
When creating an upcoming ax handle, you must have an example of the desired ax handle in front of you, or use ready-made drawings. The blank is cut with a small ax, chisel and knife until the required shape or size of the reference sample is achieved.
Further, it should be noted that the blank model must necessarily be oval, since a round handle contributes to increased muscle tension in a person when working with such an ax handle, and also reduces the accuracy of the blow. The back of the handle should be curved and thickened (in case of slipping, it will help to hold the ax in your hand). In order for the upper end to move freely in and out of the hole in the blade, it must be trimmed accordingly, while the top of it should protrude from the hole by about 10 mm. The trimmed ax at the very end is sanded to perfect smoothness with the help of coarse-grained, and then fine-grained sandpaper. Then the finished workpiece must be proliferated.
How to plant an ax on an ax handle? Everyone who has ever planted an ax on an ax handle knows what an important stage this is, because the safety of the worker's life depends on the correct installation of the ax handle.
So, initially on the upper end of the wooden handle it is necessary to make one longitudinal and two transverse cuts. The recesses are made with a hacksaw approximately 2/3 of the height of the eye of the blade plus 1 cm provided for the protrusion.
Next, 5 wedges are made of hardwood (oak or beech): two of them should be equal in width to the blade eye, two side wedges should rest tightly against the eye, and the average longitudinal wedge should correspond in width to the distance between the two transverse ones. The decrease in wedges must run parallel to the grain of the wood.
Then the simplest medical gauze is taken, folded in 4 layers, impregnated with epoxy resin. Until it hardens, the impregnated gauze is wrapped around the end of the ax handle so that its ends hang down under the blade, while the end of the handle should fit very tightly into the eye, then the excess gauze is cut off.
Resin - performs the function of repelling moisture and clogs microcracks in wood.
The final stage consists in the fact that the cuts are also filled with epoxy resin, about 1/4 of the depth, and the wedges are also impregnated with it, which are then tightly planted in the ax handle. First, the transverse wedges are driven in, and then the longitudinal ones.
This completes the attachment of the ax to the ax handle. Approximately after 2 days, the protruding parts of the wedges should be cut off and the irregularities that have arisen should be sanded. An ax impaled in this way will serve its owner for a very long time.
DEGREES OF COMPARISON OF ADJECTIVES In English, as in Russian, ...

In the early days of comics, there were several female wrestlers with...

The message about Beethoven, summarized in this article, will tell you about the great ...