Single-digit numbers are added using an addition table. Addition table, and ...

Sponge cake translated from Italian means baked twice. The classic biscuit is made from flour, sugar and eggs. The recipe for a delicious biscuit can also contain cottage cheese, sour cream, kefir, chocolate, etc. Cooking a biscuit, as a rule, does not take much time. It is because of the speed of preparation and the excellent result that many housewives love to cook biscuit dough. Products made from it are lush and delicate. Biscuit baking can be very diverse. Distinguish between a biscuit for a cake, roll, pastries, etc.
How to make a biscuit? A simple biscuit recipe, however, has some cooking characteristics. Well-beaten egg whites and yolks with sugar and flour give the baked goods splendor. The quality of the biscuit largely depends on the freshness of the eggs, as well as on the temperature of all the ingredients included in the composition. The duration of the whipping and the baking regime play an equally important role. Our recipes will tell you how to make a biscuit. Cooking a biscuit at home will not be difficult if you adhere to all the rules of preparation. To obtain the most lush and tender biscuit, it is recommended to carefully separate the yolks from the whites so that they do not mix. Whites are harder to whisk if yolk or fat gets into them.
There are many biscuit recipes. A dough recipe can include grated lemon or orange zest, vanilla sugar, cocoa powder, chopped nuts, poppy seeds, raisins, and other toppings. They must first be mixed with flour. In a classic biscuit, the recipe for which consists of eggs, sugar and flour, you can add sour cream and kefir. Sponge cake with sour cream and biscuit with kefir are even more delicious and fluffy than the classic one. The sour cream biscuit recipe will not cause you any difficulties. Chocolate sponge cake, the recipe for which includes cocoa powder, is especially popular with children who require regular chocolate sponge cake preparation. We advise you to definitely prepare a very popular biscuit with apples - charlotte. You can even try making a biscuit without eggs - in vegetable oil and soda solution.
Biscuit dough is used to bake cakes for cakes. The biscuit cake recipe can be found on our website. The combination of a biscuit with various creams, fresh berries, fruits and nuts allows you to get a variety of delicious pastries. An important ingredient for such sweet products is biscuit cream. A biscuit cream recipe can include cottage cheese or chocolate. Curd biscuit can contain curd both as a filling and as a component of the dough.
How to prepare a biscuit? There are two ways to prepare this treat - cold and hot. Beat whites only in completely clean dishes, without traces of fat. If the whites do not whip well, then they need to be cooled. Beat the whites until a stable foam is formed. Excessively whipped proteins with small bubbles, when baking, lead to the fact that the dough shrinks. The yolk should be rubbed white with sugar and beat until foamy. You need to mix whites and yolks immediately, while adding flour.
Warm preparation of the biscuit speeds up the process. How to make a hot sponge cake? In a water bath at a temperature of 40-50 degrees. Beat eggs with sugar right away. Such a biscuit turns out to be denser and more crumbly than a cold-made biscuit. It is best to beat the resulting mass in an electric mixer, but you can also manually. The finished dough must be immediately poured into special molds and baked immediately.
How to bake a biscuit? A delicate structure and a thin crust are obtained only if the biscuit is baked correctly. You need to bake the biscuit over even medium heat. Do not open the oven while baking. But the finished biscuit must be left for a while in an open oven. This is done so that it does not fall out. Freshly baked biscuit is poorly cut, so after baking it is advisable to keep it for about a day.
How to bake a biscuit quickly? You can also microwave the biscuit. This method is simpler than the previous one. The dough itself is rather dry, so impregnation is needed for the biscuit. As an impregnation, you can use chocolate, various syrups or alcohol.
Make a biscuit! Recipes with photos on our website will tell you how to do it right.
Biscuit is a versatile pastry for confectioners. Almost no cake can do without a biscuit, cakes and rolls are made from biscuit, used as a basis for any confectionery.
Lush, like a cloud, and quite dense, with butter and cream, with nuts and with carrots - they can be very different, but they are united by the cooking technology. Whatever the biscuit dough, for it you just need to beat the eggs (or separately the whites and yolks) and add the rest of the ingredients as carefully as possible. It is due to the air added during whipping that your biscuit will rise in the oven.
When baking a biscuit, two processes take place simultaneously. Firstly, the air in the dough heats up and, accordingly, expands, it makes the dough rise in the oven, that is, to increase in volume. Secondly, if there is enough heat (at a baking temperature of 180-200C), the walls of the growing pores are baked. Thus, to get the correct biscuit, you need to beat the eggs well, add as much air as possible, stir the dough, being careful not to lose the added air, and then bake it correctly at a sufficiently high temperature.
Before carefully studying the technology of Irina Chadeeva, we suggest watching the video recipe of the professional pastry chef Oleg Ilyin!
FLOUR
The biscuits are baked due to the starch gelatinization process - when heated in a wet dough, it changes its structure, becoming thicker and more viscous. Therefore, it is the presence of starch that is important for the biscuit, and, accordingly, it can be baked from almost any flour - rice, wheat, corn, buckwheat (any flour contains starch). If you replace part of the wheat flour with starch, the biscuit will be more durable and crumbly. You can bake a biscuit without flour at all, only on starch. But in nut flour (ground nuts) there is no starch, and therefore biscuits with nut flour are less durable and easily settle. Nevertheless, pastry chefs often make biscuits with nuts - it turns out very tasty!
Without which, in principle, a biscuit cannot be baked - it is without eggs. It is the eggs that give it both splendor (when beaten) and strength (when baked). A well-beaten egg mass is the key to success when working with a biscuit.
For a biscuit, use regular sugar, preferably with small crystals. They dissolve faster, respectively, and eggs beat better with them.
There are many options for biscuit, but it's worth starting with the simplest recipe, which, however, is no worse than the most complex ones. Remember the proportion:
4 eggs
120 g sugar
120 g flour
and no baking powder!
How to make a biscuit:
1. First, measure out all the ingredients. Sift flour (as well as starch, if you use) - it is saturated with air and then it is better stirred in the dough. Divide the eggs into whites and yolks (remember that cold eggs are best separated into whites and yolks), using a large bowl for whites and medium in size for yolks.
Please note that the biscuit molds and trays must be prepared in advance, and the oven must also be preheated in advance. When the biscuit dough is ready, it must be immediately transferred to a mold (on a baking sheet) and baked without wasting time. The biscuit dough settles quickly, and the finished products from the settled dough are low and dull.
2. Pour half of the sugar into the yolks and beat with a mixer at maximum speed until they are thick, almost white.
3. Wash and dry the beaters and beat the whites at full speed until the mixture is white and thick. Mixer attachments should leave a clear, non-spreading mark. Only now add the remaining sugar and beat on until the mass becomes snow-white and shiny.
 publishing house "Mann, Ivanov and Ferber"
4. Add the yolks to the whites and stir very gently with a spoon until the mixture becomes homogeneous, light yellow in color.
How to mix correctly? Take a spoon and dip the side into the middle of the bowl. Pass the convex part of the spoon along the bottom (towards you), then up the side of the bowl, continue moving over the dough and again lower the spoon in the middle. The spoon will describe a circle. Repeat this movement while turning the bowl with your other hand. Thus, all types of biscuit (and other whipped) dough are quickly and accurately mixed. This method is called the "folding method".
5. Add flour and other dry ingredients. Stir again by folding. Do not stir for too long, as the dough may thicken too much.
 publishing house "Mann, Ivanov and Ferber"
As soon as the lumps of flour have disappeared, stop. Transfer the dough to a mold, flatten the surface and place in the oven.
 publishing house "Mann, Ivanov and Ferber"
Butter is often added to the biscuit. To do this, melt it, cool it and pour it in as carefully as possible. Even a small amount butter makes the crumb more tasty and moist, biscuits with butter do not stale longer.
There are several ways to prepare the tins and bake the biscuit. Each has its own advantages and disadvantages. Sometimes it doesn't matter in what form you bake, and sometimes it matters.
Lubricate the inside of the mold with softened butter (the melted butter will drip off and you won't get an even coating). Pour in a spoonful of flour and, shaking the mold, distribute the flour first along the sides of the mold, and then along the bottom. Tap the mold well to sprinkle the excess flour out.
With this method, the biscuit does not stick to the bottom and walls of the mold at all. After baking for 5–10 minutes, the biscuit cools down and slightly decreases in size, while a small gap appears between the wall of the form and the biscuit, and a small slide remains on the biscuit. Turn the biscuit over onto the wire rack, it can be easily removed, while the slide will be at the bottom, and the top will be completely flat.
DISADVANTAGE: when using this method, the biscuit is slightly lower.
Do not grease the baking dish, but cover the bottom with baking paper.
When baking, the biscuit will stick to the walls, but when you take out the mold, it will also settle. Since the walls cannot settle (they are stuck), the “pea” will settle, thus, when the cake cools down, the surface of the biscuit will become even. The biscuit is taken out of the mold only when it has completely cooled down. To do this, you need to very carefully run a knife along the walls, separating the biscuit, and remove the form. Remove the baking paper before using the biscuit.
DISADVANTAGE: in order to separate the biscuit from the walls, skill and accuracy are needed; silicone molds cannot be used.
Do not grease the dish or place baking paper on the bottom.
 publishing house "Mann, Ivanov and Ferber"
This method is suitable for the lightest and most delicate biscuits, which settle under their own weight as they cool. These are biscuits with a small amount of flour and starch, as well as protein biscuits. Usually they are recommended to be cooled upside down - for this, immediately after baking, the mold is turned over and placed on bowls so that the biscuit does not touch them. In this position, the bottom and sides of the biscuit are glued to the mold, it does not fall out, but it also does not settle under its own weight. Please note that in this case, it is important to choose the correct size of the form so that the biscuit does not turn out above the edges and can be turned over.
DISADVANTAGE: sometimes it is difficult to separate the biscuit from the mold; silicone molds are not suitable for such baking.
Always preheat the oven to a temperature of 180-200 ° C in advance. It is advisable to bake biscuits on the middle level of the oven; convection can be used. Try not to open the oven for the first 15 minutes of baking to keep the air cool. You can check the readiness of the biscuit 25-30 minutes after the start of cooking. Ready biscuit - always with a uniform slide, golden brown in color. Pierce it in several places (closer to the middle) with a toothpick, there should be no dough stuck on it. You can also press with your palm, the finished biscuit is elastic and durable.
IMPORTANT!
To prevent the biscuit from getting soaked during impregnation, to be strong and elastic, it is advisable to let it lie down for several hours. For cakes, I usually bake a sponge cake in the evening and leave it in the kitchen overnight. Please note that the biscuit should not dry out - for this, if the air in the kitchen is dry, you can put the biscuit in a bag after it has cooled completely.
 publishing house "Mann, Ivanov and Ferber"
One four-egg sponge cake baked in a 20 cm diameter pan can usually be cut into three cakes. Use a few simple tricks to keep your cuts straight and the cakes consistent in thickness.
Lay the sponge cake upside down - it is very flat and your cake will be flat on top too. It is convenient to use a sheet of baking paper, a flat plate or wire rack as a substrate, the main thing is that you can easily rotate the cake along with the base. Prepare a knife - it is highly desirable that it is sharp, with a blade that is longer than the diameter of the biscuit. A bread knife with a wavy blade works very well.
Using a knife, mark the cut lines about 1 cm deep around the circumference of the biscuit.
Insert the knife into the notch and cut, carefully turning the biscuit and pressing the knife against the bottom cake, it should go exactly along the marked line.
To make a biscuit, we need flour, sugar and eggs.
Form for diameter - 20 cm (or square 18x18).
Note: some recipes use 100 g flour and 20 g starch instead of 120 g flour. Biscuits with starch fall off less during baking, but crumble more when cut and are less plastic. This means they are not suitable for rolls.
Real biscuit dough does not require any additional leavening agents (such as soda, leavening agents, yeast, etc.).
The quality of the biscuit dough and the future biscuit depends on the freshness of the eggs. The fresher the eggs, the fuller and better the biscuit will be. To determine if they are fresh, you need to break and pour one egg onto a saucer. It is fresher if the yolk is a tall dome, and the protein encircles it, and only a small amount of liquid spreads over the saucer from the bulk of the protein.
For clarity, I photographed two eggs.
The one on the left was demolished by a chicken just a few hours ago. The one on the right has been in the refrigerator for a week. Do you see the difference? In the first, the protein is collected around the yolk, and in the second it spreads over the dish. The first egg is good for a biscuit, and the second is only good for scrambled eggs.

Separate the whites from the yolks. It is important to do this so that even small droplets of yolks do not get into the whites, otherwise the whites will not whip well.

Beat the yolks with 2/3 of the sugar until a light, homogeneous mass is obtained.
It will be possible to stop when the sugar grains disappear in the mixture, and it itself becomes white and frothy. With my mixer speed, it takes me 6 minutes.

Beat the whites.
The dishes for whipping the whites must be completely clean, without traces of fat, otherwise the whites will not whisk well. Whisk the whites until a stable foam is obtained. If the dough contains too small bubbles, it will shrink when baking. If the whites do not whip well, they need to be cooled, add a little salt, citric acid or a few drops of vinegar. It takes me 5 minutes to whip the whites.

Add the remaining sugar to the whites and beat until shiny (about 1 minute).

Mix together the protein and yolk masses. This should be done quickly, not in a circular motion, but lifting layer by layer so that a sufficient number of air bubbles remain in the dough.

Pour in the sifted flour and gently but quickly stir from bottom to top.

Pour the finished dough quickly into prepared molds or onto a baking sheet and bake immediately, otherwise air bubbles will escape from it, and the biscuit loses its taste and tenderness.
It is convenient to bake a sponge cake in a split form, the bottom of which must be greased with oil or lined with baking paper. Do not grease the sides of the non-stick pan, otherwise the dough will only rise in the center of the pan during baking. If a mold without a non-stick coating is used, then the walls of the mold can be greased with oil.

You need to bake the biscuit over even medium heat. The oven should be preheated 10 minutes before placing dough products in it. You should not put the biscuit in a hot oven, as a hard crust can immediately form on the surface of the product, the biscuit will burn on the outside, but will not bake from the inside. For baking, the optimum temperature is 200 degrees and the time is 20-25 minutes.

During baking, especially in the first 15-20 minutes, the biscuit should not be shaken, as it may settle and not bake.
Readiness is determined with a wooden skewer or toothpick.

The baked biscuit should be left in an open oven for a while so that it does not fall off. If it is immediately exposed to the cold, it may settle.
The average height of the finished biscuit should be approximately 4.5 cm.

The finished biscuit is easily separated from the walls of the mold, when pressed with a finger, the dimple quickly levels out, the upper crust of the biscuit is golden brown. Putting the finished biscuit on a damp cold towel will make it easier to remove from the mold.
Tip: a freshly baked biscuit is poorly cut and poorly saturated with syrup, so it is recommended to stand it for about a day after baking, or at least at least 8 hours. So that it does not dry out at the same time, you must wait until the biscuit has completely cooled down and wrap it in plastic.
Tip: the finished biscuit can be frozen. To minimize labor costs in preparation for great holidays(Birthdays, New Year etc.), the biscuit is best prepared in advance and stored in the freezer. After defrosting at room temperature, it tastes the same as freshly cooked.
Bon Appetit!

A celebration is coming, a three-tiered cream giant looms in the plans and you want to conquer all guests with the talent of an excellent pastry chef? Then especially you need to know why the biscuit is not baked or falls off after baking, as well as at what temperature it is baked and how long. You can get all the necessary information regarding the insidiousness of the biscuit from this post, and using it, you will be successful.
All women are impossible sweet tooth. Craving for confectionery sometimes cannot be overcome even by such pesky extra pounds. And in a fit of true love, many housewives try to conjure some delicious trifle for tea in the kitchen.
Three-story cakes, rolls stuffed with creams, the most delicate cupcakes, in general, something based on it, this incredibly tasty, but no less capricious, biscuit, can act as a "trifle".

However, this "Olympus" is not so easy to conquer, and often the ardor of the culinary experts fades away at the sight of a failed masterpiece. So much work, and all down the drain. It is not surprising that the activity of a pastry chef, started so spontaneously, is supported by a host of pressing questions: "Why is the biscuit raw inside, how many minutes does it need to be baked, at what temperature, or why does it settle?" and others, others ...
However, it is worth dealing with everything in order.
Often in recipe descriptions, you can notice that starchy powder is added to the dough along with the main components. In this regard, a reasonable question arises, why is there starch in the biscuit?
Probably, one should start with the fact that, depending on the plant from which it is extracted, this component is presented in a fairly extensive assortment, namely, corn, soybean, cassava, rice and other types of starches are used in cooking. In confectionery, they often resort to potato and wheat.
The starch in the biscuit is designed to eliminate excess moisture, which allows the product to be airy and tender. If, when kneading the dough, 30% of the flour is replaced with wheat starch, then you will notice that the volume of the cakes increases during baking, their structure turns out to be lighter and more grainy, and the cake or roll comes out incredibly soft.
However, it is worth remembering that if you use potato powder, then it should be dissolved in dairy or fermented milk products, and also pay special attention to vanilla or any other flavoring agent, since potato starch helps to suppress the taste of the finished product.
You've probably noticed more than once that store cakes are the owners of such thick cakes that willy-nilly you feel a prick of envy and try to find out how to achieve this in your homemade baked goods? It should be noted that this is not one or two rules, but a whole set of measures aimed at achieving an excellent result.
Many hostesses had to deal with such a problem that when baking the biscuit does not rise, and if it does rise, then it must fall afterwards. And it becomes so offensive, because we are trying to comply with all the subtleties and rules, but apparently we are missing something. And this is exactly so, there are several reasons for this "piggy" behavior of the cakes.

Owners of multicooker, for example, often boast of huge biscuits, but even among them there are "losers" who get a flat pancake instead of a plump sweet roll.

The rules for this unit are, in principle, similar to a conventional oven: set the correct temperature and time regime, do not open the lid during the baking process, but here is one rather tricky point. Some are trying to create an incredibly tall monster, such that when raised, it closes the valve of the multicooker and spoils all circulation of warm air.
Well, ladies, dear, do not be lazy, well, better make two mediocre and successful cakes, then happiness will smile at you.
Many newly-minted "pastry chefs" are wondering how to determine if the baked goods are ready, whether they are baked? There are a couple of ways to find out.
You can check the readiness of the cake by piercing it in the center with a wooden stick. If after removing our "dosimeter" from the baking at the end it is dry, then hurray, comrades, the biscuit was a success, because otherwise the piece of wood will be sticky, with the remnants of dough.

Another factor signaling the readiness of the biscuit is its appearance, if you find that the baked goods have shrunk somewhat in the form, that is, they have moved away from the walls, then this can be regarded as the readiness of the product.
However, such breakdowns often happen that the outside of the cake looks amazing, but inside it is soft, floundering and clearly unprepared. So what if the biscuit is not baked?
Initially, you need to determine what exactly happened such nonsense.
Large dose of sugar
Often, a semi-baked cake can be the result of a technology error in kneading the dough. If, hoping to make the future cake even sweeter, a naive housewife put 2 times more sugar in it, then you should not expect a perfect biscuit. The same applies to flour, put less is bad, put more - the same. It is worth remembering once and for all, jokes with a biscuit are bad and neglect of proportions is a sure "death" for the future confectionery.
Temperature regime
The second and the most common mistake- this is a broken biscuit baking mode, that is, the temperature and time were not chosen correctly. Or you have overheated the oven so that the dough is simply baked too quickly around the edges without reaching the center. Or, on the contrary, the degrees in the oven are not enough and the time that you measured for baking is simply not enough.
How to finish a biscuit
But how to save such a “miracle-yudo” and bake it to full readiness? First, check the temperature in the stove, if it's high, lower it, if it's low, add it. Secondly, so that the biscuit, which is already fried enough on top, does not burn, it should be covered with foil and left in the oven to bake, periodically poking with a stick to check. That, in principle, is all science.
Many recipes for biscuit confectionery prescribe a baking time on average of 30-40 minutes, but this does not mean that any cakes are baked that much.
Of course, its taste parameters and quality characteristics depend on how much the biscuit is prepared. After all, if you overexpose the product in the oven, it will become dry, dense and tasteless, and if, on the contrary, underexpose, then there is a risk of getting a sticky and dull mass, instead of a tasty and tender crumpet.
Naturally, the baking time also depends on the exposure temperature, as well as on what kind of cake you need, whether it is for a cake or for a roll, that is, the thickness of the dough is of primary importance.
For a roll, the time regime varies within 10-15 minutes. For cakes, from 25 minutes to 1 hour.
Cooking a biscuit is certainly a tricky business, in which every nuance can be reflected in the appearance and taste of the product. Therefore, you need to take into account everything, even the choice of temperature for a certain type of dough.
For butter biscuits, the baking temperature should not exceed 180 ° C. The simplest cake should be baked in a well-heated oven at 200-220 ° C.
Put the form with the dough in the oven only after making sure that it has warmed up enough, otherwise you will have to re-read question number 3.

In addition, after the end of cooking, you cannot leave the product in the oven so that it does not dry out. This rule does not apply to multicooker. When working with this device, on the contrary, after the end of baking, the cake should be left inside for 10 minutes, so you can avoid the rapid fall of the biscuit.
And what nasty things the biscuit does not come up with to make the hostesses nervous. It does not rise, and falls, and is not baked, but besides, it does absolutely terrible things - it swells up like a slide, bursts and pretends to be a volcano, spewing out a liquid dough from itself.

Heat
What could be the reason for such a character trait of this whimsical baking? Heat! This is the main point. If you heated the oven to hellish flame, then the biscuit will behave inadequately, the top will bake quickly, and inside the dough will simply boil and under pressure will raise a mound, and in more advanced cases it will burst and flow out.
Girls, dear, remember, how long and at what temperature you will bake a biscuit depends on the outcome of the entire culinary event.
Overdose of flour
However, baking can crack not only for this reason. It is especially noticeable on cupcakes that cracks appear on top of the finished product. Everything is explained by the banal excess of the proportions of flour in the recipe, or when baking you simply overdried the biscuit.
One of the most popular mistakes in making biscuits is eggs, or rather incorrectly beating them. Firstly, the eggs should be very carefully divided into whites and yolks and beaten separately with sugar, and the dosage of sand should not be changed, but followed strictly according to the recipe. Yes, yes, biscuit is a capricious thing. If the beaten egg foam is not firm enough, the crust will end up "rubbery".
You should also mix all the ingredients as gently as possible so that this foam does not precipitate.
And so he succeeded, chic, lush and airy. But what is this ?! The smell of eggs spoils all the hard work done. The biscuit recipe contains a large number of eggs; for some, this smell in the finished product is not perceptible, but some especially sensitive individuals simply cannot bite off a tiny piece. In addition, eggs from domestic chickens make the smell even more expressive than store goods. In addition, those biscuits that contain baking soda also smell like an egg.

What to do in such a situation? If soda can still be replaced with a more innocuous baking powder, then giving up eggs is not an option at all. Then there is only one solution, masking the smell. For this, vanillin or various artificial food flavors are added to the dough.
Another way to overcome the unpleasant aroma is to impregnate the cakes with syrup or confectionery cognac, which will also give the cake or roll a peculiar rich taste.
The originality of the baking design makes it even more attractive for those with a sweet tooth. Making a dark or striped cake is not such a difficult task, just add cocoa powder to half of the cakes (mix it with flour while kneading the dough).

You can also often see orange, pink and other rainbow biscuits, the coloring of which is achieved using food colors added to the dough. Such products are incredibly colorful, interesting and children like them. However, are you ready to stuff a tasty treat with chemistry for the sake of momentary beauty?
Biscuit, in comparison with many other flour products, has a rather modest calorie content.
"Enemy" biscuit in classic recipe where sugar, eggs and flour are used, has 258 kcal per 100 g. Butter biscuit has an energy value close to 300 kcal per 100 g. If you add cream, jam and other grease, with which it is so abundantly customary to coat confectionery, then you can safely, without giving a damn about all the diets, grump the cake without a twinge of conscience. And why is there, if 0.1 kg contains more than 400 kcal, then what difference does it make how much to eat, you still won’t get any thinner.

Having measured how much time it takes to bake a biscuit and the amount of nerves spent on it, you can think about whether it is worth bothering with it at all. However, having mastered the skills of cooking this seemingly simple, but terribly moody confection, you certainly will not experience problems with others.
A handmade cake is a symbol of a family holiday, home warmth and comfort. The simplest and most popular homemade cake is made from sponge cake. Biscuit dough contains a minimum of available ingredients that are found in any home kitchen; it is easily whipped with a mixer, just baked. And of course, homemade biscuit cakes with homemade cream are incredibly tasty. Any of the most beautiful cakes from the best pastry shops cannot compete with them. And even though a homemade cake is not as beautiful and exquisite in appearance as a cake from a professional pastry chef, when baking at home, we are always sure that we used quality products and cooked with love. Here you will learn not only how to bake a biscuit for a cake, but also how and with what to soak it. I will also offer you some of the most popular biscuit recipes and I will give you a selection of recipes for simple and delicious creams, ganaches and cake icings. And of course, simple options for decorating homemade cakes with beautiful photos await you.
Classic biscuit
Proportion of eggs, sugar and flour for a classic biscuit: for 1 egg 30 grams of sugar and 30 grams of flour.
For round shape with a diameter of 24-26 cm
For round shape with a diameter of 28-30 cm
For a roll on a baking sheet measuring 38 cm X 32 cm
If you replace 1/3 of the flour with ground nuts or cocoa powder in a classic biscuit, you will get a nut or chocolate biscuit, respectively.
Often in the biscuit dough, part of the flour is replaced with starch, it is believed that with it the product will turn out to be more airy and tender, since it reduces the amount of gluten. But I do not advise and never add myself. And to reduce the effects of gluten, simply stir the flour into the eggs quickly.
Beat eggs until foamy for 7-8 minutes. Gradually add sugar, beat for at least 10-15 minutes until fluffy and increase in volume by 2.5-3 times and sugar is completely dissolved. Sift flour into beaten eggs in 2-3 doses, stir with a spoon or spatula. Make sure all the flour is mixed into the dough. Pour the dough into a mold, cover the bottom of which with baking paper, the sides do not need to be oiled. Bake in a preheated oven at 180 ° C for 35-40 minutes.
The classic biscuit is very fluffy, delicate and airy. In my opinion, it is good even by itself without impregnation and cream, just sprinkle with powdered sugar.
Detailed step-by-step photo recipe for cooking ⇒
Butter biscuit
For one round mold with a diameter of 26-28 cm or for two molds with a diameter of 20 cm
This amount of dough can also be baked in a 24 cm diameter pan, place the excess in muffin tins and bake with the main biscuit.
Melt the butter, microwaveable.
Beat eggs until frothy for 7-8 minutes.
Add sugar gradually, beat until volume increases for 10-15 minutes. Add the flour and baking powder to the beaten eggs in 3 to 4 meals - sift directly into the eggs. Stir gently with a spoon or spatula from bottom to top and toward the middle. Make sure that all the flour is mixed into the dough.
Add 2-3 tablespoons to melted and slightly cooled butter. biscuit mass, mix and then add to the total mass in 2-3 doses, mix gently. Make sure all the butter is evenly mixed into the dough.
Bake the biscuit in a preheated 160 ° C oven for 40-45 minutes.
More tips for baking a sponge cake at the bottom of the page.
Detailed step-by-step photo recipe for cooking ⇒
Angel biscuit
For round shape with a diameter of 20 cm
It is not necessary to use the freshest proteins, on the contrary, it is better to use "aged" ones, that is, those that have stood in the refrigerator in a hermetically sealed container for 3-5 days. You can also use thawed proteins.
Carefully separate the whites from the yolks so that not a drop of the yolk gets to the whites. Add salt to the protein mass and beat until a fluffy and soft white foam is obtained. While whisking, add a mixture of plain and vanilla sugar in small portions. Whisk until firm.
Remove the zest from the lemon by rubbing on a fine grater (remove only a thin yellow layer, without touching the bitter white part), add to the whites. Sift flour with baking powder, add (sift) to the protein mass in 3-4 doses, gently knead from bottom to top and to the middle. Avoid too intense or rough movements, otherwise the delicate air mass may settle! Put the protein dough in a dry form (do not grease the walls with anything), level the surface. Bake in a preheated oven at 180 ° C for 35-40 minutes.
More tips for baking a sponge cake at the bottom of the page.
Yolks can be prepared, which can be stored in the refrigerator for up to 2 weeks or cooked very tasty
Orange biscuit
Similarly, you can make a lemon biscuit, replacing the orange with 2 lemons.
Remove the zest from the orange and squeeze the juice. Combine flour, starch and baking powder - sift. Beat eggs until foamy for 7-8 minutes. Gradually add sugar, beat for at least 10-15 minutes until fluffy and increase in volume, 2.5-3 times and complete dissolution of sugar. Heat orange juice to a boil. Add orange zest to the egg mixture and sift the flour mixture into the beaten eggs in 2-3 doses, stir with a spoon or spatula. Make sure all the flour is mixed into the dough. Stir in the orange juice into the dough. Bake in a preheated oven at 180 ° C for 30-35 minutes.
More tips for baking a sponge cake at the bottom of the page.
Chocolate biscuit
For round shape with a diameter of 24 cm
For the chocolate mass:
For biscuit:
Cook the chocolate mass: combine cocoa powder and sugar in a small saucepan, add water and vegetable oil - bring to a boil with constant stirring.
Combine dry ingredients: flour, baking powder, salt - stir with a spoon and sift.
Beat eggs with sugar until whitened and swollen.
Add the chocolate mass to the beaten eggs in 3-4 doses, continue whisking.
Add flour mixture in 2-3 doses (sift into the dough), mix well with a spoon. At the end, you can punch a little with a mixer.
Bake in a preheated oven at 180 ° C for 45-50 minutes.
More tips for baking a sponge cake at the bottom of the page.
Chocolate biscuit (lean)
For a round shape with a diameter of 20-22 cm
(glass volume 200 ml)
Combine dry ingredients: sift flour with cocoa powder and baking powder, add vanilla and regular sugar, stir. Pour in water gradually, stirring well. The dough should be smooth, viscous and uniform, evenly chocolate colored. Add vegetable oil, mix thoroughly. Bake in a preheated oven at 180 ° C for 30-40 minutes.
More tips for baking a sponge cake at the bottom of the page.
Unsweetened chocolate in recipes can be replaced with cocoa powder, according to the following scheme:
every 30 grams of chocolate = 1 tbsp. l. butter + 3 tbsp. l. cocoa (no slide). Reverse replacement is also possible if we want to replace cocoa with chocolate.
Basic impregnation recipe
So that the cake is not dry and at the same time, so that your biscuit does not float in a puddle of syrup, you need to correctly calculate the amount of impregnation. Remember the proportion: for a 500 g biscuit, you need 250 - 300 g of impregnation.
From this amount, 100 ml of syrup is obtained.
Heat water, add sugar, heat and stir to dissolve sugar. Once all the sweet crystals have dissolved, leave the syrup alone and wait for it to boil. Remove any foam from the surface and remove the saucepan from the stove. Add alcohol to the cooled syrup: brandy, whiskey, rum.
You can add vanilla, cinnamon to sugar syrup.
Water can be replaced with coffee.
For a baby cake, water can be replaced with fruit juice, no alcohol is added. You can also prepare milk impregnation for children: dilute condensed milk with boiling water to the desired consistency, add vanilla or cinnamon.
You can use any ready-made syrups (my favorite is almond - it goes well with chocolate biscuits). Homemade jam syrup is also suitable (if it is very thick, dilute it with a little water). Often I use homemade for impregnation.
We also add alcohol to ready-made syrups.
Cream with Mascarpone and cream
Whisk in the cream and icing sugar. Stir the mascarpone with a spoon, gradually pour the cream into it. Add vanilla. Whisk.
Cream with Mascarpone and butter
Whisk butter and icing sugar until lightening for 3-5 minutes. Add Mascarpone and beat again until smooth.
More tips for making creams at the bottom of the page.
Cream with boiled condensed milk and butter
Mix butter at room temperature with a spoon with boiled condensed milk until smooth, beat slightly.
More tips for making creams at the bottom of the page.
Custard
Beat starch, sugar, vanilla sugar, salt, egg and a small amount of milk with a blender until smooth. Add remaining milk, stir. Bring to a boil with constant stirring. Try to get a homogeneous mass. Pour the cream into a bowl, cover with foil "in contact", cool. Whisk the butter and icing sugar until white, gradually add the custard base in 3-4 doses, beat well.
More tips for making creams at the bottom of the page.
Lemon cream
Similarly, you can prepare orange cream by replacing lemon with orange.
In a heavy-bottomed saucepan, combine the lemon juice, zest, sugar and eggs, and combine until smooth. Put on low heat and, with constant stirring, bring to a boil and lightly thicken. Cool the resulting Kurd completely. Whisk in soft butter until fluffy. Continuing to beat, gradually introduce the cooled Kurd.
More tips for making creams at the bottom of the page.
Cream with Nutella
Whisk in the cream and icing sugar. Stir the mascarpone with a spoon, gradually pour the cream into it. Add Nutella. Whisk.
More tips for making creams at the bottom of the page.
Chocolate cream with chocolate
Whisk in room temperature butter and sugar until whitened. Heat the chocolate on a steam bath, gradually add it to the butter in small portions, beat. Add hot coffee without stopping whisking.
More tips for making creams at the bottom of the page.
Chocolate cream with cocoa powder
Melt the butter, be careful not to burn. Mix sugar, cocoa powder and flour, add to melted butter, stir until smooth. Pour in milk little by little and cook with constant stirring until thickened. Refrigerate. Add cognac.
More tips for making creams at the bottom of the page.
Cover the top of the cake with ganache or icing. With their help, you can create beautiful streaks on the sides of the cake. To make the ganache or icing cover the cake in an even layer, when forming the cake, place the bottom of the biscuit on top, which is in contact with the bottom of the mold.
Ganache with dark chocolate
Break the chocolate into pieces, put in a cup. Bring the cream to a boil and pour over the crushed chocolate. Stir until the chocolate is completely dissolved. Let cool, add butter, stir - you should get a smooth and shiny ganache.
Ganache with white chocolate
Break the chocolate into pieces, add the boiling cream, stir until smooth and refrigerate in the refrigerator for 2-3 hours, if necessary, you can leave it overnight. Take out the yellowish mass and begin to beat it with a mixer. In the process of whipping, add butter - it is necessary for a shine and a more delicate structure of the cream. After this manipulation, the ganache will thicken, turn white and be ready for use.
Ganache with cocoa powder
Pour milk into a saucepan and bring to a boil. Pour in the sugar mixed with cocoa powder. Cook the ganache over medium heat, stirring constantly, until the sugar is completely dissolved. Remove from heat and add oil. Stir to dissolve the oil.
Chocolate glaze
Combine pieces of chocolate and butter, heat in a water bath until smooth.
Chocolate glaze (lean)
Combine cocoa powder, vegetable oil, sugar. Add water and, stirring occasionally, bring to a boil. Simmer for 2-3 minutes. Cool the finished icing slightly and pour over the cake.
Lemon glaze
Squeeze the juice out of the lemon and be sure to sift the icing sugar - rub through a strainer so that there are no lumps. Gradually add the juice to the powder, stir until a homogeneous thick mass. If the icing turns out to be very thin, add powdered sugar to it, if it is thick, add juice or water.
Jelly to cover the fruit on the cake
Pour in gelatin cold water... When the gelatin swells, heat the mass until the gelatin is completely dissolved. Do not let it boil as the gelatin will lose its strength.
Add sugar and lemon juice. Cool slightly. Use a brush to apply the jelly to the fruit. The gelatin will harden and the fruit will retain its freshness.
♦ Eggs
Eggs for biscuit dough should be fresh and at room temperature.
If you forgot to take your eggs out of the refrigerator beforehand, put them in a bowl with warm water t 40 ° - 50 ° C for 3-5 minutes.
Usually eggs whipped whole, without separating the whites from the yolks, but in some recipes, separation is possible.
Eggs beat first at high speed for at least 7-8 minutes. And only then sugar is gradually introduced in small portions and whipped for at least 10-15 minutes until splendor and an increase in volume by 2.5-3 times, and complete dissolution of sugar. You can determine the readiness of the beaten egg mass by the traces of the mixer whisk, which will begin to form on the mass when it reaches the desired consistency - the biscuit mass can be painted on the surface and the trace of the dough remains visible for several seconds.

The grandmother made the cream from homemade sour cream. It has its own characteristics of preparation, read about it in the same publication ⇒
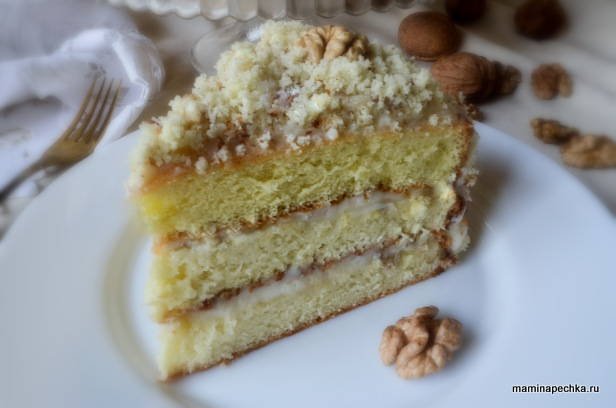
The modern version of Grandma's cake is a classic biscuit, between the cakes there is butter cream with boiled condensed milk, walnuts.

Covering - Cream of Mascarpone and cream. Decoration - biscuit crumbs, nuts, tangerine chips, star anise.

Another option is to decorate the cake with meringue crumbs. Meringue (meringue) can be bought at a pastry shop, or you can bake at home ⇒
I not only decorated this cake with a tiny meringue, but also made a layer of meringue between the biscuit cakes. There are still fried almond petals, whole hazelnuts and figs.

Cream from Mascarpone and boiled condensed milk. Prepared in the same way as Cream from butter and boiled condensed milk.

Fresh fruits are a beautiful and tasty decoration of the cake. The only downside to this decoration is that the fruit winds up quickly, so decorate the cake just before serving or cover it with clear jelly (recipe above).

This is made from butter biscuit and I used strawberries to decorate it, black currant and small meringues bought in a pastry shop.

Mascarpone cream and cream.

An easy way to give your cake a festive look is to decorate with live edible flowers. This must be done before serving and, of course, use flowers grown without chemical fertilizers.
In the photo, it is decorated with a strawberry flower and mint leaves. This option is also suitable for decorating a cake.

Fresh flowers that can be eaten: rose, orchid, calendula, nasturtium, cornflower, chamomile, dandelion, clover, lilac, violet, pansies, sunflower, acacia, lavender, geranium, jasmine, hibiscus, elderberry. Flowers of edible berries and fruit trees: citrus, apricot, peach, apple, cherry, pumpkin, vegetable marrow. Leaves of mint, lemon balm, basil.
While these flowers are edible, you don't have to eat them if you don't feel like it. After admiring enough of a beautiful cake, you can just put them aside.

My granddaughter Eva is happy to decorate a sponge cake with cherries.

I tried to collect for you the most affordable and at the same time a variety of recipes biscuits, creams and ganaches, shared the secrets of their preparation - I think, sufficient material for home improvisations. Bake cakes at home, friends! Even if they turn out to be not very even, not very beautiful and will not delight in the luxury of decoration, the home kitchen more than compensates for all this with love and joy that you will give your family. I wish your families to be friendly and happy, may they have a lot of children, a lot of fuss and worries. And let your families be big, because in small families, as a rule, cakes are not baked.
In contact with
Single-digit numbers are added using an addition table. Addition table, and ...

When starting a construction business from scratch, it should be remembered that when doing ...

Often, while engaging in a handicraft hobby, a person begins to be interested in yarn as ...