DEGREES OF COMPARISON OF ADJECTIVES In English, as in Russian, ...


The most frequent bites for catching perch I took place on this gear. The striped robber was attracted by the entire equipment.
Through trials and tests, I found for myself the most catchy equipment for perch at the moment in the autumn-spring period.
In essence, the perch bites on everything - that's why it is interesting for the fisherman. Such a responsive predator without any sophisticated gear and without any experience can be caught all seasons.
But this tackle catches perch more successfully - it grabs the bait much faster and more willingly than others.
Additionally, to attract the "sailors", I tied a red woolen thread to each hook.
I planted a worm or bloodworm on each hook (can be combined).
I cast the line and wait for all the tackle to sink to the bottom. Then a calm, not sharp jig.
The tackle is dragged along the bottom, while the hook with foam balls will pop up and will always be at some distance from the bottom.
Most often, the bite falls on the pop-up hook with balls. This bait seems to attract more perch.
Try to be sure to catch perch with such a catchy tackle.
Donka with a feeder is a catchy and popular tackle. With its help, a small container of bait is delivered in close proximity to the nozzle, which allows you to increase the number of bites. For all the seeming simplicity of the device of such a donkey, when installing it, several subtleties must be taken into account, which will be discussed in the article.
The peculiarity of bottom rods with feeders is that the container in which the bait is placed performs a dual function. When casting, it becomes a load and flies a long distance, when it falls to the bottom, it turns into a place for feeding fish. In this way, the angler not only delivers a hook with bait to the required point, but also tells you where to eat.
In addition to this quality, there are also other advantages, such as the possibility of fishing at long distances, at depth or in the current, where it is not possible to accurately cast bait, and finally, the cost of components is low. The main drawback is the difficulty in using the donkey in the twisted places.
To understand how to make a donkey with a feeder, you should familiarize yourself with the types of donoks. The most commonly used bottom gear of the following designs:
"Zakidushka". Ancient tackle. It is a fishing line with a diameter of 0.3-04 mm and a length of up to 50 meters, collected on a reel. Initially, a load was used, fixed at the end of the snap, leashes with hooks were located a little higher. Then sliding sinkers began to be used, and the leash with the hook was moved to the end. This decision increased the sensitivity of the gear. Feeders in this version are not used for a simple reason: in order to cast the bait, the angler first spins the load, and due to centrifugal force, all the bait is poured out of the container.
"Elastic". An original and very catchy rig that helps to achieve high results in mass fishing of such fish as crucian carp, roach, ram, sabrefish. To make it a bottom tackle, you just need to tie a rubber shock absorber directly to the load. The fishing line following, then spreads along the bottom. You can make an elastic band with a feeder, but then you will have to choose a tighter shock absorber and the lightest possible feed container in order to spend less effort on its delivery.
Donka from spinning with a feeder. Came to replace the "zakidushka". Initially, a spinning rod (usually a large test) was taken as the basis, equipped with an inertia or inertialess reel, on which a fishing line with a load and hooks is wound. Later, a feeder, mainly of a spring type, began to be used as a load, in which the bait was stored for the longest possible time. This option was chosen for a simple reason: it is inconvenient to make frequent casts, but there are no longer any shortcomings of the snack.
Feeder. Modern tackle, consisting of a special rod with flexible interchangeable tips (signalers), an inertialess reel, monofilament with a diameter of not more than 0.3 mm and multiple variations of feeders and leashes.
There are several types of feeders in which anglers deliver bait mixtures. Let's describe them.
"Spring". The most common type of donkey feeder. It is designed for stagnant water and is manufactured industrially or with your own hands exclusively in a sliding version. Assembling the tackle is very simple: just pass the fishing line through the axial tube, then into the stopper, tie a swivel, to which attach a leash with a hook.
Most often, it was equipped with a donkey from a spinning rod with a feeder. Some modifications of the "spring" provide additional weight on its axis. If you need to load it yourself, then it is better to use a lead tape, making several turns on the axis.
The bait for such a feeder is prepared with a viscous consistency so that it does not crumble when it hits the water and, when it falls to the bottom, disintegrates for a long time. It is rarely used on rivers and canals due to its shape and tendency to roll downstream.

The classic "spring" with a "rocker" and their location in gear
There are very small feeders, which can be equipped with both half-donks and a fishing rod with a float. Tackle collected in this way sometimes gives unexpectedly good results.
"Cage" - a mesh feeder. The most common option. It appeared with the introduction of the picker and feeder into the practice of fishing, and during its existence it has been modernized and improved more than once. It is made with a built-in weight and is attached at one point. It can be round or rectangular in cross section.
With this feeder you can go to any non-predatory fish, including carp and bream. With its help, the angler first feeds the selected fishing point, throwing a container filled several times without a hook and sharply pulling the tackle when it reaches the bottom. The feed freely exits the tunnel and remains in the water. Then the leash is put on, the tackle is thrown and the fishing process itself begins. Each time you strike, additional feeding occurs.

Net feeder - the main tool for feeder fishing
If you plan to fish in a strong current, a rectangular net with a large flat weight is selected. In stagnant water, both types can be used, but if the bottom of the pond is silty, containers that do not go into the viscous bottom should be preferred.
Closed feeder. A cylindrical plastic container of this kind is used in circumstances where there is a large amount of an animal component in the bait, such as maggots or bloodworms. They can leave the inner space only through a limited number of holes, near which the interested fish will be “on duty”. Sometimes some of the outputs overlap for greater efficiency.

Feeders of closed type are designed for bait with animal components
Naturally, it will be possible to successfully use such a feeder only in stagnant water, since it does not provide for weighting. But it does not sink much into silt, which is an additional advantage of this container option.
Feeders for long distance casting. When fishing, it may be necessary to cast tackle over a long distance (more than 60 meters). Ordinary mesh containers will not fly like that, and they may not withstand the load. Therefore, special designs have been developed that can travel long distances by air.
To improve flight performance, a round lead weight is attached to the feeder at some distance, as a result of which it takes the form of a bullet.

Feeder "bullet" - designed for long distance fishing
This design should not be used on silted water bodies. In addition, she is prone to hooks.
In fishing practice, there are cases when conventional types of feeders are not suitable for fishing conditions. Let's describe them.
The old proven design for many years allows you to successfully lure carp and carp. It consists of a lead plate, to which a bar of pressed sunflower cake is attached with the help of rubber from a bicycle tube.
Leashes with hooks here are tied tightly to the base, the hook attachment was not put on, and its sting was stuck into the top of the head in the corners into the drilled holes. The tackle worked on the principle of self-cutting, and the angler sometimes did not even set a bite signaling device, determining the presence of a trophy by the sag or tension of the fishing line.
In the complete absence of a bite, the hooks could be equipped with a nozzle, which was preferred by large fish - corn, peas, soybeans, etc.

A plate with a top is a passive tackle designed for large cyprinids
In strong current conditions, it is required that the bait container remains stationary during the entire time of fishing. With conventional mesh feeders, this result is difficult to achieve. Therefore, the anglers made it as flat as possible, while maintaining the volume for the bait mixture.

Flat feeder for strong rivers
In order for the other qualities of this element to remain in force, it was necessary to strengthen the attachment point to the fishing line. It is made from all metal.
This type of bait container is indirectly related to the topic of our article, but it should be mentioned, because sometimes in the process of fishing you have to rebuild on the go in order to get away from zero.
You can do it yourself by taking the feeder, removing the load and securing in the upper part (where there is no fastening) a large amount of floating substance (mounting foam, polystyrene, etc.). The main thing is that the device capsizes in the water, gradually dropping the bait.
The tackle here will become more complicated, since it is necessary to calculate that the nozzle does not sink too much, and the fish is not afraid of the container.

A floating feeder is a good tool to attract fish close to the surface of the water.
There are several rigging recipes for a bottom feeder rod. The leash is knitted the same for everyone, but the attachment of the bait container depends on the intentions of the angler, his preferences and fishing conditions.
Sliding fixture. It is used both for "springs", when the line is threaded through the axial tube, and for feeders with one attachment point, when the line passes through the eye of the bracket or anti-twist tube. It is worth dwelling on the last option in more detail.
The essence of the equipment is that when biting, the fishing line slides freely in a plastic tube, and when casting, the feeder with the nozzle are divorced and do not intersect. The finished item can be purchased at the store, but most often it is made independently.
As an anti-twist, anglers use either an empty ballpoint or gel pen refill, or a cocktail tube. The rigid construction element prevents the rig from twisting and overlapping without resisting the line.
The feeder is attached at the place of the fold, made about 1/3 of the tube, rigidly to the tube or with a small leash. Hook and container when casting will be located at a certain angle. The free movement of the main line within 30 centimeters is limited on both sides by stoppers. The leash for the hook can be placed directly after the straw.
The attachment point is made of copper or soft steel wire. When winding, they leave a small eyelet into which a swivel or carabiner is threaded. You can pick up a small piece of insulation that fits over the tube in diameter.

The anti-twist tube allows the line to slide freely inside and prevents the equipment from twisting
The tackle is convenient, but athletes are skeptical about it because of poor camouflage in clear water.
Paternoster. It is not difficult to assemble such equipment correctly, and installation is carried out directly on the pond.
First, at the end of the fishing line, we tie a loop about 25 centimeters long. Knit should be a double knot, be sure to wetting it for strength. Then we conditionally divide the circle of the loop into three parts and cut it at a distance equal to 2/3 of this circle. You will get two unequal parts. We tie a swivel for a leash to the larger one, and a swivel for the feeder to the smaller one.

After casting and pulling up the tackle, they are parallel to each other. When biting, the force is directly transmitted to the signaling device, bypassing the feeder.
Equipping a donkey with such a mount is also not difficult. First, a swivel is put on the fishing line, to which the feeder will be attached in the future. Then a side loop is knitted about 15 centimeters long. Moreover, it is necessary to make sure that the swivel is inside the loop. The free end is left 25-30 centimeters long.

Gardner loop - modification of the paternoster (diagram)
The bottom equipment of this type allows you to increase the sensitivity of the gear and reduce the number of overlaps during casting.
We take a separate piece of fishing line (preferably fluorocarbon for rigidity) about 80 centimeters long, fold it in half. We pass one end into the swivel. At a distance of 10 centimeters from each edge, we knit knots. Along the edges, we will have loops of 10 centimeters each, and in the center there will be a 20-centimeter loop with a swivel inside.

Symmetric loop - convenient when casting and does not interfere with the bite
Experienced anglers make these small twist loops. A leash will be attached to one of them, the main line will be attached to the other. After casting and pulling up, the container will be close to the nozzle. When hooking, the fish will have 20 centimeters until it feels the resistance of the load.
Installation of such equipment is somewhat more complicated than the previous one, but if you practice, it is quite achievable. The central loop is also knitted here, but it should have an irregular shape.

Asymmetric loop allows you to separate the leash and the feeder at a safe distance
Overlaps in this version are minimized, and the sensitivity has increased even more, especially in the current.
Summing up, we note that fishing with a feeder can bring a lot of joy and pleasure to the angler. Such tackle is easy to complete, even in the budget version. The main thing is to choose the type of container acceptable for the reservoir and choose the right bait.
Carp is a fish of the carp family, lives almost everywhere throughout central Russia. The crucian feeds on almost everything, from algae to worms and insects that have fallen into the water. The crucian carp living in the middle lane, as a rule, is not large, but living in the lower reaches of the Volga, sometimes it reaches the size of a small carp. There are two varieties of crucian carp in the middle band:
content
 (or "float rod") is perhaps the most popular and sports tackle for catching crucian carp. It consists of a rod, a reel, a fishing line, a float, a sinker and a hook with a nozzle.

Also read the guide to, which will come in handy while fishing with a float and other gear.
 Feeder rod () should be selected depending on the conditions (reservoir, weather). So, for large reservoirs with a strong current (rivers, reservoirs), tackle with a large rod test up to 120 g is suitable. For small reservoirs, tackle with a rod up to 60 g and a small feeder is suitable. The 3.5 - 4 meter rods are the most versatile and offer good value for money. When choosing a feeder, you should take products weighing slightly less than the test of the rod, since the bait will “take” the rest of the weight.
Lure should also match the reservoir (). When fishing in a pond with a strong current, the bait should be dense enough so that it does not wash out, and in reservoirs with a weak current or stagnant water - as light as possible so that it does not sink in the muddy bottom. For the latter option, a base of breadcrumbs is suitable.
So that the fish could not quickly get enough and thus lose interest in the bait, the components of the bait should be small. The crucian does not have specific taste preferences, so there can be no unambiguous and clear advice on how to make bait. For smell, you can add a little grated garlic, ground seeds, vegetable oil or even ground biscuits to the bait.
Bait. As with groundbait, there is no advice on what to fish for. The taste preferences of crucian carp can change even during the day. One can only say that crucian bites well on pasta, corn, pancakes, their rye bread dough, flavored with garlic.
fishing line suitable for a section of 0.12 mm. If there is a possibility of biting a carp or other strong fish, it is better to take a fishing line of about 0.2 mm. The leash should be made in this case from thinner fishing line. The nozzle should be such that a trifle like roach or bleak could not swallow it. Hooks are best used from No. 5 - 7 to No. 9. The latter is suitable for large carp. Also, the hooks should be as sharp as possible, otherwise there may be problems with hooking the fish.
Vershinki (quivertypes), like other tackle should be selected depending on the conditions. In the current and in the wind, the tip should not be very sensitive so as not to react to these factors and not create false bites. When fishing on a still body of water in calm weather, it should be more sensitive so that the angler can see even the most sluggish bite.
The simplest equipment for carp- paternoster.

The technique of catching carp with a feeder is described.

We will not repeat ourselves - there is about this gear. A is the design of a conventional feeder donkey with 3 feeders and 3 hooks.
 A makoshatnik is a special tackle for fishing using cake. Usually carp are caught on it, but sometimes carp are also caught on it. In view of this, it is possible to catch crucian carp purposefully with it. Carp fishing on top has several features.
They often use spinning rods as tackle, but more professional anglers use feeders.
Bored with a fishing rod on the lake? Doesn't peck? Fixable!
Today we will make tackle with our own hands that will not let you get bored on the pond.
A tool that you can take with you anywhere. For fishing, hiking and even to the Bolshoi Theater.
If you are not a fisherman at all and went on a weekend hike with your other half, you can always surprise and please her with a delicious fish soup from spontaneously caught fish in the very first forest pond. Unless, of course, your other half gets to read this publication first.
So! What do we need?
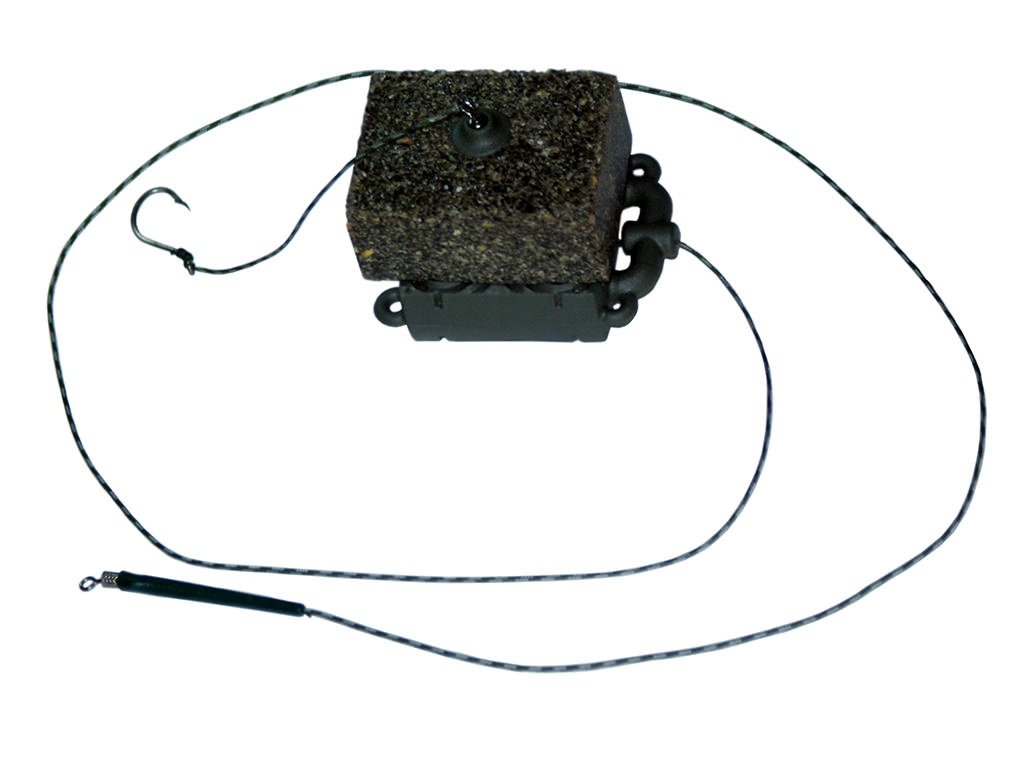
A piece of wire 20-30 cm. In my case, it is copper. In yours - any kind of soft wire.
Pliers. Everyone has them. If they are not there, we take it from a neighbor.
Ball pen. In my case. In yours - door, women's, etc.
Carnation.
A piece of line.
Two hooks.
Two foam balls.
That's all we need. Now calculate the costs, taking into account the fact that a ballpoint pen, carnations and pliers will not suffer in the manufacture of gear.
There are dozens of names for this tackle, but in order not to be confused, let's call it not lost .
1.
We pick up a piece of wire with a diameter of 1 mm and hand it over to the non-ferrous metal collection point, and with the proceeds ...
No, wait! It's a slightly different story.
Using pliers, twist a small eyelet at the end of the wire, wrapping it around the carnation. We bite off the extra piece of wire and bend it so that the sharp tip does not stick out. 


2. The fish flocks to the bait and sees two delicious (checked!) Styrofoam balls. And before embarking on a side dish, he hurries to feast on our balls. This is where it gets hooked.
2. Gathers on the knee in 10 minutes.
3. Does not require financial investments. Two hooks and a fishing line - all waste.
4. Lightweight and compact. Will not become a burden on any of the trips.
Do you want to catch the same?
Then to the neighbor for pliers! 
For a beginner, it is not clear why there are so many different feeders and what is better to buy for your needs.
Experienced amateurs have a lot of them in stock. Depending on the conditions of fishing, one or another feeder can be used in the equipment. As a rule, it is connected to the feeder equipment through a swivel with a carabiner, and it can be changed quickly.
The main parameters of feeders: weight and volume. But besides them, there are several other important characteristics that you need to know about.
The main rule when mastering the feeder: do not buy too much, so that later you do not lie around idle.
There is no need to repeat the experience of those anglers who bought different gear just in case, but did not use many of them. With each fishing, with experience, it will become clear what gear is running, and what you can do without.
In the current, the feeder should lie well on the bottom, and not jump on it. It is allowed to move slightly (1-2m) after casting, before it hits the uneven bottom. This is achieved by the correct selection of the weight of the feeder and the use of the main line with the minimum allowable diameter.
For the river (current) feeders weighing 60 - 80g (weak current), 80-100-120g (strong), more than 120g (very strong current) are rarely used.
The most popular weight of feeders: 70, 80 and 100g - it is with them that you most often have to catch on rivers. Such a load is suitable for medium and moderately strong currents.
If you are going to fish with a feeder on the river, then in your arsenal there must be feeders weighing 60-100g. The current can be different, even in the same area. It may vary depending on the season, precipitation, open closed locks, etc.
At the same time, do not forget that to this weight you need to add 20-50g (depending on the volume of the feeder) of the weight of the bait. And at the same time, see if the feeder test is suitable for this total mass. Most rods can handle casting more than their nominal test weight of 20-30g or more without any problems. But this should not be practiced often, especially since working with an unacceptable test changes the action of the rod.
For stagnant water, the weight of feeders from 30g is suitable. Adding to this weight 20-30g per bait, we get the total mass that is comfortable to throw.
Square and round are the main cross-sectional shapes of feeders. Triangular types have been out of use for a long time.
A few years ago it was believed that square feeders are better kept in the current. But time and practice have shown that there is not much difference between them and round ones.
For the river and lake, round and square ones are used, depending on the desire.
Round, cone-shaped, winged shapes float faster when reeled out. Pulling them up is easier and faster. In this case, the load on the coil is less.

Understanding the importance of volume comes with time. The larger the feeder, the more bait can be placed in it.
You may need more or less bait:
Therefore, in addition to weight and shape, it is better to have several different volumes in stock.

Two names for the same feeder designs. Rocket feeders (bullets) have an offset sinker at the end. This design allows them to fly better, one and a half times further than round and square ones.
Missiles must be in reserve. It happens that you need to catch it at extremely long distances.

Often the fish are far from the shore. Throwing the feeder to the maximum distance is not easy. But if you put a rocket, then it is easier to make such throws and they turn out to be more accurate. Moreover, such a design sails less in the wind.
Again, a few years ago there were many feeders with a cap on one end on the market. Fishermen-donochniks, saving bait, considered such a cover necessary. But for the feeder it is better to use open forms. Let the bait wash out freely, lure the fishing point. This is the essence of feeder fishing.
Such processes on the sinker are intended for better retention at the bottom. In practice, this is not noticeable. If there are lugs, they will not interfere, if not, then you should not be upset, an ordinary smooth sinker is no worse.
A special type of construction with a flat sinker and ribs for attaching bait. Used in flat feeder fishing. This is a slightly different type of fishing for standing water. It differs from the classics in the technique and tactics of feeding bait with a nozzle.
Video about the variety of feeder feeders
So, after reading a lot of recommendations, knitting and tying loops for rigging, tying leashes, buying tackle .... - Finally, the feeder is assembled and you can start fishing. But how to find a fishing spot? This will be discussed below.
For those who are not familiar with casting technique with a spinning reel, I bring a short educational program.

. We take the feeder with two hands. For a right-hander: left at the beginning of the rod, right at the level of the reel.
. Right index finger fix the braid pressing it to the rod (see photo).

. left hand open the arc of the line stacker.
. We take the rod back over the right shoulder, the feeder should hang down to 50 cm.
. The left hand is straightened.
. Smoothly accelerate, straightening the right arm and bending the left. When the feeder reaches the "2 o'clock" position, we increase the acceleration, so that in the vertical position of the feeder, the acceleration is maximum.
. We release the index finger from the cord. The feeder is flying.
. If the cord is fixed in the clip (also when using a bank elastic), then until the moment of fixation, we build the feeder in a vertical position. So that at the moment of fixing the flexibility of the feeder absorbs the load on the cord.

It is clear that for successful fishing, fish must be caught where it is. And for this you need to know the potential location of its location. These are, first of all, areas of the bottom with a difference in depths: the edge of the river, rifts, underwater boulders, pits. The task of the angler is to “probe” the bottom and find promising places for fishing. Moreover, you can successfully do this without an echo sounder, standing on the shore at one point. Let's see how to do it.
Probably, many people know the “jig” wiring, in which the winding alternates with the free fall of the load. We will use it to study the bottom.
We take a feeder and hook a weight on the tip of the cord for the feeder. For this purpose, a lead drop weight is better suited. We select a small weight, such that the load is not carried away by the current. We select the study area, remember the direction of the cast (for example, along the landmark on the opposite bank) and cast the weight.
As soon as we felt the impact of the sinker on the bottom, we begin to “walk” along the bottom: we make three turns of the reel handle - a pause, we count to ourselves the time until the load falls to the bottom, the next three turns - pause again, count again, hit, the next three turns - pause , count, hit, three turns, etc. The time the weight falls between our winding and touching the bottom, and gives us information about the bottom topography. If this time increases, then there is an increase in depth, if it decreases, then the depth becomes smaller.
Thus, by exploring different directions, one can find a suitable fishing area. But that's not all, you need to fix the casting distance at this place.
For example, by "jigging" we noticed bottom relief difference. We wind out the weight, while counting the revolutions of the coil. We got, for example, 25 revolutions. We throw the load again in the same direction. Again we carry out a jig winding. Again found the place of the drop. We pull out the tackle. Again 25 turns. So, we were not mistaken and a real bottom drop is already looming. In the same way, we will try to “feel” the bottom several times to the left and right of the place under study, etc.
So we begin to present a picture of what is happening at the bottom. For example, it becomes clear pit whether it is or edge.
After we have found a suitable place at the bottom and are planning to feed it, we throw the weight again, farther than the studied place. We find this difference again, stop winding, take a bank elastic and fix the braid on the spool. To do this, we make three, four turns around the spool with an elastic band and fix it in the clip.


Never fix the braid in the clip! With an excessively strong cast, it may simply not withstand the load. And the bank elastic absorbs the tension of the cord well.
We wind out the weight, at the same time, we should get the same revolutions of the coil handle (in our example, 25), and we hook the equipment.
Now we know the direction (landmark on the shore) and we have a fixed casting distance. You can throw a feeder not only in the same place, but also in a potentially catchy place!
Believe me, it's better to spend even an hour exploring the bottom, and fishing in a potential fishing spot, than throwing at random and thinking: “am I fishing there?”.
Do the first few casts without a hook, just with a feeder stuffed with a crumbly mixture. For example, 4-7 casts, every 20 seconds. Of course, such frequent casts can also frighten the fish, especially since the fish have good hearing. But if fishing comes from 20 meters from the shore, and even at a good depth, then the fish feel quite confident there. And the pleasant smell of our bait will make even shy fish come up. After these casts hook the baited hook and cast at your normal pace (every 8-15 minutes on average). So it is possible to quickly create a "cloud" of bait at the bottom, and attract fish.
When fixing the bank gum in the clip, it is impossible to remove the excess braid. This can play badly when catching a large specimen, when the work of the friction clutch is simply necessary. In this case, you will need to hook the gum and tear it. Then you can work the friction clutch as usual.
For those who like to watch and listen more than read, I suggest watching a small film about the basics of feeder fishing:
In this article, we will not touch on the rhetorical question “what to choose a cord or fishing line? ”, and let's move on to buying and winding a cord for fidear. If you use fishing line, then the winding will be similar.
On the market and in stores there is a large selection of cord (braid) of various sections and colors. But let's think about what kind of fish the feederist is counting on. Of course, each of us wants to catch our giant, and of course we will achieve this, but when fishing on a feeder, the main part of the catch is bream, bream, small carp, roach, silver bream, rudd, crucian carp, blue bream, which rarely come across weighing more than one, two, three kilograms. Larger carp are mainly found in fish farms, but for him the method of catching is different. And for our trophies, a sufficient diameter of the cord will be 0.08 - 0.14mm.
The smaller diameter of the line allows you to cast further, it is weakly affected by the side wind and the tackle is less carried away by the current. But it is easily cut by shells, with which the edges and rifts are so richly dotted, where exactly the fish loves to feed. So a diameter of 0.12 - 0.14 will be optimal.
As for the color, it is a matter of taste here, someone prefers the cord to be as disguised as the water surface, someone chooses it brighter in order to see it well when winding it up.
There are many manufacturers of cords, recommending a particular brand is a thankless task. In our market, often the same cord, depending on the batch, can be completely different in quality. So it is better to buy in trusted stores and the product of well-known brands.
So the cord is bought, now we will wind it on the selected coil. The cord must be wound almost to the edge, stepping back only 1.5-2 mm.

If you wind the cord up to the very side of the spool, then when casting, the loops will be reset, and, accordingly, the thread will become tangled.
The purchased cord can be both 100 meters and 150, and for example 200 meters fit on the spool. How to calculate the required 1-2 mm to the edge of the boot? To do this, we need a spare spool that came with the reel. Having a similar capacity, it will help us to finish the required amount of inexpensive fishing line (for example, 0.2 in diameter) or nylon thread.
Many anglers, instead of refinishing the line, wind several layers of electrical tape onto the spool, thereby increasing its diameter. But this should not be done, because in the heat, the melted glue from the insulation will fall on the braid, and this will lead to its complete replacement.
So, we install a spare plastic spool on the reel and mount it on the lower knee of the rod. We pass the cord through a single ring, and tie it to the spool. It is better to lower the coil with the cord into the water, because the soft cord will lie more tightly and give the necessary winding accuracy. With one hand we rotate the reel, winding the line, and with the other we press the line to the rod, creating the necessary tension and winding density. After the thread is wound, if the distance to the edges of the spool is greater than necessary, then we finish the line. You can take any, it will not participate in the fishing process.
The line and cord must be spliced together. A node like this might work for this:
After that, we wind the fishing line, not forgetting to create tension when winding. There should be a distance of about 1.5-2 mm to the edge of the side.
We remove this spool and lower it into the water, put a metal one, fasten the fishing line behind it and rewind the sharpened fishing line and cord in the reverse order. Do not forget to create tension when winding! Alternatively, you can pass the cord or fishing line between the pages of the book, while pinching it with your knees.

For fishing on the feeder, hooks No. 10 - No. 18 are mainly used according to the international numbering system. Larger and smaller hooks rarely have to be used.
Choosing the size and shape of the hook depends on the conditions of fishing, the type and size of the fish, the type and size of the bait.
The more passive the bite, the more picky the fish are, and we need to make our rig even more inconspicuous. And you have to put a thinner leash, and a smaller hook. But with a decrease in the hook, the possibility of a fish getting off also increases.


Moreover, the larger the fish, the less picky it is about the size of the hook.
The hook must be perfectly sharp. A good hook easily pierces a maggot, or scratches a nail. If there is a suspicion of loss of sharpness, it is better to replace the hook, because a blunt sting is an empty bite.
Hooks must be made of high quality properly hardened wire. The thickness of the wire is different. On thin hooks, the worm, maggot, bloodworm remain alive for a long time, attracting fish. But a thin wire easily cuts the lip of the fish, which leads to gatherings. This is especially noticeable with long casts. Therefore, choose the average thickness of the hook, and preferably thicker.
Popular hooks from manufacturers such as Gamakatsu, Owner, Kamasan, Trabucco, Hayabusa.
There are fakes of well-known brands on the market, so buy hooks in good stores that value their reputation.
Breaks and loss of hooks and feeders for the feeder, when fishing on the feeder, the most common thing. So the leashes will need to be knitted a lot and different.
For leashes, a high-quality monofilament with a diameter of 0.12 to 0.18 is usually used.

Diameter selected depending on the size of the fish you are targeting. If it is a roach, a silver bream, a ram, then a diameter of 0.12-0.14 is enough. It is quite difficult to find a quality fishing line of a smaller diameter on sale. If the object of fishing is underbream, bream, large crucian carp, then the diameter of 0.16-0.18 is optimal. On sale there are special leash fishing lines of different companies with windings of 20 - 25 meters. They are usually of better quality than similar line in large coils.
Pick up a soft fishing line, no memory, with a good breaking load at the smallest diameter.
Many anglers prefer fluorocarbon fishing line as a leash.
Its main advantage over conventional fishing line is invisibility under water and resistance to abrasion, which is important when fishing on edges dotted with shells. Well, the disadvantage is rigidity, a relatively small breaking load and a higher price.
Average lead length for feeder fishing from 30 to 60 centimeters. And there is such a rule - the weaker the bite, the thinner and longer the leash is placed .
So its length can reach one meter.

Before going fishing, it is advisable to tie in advance several types of leashes(or rather a couple of dozen) with different lengths, diameters and different hooks. This will save valuable fishing time and will allow you to quickly adapt to the fishing conditions. It is convenient to store leashes in a special leash holder.

See also a detailed video on choosing a leash line:
So, after choosing a reel for the feeder, let's move on to the "heart" of feeder fishing - to the equipment.
Probably you have heard the terms more than once: asymmetrical loop, asymmetric loop, paternoster. These are the names of various equipment for the feeder. So what should we choose from this?
The requirements will be simple:
Well, experienced feederists do not like these tubes and that's it. Such an opinion may develop after reading articles on this topic. And it certainly has its justification. But for beginner anglers who may find other rigs too complicated, we can recommend using anti-twist tubes as an easy and quick way to get into feeder fishing.


Some models even provide for the installation of two hooks. It is understandable. A fisherman who has been fishing with bottom tackle for a long time knows very well what bitelessness is, and the more hooks with bait, the more likely it is to catch at least something. But feeder rigs were just invented to enhance this bite at times! Fishermen, even fish inspectors, often come up to me and wonder: why do you have one hook? But believe me, with the right feeding and choosing a bite point, you won’t be bored, bites will go one by one, literally a few seconds after casting. Usually 3-4 hours after feeding, the catch rate is reached. So why two hooks? Or even three? They will only interfere with each other and get confused. And if the bite is weak or absent, then it is better not to add hooks, but to look for new places for fishing, experiment with bait, with bait and you will definitely find your fish.
 The main advantage of the anti-twist is the ease of installation, which is really important for a novice angler. Thread a cord through it, install locking beads on both sides, a swivel with a carabiner is attached on one side, and just a loop for attaching a hook on the other. That's all. When biting, the cord slides freely through the anti-twist, signaling a bite.
Video about equipment with anti-twist tube:
But still, experienced feeders do not like these "rocker arms". And there is a reason. The sensitivity of the gear when using these tubes is minimal; on a muddy bottom, dirt gets into the anti-twist, which leads to clogging and the line getting stuck. Flight performance when casting the feeder is reduced. It has been repeatedly noted that with a careful bite, the fish took the bait with an anti-twist much more reluctantly than when using other rigs.
Probably the most popular tool. We have already devoted a whole detailed one, where we carefully considered its advantages and disadvantages. For a while I was skeptical about it just because of its simplicity. But after much experimentation, I came to the conclusion that, although it is slightly inferior in sensitivity to an asymmetric loop, due to the minimum manufacturing time, it deserves to take its place among the favorite mounting methods.
I often fish with two feeders, one with an asymmetric loop, the other with a paternoster. The difference in sensitivity is practically not noticeable. Yes, asymmetry responds better to even the slightest movement of the feeder, or to the sipping of a worm by a fish, but is this sensitivity always necessary? In any case, the choice is yours, but knowing what a paternoster is and how to knit it will not be superfluous. It knits in a couple of minutes and is quite capable of replacing a broken loop.
Consider the two main types of paternoster.
1. Paternoster Gartner (on two loops)
We knit paternoster directly on the main braid. And you can do it at home too. Since there are no auxiliary parts on it, it will easily pass through even the smallest ring at the tip of the feeder.
At the tip of the main braid we make a loop for attaching a leash with a hook to it. At the same time, we make three or four turns, moisten and tighten the knot well.

We retreat from the connected loop a distance of 15 centimeters. And we knit a larger loop in a similar way, 5-8 centimeters long. It should be such that a feeder crawls through it.


When fishing, we pass the resulting paternoster through the feeder rings. We pass a large loop through the ring of the swivel on the feeder. We pull out this ring and pass the feeder through it. When tightening the loop, try so that the tightening is not at one point, but is distributed over the swivel (see photo). This makes it easy to change the feeder without breaking the loop. Or we use a latch, with which it will also not be difficult to change the feeder.
 Loop into a loop, fasten the leash with a hook to a small loop.
And the paternoster is ready. See also video
2. Paternoster (blank rig).
We measure the loop about 10 centimeters, make a knot in three or four turns, moisten and tighten well. We cut in the middle. At one end we make a small loop for the hook, and we tie the other to the feeder.
After fishing, it should be cut off and tied new.

This is probably the most popular equipment for the feeder. Its main advantage is sensitivity. And the disadvantage is the tendency to tangle when casting, especially with a leash longer than 40 centimeters.
If, with an active bite, I once again throw this tackle, and there are no bites, then the overlap again. I pull it out - for sure!
For this equipment, it is important to choose a rigid fishing line with a diameter of 0.3-0.45. An asymmetrical loop consists of two parts: a twist with a loop for a hook and an asymmetrical loop itself.


In this rig, the feeder slides freely along the loop, which gives maximum sensitivity to the tackle. When casting, the twist takes the hook to the side, preventing it from overflowing the loop.
Watch the video of the non-symmetrical loop
After fishing, it should be cut off and a new one tied.
DEGREES OF COMPARISON OF ADJECTIVES In English, as in Russian, ...

In the early days of comics, there were several female wrestlers with...

The message about Beethoven, summarized in this article, will tell you about the great ...