


Lbvf Reply How it all started, I enter the room behind the brother, sitting naked...


Well, I got around to preparing a master class on making a photo album from scratch)))
This is always a very inconvenient process, because... you need to have time to take a photo with one hand, and with the other, cut the paper and glue the parts at the same time)))
Many operations are done so quickly and almost unconsciously that sometimes you don’t have time to record such moments)))
Nevertheless, I made this MK! Of course, it’s better to watch and repeat everything live, but many people don’t have the opportunity to attend a live Master Class; they have to learn from photographs.
I am ready to answer your questions and help you as much as possible)
1. First, let's prepare the paper. To make photo albums, special scrapbooking paper is used. It does not contain acids, which can ruin your photographs in the future, and its quality is so-called archival, that is, the paper should look perfect for at least 70 years. Many needlewomen manage to print the pattern they like on a color printer, but I recommend not experimenting. Scrapbooking is a fairly new trend in Russia, at most ten years old - during this time it is quite possible that pages printed on acid-rich paper have been preserved. But do you hope that the album will be viewed by your grandchildren, great-grandchildren and other subsequent generations? What will happen to your photographs in 40 or 70 years? It seems like such a long time now... But time flies very quickly and you always need to remember about the future)
In addition, handmade albums are very expensive and it will be a great shame if, after 20 years, the photos are hopelessly damaged, and the paper simply crumbles due to its antiquity (for ordinary paper of non-archival quality, the shelf life and shelf life is 25 years maximum).
Before you start creating an album, decide on the theme (decide at least for whom the album will be created - for a boy or a girl, a man or a woman, a colleague or a close friend), so as not to end up with a mixture of styles.
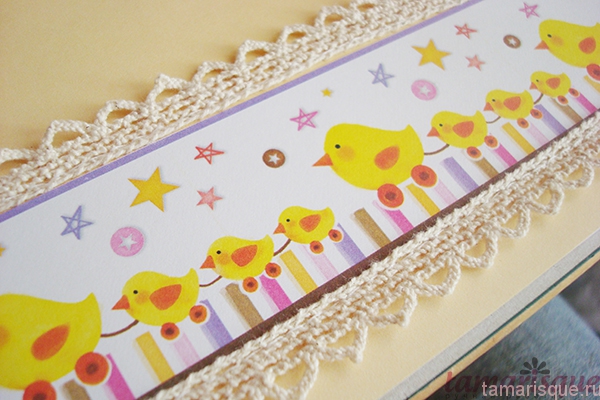
Since this album was created for a newborn girl, the appropriate paper was chosen.
The number of sheets is selected individually, according to your idea.
To decide on the scale, initially take a little more paper than you need, lay the sheets side by side and choose in pairs the combinations that you like best and that look harmonious next to each other.
Paired separation is necessary in order to make harmonious album spreads that will not drown out or spoil each other.
2. Preparation of tools and decor. In addition to paper, you will need scissors, double-sided tape for scrapbooking (it is made on the basis of special glue), a breadboard or stationery knife, edge and corner hole punches, ribbons, lace, flowers, buttons and other decorative elements that you want to use in the album.

I usually collect everything that I would like to use, and as I work, I sweep away the unnecessary, choosing only the most necessary parts.

I store buttons and small items (brads, anchors, etc.) in containers and sort them by color. This makes it easier to select according to the range.

For ribbons, for example, there is a container in which rolls of ribbons are stored in compartments. If necessary, you pull out as much as you need, cut it off, and the rest of the tape remains in the container. Very comfortably.

3. Composition. When I make an album, I lay out the sheets in pairs - the way they will be placed in the album. This is necessary to arrange all the elements harmoniously, so that one page does not conflict with another.
We lay out the necessary elements on the pages, look, add something, remove something.
Gradually we begin to attach the decor.

4. Making corners. When I didn’t have a hole punch for photo corners, I made do with homemade corners. I really like them and still use them often. They are reliable and dense, I like them much more than the corners from a hole punch)))
Draw squares on the back of a sheet of paper. I take the width of a metal ruler as a basis - the side of the square is 2.5 cm - this is enough.

We cut it out, fold it diagonally with the front side facing out and go along the edge of the cut with a pad of paint. Again, use special scrapbooking materials in your work; they are developed specifically for archival paper and photographs. This pleasure, of course, does not cost a penny, but it is spent wisely, and for example, I don’t have crazy expenses for such consumables - everything is evenly distributed.

Next we apply it to the sheet. A little trick - I cut out templates from paper according to the size of the photos (12x12, 10x15) and don’t measure each time with a ruler - I just put the template where I need it, try on the corners and sew it on.

A few stitches on the machine - and your corner is ready!

After sewing, be sure to bring the threads to the wrong side, tie knots and secure with tape - this is necessary for fastening so that everything holds tightly.

5. Fastening the frames. In this album I used ready-made frames from the set. They are attached to the base with small legs and these burr legs need to be cleaned with a regular nail file so as not to spoil the appearance.
Movements with a nail file should be done in one direction so as not to damage the fibers of the paper.
The edges of frames made by hand from binding cardboard are also processed.

Next, I needed to not just glue the frame, but raise it to a higher level and give it volume. This can be solved using bulky double-sided tape. You can use both squares and solid tape.
We attach the tape to 3 sides of the frame, leaving the fourth so that you can insert a photo there.


I glued the other frame with wood glue. Many people now widely use hot glue guns and the popular Moment Crystal glue…. Oh... Don't do this when working with paper and, in particular, with a photo album! You cannot guarantee either yourself or your clients that in 5-10 years this glue will not crumble to dust or damage the photo! Remember - you can work with paper only with glue intended for it! Now there is a very large selection, the same thick PVA, or for example there is a very inexpensive wood glue - it is generally ideal, dries quickly, grips perfectly and does not spoil the paper!
6. Securing the decor. Well, as I just wrote above - try to sew on all the decor))) The cotton threads will not harm the album, and the look will be unique, hand stitches will only add additional attractiveness - you must agree, it’s better than drops of hot melt glue, just like it came off a Chinese assembly line ?))))

First we sew on a leaf, then a sakura branch.

We fasten the seams on the reverse side.

We pin the brads. Brads is a little thing, like a beautiful bead that has legs. And these legs hold onto the paper from the reverse side.
First, I make a puncture in the right place with a thick bookbinding needle.

Then I insert both legs of the brads into the puncture.

And on the reverse side I spread the legs in different directions. It is also recommended to seal the top with tape.

This is roughly how it works.

I glued on clear glass droplets to complete the look. The terrible evening light distorts very much (((

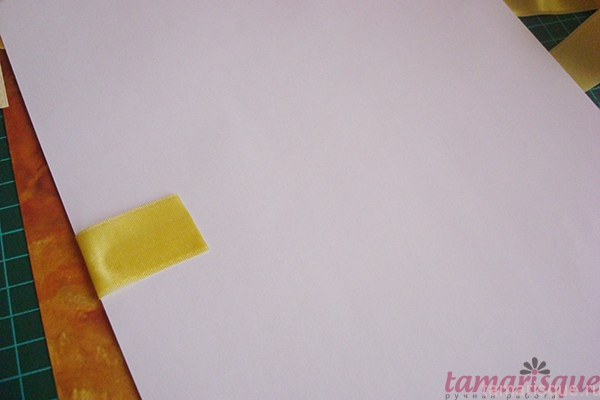
7. Fastening the tape. I have included this procedure in a separate paragraph, because you often have to work with ribbons in scrapbooking and the process must be debugged.
The tape must be ironed before use to avoid creases. Then it will not disappear anywhere and every defect in the tape will be visible to the naked eye... Alas.
We glue double-sided tape to the back of the tape, remove the protective layer, turn the tape over and attach it evenly to the page. When gluing the tape, make sure that the tape lies perfectly flat, otherwise the tape will fix any bend!


They applied the ribbon, ironed it, turned the ends over to the wrong side of the page and ironed it again. This method will help you sew pages in the future without worrying that the tape will lie wrong. Of course, this method is not mandatory, you can only secure the edges of the tape on the wrong side, it all depends on your idea.

Using tape, we glue the frame from the set onto the tape and a beautiful inscription on top. You can use ready-made inscriptions, or you can make your own.

Glue the droplets.

We sew on the flowers, and this is what we ended up with:

8. Making a photo box. I think it would be interesting to also consider a way to make a mini box for several photos. It happens that you need to put a lot of pictures on a page - how to do this optimally?
For such purposes, mini-boxes are used, consisting of 3-4 mini-pages fastened together, where you can place photos. When folded, such a box takes up no more space than 1 photo - the savings are obvious!)))
So, we take two sheets of paper measuring 15x10 cm, and on one sheet on the long side we make a valve, approximately 1-1.5 cm wide. Using a hole punch, we cut out the corners for the photo on one sheet, which will be the base, and glue the cut out corners to the other.

We glue the flap of the top sheet to the wrong side of the base.

To the album page where we plan to attach the box, we attach a ribbon or, as in this case, two waxed cords of different colors. The length should be 3-4 times the width of the box (in our case, if the box is 10 cm wide, choose the length of the tape 30-40 cm).

We place our box on top in an open form, with the base to the album page and sew it along the edge using a typewriter (or with a hand stitch). We bring the threads to the wrong side and fasten them.

Close the box and tie it with cords. All. On the top of the box you can write something or place another photo. In this example, 3 photos fit, but you can increase the number of internal pages of the box and simply put several photos inside - the cords are tied, nothing will be lost!

I'll go into a little detail. Sometimes I want to emphasize certain elements on the page, for this I use voluminous tape and bring the elements to a higher level.

Try and use different materials - for example, I used an ordinary paper napkin under a glass - glue it where necessary, trim off the excess.


The decor was very beautiful using a regular picture and lace around the edges.
They tied a bow and sewed it on. Very beautiful and no frills. By the way, when using ribbons on a page, be sure to process the edges over a candle or lighter so that the sections do not crumble during use.

Tracing paper butterflies are very simple shapes, cut out the outline of the butterfly, glue a couple more wings on top and you're done!

9. Cover. Even though the cover is the very first page of your album, it is better to do it at the very end. It should reflect the overall mood of the album, and this works best when you've played around with the pages, gotten a good feel for them, and can easily create a unique cover!
We choose a suitable sheet of paper (don’t forget that there will also be a back cover, so everything should be harmonious), attach a ribbon.
For the cover, it is better to choose stronger and wider ribbons, since they will be constantly tugged - open and closed, etc. I secure the tape with tape and also reinforce it from the inside.

In parallel, I am working on the back cover - there is no special decoration there, but the ribbon should be at the same level as on the first cover.
I glue the lace paper to the ribbon and attach the decorative details. At this stage, you can still turn and twist, remove and add, that is, create a composition that completely satisfies you. Next, we begin to sew and glue step by step. Somewhere I use double-sided tape, somewhere I sew it, secure it with brads - I listed all the methods in detail above, nothing has changed, the principle is the same.

10. Connecting pages. Phew. We finally reached the end. One more push, one more try, as they say))))
Here's a little backstory. Let me first tell you what materials I use and why.
When we have created the album pages, they need to be connected. But not just like that, but put something hard inside, between them, that will keep its shape. Many people use incomprehensible cardboard, even corrugated cardboard, as far as I know, from ordinary boxes, glue it all with a thick layer of the moment, rejoice and give it to the client...
As I already wrote above, these are pathetic attempts to reduce the cost. Buying (or picking up from a trash bin) a box is much easier and cheaper than spending money on high-quality binding cardboard and the right glue for paper. Is it really beneficial? Let's get a look. The cardboard used in packaging is made from such waste that you cannot even imagine... All this waste is ground into flour, filled with glue and sheets of low-quality paper are cast, from which corrugated and other packaging cardboard is then made. I think that even without delving into the details, we can confidently say that such cardboard is not suitable for us, it is clearly not of archival quality and in general there is no quality in it.
Binding cardboard is also not all suitable. There are very cheap types of such cardboard that consist of resins and acids, which can directly damage our album, even if these cardboard seals are inside the pages (believe me, a chemical reaction will occur even in this case).
Glue Moment. This is a separate story. Not only will you ruin the album with this terrible substance, you will also inhale it until the green devils in your eyes... After all, the Moment stinks terribly. Do you need it?
I could describe in detail the chemical composition of the materials here, but this is a lot and tedious, if you are interested, you can find the information in Tyrnetiki, read, think about it. Or just trust me as a printing production technologist. No wonder I spent many years learning wisdom?))))
Well, I rejected all your consumables, so what should I do now? What should I do? Where to run?
There is an exit. First, you can buy high-quality binding cardboard that meets all scrapbooking requirements. If you are too lazy to bother, you can use the second option, which I almost always use when making albums.
We will use regular watercolor paper. The trick here is that watercolor artists are also very bothered by paper acids and resins, so paper is made for them that is free from such impurities. That is, regular watercolor paper. In terms of density, it is of course inferior to cardboard, but in practice, albums with such a base are very popular, easy to use, much lighter in weight and lower in cost.
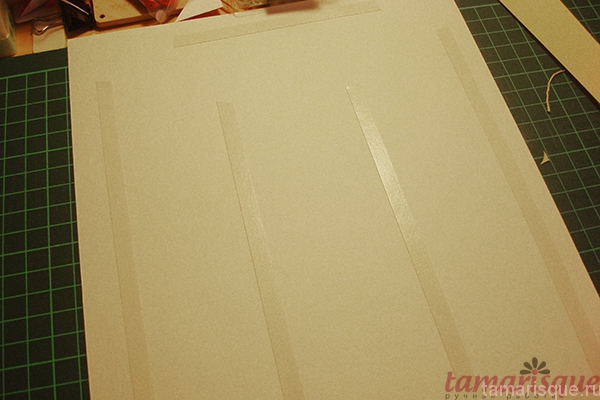
So, since our album sheets were cut into A4 format, we take watercolor paper of the same format. Use double-sided tape to go over the edges of the sheet and in the middle. Remove the protective layer and carefully place the finished album page on top. It is very important here that the edges match. small deviations are acceptable, this can be corrected later, but there should be no obvious shifts.
After we have fixed the page, we turn it over, and on the back side of the watercolor sheet we do the same operation - tape, album page.
Be careful - the pages must match by serial number! Otherwise you will end up with confusion!
We also glue the pages that end up on the cover to a watercolor sheet, but it’s better to use two - to make it more dense.
After gluing the pages together, you should end up with a sandwich like this:
1. Page (face up)
2. Watercolor paper
3. Page (face down)
When all the pages are fastened in pairs and watercolor paper is laid between them, we begin to stitch.
We sew on a machine, you can sew by hand, but it takes a long time. Don’t forget that the pages already have ready-made elements that can be quite voluminous, control the process, support them with your hands in some places, align them in others - that is, carefully stitch all the edges.
Of course, you can not sew all the pages, but glue them with the same wood glue. But I think this method is not very convenient - firstly, glue is consumed in huge quantities, secondly, you need to dry each page for a long time and thoroughly (in our high humidity conditions this is difficult to do, the paper begins to warp if drying is unsuccessful), thirdly , if something is glued incorrectly, you will have to redo the entire page, and sometimes this is simply impossible.
All edges are secured on the machine, taped inside - this is a “dry” method, you can be sure that the product will not be deformed from moisture (my clients have been using albums for quite a long time, they say everything is fine), and if you made a little mistake when stitching, you can unravel the seam and stitch again. Well, again - the line adds comfort))

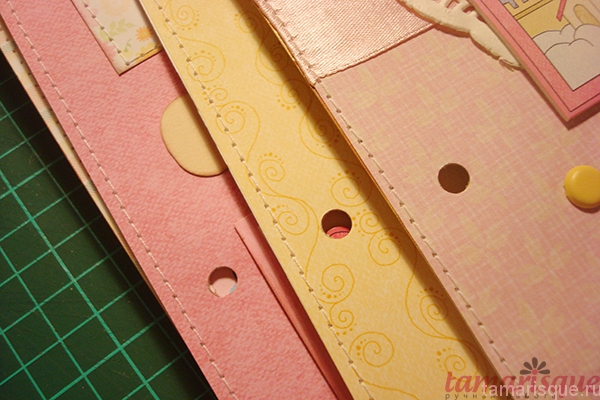
After stitching, you can make holes for fastening. We punch from the spine side.
I do this with an ordinary stationery hole punch. For more complex holes (where you need to adjust the distance), it is of course better to use a professional one.
Be careful - watch which side you punch with the hole punch! It’s easy to get confused, but almost impossible to fix!
We open the ring, put on the pages in order and close the ring.

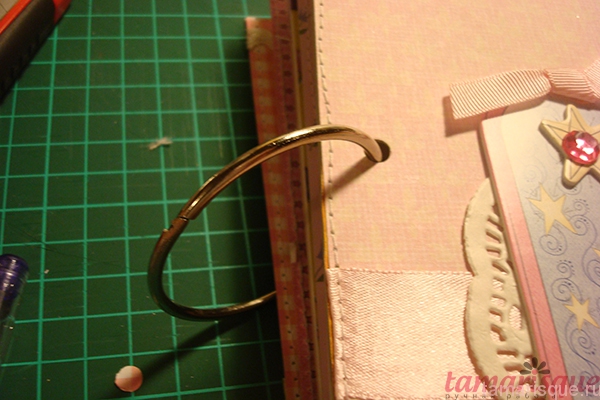
To complete the rings, you can tie ribbons, lace, put on beads, if the diameter allows - in general, decorate and complete the album with such touches.
This is roughly what it will look like:

I tried to talk about the key points in the creation. Of course, you can show and tell for a very long time, I will be glad to answer your questions)))
If there are any points you would like to know in more detail, write in the comments, I will do separate small master classes specifically for each process.
A family photo album is a tangible memory of the past; creating such a thing requires creative ideas and a creative approach.
This interesting process can unite the whole family: children and adults, turning photo design into a good tradition. And no matter how much time it takes to work, the result will be worth it and will delight family members, loved ones and guests from time to time.
By creating a family photo album and decorating it according to your taste, you become the owner of an exclusive item, one of a kind. We invite you to familiarize yourself with the interesting works that are presented in our photo gallery.


Remember, the photo album will carefully preserve the history of your family’s life, the most memorable and valuable moments.
Today, there are special design techniques that can be easily mastered if desired, and decoration elements are widely available. The most important requirement is the desire to create a family heirloom and put a piece of your soul into it.
A photo album is a symbol of family unity, a detail that connects older and younger generations. Flipping through old heavy albums that predate digital technology, you feel a sense of warmth and charm.

They will never be replaced by computer files. Therefore, photographs need to be printed, and albums should be designed with your own hands - in the future, your children, and, possibly, grandchildren and great-grandchildren will look at them with interest.
A family photo album can be dedicated to an important event in life, for a child, or uniting several generations (in the form of a family tree).
A photo album with the history of our acquaintance and old wedding photographs is the best gift for parents on their wedding anniversary. You can make this attribute the initial step in the design of a series of albums about the family.
Select the cover design style based on the theme and style of the photographs:

The cover can be covered with paper, fabric, leather, or a combination of different materials. It is better to choose dense fabric: denim, felt. Place a piece of padding polyester between the base of the cover and the decorative fabric - this will make the album soft. Decorate the seams with suitable decorative elements.

When designing the cover, you need to be guided by the rules of composition; make sure that there are not too many decorations.
To decorate a family album, you can use special scrapbooking kits or look for materials yourself. Suitable parts can be purchased at a sewing accessories store, but you can certainly find interesting products right at home.
To do this, it is worth reviewing things that you do not wear, children's toys, jewelry, postcards, beautiful covers, unnecessary handbags, buttons, etc. Do not neglect parts made of wood, metal and plastic.

Albums decorated with various types of stitches made from multi-colored threads look very beautiful. They can be made by hand or using a sewing machine.
A win-win option that is suitable for most family albums is flower decorations. Flowers are made by hand from fabric, mesh and beads.
An interesting effect is provided by ribbons and narrow ribbons, which are placed at the edge of the album. A tourniquet is suitable for these purposes, especially if the background design is made of natural fabrics.

You can get an unconventional result on the cover or pages if you attach rounded clockwork parts. Family members in large format photographs can be decorated with a crown, hat and other interesting details cut out from magazines.
Favorite cartoon characters are most suitable for children's pages or albums. You can draw them yourself or stick cut ones.
Supplement the proposed design ideas with details that are close to your heart, this will make it even more memorable and valuable.
Scrapbooking is a handicraft technique that is actively gaining momentum today. This art form aims to preserve photographs in an interesting form through the use of special tactile and visual techniques.
Scrapbooking allows you to create albums with your own hands not only in the traditional form of a code; among the works of masters there are: a box-photo album, a house-photo album, a basket-photo album.

The decoupage technique involves decorating various surfaces with printed pictures and then varnishing them. After the varnish dries, the image looks like it was painted.

In conclusion, we bring to your attention a short video master class on creating a beautiful photo album with your own hands, in particular, we will look at creating a cover. Enjoy watching friends!
Once you try this activity, it is impossible to stop, because the desire to create beauty is indomitable. Even a beginner can make an album for newborns using scrapbooking technology. To work, a talented craftsman will only need a basic set of knowledge, a boundless flight of imagination, materials and tools, as well as a sunny mood.
The name of the original technique was given to the English words scrap and book, which translated means “clipping” and “book”. From the title, even a beginner understands that the book should contain clippings from newspapers or magazines that emphasize the topic. The tradition of beautifully decorating an album with your own hands was born in the 15th century. In Europe, it was considered fashionable to collect books with records of poems, quotes, drawings, and sketches. The advent of printing made it possible to make scrap, supplementing albums with lithographs, images, and engravings. Fans of this unusual hobby decorated their products with personal items, labels, travel tickets, and invitations to attend social events. The more varied the scrap, the more luxurious and interesting the book looked. As children, we all loved to leaf through old grandmother’s albums, full of secrets, personal memories, and our imagination painted us pictures from the past.
Today, scrapbooking masters are actively searching for new creative forms for their masterpieces, decorating chocolate bowls, tea houses, and miniature birdhouses in unusual ways. But a scrapbooking album for newborns is a valuable gift for parents and a memory for a child, an unchanging classic of touching design.
Children's album design

With the advent of a baby, we become more sentimental, look at the world in a new way, and appreciate every moment of life. By creating an album for a newborn with our own hands, we are writing history, because even after many years these events will not lose their value.
Description of errors in work
What does the baby album contain?
Baby album pages


When creating an album using scrapbooking technology for newborns, ideas for filling and decorating can be very different. A smile, first steps, games and getting to know the outside world - all this is so significant during the development of the baby for parents. Each photograph requires a special treatment, the decor must be thematic, and the journaling must hit the bull’s eye, complementing and revealing the deep meaning of the memorable image. Many years will pass, the events will fade and be forgotten. But as soon as you pick up the album, the unforgettable moments that its pages so carefully preserve will flash through your memory in a bright series.
If you decide to create an album for a newborn using the scrapbooking technique with your own hands, then you should get acquainted with the basic rules of design. Popular materials and tools:
Fastening materials


Stamps for decoration


Stamps should be stored in special packaging containers with a tightly closed lid. To wash the stamp, use a regular soap solution, after which the stamp is wiped dry.
High-quality care of stamps will allow them to serve the scrapbooking business faithfully for a long time.
Various inks


Tools for punching shaped holes


Useful tools for beginners part 1
Useful tools for beginners part 2
Useful tools for beginners part 3
Useful tools for beginners part 4
In addition to equipment for scrapbooking, there is all kinds of decor. The industry suggests using metal pendants, cardboard cut-outs, ready-made paper or fabric flowers, cardboard chipboards, and plaster frames. Glitters, paints, structural pastes, patina, pastels will help create unusual effects on paper. When listing the decor for a newborn’s album, one cannot fail to mention lace and ribbons. An ideal addition to the photographs will be the first cut strand of hair, the imprint of a tiny hand and foot. It is the decor that will help you create an exclusive product, and your heart will tell you the theme of the album!
There are many master classes on creating albums for newborns. Anyone who takes the first steps in a creative direction must learn to express themselves and develop their own individual style, which is easily “readable” in each product. Children's themes are the most fertile.
 Such an album can be filled with all the important moments of the first year of life.
When creating cute things, your imagination does not need to be limited by choosing touching decor or the semantic content of the composition. A master class on creating an album is needed to understand the basic principles of work, and you just need to choose the most beautiful design method for yourself.
A series of master classes on creating an album for a baby:
Making a children's album part 1
Making a children's album part 2
Making a children's album part 3
Making a children's album part 4
Making a children's album part 5
As you know, blue is considered a classic “boy” color. In Soviet times, those around him could only understand his gender by the color of the bows on the envelope. Since then, little has changed, so when decorating an album for a newborn boy, it is the soft blue color that is at the peak of popularity.
Album for a boy of the first year of life
Beginning artists mistakenly believe that it is more difficult to design an album for a boy, because flowers, butterflies and other “cutes” have no place here. The scrapbooking industry is replete with a wide variety of decor, and your imagination will tell you the right choice.
A few design rules:
The cover is the “face” of the album, so the choice of colors is extremely important. Check, stripes of blue and white, bright check - all this is relevant for a boyish theme.
Interesting album option for my son
The choice of decor for the cover and pages is a matter of taste and desire of the artist. When creating your masterpiece, you should not think about strict principles and rules; it is important to be guided by tender feelings for your child.
When creating an album for a newborn girl, a bright pink color scheme, delicate shades of lilac, creamy peach or purple come to mind. You can use mono colors, but it is more interesting to organically combine all the shades with each other.
Scrapbook for a baby in the form of a dress
To work on an album using the scrapbooking technique for newborns you will need:
For decoration we use cardboard cut-outs of flowers and butterflies, satin ribbons and lace. Work algorithm:
An interesting version of an album for a girl
The fountain of ideas for creating an album for a newborn is inexhaustible. It all depends on imagination, the wishes of the parents and the master himself. A baby diary made using scrapbooking technique or an album with photographs of the baby with an original design will be the best gift for happy parents.
Photography is a unique thing. This is not just a picture, this is a whole segment of life. When you look at a photograph, your memory brings up a whole heap of memories from the depths.
You can spend more than one pleasant evening looking at a photo album. You can never expect such warmth and impressions from electronic versions of photo collections. In addition, if the gadget breaks down, pictures can be lost forever. Isn’t this a good reason to continue the traditions of our ancestors and make a photo album with our own hands?
Why make your own if you can buy ready-made options? There are a lot of arguments:
1. Because it will be unique.
2. It can be made in various styles and themes.
3. A piece of your soul will fall into it.
4. And simply because it is an interesting activity.
Interested? Let's look at creating a photo album with your own hands step by step.
Like any business, scrapbooking requires advance planning. The problem is that it is not enough for a photo album to have an aesthetic appearance; it needs to carry a certain semantic load. To fulfill all the conditions, you need to find the optimal way to implement the idea. And here it is better to stick to already proven techniques and stylistic ideas for designing photo albums.
DIY photo album
It should be noted that scrapbooking is not a cheap hobby, so before you go purchasing supplies, you need to think about the following for your future masterpiece:
It is the plot that will give you the idea of how to make a photo album with your own hands. The design of the product will directly depend on the theme. A photo album can be a family album or a gift album.

The design of a photo album directly depends on the topic
For a do-it-yourself photo album, page design ideas must be correctly positioned. The photos themselves and the design elements should appear in visual unity. Here it is important to determine the semantic center of the composition and, in relation to it, select accents or decorations for the page. The subject of the image will help you choose a title and perhaps even make a brief description of the photo.

All pages of the photo album must be made in the same style
“By creating a photo album with your own hands, you are free to choose any style of its design”
Admirers of lush decor should focus on the American vision of a photo book. Connoisseurs of antiquity and those who like to immerse themselves in bygone days will certainly choose shabby chic or vintage. Adherents of minimalism can take a closer look at the European style and one of the most popular ideas for designing photo albums – “clean and simple”.

Design of a photo album in the “clean and simple” style.
When creating a photo album with your own hands, you are free to choose any design style. Other design options can be used, the main thing is that they can present the theme of the album from the best side.
There are many options on how to make a photo album with your own hands. The following help to implement your ideas:
There are about a hundred more entertaining techniques that allow you to create magnificent copies of photo albums.

Decoupage technique in photo album decoration
The presented methods are distinguished by relative ease of implementation. Thus, stamping involves the use of applicators and all kinds of impressions. In decoupage, plot drawings and ornaments are used. In cropping, they work with the photo itself. It is trimmed so that only the key points are preserved. Journaling is characterized by adding original descriptions to photographs. Distress is based on the aging of the paper.

Many different types of impressions are used in stamping
Essentially this is preparation for work. At this stage, we focus on selecting tools and purchasing materials. What will you need?
Materials:
Tools:
We sit down to plan the implementation of our own photo album design ideas. The result will not disappoint if you clearly formulate what you want to see in the end. This is where a notebook comes into play. It is desirable that it be similar in size to the future original. It will become a kind of template for work. On its pages you can experiment with the arrangement of photographs and decorative elements. The most successful options are recorded.

Sketch of the location of pictures and decorative elements
Let's start creating a photo album with our own hands by assembling the spines for the pages. To do this, you can use less thick photo cardboard. Strips are cut from it corresponding to the height of the sheets. The width of the stripes may vary. On average, the figure rarely exceeds 3 cm.

Stripes corresponding to sheet heights
Using a ruler, find the center of the narrow part. We set aside 2 mm on both sides of it if the landscape pages have convex decorations and 1 mm in other cases. We proceed in the same way from the opposite side. We connect the outlines with a ruler and draw a strip not with a pencil, but not with a writing pen. This photo album design idea will help you bend the sheet strictly along the given lines. We cut off the corners of the workpiece. Now you can put sheets in them and fix them with glue. The outer sheets should not have “partners”. The free part of the spine will be needed for another.

Fix the leaves with glue
Page finishing. Their decor begins with covering them with scrap paper. Select the right colors and create a general background against which the rest of the composition elements will later be located. The decor for a photo album assembled with your own hands can be:

Decorative materials for photo album design
In general, everything that your fantasy draws. If there is an abundance of volumetric parts, they should be evenly placed on the pages, then the sheets will not be deformed, and the product as a whole will not lose its shape. This is another reason to work on a photo album with your own hands step by step.

Place the decor evenly on the pages
We make the binding and attach the cover. We collect the sheets glued into the spines into a book and glue the first ones with a piece of bandage, gauze or adhesive fabric, so that there is one and a half centimeters of free material left at the edges of the binding.

Cover the spine with gauze
From cotton braid with processed edges, we cut out two strips, the same length as the width of the binding. We bend the remaining gauze and glue it exactly along the edge. This idea for decorating a photo album will help hide flaws in the assembly of the end part of the binding and will serve as an additional fixation for the sheets, preventing them from coming off.

Glue two strips along the edge
While the cheesecloth is drying, work directly on the spine for the binding. If the paper for work is not too thick, then the part can be assembled. You will have to cut out two components: one strictly according to the dimensions of the binding, the second with a width allowance of 3 cm. We lay the smaller strip on top of the larger one so that there are even allowances on both sides. Mark the boundaries and glue the parts.

Spine for binding
It would seem that's it? But at this stage there are some secrets. Design ideas from scrapbooking professionals will help you make a high-quality photo album with your own hands. What do they advise? A thick spine will prevent the album from opening. Is it possible to avoid problems? Yes, if you draw longitudinal lines along the inside of the spine with a sharp object (the same non-writing pen) with a step distance of 1 cm. This technique will allow the part to bend smoothly.
But the nuances of the topic “how to make a photo album with your own hands” do not end there.

The spine is fixed under the cover
The spine must not be glued to the binding. It is fixed on the cover. The structure is allowed to dry, after which the sheets collected on gauze are placed in it. We fix the free ends of the fabric and the part of the sheet spine that was prudently left when assembling the photo album with our own hands to the inside of the cover. It’s better to make it a transparent “Moment”. It holds more firmly and marks are removed more easily. The drips are simply erased with an eraser.

Inside cover
The creation of the photo album is complete. All that remains is to decorate the cover and fill it with content.
Pleasant memories require beautiful cutting. Selfie, which has become fashionable, allows you to make photo albums with your own hands for almost every occasion, but still more often they are created for more global reasons.
It can look like a full-fledged photo book. Its contents will include not only interesting and memorable photographs, but also newspaper clippings, postcards dear to the heart, and things closely related to family history. It’s a good idea to write a motto on the title page that reflects the credo of the family.

DIY family photo album
How to make a photo album about your family with your own hands? For example, in genealogical chronology. Dig into the family archives. There will probably be many photographs of your ancestors that you remember and will be able to tell something to your descendants. These photos will appear on the first pages of the chronicle. The story should continue right up to the present day. In the future, your creativity can lay the basis for a whole galaxy of similar photo albums.

Make a series of family photo albums
If a family leads an active lifestyle and does not forget to record everything that happens in it on camera, then it will be difficult to fit everything into one album. In this case, you should divide all the photos into thematic groups and try to assemble a photo album with your own hands for each occasion.
If you love to travel, take a selection of photos from your most memorable trips. Additional decor for such albums can be postcards depicting excursion places of countries or trophies obtained, such as a dried leaf of an exotic plant. The epic of a sea holiday is perfectly decorated with sand, pebbles, shells from the beaches, seagull feathers, and sprigs of seaweed.

DIY photo album about travel
Don't be lazy to describe what is shown on the pages. It will be interesting for your descendants to read about your adventures.
Start working on a photo album with your own hands, and design ideas will appear in your head. All relatives can be involved in the matter. Give them a page and ask them to decorate it as they wish. You can ask them to compose a poem or write down a life story, or make a drawing with their own hands. In a family photo album, any illustration will be significant.

Make a photo album for the whole family
“Don’t think that the time it takes to create a child’s photo album with your own hands will be limited to one day - it will be a long process”
The birth of a child is probably the most important event in the life of every family, overshadowing even a wedding, so the desire to immortalize every minute of the child’s life is quite natural. How to make a child’s photo album with your own hands so that what is reflected in it evokes affection even years later? Pay attention to details and wisely plan the sequence of filling with photographs. From the heap of photographs, try to select symbolic images that tell about a new milestone in a child’s life.
DIY children's photo album
You can start the story from afar. Let a photo of the last days of pregnancy appear on the first page. An excellent addition to them would be ultrasound printouts. The logical continuation will be shots from the discharge photo shoot in the celebration hall of the maternity hospital. Next will be pictures with relatives. Later they will paste into the photo album with their own hands: the first smile, the first tooth, the first independent breakfast, the first steps. For every mother, these events are simply etched in her memory, and a desire is born to share her happiness with the whole world.
Ultrasound printouts would be a great addition.
There are a lot of ideas for designing baby photo albums. They can be made into a repository of children's heirlooms by gluing inside a strand of the first hair, ribbons from a cap, or a piece of a bow that was used to tie a blanket. Over time, it will be possible to add children's drawings, crafts and greeting cards brought from the garden and school. Then they will be replaced by artifacts of achievements in the form of certificates and awards.
An example of the design of pages for a children's photo album
Don’t think that the time it takes to create a child’s photo album with your own hands will be limited to one day - it will be a long process. Its contents will be replenished as the object grows.
One more thing. Children often delight us with pearls. Don't be lazy to record them in the same album. This will be a great reason for fun years later and will decorate the pages well if it appears on them in color.
Wedding photoalbum
The wedding day is special for both newlyweds. Naturally, you want to save every moment of it in your memory. A huge number of photographs from the celebration will require systematic storage in a decent design. So how can you make a photo album with your own hands as unusual as the event itself?
DIY wedding photo album
It's not trivial to decorate it. The bride's accessories, lace, ribbons, and elements of wedding paraphernalia will help with this. The photo can be decorated with dried flower buds from a young wedding bouquet. Over the years, such little things will become incredibly valuable and touching. Here are some more photo album design ideas.
1. Recreate the historical accuracy of the wedding celebration by grouping photos according to the chronology of its course.
Recreate the chronology of events on the pages of the album
2. Don’t be afraid to put so-called reportage and staged photographs in the album. They can be quite funny.
3. Try to give the design of the photo album a specific stylistic direction. It can be retro or something more modern.
Give the album a general stylistic direction
4. Create personal pages for portraits of heroes of the occasion and VIP guests.
5. When making a photo album with your own hands, supplement it with images of landscapes that served as the background for the wedding event.
Complete the album with landscape images
6. Multi-colored pages in the album will look original.
7. Bet on the originality of the photographs themselves. Let them be highlighted in sepia or decorated like a painting. Dilute color photos with black and white.
Dilute color photos with black and white.
8. In the wedding album, you can use several photos of the newlyweds taken on the eve of the wedding, as well as those telling about the ups and downs of the preparations for it.
9. Separate the official part and the party. This way you will have two albums with photos at once.
10. A photo collage of small-format photographs is also interesting.
Photo collage of small format photographs
Design ideas used when creating a photo album with your own hands can cause a certain imbalance in the perception of compositions due to the overload of frames with characters. When placing close-up group photographs in a photo album you created yourself, try to place them on the spread so that the views of the guests captured in them are directed in one direction. Then you won't get the impression that they are looking at each other. Also, a spread literally “littered” with small photos is not perceived in the best way. Use a compositional approach to their arrangement, dilute the pictures with texts and decorative elements. Let your design talents make a splash!
Dilute your photos with text and decor
Conclusion
The proposed options for creating and filling photo albums are just the tip of the iceberg called scrapbooking. Knowing how to make a photo album with your own hands, you will ensure that it excites memories of bygone days and helps bring loved ones closer together.
Photo gallery – DIY photo album
Evgenia Smirnova
To send light into the depths of the human heart - this is the purpose of the artist
Content
Scrapbooking is the art of making and designing photo albums, photo and picture frames, booklets, postcards, and gift wrapping. Scrapbooking for beginners will give everyone a chance to learn how to create original things with their own hands. The art of scrapbooking has several different directions and techniques - distressing (aging album pages), stamping (creating original effects using ink, stamps and applicators), embossing (creating raised paintings) and other styles used to design albums and paintings.
Scrapbooking for beginners is a type of manual creativity, which is based on the design and production of photo albums, the original storage of family photographs, personal stories in the form of photographs, drawings, newspaper clippings, and notes. An original wedding and New Year's album, personal diary, invitation card, gift box, picture, book, binding, envelope for money will be very beautiful. Scrapbooking is also suitable for beginners; it is worth choosing simple options, after mastering which it will be possible to move on to complex patterns.

At its core, scrapbooking acts as a unique way of storing stories, using tactile and visual techniques that replace the story. The photo album must be decorated in a special way and consist of separate leaves, each of which will express a complete thought (collage). Such original albums should cover one topic - the birth of a child, a wedding. For beginning craftsmen, there are ready-made diagrams (sketches).

In Russia, demobilization albums are widely popular, containing not only photographs, but also drawings, collages, interesting caricatures, wishes, and addresses of colleagues. The production of such original albums is carried out by soldiers who are novice craftsmen, and everything necessary can be collected during the service.
It simply doesn’t make sense to arrange all the photographs in the house in scrapbooking style, so a specific theme must be chosen, after which photos will be selected to match it. Beginning scrapbookers may find it tiring to spend a long time creating a masterpiece, but after completing a few elements, they will have a desire to continue practicing this art.

Scrapbooking for beginners requires patience and preparation of materials. You will immediately want to buy a lot of things for work, but you should not buy too expensive tools. For beginning scrapbooking masters, you need to select a starter set of tools that are not very expensive, and any beginner can purchase them. It is not necessary to buy professional tools that experienced scrapbookers use.

If you have decided to engage in this type of art, beginning scrapbooking craftsmen will need the following materials:
Beginner scrapbookers should have the following tools:

Scrapbooking sketches for beginners will help make cards, postcards, and notebooks much easier. For beginning craftsmen, sketches will be a real lifesaver, because they can give new ideas and inspiration when creating an original photo album, frame, or notepad. If you can’t make a scrapbook page yourself, you should pay attention to ready-made templates (blanks) for scrapbooking.


A step-by-step scrapbooking master class for beginners will help you easily make a beautiful, original album for a child. Possessing creative and unconventional thinking, you can easily create a real work of art, but if you lack imagination, there is a way out - check out the master classes and choose a more suitable option for beginning craftsmen.

In this case, you will need the following materials:

Step-by-step instructions for scrapbooking a photo album for beginners.


To make an original photo frame with your own hands, beginning scrapbookers will need the following materials:

A step-by-step plan will help you avoid mistakes and do all the work correctly, and a stencil will help you make a beautiful inscription, which will be simply irreplaceable in the initial stages. To create an original and unusual photo frame, you should use a variety of stencils that help you make various drawings, which will be important for people who do not know how to draw beautifully. Scrapbooking video tutorials for beginners will become an indispensable assistant in creating a real masterpiece.


To make a beautiful notebook with your own hands, a novice crafter will need the following materials:

Things that were made with your own hands, and this is scrapbooking for beginners, are in a real trend and are becoming more and more popular every day. It is possible to buy ready-made exclusive items or be patient to create a work of art. Having done just one or a birthday, you may not even notice how scrapbooking will become a favorite hobby and very soon not only at home, but also at friends’ houses there will be beautiful souvenirs. The children's theme will interest schoolchildren, because it is ideal for beginning young craftsmen.
Discuss
Scrapbooking Ideas for Beginners
Lbvf Reply How it all started, I enter the room behind the brother, sitting naked...

In A. Balashov’s book “Magic: attracting love and happiness” it is said that...

Dream Interpretation of what you dream about Key from Monday to Tuesday Tuesday is under...