Compatibility of Snake and Monkey according to the eastern horoscope does not promise a happy...


Flowers are a necessary element of every holiday. They are a universal gift and decoration. In this article we will look at how to make flowers from corrugated paper with your own hands.
You will need: corrugated paper in pink, white and green, scissors, wire, green tape.
Corrugated paper peonies are ready! I recommend watching this video!
You will need: corrugated paper of lilac, green and yellow colors, scissors, paints, brush, wire, glue gun, ruler, semolina, pencil.


Corrugated paper lilies are ready! I recommend watching this video!
You will need: thick cardboard, corrugated paper, pencil, scissors, thick wire, green floral tape, adhesive tape, glue.


You will need: corrugated paper in red, green and black, scissors, black thread, paint, brush, green tape, paper, wire, glue gun.

You will need: 7 sheets of corrugated paper measuring 50x75cm, 7 clips, scissors, ruler, wire.


A three-dimensional flower made of corrugated paper is ready!
You will need: blue and green corrugated paper, scissors, black thread, wire, semolina, glue gun.


Corrugated paper cornflowers are ready! I recommend watching this video!
You will need: white and green corrugated paper, cotton wool, scissors, corn grits, glue gun, wire, polystyrene foam.

Snowdrops made from corrugated paper are ready! I recommend watching this video!
You will need: corrugated paper of white, blue and green, thick and thin wire, glue gun, scissors, pencil, ruler, flower pot and pebbles.


The corrugated paper bell is ready! I recommend watching this video!
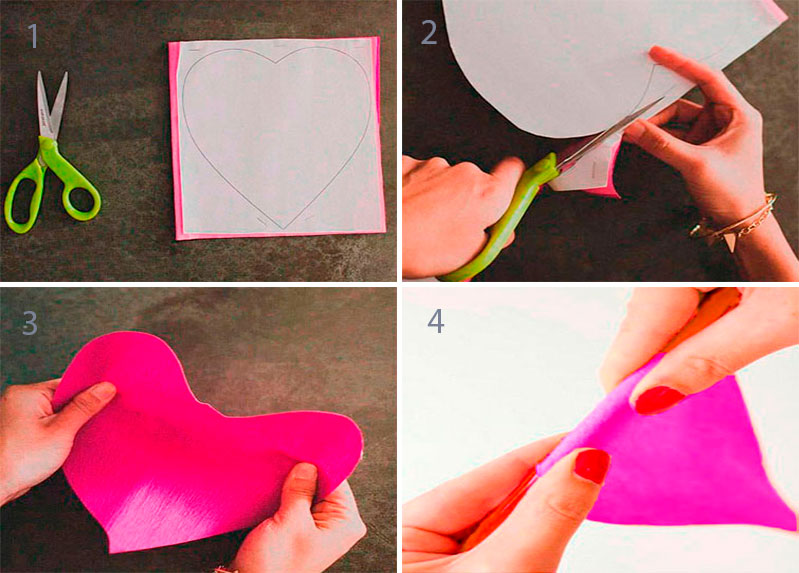
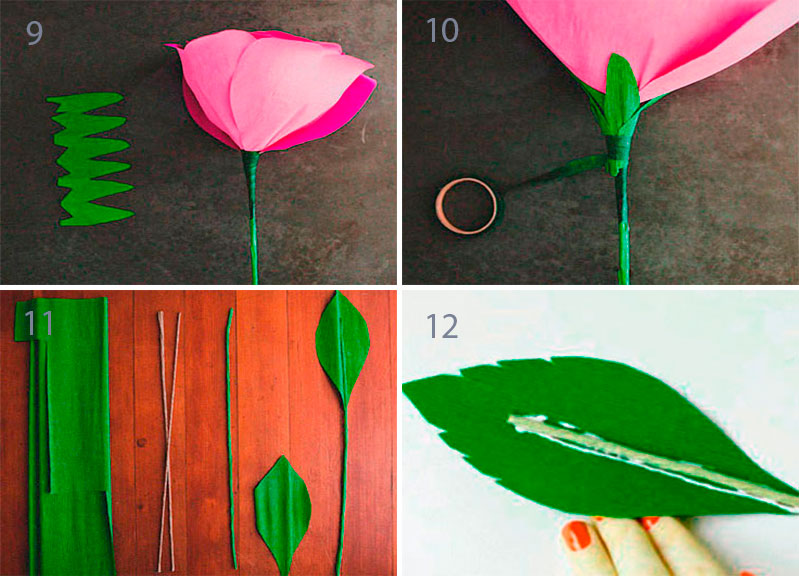
You will need: pink and green corrugated paper, green adhesive tape, stick or wire for the stem, scissors.

You will need: corrugated paper of your favorite colors for buds, green corrugated paper for leaves, Raffaello candies, double-sided thin tape, green tape, satin ribbon, packaging material for a bouquet, scissors, wire, pliers, a wooden stick, optionally transparent beads to create dew , glue gun, tweezers.


Greetings! Today I have selected a lot of ideas for you on the theme “Autumn”. More precisely, we will figure out how to make autumn bouquets with our own hands. With the start of classes in schools and kindergartens, parents are often puzzled by what needs to be done. I think that if you have fruits, leaves and dried flowers, it is easiest to create a composition of flowers.
And they also turn out so beautiful that they are suitable as a gift for a ball, for Teacher’s Day and for the autumn holiday itself.
And to make it easier for parents, I decided to make a selection where I collected the most interesting ideas for bouquets using everything that is at hand: from paper to twigs and seeds. There will be simple ideas and more complex ones for those who feel a creative touch and want to create a masterpiece.
One of the most accessible autumn materials is leaves. They have already turned red and yellow. They are collected into beautiful compositions, used as a basis for bouquets, or simply placed in a vase without embellishment.
And we can make a rose out of them. And then make a bouquet from such roses and buds. This is not very difficult to do and for 1 rose you will need 5-7 leaves. This depends on the level of openness of your flower.
It is important to take those leaves that still bend easily and do not break. Unfortunately, nothing will come of dry things.
By the way, take them in so that there is a long tail at the base. It will help you hold the workpiece comfortably and tying a “rose” with it will also be easier.
So let's take:
Let's start by choosing the smallest leaf available. Fold it in half horizontally.

And twist it into a tube. This is what we got in the middle.

Hold the middle with one hand. And the second one folds the next sheet horizontally again. We wrap it around the middle. We don't tighten it too much.


We wrap this way until we run out of leaves. Not all of them can be used if you want to make a bud.

We open the “petals” and tie all the tails with thread. To make it more convenient, ask your family for help.

This is how the blanks turned out. They can already make a bouquet.

I think that any schoolchild will be able to repeat these simple steps and create a bouquet of “roses” on their own.
Now let's compose the composition. After all, in floristry, not a single bouquet is made without it. The idea always comes first.

You can combine such roses with fresh flowers, dried flowers or rowan.

The main thing is that there are no empty spaces in the bouquet, otherwise there will be a feeling of incompleteness. Here is an example with the addition of regular leaves. After all, they are also beautiful in themselves.

And here the flowers lie on a beautiful background and the middle is highlighted with a bright accent.

If you try, you can make roses of different shades that will look very realistic in a bouquet.

It’s not a shame to give such beauty at the Autumn Ball or on Teacher’s Day.

It is very beautiful when leaves of different colors and shapes are combined. Nevertheless, our autumn is very diverse and plays with all the colors of the rainbow.

Another idea is to use green plant branches.

I really liked how the leaves were beautifully wrapped in a tube in this photo. This immediately highlights the composition and makes it individual.

Here, in a composition with autumn fresh flowers, the leaves also actively attract attention. Agree, it turned out very original.

Another small composition on the theme “Autumn”. Very cute and beautiful idea with an apple.

Just go to a park or a forest and you can immediately collect a whole bag of material. Branches of birch, maple, rowan, apple tree - anything will suit us. 
A variant of an autumn tree in the form. It can also replace a bouquet. All the gifts of the trees are used: from leaves to berries and cones.

You don’t have to fold the leaves, but simply collect them beautifully and tie them with a ribbon. You can maintain the color style. For example, take only green or only red leaves.

But you can use the branches themselves! Look how self-sufficient they look.


I think that any mother would be happy to help her child create such compositions. And collecting leaves together in the woods during a walk will only bring the family closer together.
You can use autumn fruits. Bouquets with them are also very popular now and look quite unusual.
For creativity you need to choose beautiful, small fruits. No dark spots or wrinkled sides.
Let's begin to consider possible options for compositions of fruits and berries. And then we’ll smoothly move on to vegetables.
Here is an idea with tangerines and rowan berries. Fruits are strung on skewers for kebabs. For strength, they are fixed with tape or special floral tape.

Here you can see that the apples are strung on skewers. They combine beautifully with asters and rowan and bird cherry. My parents made a very original stand from birch bark.

Apples go well with any leaves and berries.

Here the emphasis is on rowan. Twigs of coniferous trees add splendor to the composition.

These bouquets are made to order. Here it is important to firmly connect all the workpieces together.

I was captivated by the idea of painting fruits. For example, such “golden” apples look very expensive. You won’t immediately realize that they are real!

Variations with fruits, cones and berries in a pumpkin. A little later I’ll show you how you can use this vegetable.

You can put the composition not in a pumpkin, but in a zucchini.

Apples go well with the “roses” we made earlier.

Step-by-step video about making fruit compositions.
Now I’ll show you options for bouquets with vegetables. You may not collect all types. And turn on the designer’s imagination and use only two types - pepper and garlic. Look what came of it.

Small fruits make cute arrangements.

The entire space between the vegetables, where the joints could be seen, was covered with rowan berries.

By sticking to a certain color scheme, you can create a very stylish bouquet. For example, using cabbage and succulents. After all, autumn can be different.

In this photo, I was captivated by the background of rolled leaves. The composition is clearly visible here. The highlight is in the form of earrings that fall down under their own weight.

Look how beautiful the idea of painting the ears looks. Very bright and lively.

Now let's move on to the very common idea of using a pumpkin as a vase for flowers and herbs.
Bouquets with pumpkin
It is convenient to place bouquets in a pumpkin. But in order for them to stand and not wilt longer, all plants need water. How to place it in this large vegetable?
There are three most convenient options: using a floral sponge, using a tin can, or combining both of these options.
So, take out the middle with the seeds from the pumpkin. They can be dried and used for appliqués and panels. More on this below.

And put a floral sponge inside. It is sold in many flower shops, as well as in creativity departments.
Then you water it with water and insert flowers. Most often, this option is necessary when you create a bouquet of fresh flowers. The sponge also helps keep the shape of the composition when the stems are stuck into it.
You can also put a tin can inside. In this case, there is no need to remove all the pulp. The main thing is that the jar is not visible. We use canned pineapple containers. You can also pour water into it, but you don’t have to do this if you are using dried flowers.
For these purposes, it is better to take a wide pumpkin.

Instead of a jar, you can use a glass. Its top side indicates the diameter that needs to be cut to fit the glass. For fresh flowers, put a floral sponge inside and saturate it with moisture.
 Ideas for compositions in a pumpkin are in front of you.

A vegetable vase can be decorated with ribbons or braid. 
There are only fresh flowers here.

And here we see the use of spruce branches, bunches of bird cherry and rowan. 
The whole composition is on the theme “Autumn”. 
This craft will appeal to both schoolchildren and children in the older group of kindergarten.

The main thing is not to be afraid to use the materials that are at hand. Making a bouquet is a very entertaining and creative process.
There is an idea to make autumn bouquets from paper. Initially, flowers are prepared from which the composition is created.
It turns out very beautifully when using the origami technique.


Interspersed with . 
Let's add leaves in autumn shades to them.

This master class describes the detailed process of creating leaves.
Coat the ends of the accordion-folded sheet with glue and connect.

Maple leaves can also be made using the origami technique.

Here is a detailed master class. 
If it’s not clear from the photo, I’ll attach a video.
Everything is described in detail here. I think that using the video you can definitely create a craft by repeating all the steps step by step.
For small children you need something simpler. Therefore, I suggest using natural material for bouquets. We will look at ideas from pine cones, peanut and pistachio shells, pumpkin seeds, and dried flowers.
From the cones
It turns out that cones are very similar to flowers. Especially if you put unopened things in water. They become saturated with moisture and open up. My child, when he saw these metamorphoses, was simply delighted.

The cones can also be attached to skewers, sushi sticks or toothpicks. To create a round composition, round floral foam balls are used. I made them from regular polyurethane foam.

They come in different diameters. All kinds of plants and materials are stuck into them. You can use both fresh flowers and branches, and any other materials.

A beautiful bouquet when the pine cones are turned with their tips facing forward. It turns out to be a very neat composition. The tips themselves are decorated with beads, ribbons, rhinestones and flowers. They stick well with hot glue.

How do you like this autumn composition? I think it's very original.

The cone also lends itself well to painting. They can be painted with gouache or spray paints. The intensity of the color depends on the number of layers.


dense gouache can also cover up the natural brown tint of the buds.


If you remove the inner branches, the flowers will turn out more open.

Or you can take just one thing and make it the center of the composition.

Another idea from the gifts of the forest. Everything that lies near the trunks and under our feet is used.

Agree, pine cones are an excellent material for creating an autumn bouquet for children in kindergarten.
From pumpkin seeds
Pumpkin seeds can also be used as flower petals.

There are two options for buds. The first is to glue the seeds on paper in several rows. Here is a detailed master class.

The middle can be painted or covered with a piece of colored cotton wool.

You can make daisies like this using plasticine.

Or flowers like this.

Let's take a closer look at how this is done. Rows of pumpkin seeds are inserted into a plasticine ball. You can form different buds and inflorescence options.

Also very interesting, don’t you agree?
From peanut shells
We rarely buy peanuts, but we often pick up shells from friends after men's get-togethers. To make such bouquets for teachers once a year in kindergarten.

You can get whole “hydrangeas” from pistachios.

It is convenient to attach them to plasticine.

It will be easy for children to make these daisies. Younger children can insert petals from the shell into plasticine. And the older ones connect them with hot glue.

Using floral balls (I wrote about them a little higher), you can create the correct spherical shape of a sunflower. Look how organic the coffee beans look. After all, these are all the gifts of autumn.

Whole pistachios and peanuts can be given as gifts. To do this, put them into little bags and decorate them with corrugated paper.

With walnuts
Of course, we won’t ignore walnuts. You can make an autumn topiary from the shells.

Walnut bouquets with whole fruits look very presentable.

You can cover the voids with pieces of napkins.

For fun, you can combine all of the listed natural materials and fruits.
From dried flowers
Dried flowers fit our fall theme very well. They look noble and can be painted. They will complement any composition.

Anything will do - dry herbs, cereals, leaves. 
And here the spikelets were painted. 
Cotton flowers make the composition very delicate and airy. 
A beautiful bouquet of dried flowers in a stand decorated with branches. 
More ideas for you.

An interesting frame for a bouquet of branches.

Mix dried flowers and rose leaves. 
Golden ears have a very presentable appearance. But you’ll have to go a long way to get the material – to the field. Look for wheat that has not yet been harvested. 
Dry grass and leaves combine harmoniously. 
I just loved many of the ideas.
For the older group, you can offer ideas for applications or panels. They are made from leaves, dried flowers, cereals and seeds.
An idea with a vase with twigs inserted into it. Only the side edges and bottom are glued. The top is left free to allow material to be inserted.

Use a box of chocolates as a base and frame for the panel.

Leaves, pine cones and coffee beans create such an autumn bouquet.

Different types of pumpkin seed flowers for applique.

Use pine branches.

All bones, seeds and grains stick well to hot glue.

Leaves and flowers made from paper are no worse than natural materials.

You can also take a regular frame for the base.

You can make simpler applications in the form of bouquets, or you can make them more complex.
Flowers made from corrugated paper look incredibly realistic and beautiful. For Teacher's Day, there is an idea for a small bouquet of sweets.

Or such a gift idea.

Flowers for gifts can be wrapped in autumn leaves.

You can use these flowers without candy.

Let's combine sweets with natural materials: dried flowers, cones and leaves.

Composition with sweets in a basket.

And now a detailed master class on creating roses from corrugated paper. It can be easily stretched and folded and can imitate real leaves.

The colors of autumn are very cheerful and any yellow, orange and red flowers go well with them.

I am attaching a video on how to make several types of flowers.
Corrugated paper is sold in bookstores, stationery stores, floristry, craft, and party stores.
And now you have already decided what your autumn bouquet will be made of, you have even made preparations. But you need to somehow design it so that it has a more marketable and presentable appearance!
Therefore, I offer several ideas.
For example, let’s take the now popular craft paper. Or packing tight mesh or fabric.

You can make a beautiful envelope from the same corrugated paper. With this design, there is no shame in giving your craft.

Insert the craft into a paper bag. It can even be rolled from scrapbooking sheets.

Polyurethane foam, foam rubber, floral sponge or polystyrene foam are inserted inside.

Ideas made from reed napkins turn out beautifully.

You will need:
Place the jar on the cardboard and trace the bottom. We cut it out and stick it on the tin. We will also cover the sides with cardboard.

We measure the height of the walls of the tin and cut off its size on a napkin. Wrap the sides and secure with hot glue.

That's it. Everything is ready.
The bouquet can be placed in hat boxes or shoe packaging. To do this, they are covered with fabric or special paper. The bottom is lined with film, on which we place a floral sponge. We fill it with moisture and begin to form a composition.

There is a fun idea for decorating jars with plastic cocktail straws. The main thing here is to cut them carefully and evenly.

Insert dried flowers or paper flowers into paper boxes. Here's one idea. By the way, in this article I described very, maybe you will like something too.

Cardboard fits very harmoniously into this composition. Original and beautiful.

To congratulate teachers, you can decorate the packaging with letters. 
Or just put the bouquet in the basket. They are now made not only from wicker, but also from newspaper tubes, paper and canton.

Thank you for your attention and wish you productive joint work. I’m just sure that you will be able to find an idea for yourself and create a composition that you wouldn’t be ashamed to give to a teacher or send to an exhibition!
The master class is designed for school-age children, teachers and parents.
Purpose: interior decoration, gift making.
Among the many favorite flowers, I would like to especially mention the dahlia. A beautiful majestic flower. There are no different colors and colors of these flowers today. How much joy these magnificent flowers give us, proudly raising their beautiful armfuls of buds.
King of Autumn - Dahlia
I'm sad about you, passing summer
Take the scents of flowers with you
“The dahlia remains,” she quietly whispers about it
Summer wind from fairy-tale dreams
Bright hats outfit with notes of early autumn
Amazes with its majestic beauty
He is the "Autumn King"...and the needles hurt
Leaving pain in the soul of loneliness...
He is one of the last and holds himself proudly,
And a bouquet of dahlias, like warmth from childhood
May you stay in crystal glass for a long time
But you, King, are not given the chance to survive until winter...
To work you need: colored office paper, gouache, scissors, PVA glue, quilling tool, hot glue.
.jpg)
1. Fold a sheet of office paper in half and draw circles of 2 different diameters.
.jpg)
2. Cut each circle and fold 3 times.
.jpg)
.jpg)
.jpg)
.jpg)
3. Mark the petals with a pencil and cut along the contour.
.jpg)
4. Make a cut in the center. Unfold the workpiece and do the same along the fold lines in places where there is no cut.
.jpg)
.jpg)
5. Paint the ends of the petals with gouache.
.jpg)
6. Fold all the petals in half.
.jpg)
7. Assemble the flower using glue. First we glue the large circles, then the medium and small ones. It is important that there are no gaps between the petals.
.jpg)
.jpg)
.jpg)
![]() The author of the work is Olya Kraeva (site "Country of Masters") Author's text
The author of the work is Olya Kraeva (site "Country of Masters") Author's text
Teacher's Day and Autumn Balls are approaching. I would like to bring to your attention, dear craftswomen, these corrugated maple leaves. They are easy to make and look impressive. The larger ones can be used to decorate a classroom or hall, the smaller ones will be used to decorate postcards, boxes, and bags. The maple leaves were spinning on my porch in such a waltz))))
![]()
![]()
![]()
And now the master class itself. We will make a large yellow-red leaf (pictured No. 1) 1. Fold the A4 sheet in half along the short side
![]()
2. Roll it up like an accordion. Accordion strip width 1.5-2 cm
![]()
3. Draw the contours of the maple leaf, focusing on the edges of the accordion. We use 6-7 ribs. My stencil is approximate, you can draw your own pattern.
![]() 10.
10.
4. Cut it out
![]() 11.
11.
5. Expand. At this stage you can apply color spots. I sprayed it with a toothbrush and simply applied the paint with the same almost dry brush. Do not wet it too much - the sheet will warp. Waiting for it to dry
![]() 12.
12.
6. Fold like an accordion again. But already like this
![]() 13.
13.
7. Place the accordion on the long side
![]() 14.
14.
8. Prepare colored wire. I have this some kind of network computer cable (my son gave it to be torn to pieces)))) It is good because it has a multi-colored wire: green, orange, brown - which very much matches the color of the leaves)))
![]() 15.
15.
9. Twist the wire in the middle of the accordion. We don’t try too hard to prevent the strip from bending.
![]() 16.
16.
10. Bend in the middle, where the wire is, lifting the long ends up
![]() 17.
17.
11. Apply glue to the middle edges
![]() 18.
18.
12. Glue, especially pressing the middle (center) well.
![]() 19.
19.
13. Straighten out the folds. The leaf is ready, all that remains is to wrap the wire with a thin strip of the same paper with glue. I’m not showing it, everyone can do it anyway. Small leaves are made from ½ A4 sheet, cut along the short side. From this strip you get two leaves (4 from the entire A4 sheet). In this case, the width of the accordion strip is 1 cm (or slightly less). The number of ribs involved is also 6-7. A large leaf is the size of a palm, a small one is half the size of a palm.
![]() 20.
20.
And finally - one more time. Now “in the studio”))))) On a carpet of yellow leaves In a simple dress, From crepe de Chine donated by the wind, The autumn Boston waltz danced in the gateway, The warm day flew away and the saxophone sang hoarsely. And people came to us from all over the area, And birds flew in from all the surrounding roofs, Flapping their wings to the golden dancer, How long ago, how long ago the music sounded there. How often do I see a dream, my amazing dream In which autumn dances the Boston waltz for us. There the leaves are falling down, the records are spinning, Don't go away, stay with me, you are my whim. (A. Rosenbaum)
![]() 21.
21.
Artificial flowers made of corrugated paper are not inferior in aesthetic appearance and beauty to real ones, except that they do not emit a fragrance. Properly, carefully and carefully made with your own hands, these beautiful three-dimensional crafts will become a real decoration of any room decorated for a celebration or a living room equipped for a romantic dinner. The process of making floral decorations is simple, you can master it yourself.
Artificial flowers made of corrugated paper are as aesthetically pleasing and beautiful as real ones
You can make your own flowers from corrugated paper using a simple and standard scheme that describes how to make a simple flower. For those who can easily master the basics, further complex compositions will also seem simple and accessible.
In order to make a corrugated decoration, you should purchase in advance:
The simplest flower is made step by step according to a standard template; its size depends on the wishes of the manufacturer.
These flowers turn out neat and simple. If you want to make a small bouquet, you can make it bright and colorful by using several shades of corrugated paper.


Small and neat homemade decorations can be used to make a beautiful wreath. The specificity of making such flowers is that the petals are made into a small rectangular shape, which makes the product “fluffy” and delicate.
In order to make small leaves and fragile decorations, you will need the following materials:
To make the product more expressive, it is recommended to use paper of two different colors.
Small products look neat both as individual flowers and in a beautiful, even bouquet.
Making the simplest products from corrugated paper will not take much time and will require the simplest materials.
Paper willow branches are made using the following materials:

Making the simplest products from corrugated paper will not take much time and will require the simplest materials
White corrugated sheets are cut into small squares of 3 centimeters by 3 centimeters.
At the end, the wire is slightly tucked, securing the paper along the way. Such simple willow branches will decorate the house for Palm Sunday and will remind you of spring all year round.
Petals for decorations are also made from corrugated paper. There are many known manufacturing methods, but the single petal method is considered the most popular and accessible: in this case, the product is assembled piece by piece, petal by petal.
Before you start making the product, you should decide what size and shape the future flowers will be.

Petals for decorations are also made from corrugated paper
In order to understand exactly what shape the blanks should be, just carefully look at a photo of a real flower to understand how to give the artificial product maximum realism.
Beautiful and easy to make hyacinths are available even for children's creativity. They can be made multi-colored and of the same floral palette, you can use bright colors and muted palettes.
For aesthetic hyacinths you will need materials:

Beautiful and easy-to-make hyacinths are available even for children’s creativity.
Cardboard is needed to make a tubular stem, so it is recommended to use this material that is loose and easy to twist.
It is advisable to select sharp and long leaves: they are in perfect harmony with the shape of the product.
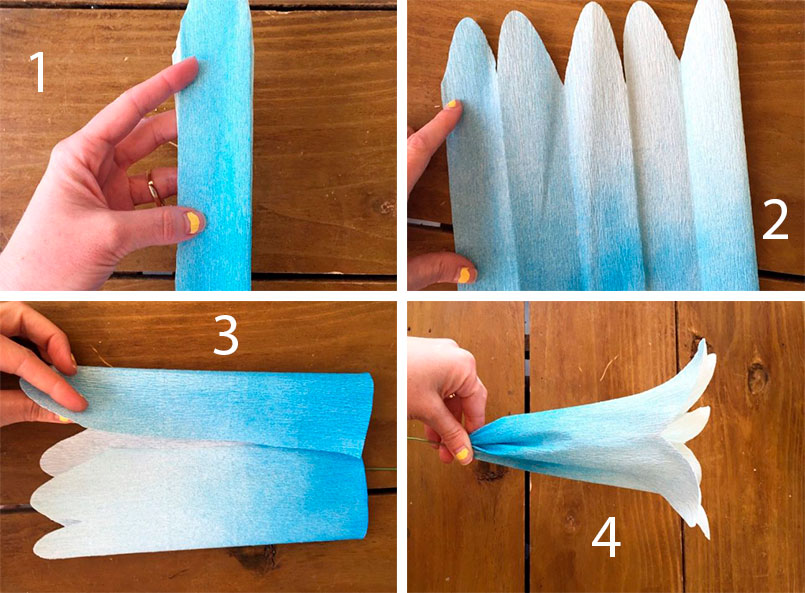
Delicate autumn flowers from corrugated paper are easiest to make using the ribbon method, this allows you to make the product multi-layered and “fluffy”.
Materials prepared for delicate decoration:
You will definitely need green paper to make a plant stem.
Compatibility of Snake and Monkey according to the eastern horoscope does not promise a happy...

“The Prayer of Detention” (see the text at the end of the article) has become...

Eastern Zodiac – Your zodiac sign gives you a certain...