


Ecology of consumption. Home: Finding the cause of cold radiators, start with...


The process of creating a staircase includes three stages: development of drawings, manufacturing of parts and assemblies, and installation of the structure at the installation site. The most important stage for any design is the design of the product.
Before drawing a staircase, its appearance is selected, the dimensions and features of the model are specified. This requires special attention to the design of a flight of stairs. The article will tell you the specifics of the process.
A staircase is an integral part of any structure whose height is more than one floor. Therefore, first of all, it is necessary to draw up a plan of the staircase on the drawing of the first floor, and determine its elevation on the second floor. This will make it possible to choose the type of structure and its dimensions.
A plan is a horizontal projection of a section of a floor on a plane. It indicates:
When drawing up a plan for the entire building, certain rules must be followed:
Before making a drawing of a staircase, it is worth getting acquainted with the names of different models and constituent structural elements.
Examples of staircase type images in assembly drawings are presented in the table:
| Stair type | Peculiarities |
|
|
The depiction of stairs in the drawings looks like straight lines. |
|
|
The appearance of this staircase is a circle with a support post in the center. |
|
|
The drawing of a spiral staircase is different from a spiral one. In this case, its dimensions are described by a circle, the internal support of which is located not at the geometric center of the structure, but at some distance from it. |
|
|
The drawing is distinguished by the presence of two marching sections, between which there are winder steps or intermediate platforms. |
|
|
Such stairs are prefabricated - the drawing includes several identical structural elements. |
|
|
The supporting frame of the structure is steel elements that connect the steps to each other - bolts. |
|
|
The finished drawings differ from conventional marching structures in size and angles of inclination. They can be vertical, as in the photo. |
In addition to their purpose and appearance, stairs differ in the materials used for their manufacture. It can be:
Advice: Stationary fire escapes should be made only of metal.


Before depicting a staircase in a drawing, it is necessary to correctly select its constituent elements.
These include:
Important! Often screw, cantilever, and sometimes marching models are made without risers.


When developing a project for a house with stairs, the flight structure is conventionally designated as in the figure. In this case, the circle marks the bottom of the product, and the arrow marks the top.

In addition to the shape, the drawing also shows the material of manufacture.
For example:
In order to correctly make stairs with your own hands, the drawings must be as detailed and high-quality as possible.
Typically the project price is up to 5% of the cost of constructing the structure. To independently draw up a working drawing of a staircase, you need not only desire, but also certain knowledge.
In this case, the calculation and drawing of the stairs to the second floor are performed after selecting its parameters. They are subject to the following requirements:
Tip: To save materials and space, in rarely visited rooms - such as an attic or basement, it is worth installing stairs for climbing with an inclination angle of up to 75°.
Before building a staircase to the second floor, dimensions are selected taking into account the recommendations of SNiP 02/31/2001:


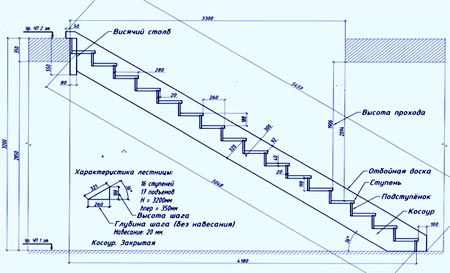
Staircase drawings with dimensions include:
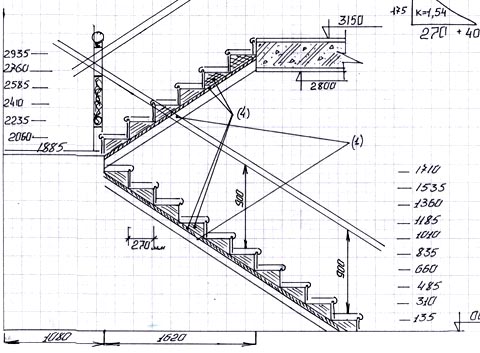
Instructions for designing a staircase in section:
In order to correctly make stairs for your home and their drawings, you should first watch the video in this article.
Tip: If you want to get a free drawing of a staircase, you should use special design programs - for example, draw it in a compass or download a ready-made design.


Developing a drawing of a staircase with your own hands is a long and painstaking process that requires patience and great precision. But modern technologies make this process much easier. In this case, you need to draw up a diagram and make it convenient and understandable for use.
To make the drawings of iron stairs to the second floor as convenient as possible for work, the following recommendations should be taken into account:


Before drawing the staircase on the plan, it is worth correctly modeling the type of structure so that it fits perfectly into the interior of the room. And of course, try not to make mistakes when installing and purchasing materials for manufacturing.
The process of creating a staircase with your own hands can be divided into 3 stages: drawing the staircase, manufacturing the parts and assembling the structure. The most important stage is the design of the product. It is at this stage that the appearance, dimensions and features of the future model are determined. Therefore, the design of staircases and flights should be approached with special attention.
The staircase can be considered as a kind of construction set with many parts, each of which differs in appearance and size. By connecting them, you get a single structure, ready for installation or use. Therefore, to develop a high-quality drawing and create a future staircase with your own hands, first of all, you should familiarize yourself with the design elements:


Creating a drawing with your own hands is a rather long and responsible process. For greater convenience and clarity, it should be divided into several stages. Since the most common model is a flight of stairs on stringers or bowstrings, we will consider this option.
First of all, it is necessary to accurately measure the length and width of the free space, as well as the distance between floors, taking into account the interfloor overlap. If the floor covering has not yet been completed, it is necessary to make an adjustment for the thickness of the future coating. Based on the data obtained, we will calculate the remaining parameters of the staircase structure:
The main parameter at the preparation stage is the type of structure. If there is enough free space, a straight staircase will do, but in limited conditions it is better to install a screw structure or a rotary one.
Regardless of the type of structure, fastening (on bowstrings, stringers or rails) and other aspects, the ladder should not only be reliable, but also easy to use. Therefore, when drawing up a diagram with your own hands, you should adhere to the optimal parameters:
Important! The dimensions of all steps must be the same, otherwise you will have to forget about ease of use. To prevent this, it is necessary to calculate the exact number of steps.
To correctly calculate the number of steps, you can use the formula: h/a, where h is the distance between floors (in mm), a is the height of the riser (in mm). For example: 3000/150 = 20 pcs. If you get a fractional number, you can make the first step of a non-standard size or make a staircase with a platform (as an option, build a podium below). It is also recommended to find out the width and height of the steps: 2a+b, where a is the height of the riser, b is the depth of the tread. For example: 2x15+30 = 60 cm, which corresponds to the length of a human step. However, this formula is not uniformly correct, since there are several nuances in this issue.
Detailed calculation of the dimensions of the stairs (alternative method). Part 1
Detailed calculation of the dimensions of the stairs (alternative method). Part 2
After calculations and measurements, you can begin drawing up a drawing. It is worth considering that the diagram should reflect 3 projections: from above, from the side and from the front. This approach will allow you to create the highest quality and informative drawing with your own hands. The first thing to do is the top view. In the upper projection, it is recommended to draw a floor plan on which to indicate the location and approximate view of the staircase (if the model has a platform, be sure to display it). It would not be amiss to indicate the beginning and end of the structure or the direction of movement from the first floor to the second.
The next projection is the front view. Here it is enough to transfer the measurements and calculations made to paper. It is not necessary to draw a diagram of the room itself.
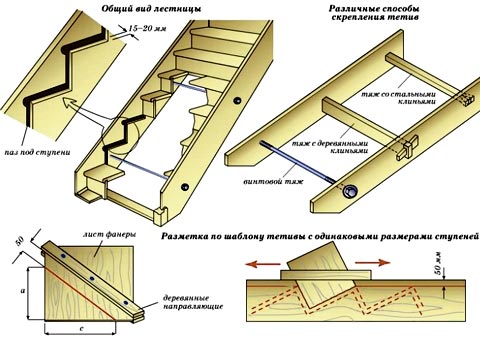
The final stage is a side view. Since it combines the top and front projections, the indication of dimensions and proportions must be approached with special attention. The type of fastening of the steps should also be displayed here. For example, if the staircase is on stringers, the steps should be located on top of the supporting beam, if on strings - on the inside.
Drawing a drawing with your own hands is a “jewelry” work that requires patience and high precision. Fortunately, modern technologies greatly facilitate this process. But it is important not just to draw up a diagram, it is necessary to make it as convenient and understandable as possible. To produce a high-quality drawing with maximum convenience, the following recommendations should be taken into account:
Designing a staircase in the SEMA program
Drawing up a drawing with your own hands is a long and responsible process. The complexity of manufacturing the staircase structure will depend on how high-quality and understandable the diagram is.
Idea! For greater convenience and speed, you can use special software, for example, an online calculator or a drawing program.
The main thing is for the drawing to be as accurate and informative as possible.
Sooner or later, they think about the issue of expanding the space and organizing the second floor in the building, be it or completing the construction of a full-fledged additional tier. In this case, you will definitely need steps leading to the upper floor, which will help to install this necessary item efficiently and safely.
Details and names of elements of a wooden staircase to the second floor of the house
Become the choice of many. It is not surprising, because they have an aesthetically attractive appearance and are favorable in terms of pricing.
Such structures have a number of advantages that open up wide opportunities for owners of private houses.

It is worth considering the shortcomings of the material, which can be encountered due to negligence and insufficient preparation.
These are the most popular negative aspects of wood products. Nevertheless, knowing them, you can warn yourself and receive only benefits from the implementation of your plans.
If you want to draw a diagram with your own hands, you should know some features that you should definitely pay attention to. You need to have on hand:
These accessories will be quite enough to make the necessary drawings for a wooden staircase in the house.
When you get your hands on it and a person begins to draw drawings of wooden stairs to the second floor on a sheet of paper, you should proceed step by step:
Carrying out the steps step by step, adhering to the order, making a drawing of a wooden staircase will not be difficult.
When taking measurements, be sure to pay attention to the following factors:
Taking into account these details, there is a possibility of drawing up the most accurate drawing of the staircase leading to the upper floor.
Of course, to climb to the upper tier of the building, you can use ladders fixed to the base of the house. But this is unsafe and inconvenient. Therefore, if the entrance to the second floor level is planned to be organized not inside the space, but outside, then you should choose the design of the street staircase made of wood that best suits your preferences.
In this case, you need to adhere to some rules, since being in an open space, a wooden staircase is very susceptible to the influence of natural factors. That is why:

Those who have decided to place a wooden staircase outdoors can note a number of advantages:
In this case, small errors are allowed, because the fact that the staircase is a little wider or longer plays a role in the house, and not outside it. Therefore, it is, of course, worth taking measurements, but in some indicators there is no need. For example, for the street there is no need to measure the space from the step to the ceiling, which must be done in the house.
This is not a complete list of advantages; each home owner will note his own. However, along with the positive aspects, there are also negative aspects.
 Project of a street staircase to the second floor
 Knowing the pros and cons, each home owner will be able to independently determine for himself whether to rely on installing stairs on the street or not.
When building a house with at least 2 floors, you definitely need to think about the stairs in it. And if the house is built with your own hands, it is logical to build the stairs as well.
Various photos of stairs help you make a preliminary choice and clearly understand what type of lift you need. But before you start carrying out the work, carefully calculate the future structure for strength and dimensions, this will save time and money, because incorrect calculations (or lack thereof) will lead to numerous alterations of the original project.
There are a large number of different options for flights of stairs. They differ in the material of manufacture (wood, concrete or metal), the type of rise (sloping staircase, spiral staircase, with a turn at a certain degree).

The most common is a wooden staircase. Staircases are also often constructed with a 90-degree turn. It is not uncommon for these two types of lifting devices to be combined into one.

In case of limited space, make a spiral staircase from metal. The screw type of lift allows you to save space, and making it from metal increases the strength of the structure. Concrete is used for stairs in massive buildings (for example, mansions).
In a low-rise building, without any construction experience, it is better to order a modular staircase, a kind of construction set, where all the parts are cut out and numbered, and all you have to do is assemble them using the instructions. This is how wooden stairs are usually made.

When building a concrete staircase, in addition to pouring the frame, you will need to perform external finishing (with beautiful stone or wood materials). It turns out to be a double waste of time and money. However, for cottages with 3 or more floors, they are mandatory according to fire safety requirements.

When making a staircase for the first time, you don’t need to jump straight into a complex structure. The simpler the model, the more likely it is that you will be able to successfully build this lifting device on the first try.
Pay attention to the angle of inclination of the stairs: if it is more than 45 degrees, the ladder will be considered an extension, and you can only go down it backwards. The optimal elevation angle is considered to be 37 degrees.

Wood is preferable as a material for construction, since, thanks to its properties, it allows you to correct minor construction flaws that arose due to inaccurate calculations and inexperience of the work performer.

Also, after construction, the building may settle due to loose soil, as a result the staircase can become several centimeters higher or lower than the floor, and it is easier to correct this in a wooden structure.

When constructing a lift with a turn towards, the distance between spans must be at least 100 mm.
Answering the question of how to make a staircase to the second floor with your own hands, there are several stages of construction.

The first stage of any structure, be it a staircase into a house or an interfloor staircase, is the creation of a project. Particular attention should be paid to the safety of the building and its ease of use.

The structure must support the average weight of an ordinary person with a fair margin. Be sure to use railings!

If they are not there, another fence must be designed to ensure the safety of descent and ascent.
After you have designed your building, you need to prepare the materials. In our case, choose boards of suitable thickness and length, prepare balusters with railings and prepare stringers. This will be the second stage of construction.

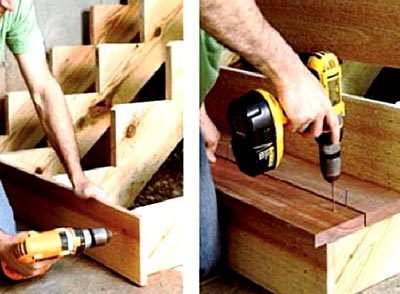
A 4 cm thick pine board is suitable as a material for stringers. On it, mark the steps according to the pattern and cut them out with a jigsaw.


We use the resulting product as a sample for the second (and if the width of the staircase is more than a meter, then the third) stringer. Let's cut the required number of steps to size.

The third stage will be assembling all the parts together. First of all, the stringers are installed in their permanent locations. Then, using self-tapping screws, the steps are attached to the stringers.

Then, using pins, balusters are placed on the steps, and handrails are attached to them. The staircase is ready!


This article is an overview of the most popular types of stairs, and also contains practical advice on how to make and calculate stairs to the second floor in a private house with your own hands. Scheme, calculations, dimensions, and drawings are attached. At the end of each chapter there is a video with a visual display of the construction process.
For ease of reading, the article is divided into several chapters:
For convenience, the article has a navigation panel with which you can go to any item and start reading from the required chapter.
Example of a metal staircase project
The staircase is used for comfortable movement between floors. As a rule, this design is used daily - two-story houses are most often built with bedrooms and a bathroom on the second floor. From this we can derive the two most important rules when designing a structure - safety and convenience.
 Above the shelves
 Important: Stairs are a source of increased trauma for people of all ages. A fall can have an extremely negative impact on a person’s health, so you should make it as safe as possible. There are several ways to do this that allow you to completely minimize the risks.
First of all, it is necessary to make steps of optimal height and width. It’s easy to trip on steps that are too high, and it’s extremely difficult to walk on narrow ones, so you can easily slip. It is necessary to take this into account when designing, including the size in advance in the project.
 In a big house
 The most optimal height of steps can be considered 150-200mm. This is enough to take a confident step, without fear of stumbling or placing your foot incorrectly. The depth or width must be at least 200mm - this requirement is easy to obtain from the average length of a person’s leg.
In addition, every staircase needs railings. They allow you to move with greater comfort and safety - the risk of falling is significantly reduced.
Important: The material must be non-slippery. It is better not to make stairs from tiles or varnished wood - they have a smooth surface that is very inconvenient for movement. If wood is used, it is not superfluous to sandpaper the steps or cover the steps with carpet.
 Above the sofa
 Convenience often depends on safety. If the steps are safe, then at the same time they will be comfortable. Of course, sometimes, for the sake of convenience, you can deviate somewhat from the standard sizes - if they are used only by a tall person, you can make the height of the steps more than 200mm.
 Graph of the relationship between the inclination of the stairs and ease of use
 The spiral staircase has its own special appearance, due to which it becomes possible to create a design that is completely unlike anything else. In addition, the screw design allows you to save a lot of space on both floors, making the room more ergonomic.
 Screw
Screw In the case of creating a spiral staircase to the second floor, the calculation must begin with the number of steps and their height. Based on what was said in the last chapter, the optimal height between steps is 200mm, and the depth is 200-300mm. But we must take into account that the steps of spiral staircases look like expanding cones, and therefore their depth must be calculated in a special way.
 With central pillar
 It is better to use mathematical formulas for calculations. First, you need to find out the circumference of the structure. The most convenient way to do this is using the formula 2*3.14*r, where r is the span width. For example, with a span width of 1000 mm, the circumference will be 6280 mm. To get the width of the step from the outside, it is enough to divide this distance by the number of steps in one span. For example, with 10 steps the distance will be 628mm, which will allow you to create a smooth staircase without voids.
 Calculation diagram for the screw model
 The height of the structure is determined by the height of the room, just as when creating a regular staircase. The height between the steps should be optimal - for example, 150-250mm is usually enough. It is better to calculate the optimal height based on the height of the room. For example, the ceiling height in the room is 2700mm. The steps will be 20mm thick, the floor thickness will be 150mm.
Advice: Calculations must begin with the floor - the floor is the zero step. First, you need to sum up the height of the room and the ceiling, since this is the distance the staircase should go to. In this case it is equal to 2850mm. To get the number of steps, you need to divide it by the suitable height of one step with its height - for example, 220mm. The result, rounded up, is 13 steps. The last, 13th step, in this case, will serve as the floor of the second floor.
 Graphic construction and dimensions
 At this stage, it is best to create the project on paper. It is not necessary to make it as accurate as possible in the drawing plan, but even a simple sketch will help to better understand the project.
When calculating the size, it is necessary to start from the most comfortable width of the stairs of 800-1000mm. This is enough to walk even with a large load on your hands, without restricting your movements (unfortunately, large furniture will still have to be lifted through the windows).
 Screw model project
 A spiral staircase is a circle, so the diameter is equal to the addition of the width of the passages and, if the staircase is built with a central support, the size of the support. On average, the diameter of such a structure is 1600-2000mm, which is enough for its convenient use, regardless of its features. More details in the table below
Advice: Very often the size of the stairs depends on the height of the ceiling. For a small country house there is no point in making a very wide staircase - 700mm will be enough to get to the second floor. For attics, exactly the same rule applies.
This video shows how to make stairs to the second floor in a private house with your own hands (the diagram and dimensions of the project are attached). The main points of installation are shown, as well as all the features of working with this type of structure.
An ordinary staircase can be built using similar calculations and methods. A do-it-yourself wooden staircase to the second floor in a private house is much simpler to make than a spiral staircase, but takes up relatively more space. Next, we will consider the main points of the calculation and video instructions.
 Made of wood
 In this case, it is necessary to start from the same average values - with a depth of 200-250mm and a height of 200-250mm. The distance must be divided in the same way - calculating from the floor of the first floor to the floor of the second floor.
 Calculation example
 The calculation of a wooden staircase to the second floor must take into account the length - it is the addition of the depth of all steps. The more there are, the longer the length itself will be. For an ordinary staircase in a room, on average, 10-12 steps are enough, which in total will be equal to 2000-2500mm with a depth of 200mm and 2500-3000mm with a depth of 250mm.
 Design of a staircase with a 90 degree turn
 Advice: The average width of such a structure should be 800-1000mm. This size should provide complete freedom of action. Therefore, if railings are planned, then there should be additional space for them on the steps.
The opening above the structure should begin from the place where less than 2000-2200 mm remains from the step to the ceiling - this is enough for anyone of any height. You should not make the opening too short - savings in this case can result in inconvenience and additional labor costs.
 Designations
 If you plan to create a turn, then it must be calculated under the same conditions - the only change is the width of the step - steps in the area of the turn are calculated similarly to screw steps, but they can be made with an emphasis on the wall.
This video provides instructions for designing and installing a wooden staircase with a 90-degree turn.
Concrete is an excellent material for stairs - it is very durable and allows you to work with any volume. Often for such a design it is enough just to assemble the frame and fill it.
 Formwork for concrete structures
 Important: It should be noted that creating a concrete staircase to the second floor with your own hands requires a very large investment - a completely cast structure requires a huge amount of concrete. Most likely, you will have to order a full-fledged concrete mixer - the process will take an extremely long time using the usual manual method.
 Cast design
 To facilitate this process, the span should be additionally strengthened with different blocks. A good idea is to create a frame of foam blocks, on which the formwork is subsequently laid. This allows you to get additional space under the structure and use it for household needs.
The video below shows the process of assembling the formwork and pouring it, depicting the main points of the work.
Metal is an extremely flexible and yet durable material. A do-it-yourself metal staircase to the second floor, unfortunately, is not the most comfortable - it is quite difficult to heat it, but the strength will be very high. In addition, a metal staircase takes up little space - this is important for houses with a small total area.
 Iron construction
 Features of the calculation in this case include the fact that the metal stage takes up very little space. Usually its size is 5-10mm, and despite the entire height of the structure, their total volume rarely exceeds 90-100mm.
The calculations are no different from ordinary stairs, but with the difference that it is necessary to take into account the resistance of materials. For the structure, we recommend using metal pipes with a wall thickness of at least 8mm, and for steps - reinforcement no thinner than 7mm. At the same time, with wide steps, thicker options should be used that will not sag under the weight of a person.
 Do-it-yourself single-flight iron staircase to the second floor
 Advice: If the structure is created from square profiles, it is worth selecting them with a cross-section of at least 5 mm - square profiles are much more stable than round ones due to their hard edges. You can work with metal using both welding and fasteners.
The video below shows an example of creating a metal staircase structure, which is subsequently covered with plasterboard. It displays the main points of the work.
This question is purely personal. Despite the optimal span width of 800-1000mm, this value can vary significantly depending on a person’s personal preferences. It must be taken into account that the wider the opening, the more resources will be required.
 Examples of the width of different types of stairs
 It is worth setting a separate minimum limit of 500mm - a narrower design will be completely inconvenient to use, and moving some things or furniture along it will be quite problematic. The maximum limit depends solely on the room, but still, you should not make the width more than 2000-2500mm, especially in cases where the staircase is not the main one in the hall.
 Scheme of stairs with straight flights
  Angled 90 degrees
  Drawing of a U-shaped staircase with a turning platform
  Plan of wooden model
  Detailed drawing
  Calculation
  Simple staircase
  With 180 degree rotation
  Straight staircase project
  Direct two-flight
Ecology of consumption. Home: Finding the cause of cold radiators, start with...

When cold weather sets in, every house or apartment should turn on...

What better time to joke than on New Year's Day? Behind us are school and work days...