Compatibility of Snake and Monkey according to the eastern horoscope does not promise a happy...


Abstract. Detailed description of installing bindings on cross-country skis. Video at the end of the note. You can download a markup template for installation.
It so happened that my old ski boots with 75 bindings broke. Naturally, I wanted to move to a new level of progress and install modern ski bindings. And then my son had some good extra Salomon boots for SNS bindings. I didn’t have to worry about choosing fasteners and they were purchased for 800 rubles. The exact name is Salomon SNS PROFIL AUTO MEN.
These bindings are marketed as: “Comfortable touring bindings with flex characteristics targeted at male skiers.” Just what the coach ordered.
Because I remembered that I had drills, a drill, an awl and a screwdriver at home, so I politely refused the offer to install the fasteners in the store. Moreover, the box contained instructions in 10 languages.
At home, when I started studying the instructions, I discovered an interesting point:
Installation of fasteners.
“Your bindings must be properly installed on your skis by a certified professional at your Authorized Salomon Dealer shop or service center in accordance with the instructions and recommendations in the latest edition of the Salomon Cross Country Ski Technical Manual. Failure to follow this rule increases your risk of injury while riding.“.
That's it, not a word more about installation. I also read useful advice from this manual that when fastening on uneven terrain, you should tie the ski to your right or left leg to avoid losing it. By the way, very wise.
The remaining points, as usual, are complete reinsurance of the manufacturer against various legal claims of a spoiled Western consumer.
Based on the lack of that same manual, I had to remember my carpentry and plumbing skills from labor lessons and install the fastenings myself. Anyone who worked hard at school and then managed to consolidate the skills of marking, drilling and driving screws in everyday life should be able to cope.
Here is a set of tools that we will need. You can use a Phillips screwdriver to drive screws. But it’s much better to have a special PZ3 bit that costs 35-40 rubles. The bit has a blunt tip and fits tightly into the cross of the screw. When driving screws with a regular Phillips screwdriver, you need to press it firmly so that it does not slip.
The RZ3 bit will make it easier to drive screws

Tool kit for self-installation of fasteners
Our main task is to establish the axis of attaching the boot to the ski strictly at the center of gravity of the ski. Professionals can move the mounts to one side or another from the CG. Fans of Sunday ski trips have no need for such troubles.
First of all, I dismantled the old 75 mounts. There were three holes left from them, which did not interfere with the installation of SNS mounts.

Find the center of gravity of the ski. To do this, we use the thrust bearing from the fasteners themselves. After several unsuccessful attempts, this center will be found. We make a line with a felt-tip pen.

Using a square, we draw a perpendicular to the side edge of the ski.
Above this line there should be a rod that is on the sole of the shoe.

Draw a perpendicular through the center of gravity
We apply the mount so that the clamping point of the boot shaft is above the center of gravity of the ski and carefully use an awl to prick the center of the front hole. We do this maneuver very carefully. One day, I was installing a mount and drilling three holes at once. As a result of inaccurate drilling, the heel of the boot was slightly shifted from the center of gravity and nothing could be corrected.

So now, I decided to drill the front hole in the center first. Screw the mount onto one screw, try on the thrust bearing and then mark the other two holes.
The front hole should be located strictly along the centerline of the ski and at a distance of 35 mm from the center of gravity. I found this out later, having found this markup template from Salamon on the Internet.
We select a drill. We take the screw from the kit and use a caliper to measure the diameter of the screw shaft.

This is the drill you need to use to drill the hole. There are tips to drill with a 3.6 mm drill. http://www.skiline.ru/sport-technology/169-ski-binding-mounting. But it's somehow risky. Too much tension in the hole can lead to cracking of the ski. According to classical carpentry canons, the diameter of the hole should be equal to the diameter of the screw shaft. I decided to go 50/50 and drilled with a 3.8 mm drill. In order not to drill through the ski, we place an emphasis on the drill using insulating tape.

You should first make sure that the length of the screw is not too long and it will not come out from the sliding side of the ski.
We drill a hole, trying very hard to keep the drill perpendicular to the ski. Here a screwdriver or electric drill is preferable to a hand drill.
When drilling, do not press too hard on the drill. We remember that a ski is a layer cake and its filling is not very strong.
We place the mount on the first screw. We apply a thrust bearing. Carefully align the mount. Holding the front part, remove the thrust bearing and mark two other holes.

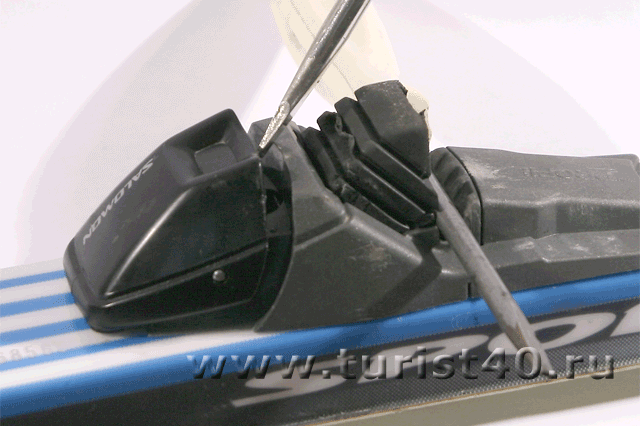
Do not snap the front mounting bracket. The front screw is located under it. The fasteners are in the box with the bracket not latched. As a rule, everyone starts turning the mount and snaps the bracket.
If the bracket is accidentally snapped, then we do this. We insert one screwdriver with a rod diameter of 4 mm into the groove where the boot rod is inserted, and with the second screwdriver we carefully pry the bracket up. It is better to remove it and put it aside until the end of installation.
I install the screws without glue. The tension in the hole is very good and in my opinion there is no need for glue.
We do the same with the second ski.
The process of installing the ski binding is shown in more detail and in dynamics in the video. Here I installed the SALOMON SNS SKATE skating bindings on new skis.
Popular wisdom: "Seven measure once, cut once"
1. SNS and NNN mounts can also be used to find the center of gravity. We use the flat side, like a ruler, and place the end side on the floor. We place the ski perpendicularly from above like a scale, moving it longitudinally to achieve balance. With a weighted binding, it is measured by attaching the binding to the ski, while ensuring that the axis of the center of gravity passes through the locking groove of the boot, moving the ski and the binding itself along.
2. Having found the center of gravity, mark perpendicular vertical lines on the ends of the skis on both sides of the mount to the upper side of the ski and connect them. This can be done using a square, although an error of up to two millimeters is acceptable for this length of skis. After this, we perform the same procedure with the second ski.
3. There is no difference between the boots of the new model with fastening directly at the front edge and the old model, where the fastening is on the ledge - for both, the axis of the center of gravity is located at the front edge of the boot. It turns out that in old boots the protrusion extends beyond the axis of the center of gravity. The planned running style also does not matter. The main thing is that when suspended, the ski does not weigh either in front or behind. The only exceptions are skiers with experience, who, to “increase speed,” shift them slightly back from the axis of the center of gravity. But putting this into practice requires experience.
4. Modern ski bindings such as SNS and NNN have a transverse groove for fixing the metal shaft of the boot in the front part. This groove must be aligned with the drawn axis of the center of gravity. Directly below the groove in the center there is a longitudinal groove. The middle fastening element is then inserted into it. Its lower bottom part coincides with the center of the rod, and we combine it with our marked line on the upper side of the ski.
5. First you need to unscrew all three screws that are not completely screwed in from the fastening. If the automatically latching SNS Profile Auto is closed, and you cannot get to the third screw, then you need to press the bracket (the latch will move inward), after which you need to insert a thick screwdriver or other suitable tool to prevent the latch from returning. Then we fold back the bracket to gain access to the screw. A similar procedure is carried out to remove the binding from skis.
6. Next comes fitting to the skis according to the marks and marking future holes in the center using an awl. After removing the fasteners, you need to check the middle mark exactly in the middle using a caliper or tape measure. The two back holes should be equally distant from the edges. To make corrections, use an awl to make new marks deeper.
7. Before drilling, we advise you to play it safe and check the depth of the screw entry so as not to pierce the ski through. We subtract the mounting height and try the rest on the ski. If the ski is thin and the length of the standard screws is excessive, then you need to replace them with screws of the required length.
8. On the drill, mark the depth of the planned hole by winding insulating tape if there is no ruler on the drill. The drill bit should have a diameter of 3.6 to 4 mm depending on the thickness of the screws. Then we carefully drill six holes on the entire pair of skis. Why carefully, because today skis have a fiberglass honeycomb filling under a few millimeters of wooden insert for bindings. Therefore, the drill, despite the restrictions made from insulating tape or a ruler, can easily slip through under pressure. Do not put pressure on the drill while drilling. The skis must first be pressed with your foot or secured with a clamp to avoid the spring factor. It is necessary to drill strictly vertically, without distortions, without rocking the drill, achieving a clear shape of the holes.
9. Having drilled three holes for each ski, remove the plastic brackets that unfasten the skis, attach the fasteners to them with screws, having previously tightened them no more than halfway, this will make alignment easier. Then using a screwdriver we tighten them with a little force, there is still a certain risk of tearing them off. Checking the tightness of the connection. Nothing should be loose.
Note: Do not use glue, as it is only suitable for wooden skis, and a lot of them have a negative effect on modern internals. A thick six-millimeter screw tightly closes the hole and prevents moisture from entering. And the edges of the screws have time to wear off before anything can rot inside the ski.
10. Reinstall the removed bracket by inserting the lower end into the loop, then pressing the bracket down firmly until it clicks. Carefully! Don't get your fingers pinched. Next, we assemble the fastening elements, first removing the screws - there are two in the middle element, and one in the last one. We install the elements end-to-end, covering the previous screws. We mark the holes in the same way with an awl, remove the elements, drill, fasten the screws, installing the fastening elements end-to-end until they stop. After screwing the last “thrust bearing”, the hole is closed with a plug.
Good luck on the ski track!
Installing ski bindings - every Soviet citizen had to master this art, because during the USSR there were no special workshops for this. And it never occurred to anyone, especially an experienced tourist, to seek paid help in this elementary matter. Moreover, before, as now, the kit included instructions for installing ski bindings.
Correct installation of ski bindings begins with reading it, which is usually done. We advise you to strictly follow the step-by-step recommendations, which take into account the specifics of installation depending on their type.
But if you managed to lose the instructions, read our story with step-by-step photos, which describes in detail the installation of semi-rigid ski bindings.
Useful articles:
 Step 1. Find the center of gravity of the ski by placing it on any small object, such as a construction angle or the handle of a screwdriver. It should be balanced - the toe and heel should hang in the air. Draw a line on the ski above this place. This will be the center of gravity.
 Step 2. Take the binding and place it on the ski so that its leading edge lies on the outlined line. Carefully, without moving the mount from its place, insert into it the boot in which you are going to go hiking (if you are going to go in shoe covers, then). Adjust so that the sole of the boot, its toe and heel are in the center of the ski. Only in this case you are guaranteed the correct installation of ski bindings.
 Step 3. Carefully, holding the mount in this position, remove the boot. Immediately place marks with a pencil through the holes in the fasteners. Using these marks, drill small holes with a drill (drill 1.5-2 mm in diameter). Or make them with an awl.
Tighten the screws included in the kit with a screwdriver or screwdriver.
Step 4. Attach the cable and insert the boot into the mount. Unscrew the frog slider as much as possible so that it is at the very end of the bolt.
Insert the cable into the slider. Snap the frog and use your hand to pull it as far toward the tip of the ski as possible. Mark the location of the hole closest to the nose for installing the frog. The second will be closed by the frog, so first drill one hole (but not through, no more than 5 mm deep), screw a screw into it, then open the frog and screw the second screw in place of the second hole.
In order for skiing to be enjoyable, it is worth considering not only the choice of winter equipment, but also such a fact as installation. They are the connecting device between boots and work equipment. Their quality plays an important role in this sport.
The fastening is carried out on the skis themselves or on a separate platform. Some manufacturers can install and make holes on it themselves. Then you will have to purchase a specific manufacturer. Any mounting installations can be installed on a flat, recess-free platform.
Attention! Among the variety of winter equipment, ordinary cross-country skis are considered the most popular.
There are three fastening systems:
The last two systems are divided into the following types:
There are such options:
The last two types can jam after water enters and subsequently freezes in them. Sometimes difficulties arise with opening them if the equipment does not have solid support (in deep snow).
There are such varieties:
Children's skis have the simplest fasteners, which consist of several thick fabric strips that secure the foot, and they can be ridden even in felt boots.
Ski fasteners are located in two separate parts and a plate in the toe area, which reduces friction of the ski shoe. The front span ensures side release, while the rear span ensures top release. The dimensions of both links are equal in all varieties. Modern fasteners are made from very durable materials (titanium, steel, plastic). The main elements are:
Running varieties consist of the following elements:
Touring ski bindings contain pins and a shackle that clamps onto the shoe welt.
Correctly chosen fasteners fit the ski boots well, but can instantly come loose at a critical moment. For example, during a period of sudden fall during a sharp turn. Under enormous loads, the installation should hold the leg in one position, and not immediately unfasten.
Choosing the right mounting system should start with choosing your boots. Having purchased shoes of the right size that meet all the necessary characteristics, you should choose exactly this pair of shoes and your existing skis.
To figure out how to properly install the selected one, you should start immediately after purchasing it by studying the instructions. It is necessary to strictly adhere to the prescribed points, which provide for the specifics of assembling ski fasteners, taking into account its variety.
Determining this parameter will be needed for normal movement, so that the ski does not have an “overweight” on one side or the other. Finding the center of gravity is quite simple. Here the equipment needs to be installed on the edge of a perpendicularly located ruler and moved along its surface until the ski is balanced like a scale and stops horizontally on the floor. In this case, the stationery will indicate the correct position, and this coordinate must be marked with a marker. In modern types of sports equipment, the axis of the center of gravity corresponds to the fastening line of the boot bracket. Therefore, the front area should be applied to the ski and its correct location highlighted in a different color.
The next step is to mark the holes. A good option would be to use a jig, with which you can find the exact location of the fastening components. If this item is not found, then use a template made of paper. It can be found on the Internet, but mostly it is included in the mounting kit. If there is no paper pattern, the ski is marked using an awl, applying the mounted fasteners so that the coordinate of the center of gravity converges with the shoe fixation line. Place marks with a marker through the holes in the fasteners.
At the beginning of drilling recesses, it is advisable to compare the gap between the holes located on the fasteners with the interval between the marks made during the marking process. As a rule, the instructions tell you how deep to screw the screws and what length of drill you need to use. If a tool of suitable length is not available, then you can use any drill, having previously wrapped it at the top with electrical tape, leaving the required millimeters protruding. Then, using a drill operating at low speed, holes should be drilled in the marking areas.
The final stage is as follows:
You can store finished skis at home on a balcony or wall by installing a special stand using brackets.
You need to start removing fasteners (using the example of SNS) from the rear of the installation. Using a screwdriver, carefully unscrew the plug, use a screwdriver to remove the screws, and then remove the strips. To remove the screw under the front cover, use a large screwdriver to press down on the latch and lift it up. After removing the cover, remove the last bolts and the fasteners can be easily removed.
Installing skis yourself is a doable process. To do this, you will need to study the included instructions, have the necessary tools available and, most importantly, be sure that everything will work out.
The performance characteristics of the skis depend on how to install bindings on cross-country skis, as well as on the quality of their execution. Skis presented in modern stores have a special platform that ensures reliable fixation of sports shoes. Even if you are perfect, improper installation can damage the structure of the skis, reducing the lifespan and strength.
Everyone can handle installing cross-country ski mounts with their own hands. To do this you will need the following set of tools:
For cross-country skiing today there are several most popular systems for attaching boots to cross-country skis:
The methods for installing different mounting systems on skis may be different, but there are certain requirements that are always the same:
Use a ruler to measure the center of the ski and mark it with a pencil. To mark the holes for screwing in the mounting bolts, use a template or a special jig - this is very convenient and quick. Install a conductor that matches the type of fastening you have chosen - SNS or NNN. The carefully measured and marked center of gravity must coincide with a special mark on the conductor.

If you don’t have a conductor, make a template from cardboard or thick paper (sometimes fasteners are sold with a ready-made template). If it is missing, attach the mount to the ski so that the center of gravity mark on the ski aligns with the mark on the template. The same applies to the axis of attachment of the boot bracket. The holes present on the template must be marked with a pencil or pressed with an awl. This marking option is not the most accurate, so it is better not to use it.
Modern mounts may have shifting elements, so the holes for the screws that hold the platform should be marked when the mount is assembled and closed. Otherwise, the holes will shift by about a centimeter.
Once the holes for the ski bindings are marked, we begin drilling them. You can make holes with a drill with adjustable speed and special drills of a suitable diameter and with a depth limiter. A special drill has an extension that centers it in the hole of the jig and stops when it reaches a certain depth.
Holes should be drilled at low speeds with light pressure. A hole with a diameter of 3.4 mm is required for installing the NNN mount, and 3.6 mm for the SNS. In both cases, the hole depth is exactly a centimeter.
If you're wondering how to install bindings on cross-country skis, keep the following information in mind. Before installation, you need to fill the holes with glue, which fills all the cracks, providing strength and protecting the internal structure of the skis from water. Without proper protection of the holes, moisture will seep into them and be absorbed into the cavity of the ski, causing rot from the inside. This usually happens with products that have a honeycomb structure or are made from natural materials.

You can buy a special branded glue, but regular PVA will also work. Epoxy resins cannot be used, as the solvent can damage the structure of the ski. The mount is screwed to the ski as efficiently as possible so that there is not the slightest play. After this, the glue should dry within 24 hours.
NIS ski bindings
Every skier should know how to install bindings on cross-country skis. The use of NIS bindings significantly simplifies the work process and allows you to adjust the position of the platform under the boots on the ski.
NIS bindings can only be installed on special skis that have a special platform. Similar models are produced by Madshus and some others. When installing, the ski mount should be guided along the guides until a characteristic click occurs. A thrust bearing is also installed along the guides, which is fixed in a suitable position with a special key from the kit.
Installing the footrest on inexpensive models of ski bindings does not require special tools. The NIS system makes it possible to select the correct location for the ski mount, taking into account the characteristics of the route and weather. You can change your position before each ski trip or workout.
Compatibility of Snake and Monkey according to the eastern horoscope does not promise a happy...

“The Prayer of Detention” (see the text at the end of the article) has become...

Eastern Zodiac – Your zodiac sign gives you a certain...